Page 9 of 34
AIR CONDITIONING AND AUDIO
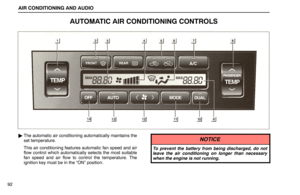
99 When the “FRONT WINDSHIELD” button is pushed while
operating in automatic mode, the air conditioning is set to
operate and the OUTSIDE AIR mode is set.
If you push the “FRONT WINDSHIELD” button once again
while in the FRONT WINDSHIELD mode, the mode then
returns to the last mode used.
CAUTION
Do not use the “FRONT WINDSHIELD” button during
cooled air operation in extremely humid weather. The
difference between the temperature of the outside air
and that of the windshield could cause the outer surface
of the windshield to fog up blocking your vision.
(c) Air filter
The air filter may clog after long use and reduce air flow. You
can inspect the filter easily.
When you inspect and replace the air filter, be sure to turn off
the fan.
1. Open the glovebox and remove the two covers.
Page 10 of 34

AIR CONDITIONING AND AUDIO
100
2. Take out the air filter.
Inspect the lower surface of the filter. If it is just moderately
dusty, it may be cleaned by blowing compressed air from the
lower surface. Do not wash or oil the filter.
If it is dirty, it should be replaced. To maintain the air
conditioning efficiency, replace the air filter according to the
maintenance schedule.
NOTICE
Do not drive with the air filter removed, or the efficiency
of air conditioning may be lost.
(d) Operating tips
�Make sure the air inlet grilles in front of the windshield are
not blocked by leaves or other obstructions.
�If air flow control is not satisfactory, check the dashboard
vents. (See “Center vents”, “Side vents”, “Lower vent” and
“Rear vents”.)
�To help cool down the interior after parking in the hot sun,
drive for the first few minutes with the windows open. After
the excess heat has blown away, close the windows.
�When driving on dusty roads, close all windows. If dust
thrown up by the vehicle is still drawn into the vehicle after
closing the windows, it is recommended that the air intake
control button be left to the OUTSIDE AIR mode and the fan
speed control button be pressed to anywhere except the
“OFF” button.
�If following another vehicle on a dusty road, or driving in
windy and dusty conditions, it is recommended that the air
intake control button be temporarily pressed in to the
RECIRCULATED AIR mode, which will close off the outside
passage and prevent outside air and dust from entering the
vehicle interior.
Page 11 of 34
AIR CONDITIONING AND AUDIO
101
Center vents
The center vents may be opened or closed as shown.
Side vents
The side vents may be opened or closed as shown.
Lower vent
The lower vent may be opened or closed as shown.
Rear vents
The rear vents may be opened or closed as shown.
Page 12 of 34
AIR CONDITIONING AND AUDIO
102
AUDIO SYSTEM
Quick reference for your audio system
�Type A
�The “CD” button works only when your Lexus is equipped with an automatic changer.
Page 13 of 34

2
Stopping and ejecting a cassette tape
(See page 111 for details.)
3
Function buttons
1 −")
AIR CONDITIONING AND AUDIO
103
1
Turning the system on and adjusting volume
(See page 106 for details.)
2
Stopping and ejecting a cassette tape
(See page 111 for details.)
3
Function buttons
1 − 6: Station selector buttons
(See page 110 for details.)
SCAN: Scan tuning
(See page 111 for details.)
P. SCAN: Preset scan tuning
(See page 111 for details.)
4
Display of functions in TAPE mode
��:
Side change
(See page 112 for details.)
:DOLBY NR
(See page 112 for details.)
��:Rewinding
(See page 112 for details.)
��:Fast forwarding
(See page 112 for details.)
RPT:Automatic repeat
(See page 113 for details.)
SKIP: Automatic skip of blank portions of tape
(See page 113 for details.)
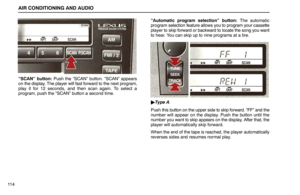
SCAN: Scan selection
(See page 114 for details.)
4
Display of functions in CD mode
:Disc selection
(See page 119 for details.)
��:Reversing
(See page 120 for details.)
��:Fast forwarding
(See page 120 for details.)
RPT:Automatic repeat
(See page 121 for details.)
RAND: Random access
(See page 121 for details.)
SCAN: Scan selection
(See page 119 for details.)
5
Mode selectors
(See page 106 for details.)
6
Cassette tape slot
(See page 111 for details.)
7
Tone and balance knobs
(See page 107 for details.)
8
Radio mode:Frequency tuning
(See page 109 or 110 for details.)
TAPE mode:Direct access to a desired program
(See page 114 for details.)
CD mode:Direct access to a desired program
(See page 120 for details.)
Page 14 of 34
AIR CONDITIONING AND AUDIO
104
Quick reference for your audio system
�Type B: “Nakamichi” logo on the panel
�The “CD” button works only when your Lexus is equipped with an automatic changer.
Page 15 of 34

2
Stopping and ejecting a cassette tape
(See page 111 for details.)
3
Function buttons
1 −")
AIR CONDITIONING AND AUDIO
105
1
Turning the system on and adjusting volume
(See page 106 for details.)
2
Stopping and ejecting a cassette tape
(See page 111 for details.)
3
Function buttons
1 − 6: Station selector buttons
(See page 110 for details.)
SCAN: Scan tuning
(See page 111 for details.)
P. SCAN: Preset scan tuning
(See page 111 for details.)
4
Display of functions in TAPE mode
��:
Side change
(See page 113 for details.)
:DOLBY NR
(See page 112 for details.)
|��: Direct access to a desired program
(See page 115 for details.)
��|: Direct access to a desired program
(See page 115 for details.)
RPT:Automatic repeat
(See page 113 for details.)
SKIP: Automatic skip of blank portions of tape
(See page 113 for details.)
SCAN: Scan selection
(See page 114 for details.)
4
Display of functions in CD mode
:Disc selection
(See page 119 for details.)
��:Reversing
(See page 120 for details.)
��:Fast forwarding
(See page 120 for details.)
RPT:Automatic repeat
(See page 121 for details.)
RAND: Random access
(See page 121 for details.)
SCAN: Scan selection
(See page 119 for details.)
5
Mode selectors
(See page 106 for details.)
6
Cassette tape slot
(See page 111 for details.)
7
Tone and balance knobs
(See page 107 for details.)
8
Radio mode:Frequency tuning
(See page 109 or 110 for details.)
TAPE mode:Rewinding or fast forwarding
(See page 113 for details.)
CD mode:Direct access to a desired program
(See page 120 for details.)
Page 16 of 34

AIR CONDITIONING AND AUDIO
106
Using your audio system: some basics
This section describes some of the basic features of the Lexus
audio system. Some information may not pertain to your
system.
Your audio system works when the ignition key is in the “ACC”
or “ON” position.
NOTICE
To prevent the battery from being discharged, do not
leave the car audio on longer than necessary when the
engine is not running.
(a) Turning the system on and off
Push this knob to turn the audio system on and off. Turn
this knob to adjust the volume.
The system turns on in the last, mode used.
Push “AM”, “FM1 / 2”, “TAPE” or “CD” to turn on that
mode. The selected mode turns on directly.
Push these buttons if you want to switch from one mode to
another.
If the tape or disc is not set, the cassette player or compact disc
player does not turn on.
You can turn off the cassette player by ejecting the cassette
tape. If the audio system was previously off, then the entire
audio system will be turned off when you eject the cassette
tape. If another function was previously playing, it will come on
again.