1995 JEEP YJ cooling
[x] Cancel search: coolingPage 315 of 2158
CAUTION: When installing a serpentine accessory
drive belt, the belt MUST be routed correctly. The
water pump will be rotating in the wrong direction if
the belt is installed incorrectly, causing the engine
to overheat. Refer to the belt routing label in engine
compartment, or refer to Belt Schematics in Group
7 - Cooling System.
XJ WITH 4.0L
(1) Disconnect battery negative cable.
(2) Remove generator drive belt. Refer to Group 7 -
Cooling System for procedure.
(3) Raise and support vehicle.
(4) Remove generator battery output terminal nut,
2 field terminal nuts, ground and harness holddown
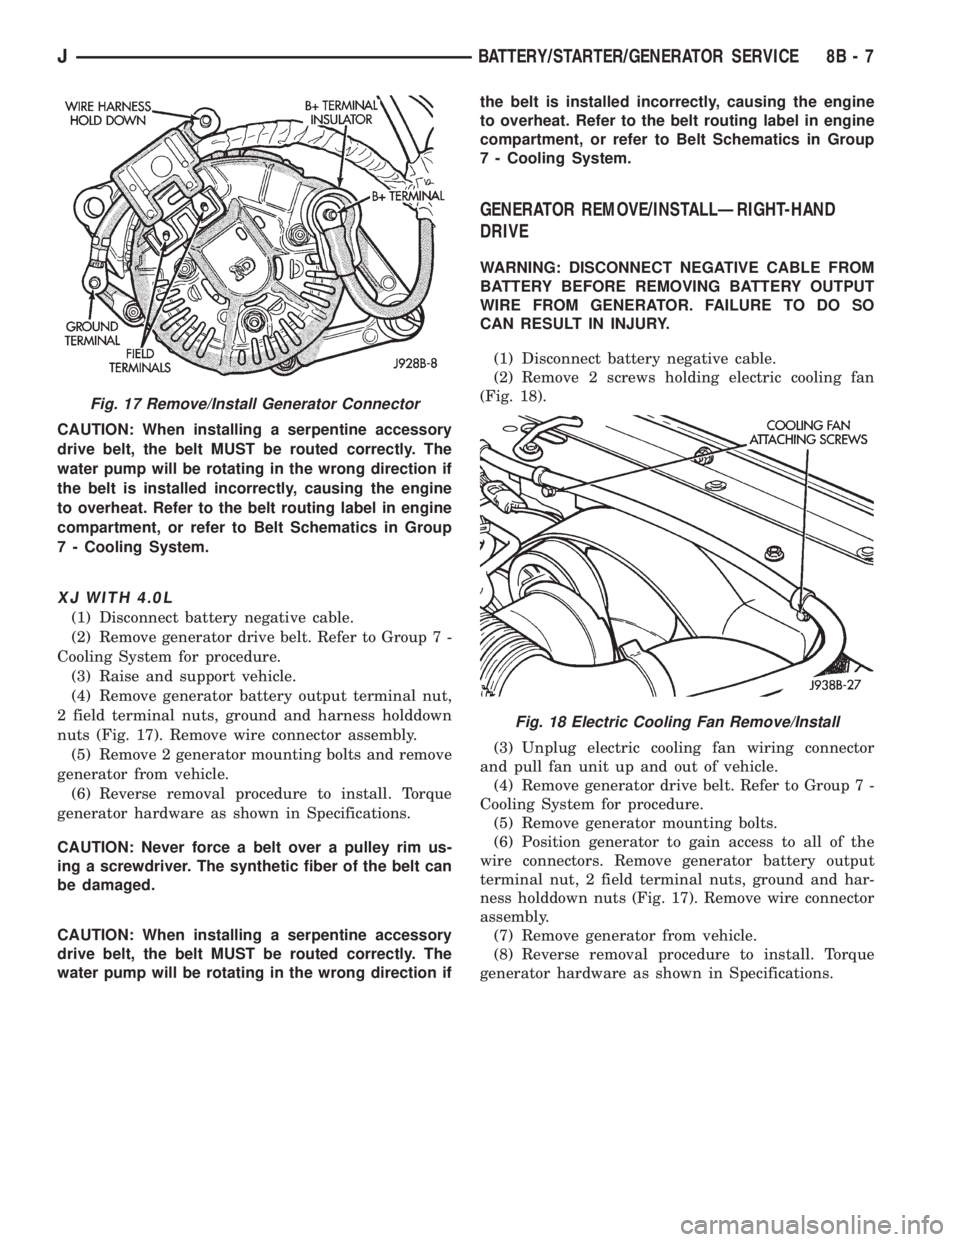
nuts (Fig. 17). Remove wire connector assembly.
(5) Remove 2 generator mounting bolts and remove
generator from vehicle.
(6) Reverse removal procedure to install. Torque
generator hardware as shown in Specifications.
CAUTION: Never force a belt over a pulley rim us-
ing a screwdriver. The synthetic fiber of the belt can
be damaged.
CAUTION: When installing a serpentine accessory
drive belt, the belt MUST be routed correctly. The
water pump will be rotating in the wrong direction ifthe belt is installed incorrectly, causing the engine
to overheat. Refer to the belt routing label in engine
compartment, or refer to Belt Schematics in Group
7 - Cooling System.
GENERATOR REMOVE/INSTALLÐRIGHT-HAND
DRIVE
WARNING: DISCONNECT NEGATIVE CABLE FROM
BATTERY BEFORE REMOVING BATTERY OUTPUT
WIRE FROM GENERATOR. FAILURE TO DO SO
CAN RESULT IN INJURY.
(1) Disconnect battery negative cable.
(2) Remove 2 screws holding electric cooling fan
(Fig. 18).
(3) Unplug electric cooling fan wiring connector
and pull fan unit up and out of vehicle.
(4) Remove generator drive belt. Refer to Group 7 -
Cooling System for procedure.
(5) Remove generator mounting bolts.
(6) Position generator to gain access to all of the
wire connectors. Remove generator battery output
terminal nut, 2 field terminal nuts, ground and har-
ness holddown nuts (Fig. 17). Remove wire connector
assembly.
(7) Remove generator from vehicle.
(8) Reverse removal procedure to install. Torque
generator hardware as shown in Specifications.
Fig. 17 Remove/Install Generator Connector
Fig. 18 Electric Cooling Fan Remove/Install
JBATTERY/STARTER/GENERATOR SERVICE 8B - 7
Page 338 of 2158

temperature ranges. This depends upon the thick-
ness and length of the center electrodes porcelain in-
sulator.)
SPARK PLUG OVERHEATING
Overheating is indicated by a white or gray center
electrode insulator that also appears blistered (Fig.
25). The increase in electrode gap will be consider-
ably in excess of 0.001 inch per 1000 miles of opera-
tion. This suggests that a plug with a cooler heat
range rating should be used. Over advanced ignition
timing, detonation and cooling system malfunctions
can also cause spark plug overheating.
SPARK PLUG SECONDARY CABLES
TESTING
Spark plug cables are sometimes referred to as sec-
ondary ignition cables or secondary wires. The cables
transfer electrical current from the distributor to in-
dividual spark plugs at each cylinder. The spark plug
cables are of nonmetallic construction and have a
built in resistance. The cables provide suppression of
radio frequency emissions from the ignition system.Check the high-tension cable connections for good
contact at the ignition coil, distributor cap towers
and spark plugs. Terminals should be fully seated.
The terminals and spark plug covers should be in
good condition. Terminals should fit tightly to the ig-
nition coil, distributor cap and spark plugs. The
spark plug cover (boot) of the cable should fit tight
around the spark plug insulator. Loose cable connec-
tions can cause corrosion and increase resistance, re-
sulting in shorter cable service life.
Clean the high tension cables with a cloth moist-
ened with a nonflammable solvent and wipe dry.
Check for brittle or cracked insulation.
When testing secondary cables for damage with an
oscilloscope, follow the instructions of the equipment
manufacturer.
If an oscilloscope is not available, spark plug cables
may be tested as follows:
CAUTION: Do not leave any one spark plug cable
disconnected for longer than necessary during test-
ing. This may cause possible heat damage to the
catalytic converter. Total test time must not exceed
ten minutes.
With the engine not running, connect one end of a
test probe to a good ground. Start the engine and run
the other end of the test probe along the entire
length of all spark plug cables. If cables are cracked
or punctured, there will be a noticeable spark jump
from the damaged area to the test probe. The cable
running from the ignition coil to the distributor cap
can be checked in the same manner. Cracked, dam-
aged or faulty cables should be replaced with resis-
tance type cable. This can be identified by the words
ELECTRONIC SUPPRESSION printed on the cable
jacket.
Use an ohmmeter to test for open circuits, exces-
sive resistance or loose terminals. Remove the dis-
tributor cap from the distributor.Do not remove
cables from cap.Remove cable from spark plug.
Connect ohmmeter to spark plug terminal end of ca-
ble and to corresponding electrode in distributor cap.
Resistance should be 250 to 1000 Ohms per inch of
cable. If not, remove cable from distributor cap tower
and connect ohmmeter to the terminal ends of cable.
If resistance is not within specifications as found in
the Spark Plug Cable Resistance chart, replace the
cable. Test all spark plug cables in this manner.
Fig. 24 Preignition Damage
Fig. 25 Spark Plug Overheating
SPARK PLUG CABLE RESISTANCE
8D - 14 IGNITION SYSTEMSJ
Page 344 of 2158

REMOVALÐ2.5L OR 4.0L ENGINE
(1) Disconnect the negative battery cable at the
battery.
(2) Disconnect coil secondary cable at coil.
(3) Remove distributor cap from distributor (2
screws). Do not remove cables from cap. Do not re-
move rotor.
(4) Disconnect the distributor wiring harness from
the main engine harness.
(5) Remove the cylinder number 1 spark plug.
(6) Hold a finger over the open spark plug hole.
Rotate the engine at the vibration dampener bolt un-
til compression (pressure) is felt.
Slowly continue to rotate the engine. Do this until
the timing index mark on the vibration damper pul-
ley aligns with the top dead center (TDC) mark (0
degree) on timing degree scale (Fig. 9). Always rotate
the engine in direction of normal rotation. Do not ro-
tate the engine backward to align the timing marks.
On XJ models equipped with A/C, remove the elec-
trical cooling fan and shroud assembly from the radi-
ator. Refer to Group 7, Cooling System for
procedures.
This will provide room to turn the engine crank-
shaft with a socket and ratchet using the vibration
damper bolt.
(7) Remove the distributor holddown bolt and
clamp (Fig. 8).
(8) Remove the distributor from engine by slowly
lifting straight up.
Note that the rotor will rotate slightly in a counter-
clockwise direction while lifting up the distributor.
The oil pump gear will also rotate slightly in a coun-terclockwise direction while lifting up the distributor.
This is due to the helical cut gears on the distributor
and camshaft.
Note the removed position of the rotor during dis-
tributor removal. During installation, this will be re-
ferred to as the Pre-position.
2.5L 4-Cylinder Engine:Observe the slot in the
oil pump gear through the hole on the side of the en-
gine. It should be slightly before (counterclockwise of)
the 10 o'clock position (Fig. 10).
4.0L 6-Cylinder Engine:Observe the slot in the
oil pump gear through the hole on the side of the en-
gine. It should be slightly before (counterclockwise of)
the 11 o'clock position (Fig. 11).
(9) Remove and discard the old distributor-to-en-
gine block gasket (Fig. 8).
INSTALLATION
(1) If the engine crankshaft has been rotated after
distributor removal, cylinder number 1 must be re-
turned to its proper firing stroke. Refer to the previ-
ous REMOVAL steps number 5 and 6. These steps
must be done before installing distributor.
Fig. 9 Align Timing Marks
Fig. 10 Slot At 10 O'clock PositionÐ2.5L Engine
Fig. 11 Slot At 11 O'clock PositionÐ4.0L Engine
8D - 20 IGNITION SYSTEMSJ
Page 361 of 2158

DIAGNOSIS
GAUGES
If an individual gauge is inoperative, see the diag-
nostic procedure under the heading for that gauge. If
more than one gauge is inoperative, perform the fol-
lowing:
(1) Check fuse 17 (fuse 26 - RHD) in the fuseblock
module. If OK, go to next step. If not OK, replace
fuse.
(2) Check for battery voltage at fuse 17 (fuse 26 -
RHD) with ignition switch in ON position. If OK, go
to next step. If not OK, repair open in circuit from
ignition switch and/or refer to Group 8D - Ignition
Systems for testing of ignition switch.
(3) Turn ignition switch to OFF. Disconnect battery
negative cable. Remove instrument cluster bezel and
cluster assembly. Disconnect gauge cluster connector
A.
(4) Connect battery negative cable. Turn ignition
switch to ON. Check for battery voltage at cavity A8
(cavity A7 - RHD) of cluster connector A. If OK, go to
next step. If not OK, repair open in circuit from fuse
17 (fuse 26 - RHD) as required.
(5) Turn ignition switch to OFF. Disconnect battery
negative cable. Probe cavities A3 and B2 of cluster
connector A. Check for continuity to a good ground.
There should be continuity. If OK, replace gauge
cluster printed circuit. If not OK, repair open in cir-
cuit as required.
COOLANT TEMPERATURE GAUGE
The diagnosis found here addresses an inoperative
gauge condition. If the problem being diagnosed is re-
lated to gauge accuracy, be certain to confirm that
problem is with gauge and not with cooling system
performance. Actual engine coolant temperature
should be checked with a test gauge or thermometer
and compared to gauge readings before you proceed
with gauge diagnosis. Refer to Group 7 - Cooling Sys-
tem for more information.
(1) Turn ignition switch to ON. Disconnect coolant
temperature sending unit connector. Sending unit
(Fig. 1) is located near the left rear corner of the cyl-
inder head. The gauge needle should move to low end
of gauge scale. If OK, go to next step. If not OK, go to
step 3.
(2) Install a jumper wire from sending unit wiring
to ground. The gauge needle should move to high end
of gauge scale. If OK, replace sending unit. If not
OK, remove jumper wire and go to next step.
(3) Turn ignition switch to OFF. Disconnect battery
negative cable. Remove instrument cluster bezel and
cluster assembly. Disconnect gauge cluster connector
A.
(4) Probe cavity A1 of cluster connector A. Check
for continuity to a good ground. There should be nocontinuity. If OK, go to next step. If not OK, repair
short in circuit as required.
(5) Still probing cavity A1 of cluster connector A,
check for continuity to sending unit wiring connector.
There should be continuity. If OK, replace gauge. If
not OK, repair open in circuit as required.
FUEL GAUGE
The diagnosis found here addresses an inoperative
gauge condition. If the problem being diagnosed is re-
lated to gauge accuracy, be certain to confirm that
problem is with gauge and not with fuel tank. In-
spect fuel tank for signs of damage or distortion that
could affect sending unit performance before you pro-
ceed with gauge diagnosis. Refer to Group 14 - Fuel
System for more information.
(1) Turn ignition switch to ON. Disconnect fuel
gauge sending unit connector. Connector is located
near the left front corner of the fuel tank. The gauge
needle should move to low end of gauge scale. If OK,
go to next step. If not OK, go to step 4.
(2) Connect a jumper wire between terminals A
and B in the body half of the fuel gauge sending unit
connector (Fig. 2). The gauge needle should move to
high end of gauge scale. If OK, refer to Group 14 -
Fuel System for procedure to replace sending unit. If
not OK, remove jumper wire and go to next step.
(3) Turn ignition switch to OFF. Disconnect battery
negative cable. Check for continuity between termi-
nal A in the body half of fuel gauge sending unit con-
nector and a good ground. There should be
continuity. If OK, go to next step. If not OK, repair
circuit to ground as required.
(4) Remove instrument cluster bezel and cluster
assembly. Disconnect instrument cluster connector A.
Fig. 1 Coolant Temperature Switch/Sending Unit -
Typical
JINSTRUMENT PANEL AND GAUGESÐXJ 8E - 5
Page 369 of 2158
Connect battery negative cable and turn ignition
switch to ON. Lamp should light. If OK, repair open
circuit to brake warning switch. If not OK, replace
bulb.
(5) Turn ignition switch to OFF and remove
jumper wire. Disconnect battery negative cable.
Check for continuity between cavity A (cavity B -
RHD) of brake warning switch connector and a good
ground with ignition switch in START position.
There should be continuity. If not OK, go to next
step.
(6) Turn ignition switch to OFF and remove
jumper wire. Disconnect battery negative cable. Un-
plug ignition switch connector. Check for continuity
between ignition switch connector cavity 3 and a
good ground. There should be no continuity. If OK, go
to next step. If not OK, repair short circuit between
ignition switch and brake warning switch connectors
as required.
(7) Check for continuity between ignition switch
connector cavity 3 and brake warning switch connec-
tor cavity A (cavity B - RHD). There should be conti-
nuity. If OK, go to next step. If not OK, repair open
circuit as required.
(8) Check for continuity between metal steering
column jacket and a good ground. There should be
continuity. If OK, go to next step. If not OK, refer to
Group 19 - Steering to check steering column ground
clip installation.
(9) Turn ignition switch to START position and
hold there. Check for continuity between terminal 3
of ignition switch and a good ground. There should
be continuity. If not OK, replace ignition switch.
(10) Unplug brake warning switch connector.
Check for continuity between parking brake switch
connector and a good ground. There should be no
continuity. If OK, go to next step. If not OK, repair
short circuit as required.
(11) Check for continuity between parking brake
switch connector and cavity B (cavity A - RHD) of
brake warning switch connector. There should be
continuity. If OK, replace parking brake switch. If
not OK, repair open circuit to brake warning switch
as required.
COOLANT TEMPERATURE WARNING LAMP
The diagnosis found here addresses an inoperative
lamp condition. If the problem being diagnosed is re-
lated to lamp accuracy, be certain to confirm that
problem is with lamp and not with cooling system
performance. Actual engine coolant temperature
should be checked with a test gauge or thermometer
before proceeding with lamp diagnosis. Refer to
Group 7 - Cooling System for more information.
(1) Turn ignition switch to START position. Lamp
should light. If OK, go to next step. If not OK, go to
step 3.(2) Turn ignition switch to ON. Disconnect coolant
temperature switch connector (Fig. 1). Jump switch
connector to ground. Lamp should light. If OK, re-
place switch. If not OK, go to next step.
(3) Turn ignition switch to OFF. Disconnect battery
negative cable. Unplug coolant temperature switch
connector. Remove instrument cluster bezel and clus-
ter assembly. Disconnect cluster connector A and
probe cavity A1. Check for continuity to a good
ground. There should be no continuity. If OK, go to
next step. If not OK, repair short circuit to coolant
temperature switch or ignition switch as required.
(4) Connect cluster connector A to cluster. Install a
jumper wire from cavity A1 of cluster connector A to
a good ground. Connect battery negative cable and
turn ignition switch to ON. Lamp should light. If OK,
repair open circuit to coolant temperature switch or
ignition switch as required. If not OK, replace bulb.
FOUR-WHEEL DRIVE INDICATOR LAMPS
(1) Apply parking brake, start engine, vehicle in
4WD Lock or 4WD.
(2) Unplug switch and touch harness side of wire
to ground. Lamp should light. If OK, check switch
operation, replace if bad. If bulb is OK, repair open
to indicator.
GENERATOR WARNING LAMP
(1) Disconnect battery negative cable and unplug
PCM connector. Install a jumper wire between cavity
36 of PCM connector (Fig. 5) and a good ground. Con-
nect battery negative cable and turn ignition switch
to ON. Lamp should light. Unplug jumper wire and
lamp should go off. If OK, refer to Powertrain Diag-
nostic Procedures to check PCM. If not OK, go to
next step.
(2) Turn ignition switch to OFF and disconnect
battery negative cable. Remove instrument cluster
bezel and cluster assembly. Install a jumper wire be-
tween cavity B8 of cluster connector A and a good
ground. Connect battery negative cable and turn ig-
nition switch to ON. Lamp should light. If OK, go to
next step. If not OK, replace bulb.
(3) Turn ignition switch to OFF and disconnect
battery negative cable. Unplug cluster connector A.
Probe cavity B8 of cluster connector A and check for
continuity to a good ground. There should be no con-
tinuity. If OK, go to next step. If not OK, repair short
circuit as required.
(4) Check for continuity between cavity B8 of clus-
ter connector A and cavity 36 of PCM connector.
There should be continuity. If not OK, repair open
circuit as required.
HEADLAMP HIGH BEAM INDICATOR LAMP
(1) Check that headlamp high beams are func-
tional. If OK, go to next step. If not OK, refer to
Group 8L - Lamps for diagnosis of headlamp system.
JINSTRUMENT PANEL AND GAUGESÐXJ 8E - 13
Page 383 of 2158
DIAGNOSIS
GAUGES
If an individual gauge is inoperative, see the diag-
nostic procedure under the heading for that gauge. If
more than one gauge in the main cluster or gauge
package cluster is inoperative, perform the following:
(1) Check fuse 9 in the fuseblock module. If OK, go
to next step. If not OK, replace fuse.
(2) Check for battery voltage at fuse 9 with igni-
tion switch in ON position. If OK, go to next step. If
not OK, repair open in circuit from ignition switch
and/or refer to Group 8D - Ignition Systems for test-
ing of ignition switch.
(3) Turn ignition switch to OFF. Disconnect battery
negative cable. Remove the affected instrument clus-
ter bezel and cluster assembly. Disconnect the cluster
connector.
(4) Connect battery negative cable. Turn ignition
switch to ON. If problem is in main cluster, check for
battery voltage at cavity 3 and cavity 19 of main
cluster connector. If problem is in gauge package
cluster, check for battery voltage at cavity 2 and cav-
ity 12 of gauge package cluster connector. If OK, go
to next step. If not OK, repair open in circuit from
fuse 9 as required.
(5) Turn ignition switch to OFF. Disconnect battery
negative cable. Probe cavities 14 and 20 of main clus-
ter connector, or cavities 1 and 13 of gauge package
cluster connector. Check for continuity to a good
ground. There should be continuity. If OK, replace
the cluster printed circuit. If not OK, repair open in
circuit as required.
COOLANT TEMPERATURE GAUGE
The diagnosis found here addresses an inoperative
gauge condition. If the problem being diagnosed is re-
lated to gauge accuracy, be certain to confirm that
problem is with gauge and not with cooling system
performance. Actual engine coolant temperature
should be checked with a test gauge or thermometer
and compared to gauge readings before you proceed
with gauge diagnosis. Refer to Group 7 - Cooling Sys-
tem for more information.
(1) Turn ignition switch to ON. Disconnect coolant
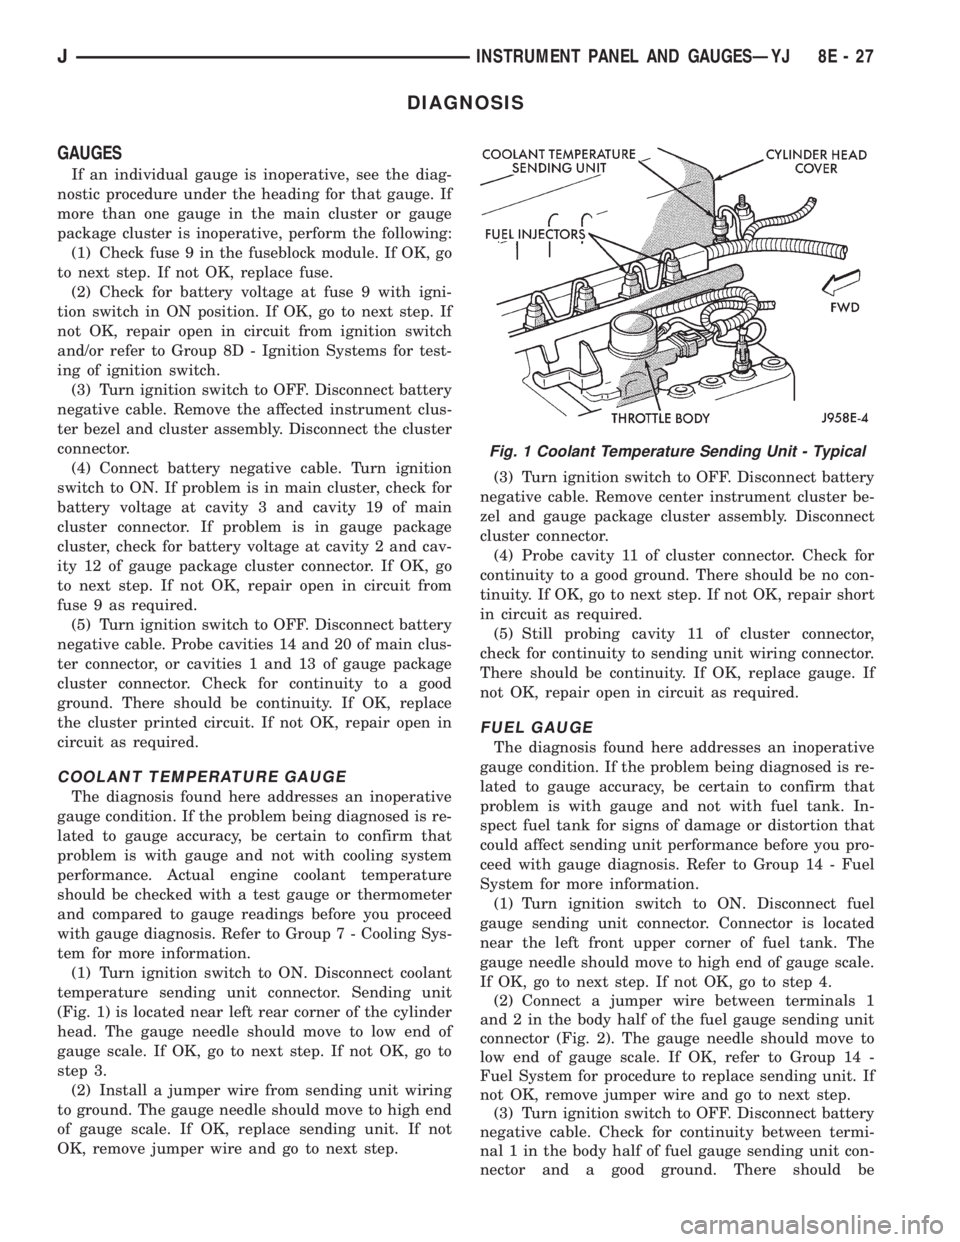
temperature sending unit connector. Sending unit
(Fig. 1) is located near left rear corner of the cylinder
head. The gauge needle should move to low end of
gauge scale. If OK, go to next step. If not OK, go to
step 3.
(2) Install a jumper wire from sending unit wiring
to ground. The gauge needle should move to high end
of gauge scale. If OK, replace sending unit. If not
OK, remove jumper wire and go to next step.(3) Turn ignition switch to OFF. Disconnect battery
negative cable. Remove center instrument cluster be-
zel and gauge package cluster assembly. Disconnect
cluster connector.
(4) Probe cavity 11 of cluster connector. Check for
continuity to a good ground. There should be no con-
tinuity. If OK, go to next step. If not OK, repair short
in circuit as required.
(5) Still probing cavity 11 of cluster connector,
check for continuity to sending unit wiring connector.
There should be continuity. If OK, replace gauge. If
not OK, repair open in circuit as required.
FUEL GAUGE
The diagnosis found here addresses an inoperative
gauge condition. If the problem being diagnosed is re-
lated to gauge accuracy, be certain to confirm that
problem is with gauge and not with fuel tank. In-
spect fuel tank for signs of damage or distortion that
could affect sending unit performance before you pro-
ceed with gauge diagnosis. Refer to Group 14 - Fuel
System for more information.
(1) Turn ignition switch to ON. Disconnect fuel
gauge sending unit connector. Connector is located
near the left front upper corner of fuel tank. The
gauge needle should move to high end of gauge scale.
If OK, go to next step. If not OK, go to step 4.
(2) Connect a jumper wire between terminals 1
and 2 in the body half of the fuel gauge sending unit
connector (Fig. 2). The gauge needle should move to
low end of gauge scale. If OK, refer to Group 14 -
Fuel System for procedure to replace sending unit. If
not OK, remove jumper wire and go to next step.
(3) Turn ignition switch to OFF. Disconnect battery
negative cable. Check for continuity between termi-
nal 1 in the body half of fuel gauge sending unit con-
nector and a good ground. There should be
Fig. 1 Coolant Temperature Sending Unit - Typical
JINSTRUMENT PANEL AND GAUGESÐYJ 8E - 27
Page 1281 of 2158
minutes). The use of a locating dowel is recom-
mended during assembly to prevent smearing the
material off location.
Mopar Gasket Maker should be applied sparingly
to one gasket surface. The sealant diameter should
be 1.00 mm (0.04 inch) or less. Be certain the mate-
rial surrounds each mounting hole. Excess material
can easily be wiped off. Components should be
torqued in place within 15 minutes. The use of a lo-
cating dowel is recommended during assembly to pre-
vent smearing the material off location.
ENGINE PERFORMANCE
To provide best vehicle performance and lowest ve-
hicle emissions, it is most important that the tune-up
be done accurately. Use the specifications listed on
the Vehicle Emission Control Information label found
on the engine compartment hood.
(1) Test battery specific gravity. Add water, if nec-
essary. Clean and tighten battery connections.
(2) Test cranking amperage draw (refer to Group
8B, Battery/Starter Service for the proper proce-
dures).
(3) Tighten the intake manifold bolts (refer to
Group 11, Exhaust System and Intake Manifold for
the proper specifications).
(4) Perform cylinder compression test:
(a) Check engine oil level and add oil, if neces-
sary.
(b) Drive the vehicle until engine reaches normal
operating temperature.
(c) Select a route free from traffic and other
forms of congestion, observe all traffic laws and
briskly accelerate through the gears several times.
The higher engine speed may help clean out valve
seat deposits which can prevent accurate compres-
sion readings.
CAUTION: DO NOT overspeed the engine.
(d) Remove all spark plugs from engine. As spark
plugs are being removed, check electrodes for ab-
normal firing indicatorsÐfouled, hot, oily, etc.
Record cylinder number of spark plug for future
reference.
(e) Disconnect coil wire from distributor and se-
cure to good ground to prevent a spark from start-
ing a fire.
(f) Be sure throttle blades are fully open during
the compression check.
(g) Insert compression gage adaptor into the
No.1 spark plug hole. Crank engine until maximum
pressure is reached on gauge. Record this pressure
as No.1 cylinder pressure.
(h) Repeat Step 4g for all remaining cylinders.
(i) Compression should not be less than 689 kPa
(100 psi) and not vary more than 172 kPa (25 psi)
from cylinder to cylinder.(j) If cylinder(s) have abnormally low compres-
sion pressures, repeat steps 4a through 4h.
(k) If the same cylinder(s) repeat an abnormally
low reading, it could indicate the existence of a
problem in the cylinder.
The recommended compression pressures are
to be used only as a guide to diagnosing engine
problems. An engine should NOT be disassem-
bled to determine the cause of low compression
unless some malfunction is present.
(5) Clean or replace spark plugs as necessary. Ad-
just gap (refer to Group 8D, Ignition System for gap
adjustment and torque).
(6) Test resistance of spark plug cables (refer to
Group 8D, Ignition System).
(7) Inspect the primary wire. Test coil output volt-
age, primary and secondary resistance. Replace parts
as necessary (refer to Group 8D, Ignition System and
make necessary adjustment).
(8) Perform a combustion analysis.
(9) Test fuel pump for pressure (refer to Group 14,
Fuel System for the proper specifications).
(10) Inspect air filter element (refer to Group 0,
Lubrication and Maintenance for the proper proce-
dure).
(11) Inspect crankcase ventilation system (refer to
Group 0, Lubrication and Maintenance for the proper
procedure).
(12) For emission controls refer to Group 25, Emis-
sion Controls System for service procedures.
(13) Inspect and adjust accessory belt drives (refer
to Group 7, Cooling System for the proper adjust-
ments).
(14) Road test vehicle as a final test.
HONING CYLINDER BORES
Before honing, stuff plenty of clean shop towels un-
der the bores and over the crankshaft to keep abra-
sive materials from entering the crankshaft area.
(1) Used carefully, the Cylinder Bore Sizing Hone
C-823 equipped with 220 grit stones, is the best tool
for this job. In addition to deglazing, it will reduce
taper and out-of-round as well as removing light
scuffing, scoring or scratches. Usually a few strokes
will clean up a bore and maintain the required lim-
its.
CAUTION: DO NOT use rigid type hones to remove
cylinder wall glaze.
(2) Deglazing of the cylinder walls may be done if
the cylinder bore is straight and round. Use a cylin-
der surfacing hone, Honing Tool C-3501, equipped
with 280 grit stones (C-3501-3810). 20-60 strokes, de-
pending on the bore condition, will be sufficient to
provide a satisfactory surface. Using honing oil
C-3501-3880 or a light honing oil available from ma-
jor oil distributors.
9 - 2 ENGINESJ
Page 1299 of 2158
(a) Align the transmission torque converter hous-
ing with the engine.
(b) Loosely install the converter housing lower
bolts and install the next higher bolt and nut on
each side.
(c) Tighten all 4 bolts finger-tight.
(5) Install the engine support cushions (if re-
moved).
(6) Lower the engine and engine support cushions
onto the engine compartment brackets.
(7) Remove the engine lifting device.
(8) Raise the vehicle.
(9) If equipped with an automatic transmission:
(a) Install the converter-to-drive plate bolts. En-
sure the installation reference marks are aligned.
Tighten the bolts to 54 Nzm (40 ft. lbs.) torque.
(b) Install the converter-housing access cover.
(c) Install the exhaust pipe support.
(10) Install the remaining converter or flywheel
housing bolts.
(11) Install the starter motor and connect the ca-
ble. Tighten the bolts to 45 Nzm (33 ft. lbs.) torque.
(12) Tighten the engine support cushing through-
bolt nuts.
(13) Install the remaining flywheel and converter
housing bolts. Tighten the bolts to 38 Nzm (28 ft. lbs.)
torque.
(14) Connect the exhaust pipe to the manifold.
(15) Install the oil filter.
(16) Lower the vehicle.
(17) Connect the coolant hoses and tighten the
clamps.
(18) If equipped with power steering:
(a) Remove the protective caps
(b) Connect the hoses to the fittings at the steer-
ing gear. Tighten the nut to 52 Nzm (38 ft. lbs.)
torque.
(c) Fill the pump reservoir with fluid.
(19) Remove the pulley-to-water pump flange
alignment capscrew and install the fan and spacer or
Tempatrol fan assembly.
(20) Install the fan shroud and radiator and con-
denser (if equipped with air conditioning).
(21) Connect the radiator hoses.
(22) Connect the automatic transmission fluid
cooler pipes, if equipped.
(23) Connect the oxygen sensor wire connector.
(24) Connect the throttle valve rod and retainer.
Connect the throttle cable and install the rod. Install
the throttle valve rod spring.
(25) Connect the speed control cable, if equipped.
(26) Connect the fuel supply and return lines to
the throttle body.
(27) Connect all the vacuum hoses and wire con-
nectors.
(28) Connect the service valves to the A/C compres-
sor ports, if equipped with air conditioning.(29) Fill the power steering reservoir.
(30) Connect the battery cables.
(31) Install the hood.
(32) Install the air cleaner.
(33) Start the engine and inspect for leaks.
(34) Fill the cooling system.
(35) Stop the engine and check the fluid levels.
Add fluid, as required.
ENGINE ASSEMBLYÐYJ VEHICLES
REMOVAL
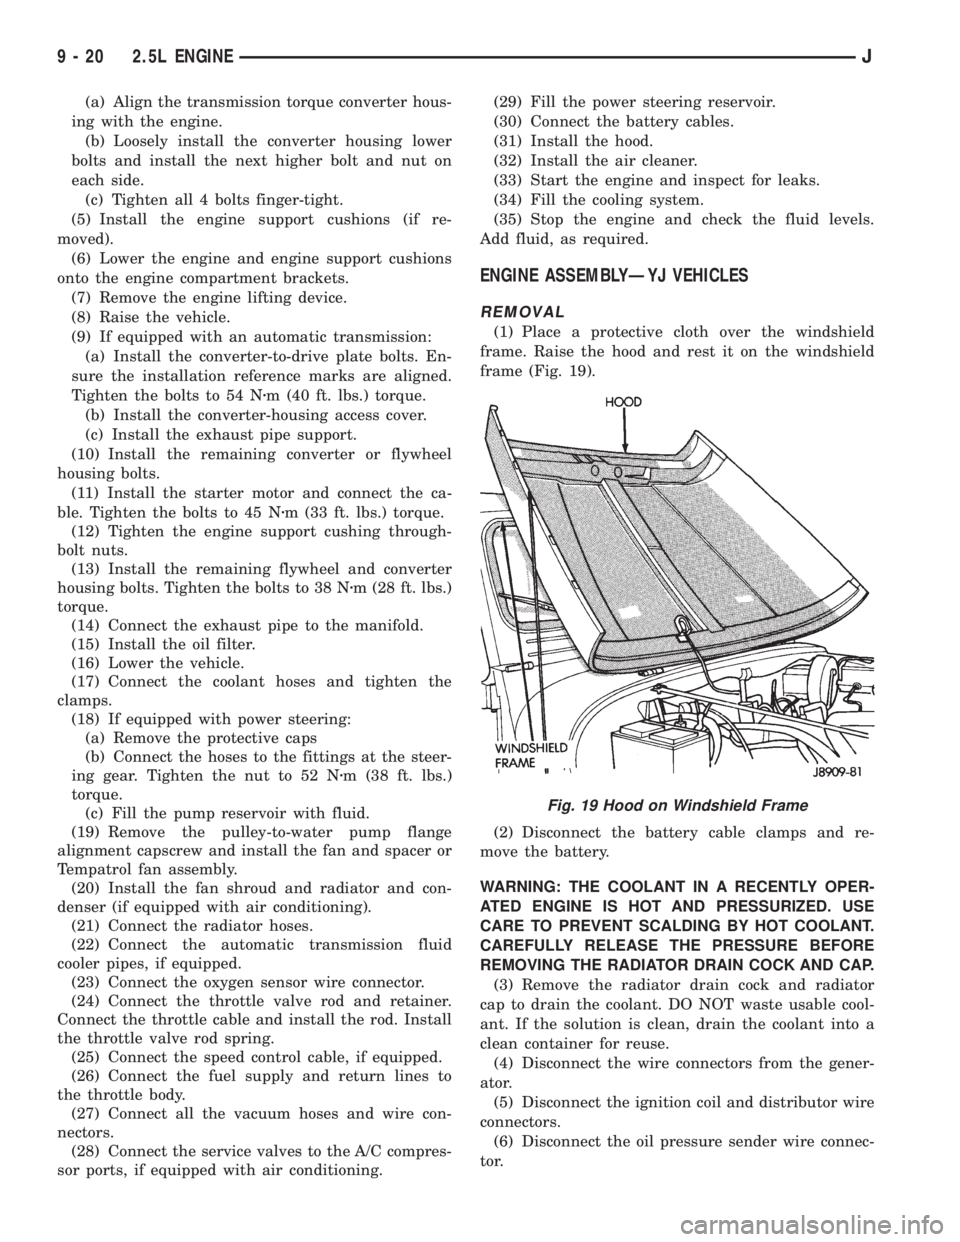
(1) Place a protective cloth over the windshield
frame. Raise the hood and rest it on the windshield
frame (Fig. 19).
(2) Disconnect the battery cable clamps and re-
move the battery.
WARNING: THE COOLANT IN A RECENTLY OPER-
ATED ENGINE IS HOT AND PRESSURIZED. USE
CARE TO PREVENT SCALDING BY HOT COOLANT.
CAREFULLY RELEASE THE PRESSURE BEFORE
REMOVING THE RADIATOR DRAIN COCK AND CAP.
(3) Remove the radiator drain cock and radiator
cap to drain the coolant. DO NOT waste usable cool-
ant. If the solution is clean, drain the coolant into a
clean container for reuse.
(4) Disconnect the wire connectors from the gener-
ator.
(5) Disconnect the ignition coil and distributor wire
connectors.
(6) Disconnect the oil pressure sender wire connec-
tor.
Fig. 19 Hood on Windshield Frame
9 - 20 2.5L ENGINEJ