1995 JEEP YJ service
[x] Cancel search: servicePage 112 of 2158
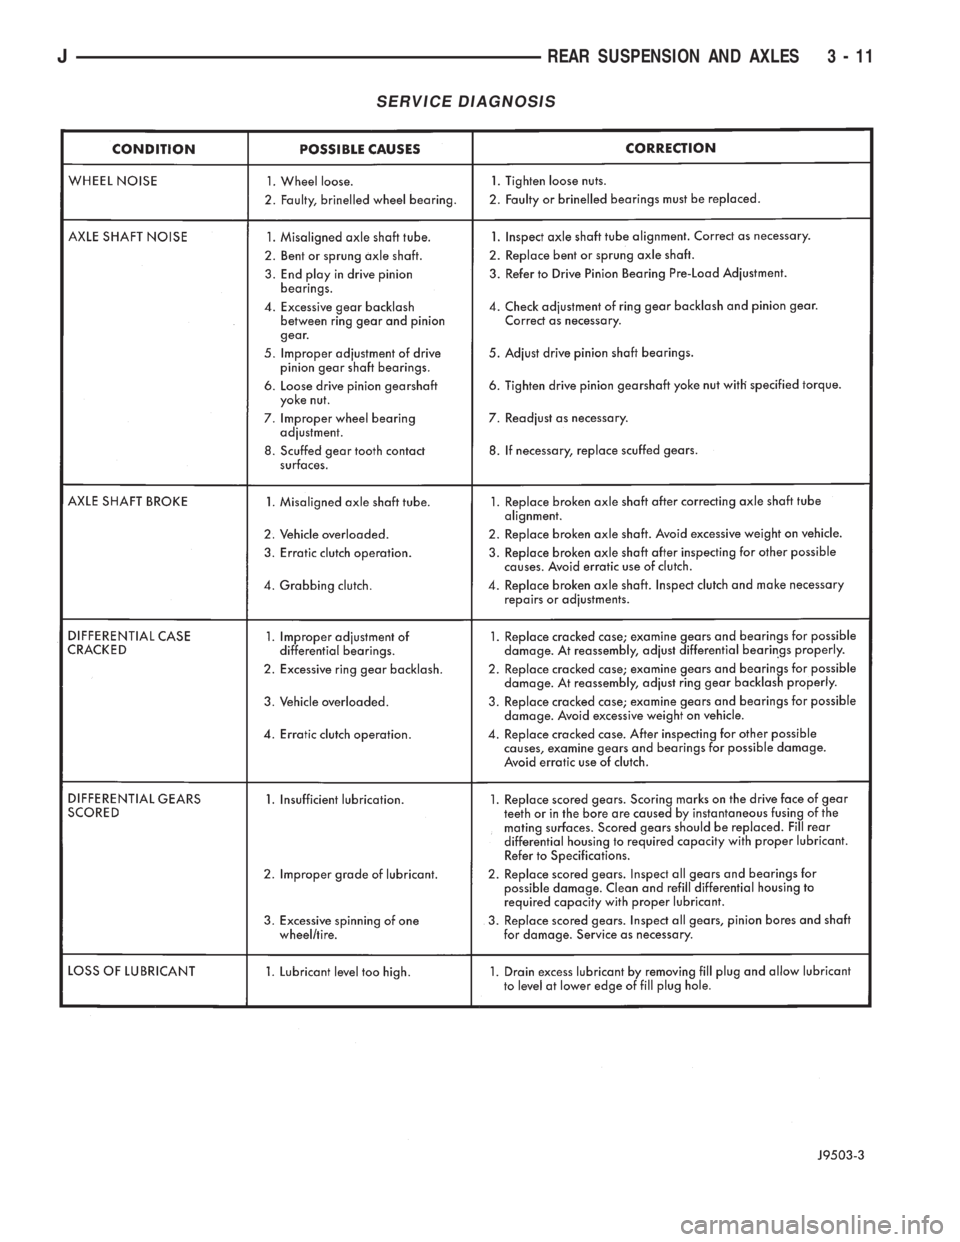
SERVICE DIAGNOSIS
JREAR SUSPENSION AND AXLES 3 - 11
Page 113 of 2158
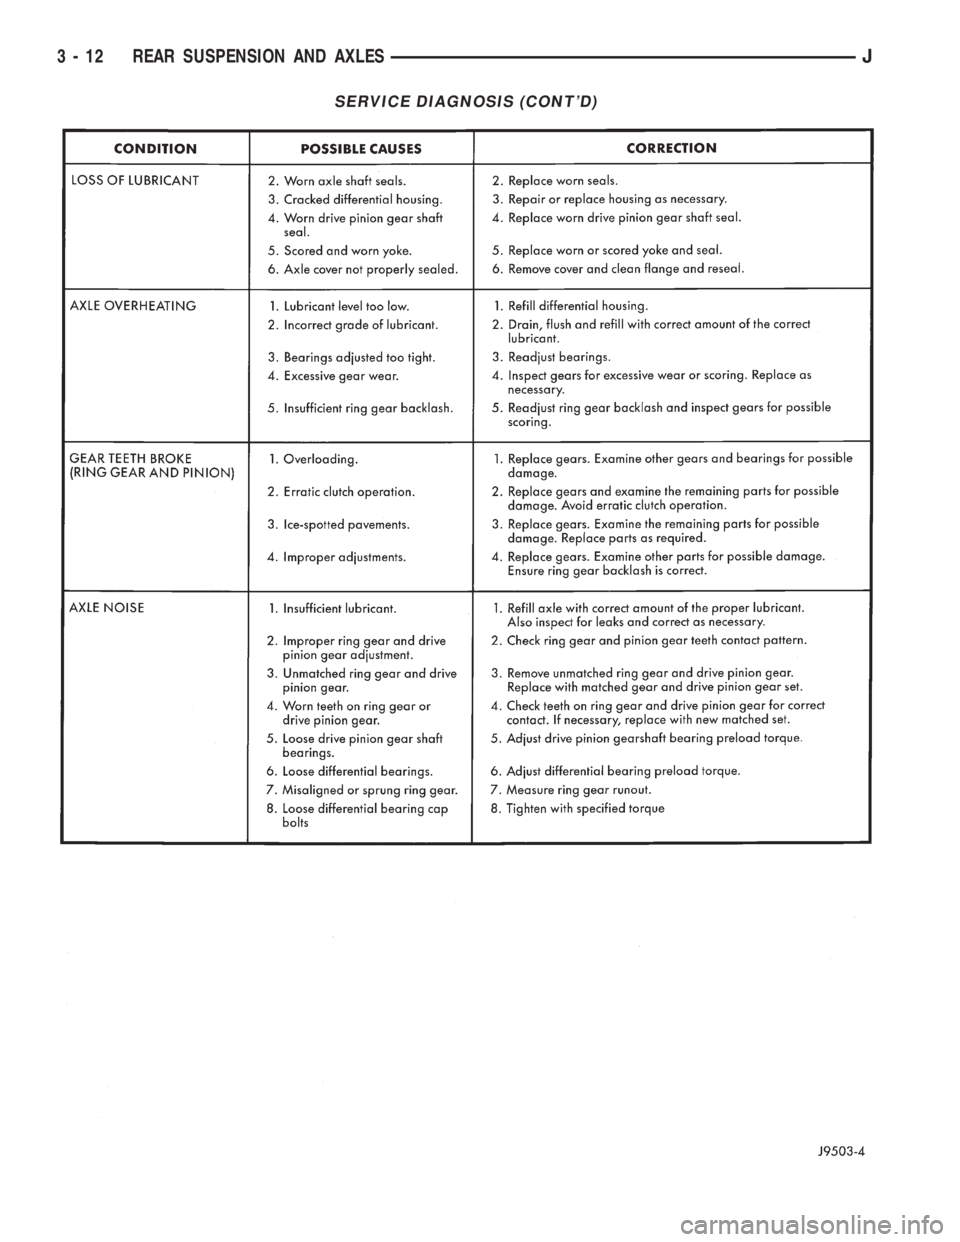
SERVICE DIAGNOSIS (CONT'D)
3 - 12 REAR SUSPENSION AND AXLESJ
Page 115 of 2158
CAUTION: Overfilling the differential can result in
lubricant foaming and overheating.
Trac-Lok Differentials; A container of Trac-Lok lu-
bricant (friction modifier) should be added after re-
pair service or a lubricant change.
(9) Install the fill hole plug and lower the vehicle.
LIMITED SLIP DIFFERENTIAL vehicles should
be road tested by making 10 to 12 slow figure-eight
turns. This maneuver will pump the lubricant
through the clutch discs to eliminate a possible chat-
ter noise complaint.
DRIVE AXLE ASSEMBLY REPLACEMENTÐXJ
VEHICLES
REMOVAL
(1) Raise the vehicle and position support stands
under the frame rails slightly in front the springs.
(2) Remove the rear wheels.
(3) Mark the drive shaft yoke and axle pinion yoke
for alignment reference. Disconnect the drive shaft
from the axle.
(4) Disconnect the axle vent hose.
(5) Disconnect the parking brake cables at the
equalizer or backing plate.
(6) Disconnect the shock absorbers from the axle
brackets.
(7) Disconnect the brake hose at the axle junction
block.Do not disconnect the wheel cylinder tub-
ing fittings.
(8) If equipped, disconnect ABS wiring connections
at the axle.(9) Support the axle with a hydraulic jack under
the differential.
(10) Remove the spring U-bolts from the plate
brackets.
(11) Lower the jack enough to remove the axle.
INSTALLATION
CAUTION: Suspension components with rubber
bushings should be tightened with the vehicle at
normal height. It is important to have the springs
supporting the weight of the vehicle when the fas-
teners are torqued. If springs are not at their normal
ride position, vehicle ride comfort could be affected
and premature bushing wear may occur. Rubber
bushings must never be lubricated.
(1) Support the axle on a hydraulic jack under the
differential. Position the axle under the vehicle.
(2) Raise the axle and align the spring center bolts
with the locating holes in the axle pads and plate
brackets.
(3) Install the spring U-bolts through the plate
brackets and tighten to 70 Nzm (52 ft. lbs.) torque.
(4) Install ABS wiring connections (if equipped) at
the axle.
(5) Connect the brake hose at the axle junction
block.
(6) Install the shock absorbers to the axle brackets
and tighten to 62 Nzm (46 ft. lbs.) torque.
(7) Connect the parking brake cables at the equal-
izer or backing plate.
(8) Connect the vent hose to the tube fitting.
(9) Align the reference marks and connect the
drive shaft to the axle yoke. Tighten the U-joint
clamp bolts to 19 Nzm (14 ft. lbs.) torque.
(10) Check differential lubricant and add if neces-
sary.
(11) Install the wheel and tire.
(12) Bleed the brakes.
(13) Remove the supports and lower the vehicle.
DRIVE AXLE ASSEMBLY REPLACEMENTÐYJ
VEHICLES
REMOVAL
(1) Raise the vehicle and position support stands
under the frame rails slightly in front the springs.
(2) Remove the rear wheels.
(3) Mark the drive shaft yoke and axle pinion yoke
for alignment reference. Disconnect the drive shaft
from the axle.
(4) Disconnect the axle vent hose.
(5) Disconnect the parking brake cables at the
equalizer or backing plate.
(6) Disconnect the shock absorbers from the plate
brackets.
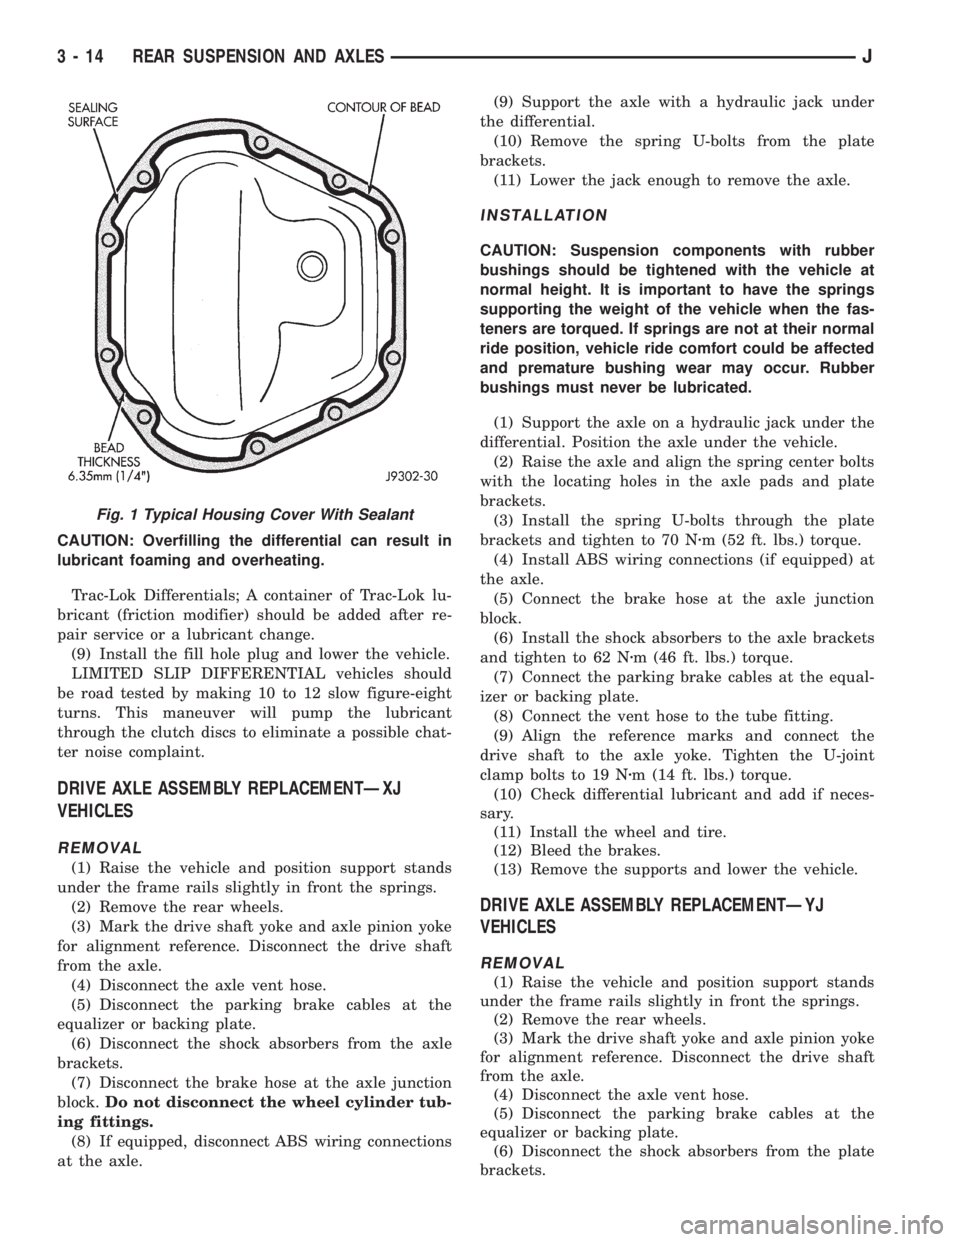
Fig. 1 Typical Housing Cover With Sealant
3 - 14 REAR SUSPENSION AND AXLESJ
Page 119 of 2158
DIFFERENTIAL REMOVAL
To service the differential the axle shafts must be
removed. Refer to the removal procedures in this
Group.
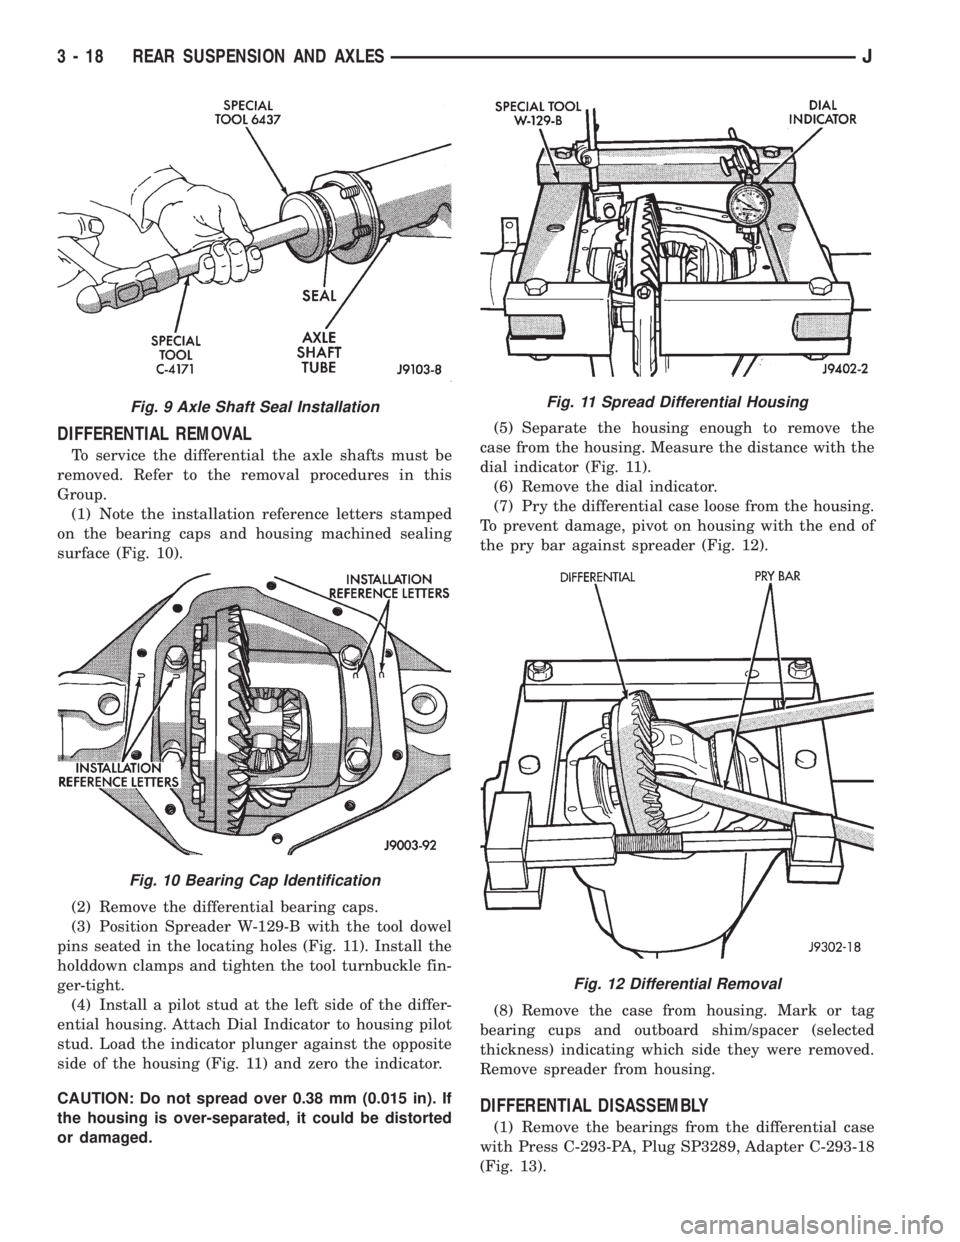
(1) Note the installation reference letters stamped
on the bearing caps and housing machined sealing
surface (Fig. 10).
(2) Remove the differential bearing caps.
(3) Position Spreader W-129-B with the tool dowel
pins seated in the locating holes (Fig. 11). Install the
holddown clamps and tighten the tool turnbuckle fin-
ger-tight.
(4) Install a pilot stud at the left side of the differ-
ential housing. Attach Dial Indicator to housing pilot
stud. Load the indicator plunger against the opposite
side of the housing (Fig. 11) and zero the indicator.
CAUTION: Do not spread over 0.38 mm (0.015 in). If
the housing is over-separated, it could be distorted
or damaged.(5) Separate the housing enough to remove the
case from the housing. Measure the distance with the
dial indicator (Fig. 11).
(6) Remove the dial indicator.
(7) Pry the differential case loose from the housing.
To prevent damage, pivot on housing with the end of
the pry bar against spreader (Fig. 12).
(8) Remove the case from housing. Mark or tag
bearing cups and outboard shim/spacer (selected
thickness) indicating which side they were removed.
Remove spreader from housing.
DIFFERENTIAL DISASSEMBLY
(1) Remove the bearings from the differential case
with Press C-293-PA, Plug SP3289, Adapter C-293-18
(Fig. 13).
Fig. 9 Axle Shaft Seal Installation
Fig. 10 Bearing Cap Identification
Fig. 11 Spread Differential Housing
Fig. 12 Differential Removal
3 - 18 REAR SUSPENSION AND AXLESJ
Page 122 of 2158
²Smooth appearance with no broken/dented sur-
faces on the bearing rollers or the roller contact sur-
faces
²Bearing cups must not be distorted or cracked
²Machined surfaces should be smooth and without
any raised edges
²Raised metal on shoulders of cup bores should be
removed with a hand stone
²Wear and damage to pinion gear mate shaft, pin-
ion gears, side gears and thrust washers. Replace as
a matched set only.
²Ring and pinion gear for worn and chipped teeth
²Ring gear for damaged bolt threads. Replaced as a
matched set only.
²Pinion yoke for cracks, worn splines, pitted areas,
and a rough/corroded seal contact surface. Repair or
replace as necessary.
²Preload shims for damage and distortion. Install
new shims if necessary.
DIFFERENTIAL ASSEMBLY
(1) Install the following components in the differ-
ential case.
²Differential side gears and thrust washers
²Pinion gears and thrust washers
²Pinion gear mate shaft (align holes in shaft and
case)
(2) Lubricate all differential components with hy-
poid gear lubricant.
PINION GEAR DEPTH INFORMATION
Ring and pinion gears are supplied as matched sets
only. The identifying numbers for the ring and pinion
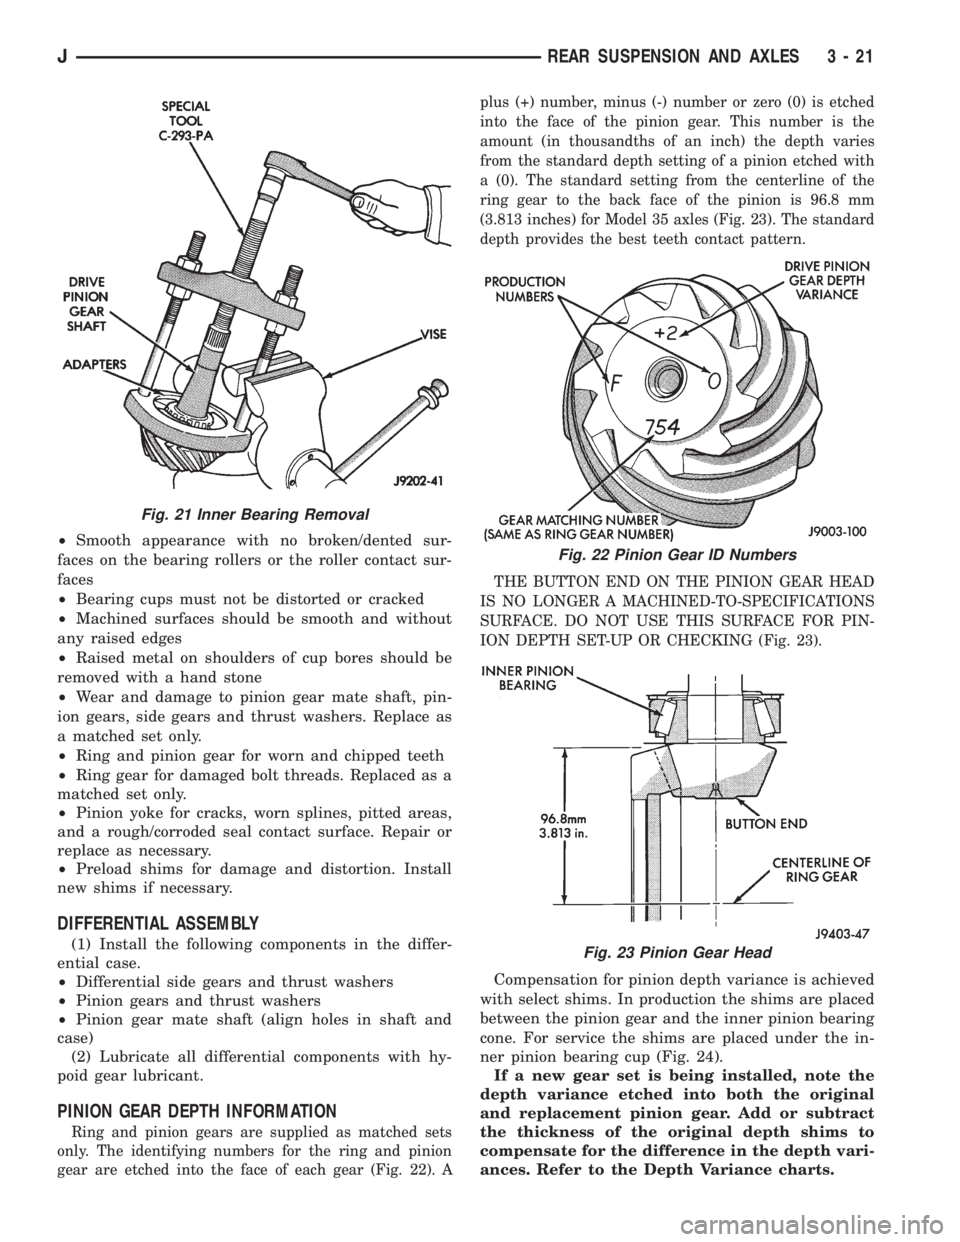
gear are etched into the face of each gear (Fig. 22). Aplus (+) number, minus (-) number or zero (0) is etched
into the face of the pinion gear. This number is the
amount (in thousandths of an inch) the depth varies
from the standard depth setting of a pinion etched with
a (0). The standard setting from the centerline of the
ring gear to the back face of the pinion is 96.8 mm
(3.813 inches) for Model 35 axles (Fig. 23). The standard
depth provides the best teeth contact pattern.
THE BUTTON END ON THE PINION GEAR HEAD
IS NO LONGER A MACHINED-TO-SPECIFICATIONS
SURFACE. DO NOT USE THIS SURFACE FOR PIN-
ION DEPTH SET-UP OR CHECKING (Fig. 23).
Compensation for pinion depth variance is achieved
with select shims. In production the shims are placed
between the pinion gear and the inner pinion bearing
cone. For service the shims are placed under the in-
ner pinion bearing cup (Fig. 24).
If a new gear set is being installed, note the
depth variance etched into both the original
and replacement pinion gear. Add or subtract
the thickness of the original depth shims to
compensate for the difference in the depth vari-
ances. Refer to the Depth Variance charts.
Fig. 21 Inner Bearing Removal
Fig. 22 Pinion Gear ID Numbers
Fig. 23 Pinion Gear Head
JREAR SUSPENSION AND AXLES 3 - 21
Page 124 of 2158
(1) Assemble Pinion Gauge Set, Pinion Block and
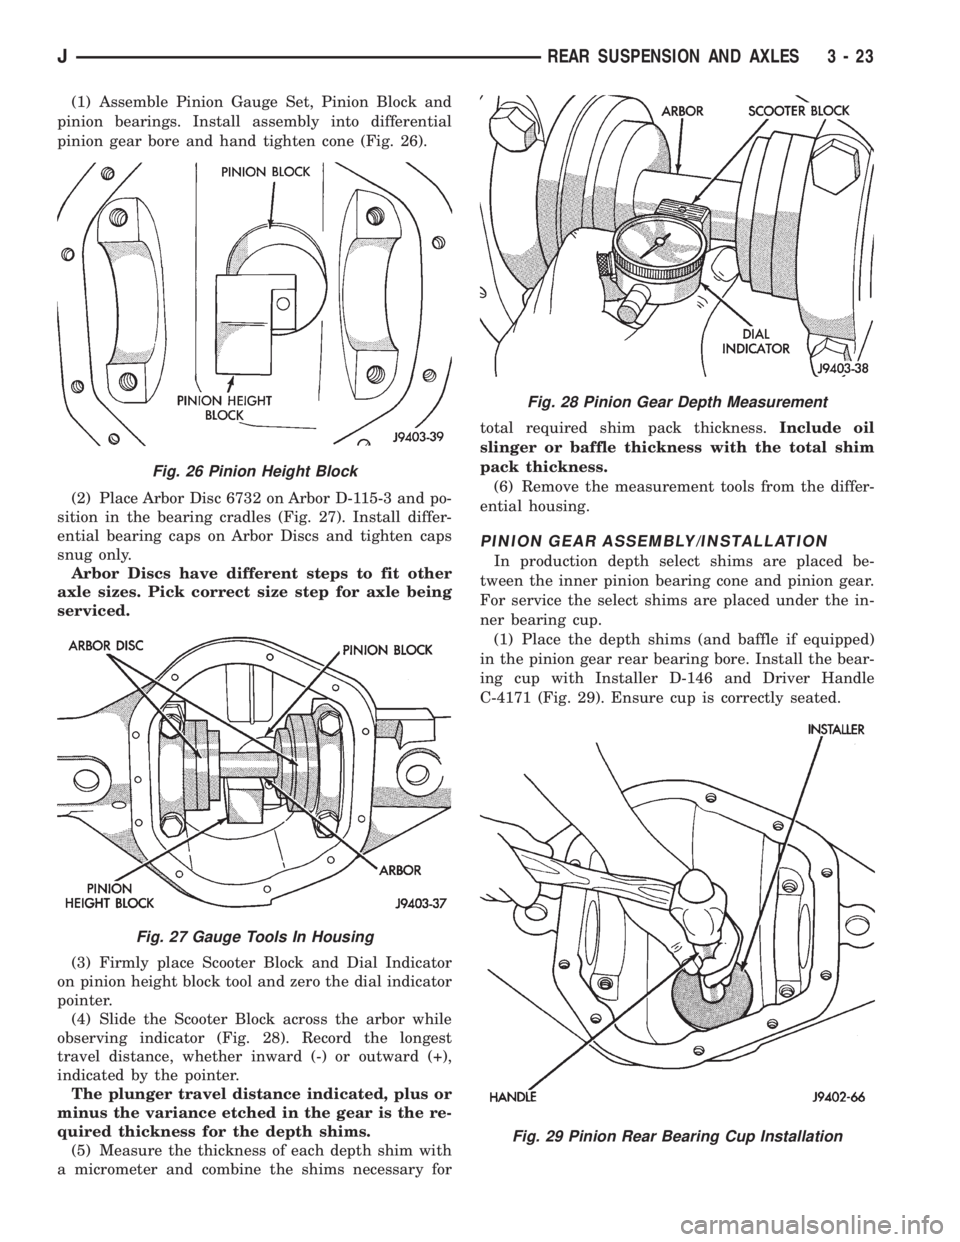
pinion bearings. Install assembly into differential
pinion gear bore and hand tighten cone (Fig. 26).
(2) Place Arbor Disc 6732 on Arbor D-115-3 and po-
sition in the bearing cradles (Fig. 27). Install differ-
ential bearing caps on Arbor Discs and tighten caps
snug only.
Arbor Discs have different steps to fit other
axle sizes. Pick correct size step for axle being
serviced.
(3) Firmly place Scooter Block and Dial Indicator
on pinion height block tool and zero the dial indicator
pointer.
(4) Slide the Scooter Block across the arbor while
observing indicator (Fig. 28). Record the longest
travel distance, whether inward (-) or outward (+),
indicated by the pointer.
The plunger travel distance indicated, plus or
minus the variance etched in the gear is the re-
quired thickness for the depth shims.
(5) Measure the thickness of each depth shim with
a micrometer and combine the shims necessary fortotal required shim pack thickness.Include oil
slinger or baffle thickness with the total shim
pack thickness.
(6) Remove the measurement tools from the differ-
ential housing.
PINION GEAR ASSEMBLY/INSTALLATION
In production depth select shims are placed be-
tween the inner pinion bearing cone and pinion gear.
For service the select shims are placed under the in-
ner bearing cup.
(1) Place the depth shims (and baffle if equipped)
in the pinion gear rear bearing bore. Install the bear-
ing cup with Installer D-146 and Driver Handle
C-4171 (Fig. 29). Ensure cup is correctly seated.
Fig. 26 Pinion Height Block
Fig. 27 Gauge Tools In Housing
Fig. 28 Pinion Gear Depth Measurement
Fig. 29 Pinion Rear Bearing Cup Installation
JREAR SUSPENSION AND AXLES 3 - 23
Page 131 of 2158
8 1/4 AXLE
INDEX
page page
Axle Shaft, Seal and Bearing Service.......... 32
Differential Service........................ 34
Drive Axle Assembly ReplacementÐXJ Vehicles . . 31
Information.............................. 30Lubricant Change......................... 31
Lubricant Specifications..................... 31
Pinion Seal Replacement................... 33
INFORMATION
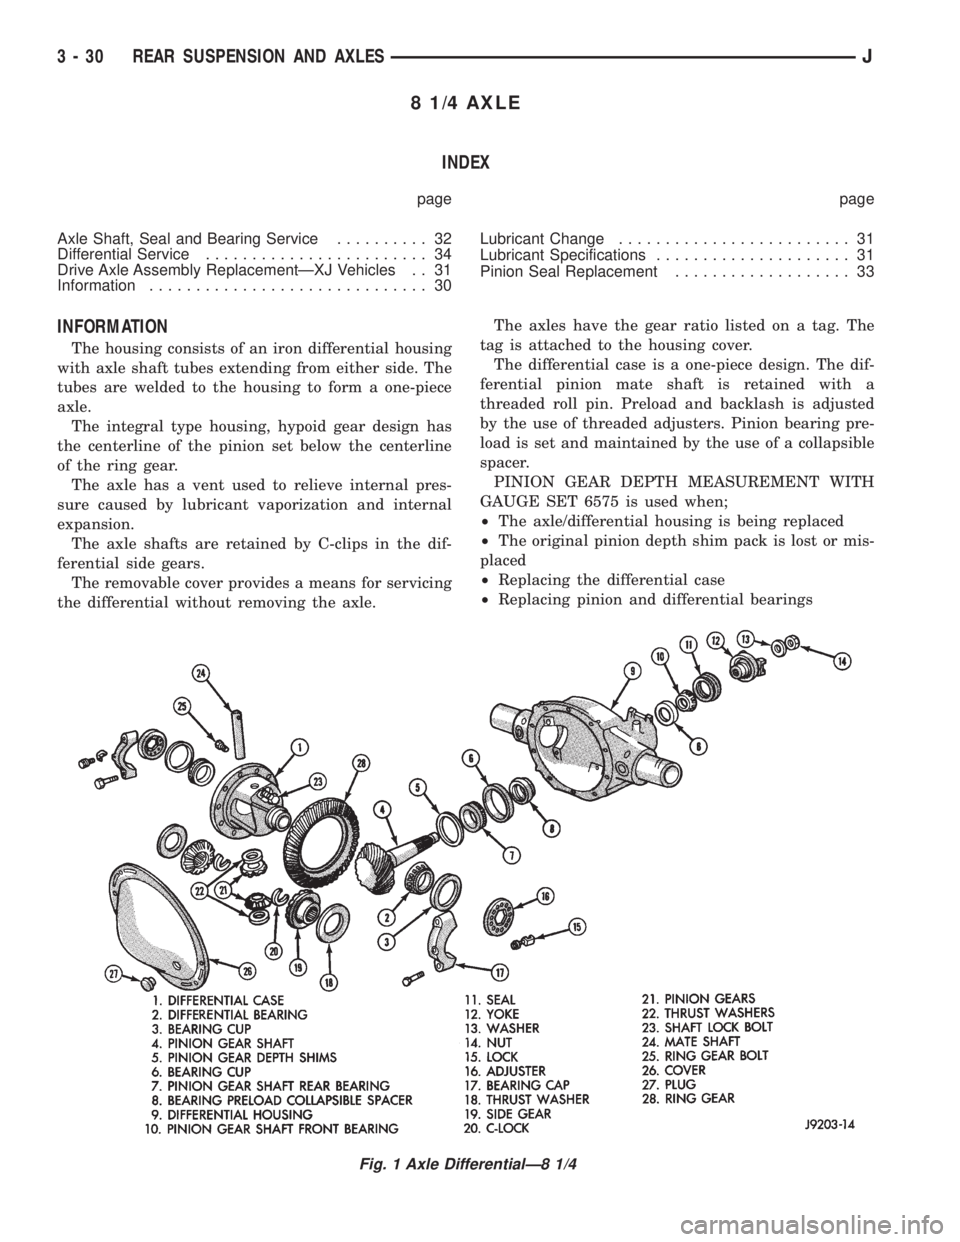
The housing consists of an iron differential housing
with axle shaft tubes extending from either side. The
tubes are welded to the housing to form a one-piece
axle.
The integral type housing, hypoid gear design has
the centerline of the pinion set below the centerline
of the ring gear.
The axle has a vent used to relieve internal pres-
sure caused by lubricant vaporization and internal
expansion.
The axle shafts are retained by C-clips in the dif-
ferential side gears.
The removable cover provides a means for servicing
the differential without removing the axle.The axles have the gear ratio listed on a tag. The
tag is attached to the housing cover.
The differential case is a one-piece design. The dif-
ferential pinion mate shaft is retained with a
threaded roll pin. Preload and backlash is adjusted
by the use of threaded adjusters. Pinion bearing pre-
load is set and maintained by the use of a collapsible
spacer.
PINION GEAR DEPTH MEASUREMENT WITH
GAUGE SET 6575 is used when;
²The axle/differential housing is being replaced
²The original pinion depth shim pack is lost or mis-
placed
²Replacing the differential case
²Replacing pinion and differential bearings
Fig. 1 Axle DifferentialÐ8 1/4
3 - 30 REAR SUSPENSION AND AXLESJ
Page 133 of 2158

AXLE SHAFT, SEAL AND BEARING SERVICE
CAUTION: When rear axle service is necessary,
both rear wheels must be raised off the surface so
that they are free to rotate. Be cautious when the
tires are being rotated by the engine or by other
means.
AXLE SHAFT REMOVAL
(1) Raise and support the vehicle.
(2) Remove the wheel and tire.
(3) Remove the brake drum.
(4) Clean all the foreign material from housing
cover area.
(5) Loosen the housing cover bolts and drain the
lubricant from the housing. Remove the housing
cover.
(6) Rotate the differential case so that the pinion
mate gear shaft lock screw is accessible. Remove the
lock screw and the pinion mate gear shaft from the
case (Fig. 3).
(7) Push the axle shaft in toward the center of the
vehicle. Remove the axle shaft C-clip lock from the
axle shaft (Fig. 4).
(8) Remove the axle shaft. Use care to prevent
damage to the axle shaft bearing, which will remain
in the axle shaft tube.
(9) Inspect the axle shaft bearing contact surface
area for indications of brinelling, spalling, and pit-
ting.
If any of these conditions exist, the axle shaft
and bearing should be replaced. Normal bear-ing contact on the shaft will be a dull gray and
it could appear to be lightly dented.
(10) If any of these conditions exist, the axle shaft
and bearing must be replaced.
The normal appearance (from roller bearing
contact) will be a dull gray surface area that
could appear slightly dented.
AXLE SHAFT SEAL AND BEARING REMOVAL
(1) Remove the axle shaft seal with a small pry
bar.
(2) Remove the bearing if it appears damaged or
the axle shaft shows any of the conditions described
above.
(3) Remove the bearing with Remover C-4167 (Fig.
5). Attach Slide Hammer 7420 and Adapter 7420-8 to
the end of the removal tool.
(4) Inspect the axle shaft seal surface and tube
bore for roughness and burrs.Polish each axle
shaft with No. 600 crocus cloth. This can re-
move slight surface damage. Do not reduce the
diameter of the axle shaft seal contact surface.
When polishing, the crocus cloth should be
moved around the circumference of the shaft
(not in-line with the shaft).
Fig. 2 Typical Housing Cover With Sealant
Fig. 3 Pinion Mate Shaft Lock Screw
Fig. 4 Axle Shaft C-Clip Lock
3 - 32 REAR SUSPENSION AND AXLESJ