1995 JEEP YJ automatic transmission
[x] Cancel search: automatic transmissionPage 1736 of 2158
at the top of the 3-4 valve to be released through the
solenoid valve drain port. Spring tension moves the
valve up exposing the overdrive clutch accumulator
feed port to apply the clutch.
De-energizing the solenoid causes the drain port to
close. Line pressure then moves the valve down ex-
posing the overdrive brake accumulator feed port for
the shift to fourth gear.
In the 1-2 or 3 gearshift lever positions, line pres-
sure from the 2-3 shift valve is applied to the lower
end of the 3-4 valve. This holds the valve upward,
closing off the overdrive brake feed port preventing a
shift into fourth gear.
Second Coast Modulator Valve
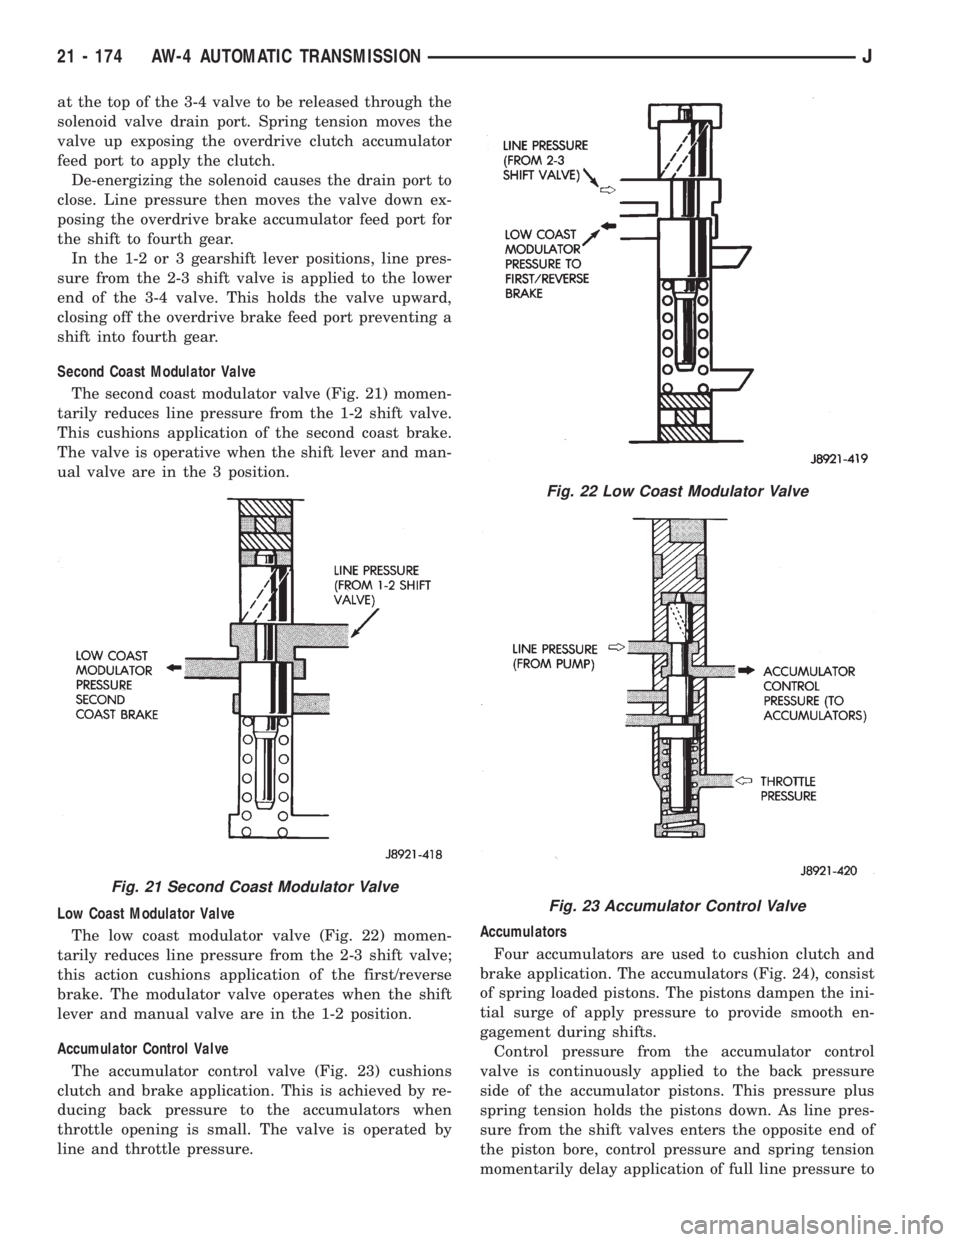
The second coast modulator valve (Fig. 21) momen-
tarily reduces line pressure from the 1-2 shift valve.
This cushions application of the second coast brake.
The valve is operative when the shift lever and man-
ual valve are in the 3 position.
Low Coast Modulator Valve
The low coast modulator valve (Fig. 22) momen-
tarily reduces line pressure from the 2-3 shift valve;
this action cushions application of the first/reverse
brake. The modulator valve operates when the shift
lever and manual valve are in the 1-2 position.
Accumulator Control Valve
The accumulator control valve (Fig. 23) cushions
clutch and brake application. This is achieved by re-
ducing back pressure to the accumulators when
throttle opening is small. The valve is operated by
line and throttle pressure.Accumulators
Four accumulators are used to cushion clutch and
brake application. The accumulators (Fig. 24), consist
of spring loaded pistons. The pistons dampen the ini-
tial surge of apply pressure to provide smooth en-
gagement during shifts.
Control pressure from the accumulator control
valve is continuously applied to the back pressure
side of the accumulator pistons. This pressure plus
spring tension holds the pistons down. As line pres-
sure from the shift valves enters the opposite end of
the piston bore, control pressure and spring tension
momentarily delay application of full line pressure to
Fig. 21 Second Coast Modulator Valve
Fig. 22 Low Coast Modulator Valve
Fig. 23 Accumulator Control Valve
21 - 174 AW-4 AUTOMATIC TRANSMISSIONJ
Page 1737 of 2158
cushion engagement. The accumulators are all lo-
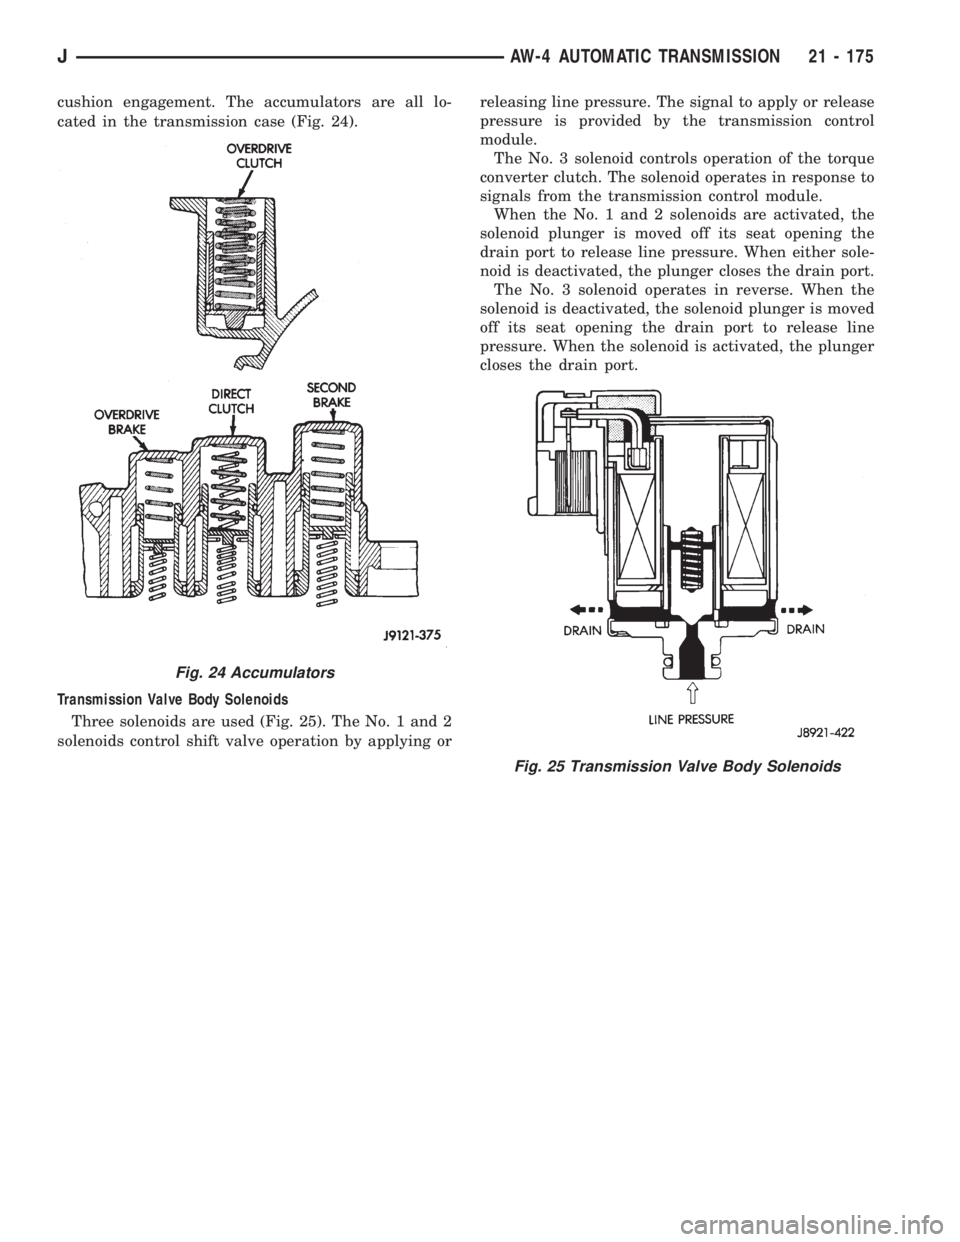
cated in the transmission case (Fig. 24).
Transmission Valve Body Solenoids
Three solenoids are used (Fig. 25). The No. 1 and 2
solenoids control shift valve operation by applying orreleasing line pressure. The signal to apply or release
pressure is provided by the transmission control
module.
The No. 3 solenoid controls operation of the torque
converter clutch. The solenoid operates in response to
signals from the transmission control module.
When the No. 1 and 2 solenoids are activated, the
solenoid plunger is moved off its seat opening the
drain port to release line pressure. When either sole-
noid is deactivated, the plunger closes the drain port.
The No. 3 solenoid operates in reverse. When the
solenoid is deactivated, the solenoid plunger is moved
off its seat opening the drain port to release line
pressure. When the solenoid is activated, the plunger
closes the drain port.
Fig. 24 Accumulators
Fig. 25 Transmission Valve Body Solenoids
JAW-4 AUTOMATIC TRANSMISSION 21 - 175
Page 1759 of 2158
the front bumper and radiator support be removed
for access to the cooler lines and attaching bracket.
REVERSE FLUSHING MAIN AND AUXILIARY
COOLERS AND COOLER LINES
Reverse flushing the cooler and lines will prevent
sludge and particles from flowing back into the
transmission after repair. The flushing procedure ap-
plies to standard (in-radiator) coolers and auxiliary
coolers equally.
Pressure equipment is preferred for reverse flush-
ing. However, reverse flushing can be performed us-
ing hand operated equipment as described in the
following procedure.
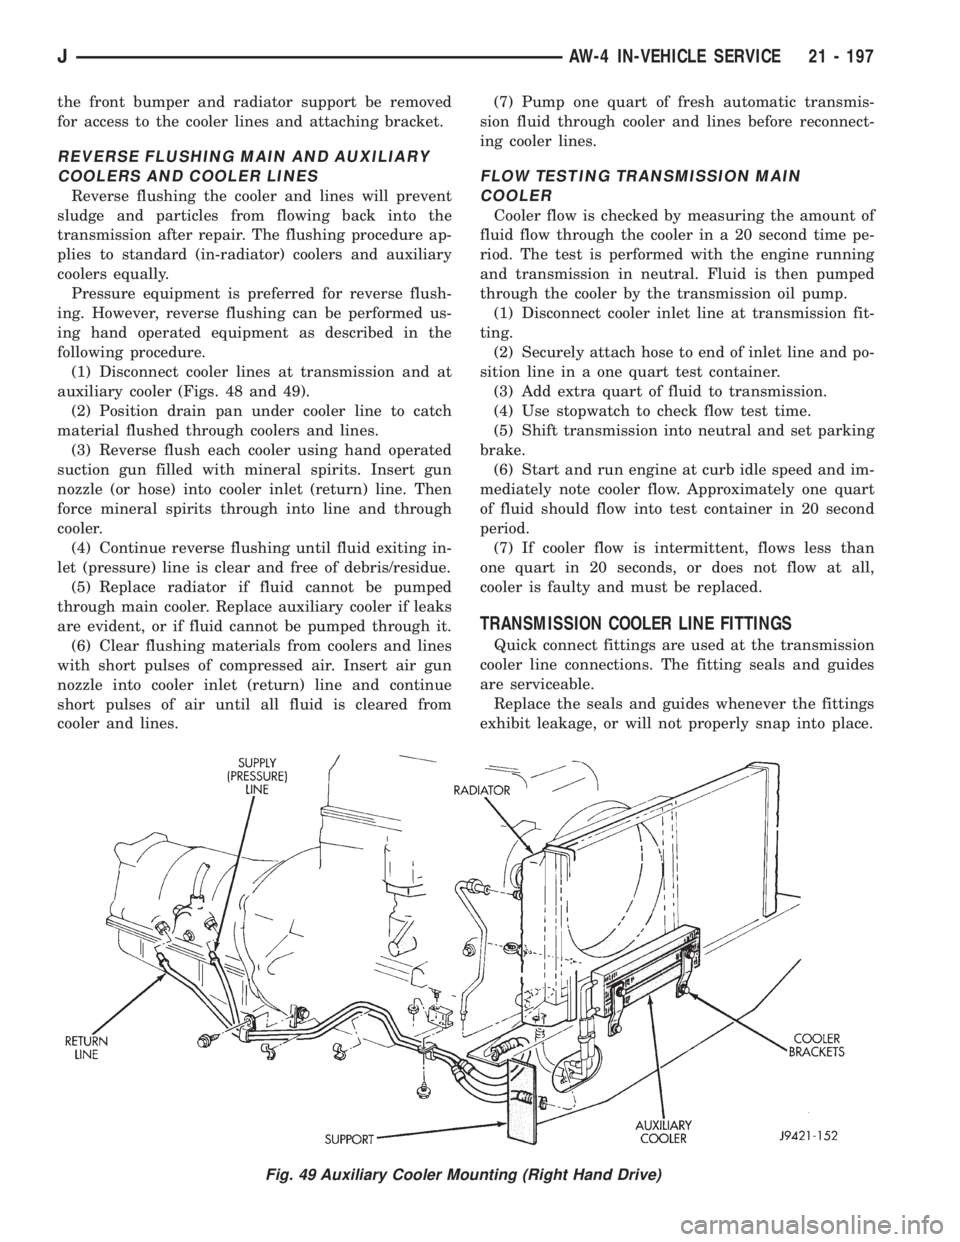
(1) Disconnect cooler lines at transmission and at
auxiliary cooler (Figs. 48 and 49).
(2) Position drain pan under cooler line to catch
material flushed through coolers and lines.
(3) Reverse flush each cooler using hand operated
suction gun filled with mineral spirits. Insert gun
nozzle (or hose) into cooler inlet (return) line. Then
force mineral spirits through into line and through
cooler.
(4) Continue reverse flushing until fluid exiting in-
let (pressure) line is clear and free of debris/residue.
(5) Replace radiator if fluid cannot be pumped
through main cooler. Replace auxiliary cooler if leaks
are evident, or if fluid cannot be pumped through it.
(6) Clear flushing materials from coolers and lines
with short pulses of compressed air. Insert air gun
nozzle into cooler inlet (return) line and continue
short pulses of air until all fluid is cleared from
cooler and lines.(7) Pump one quart of fresh automatic transmis-
sion fluid through cooler and lines before reconnect-
ing cooler lines.
FLOW TESTING TRANSMISSION MAIN
COOLER
Cooler flow is checked by measuring the amount of
fluid flow through the cooler in a 20 second time pe-
riod. The test is performed with the engine running
and transmission in neutral. Fluid is then pumped
through the cooler by the transmission oil pump.
(1) Disconnect cooler inlet line at transmission fit-
ting.
(2) Securely attach hose to end of inlet line and po-
sition line in a one quart test container.
(3) Add extra quart of fluid to transmission.
(4) Use stopwatch to check flow test time.
(5) Shift transmission into neutral and set parking
brake.
(6) Start and run engine at curb idle speed and im-
mediately note cooler flow. Approximately one quart
of fluid should flow into test container in 20 second
period.
(7) If cooler flow is intermittent, flows less than
one quart in 20 seconds, or does not flow at all,
cooler is faulty and must be replaced.
TRANSMISSION COOLER LINE FITTINGS
Quick connect fittings are used at the transmission
cooler line connections. The fitting seals and guides
are serviceable.
Replace the seals and guides whenever the fittings
exhibit leakage, or will not properly snap into place.
Fig. 49 Auxiliary Cooler Mounting (Right Hand Drive)
JAW-4 IN-VEHICLE SERVICE 21 - 197
Page 1762 of 2158
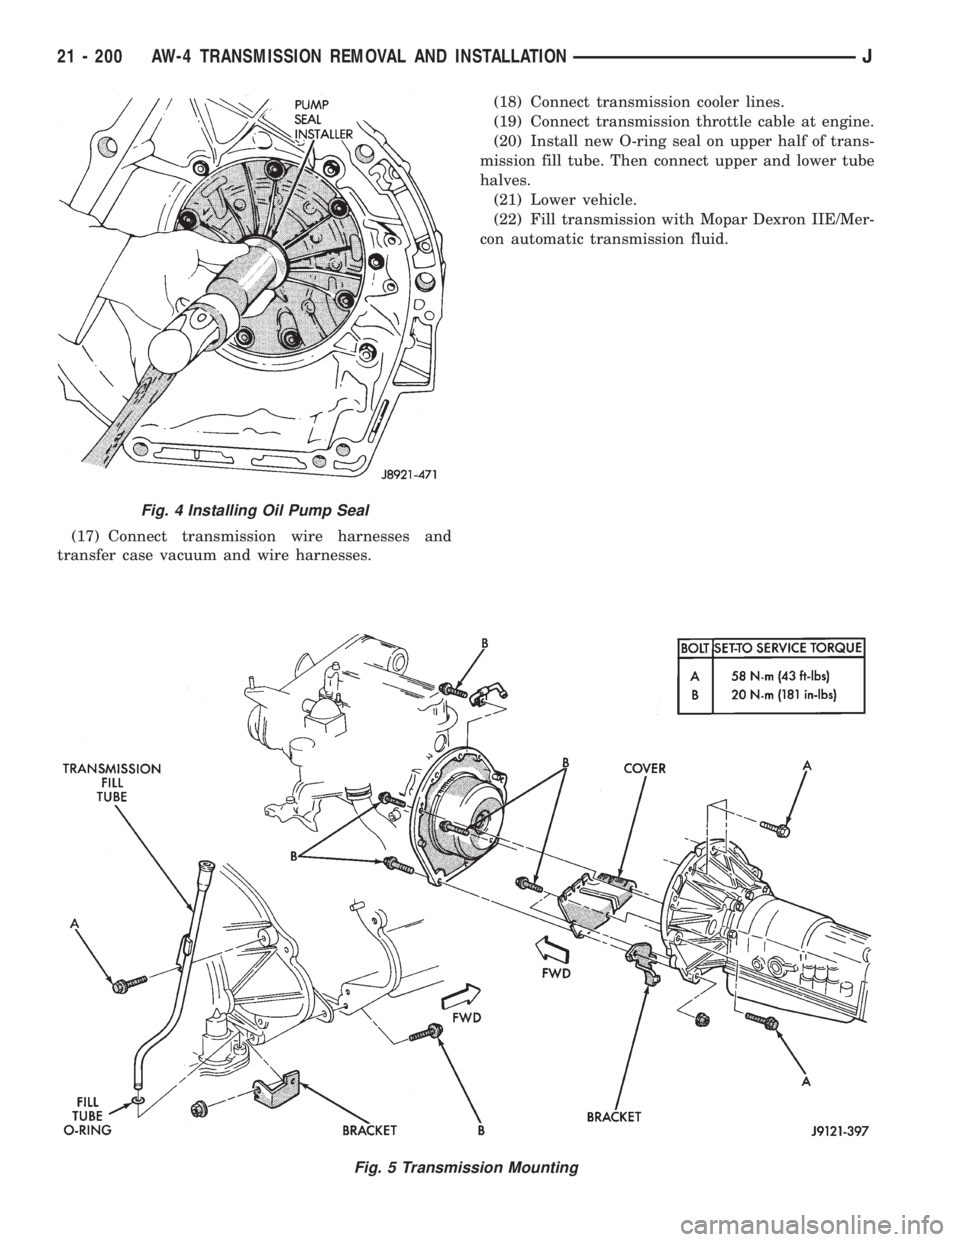
(17) Connect transmission wire harnesses and
transfer case vacuum and wire harnesses.(18) Connect transmission cooler lines.
(19) Connect transmission throttle cable at engine.
(20) Install new O-ring seal on upper half of trans-
mission fill tube. Then connect upper and lower tube
halves.
(21) Lower vehicle.
(22) Fill transmission with Mopar Dexron IIE/Mer-
con automatic transmission fluid.
Fig. 5 Transmission Mounting
Fig. 4 Installing Oil Pump Seal
21 - 200 AW-4 TRANSMISSION REMOVAL AND INSTALLATIONJ
Page 1776 of 2158
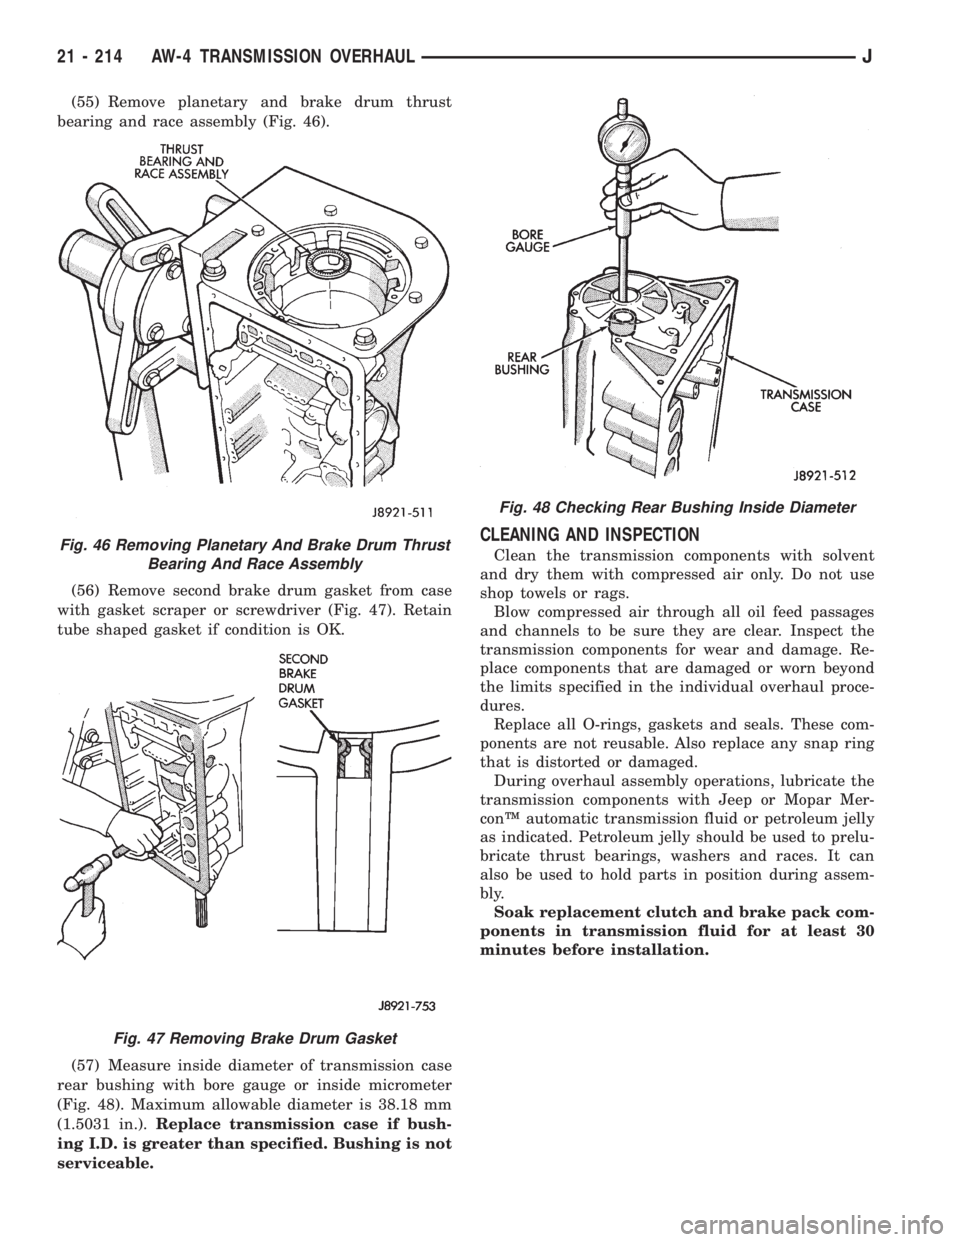
(55) Remove planetary and brake drum thrust
bearing and race assembly (Fig. 46).
(56) Remove second brake drum gasket from case
with gasket scraper or screwdriver (Fig. 47). Retain
tube shaped gasket if condition is OK.
(57) Measure inside diameter of transmission case
rear bushing with bore gauge or inside micrometer
(Fig. 48). Maximum allowable diameter is 38.18 mm
(1.5031 in.).Replace transmission case if bush-
ing I.D. is greater than specified. Bushing is not
serviceable.
CLEANING AND INSPECTION
Clean the transmission components with solvent
and dry them with compressed air only. Do not use
shop towels or rags.
Blow compressed air through all oil feed passages
and channels to be sure they are clear. Inspect the
transmission components for wear and damage. Re-
place components that are damaged or worn beyond
the limits specified in the individual overhaul proce-
dures.
Replace all O-rings, gaskets and seals. These com-
ponents are not reusable. Also replace any snap ring
that is distorted or damaged.
During overhaul assembly operations, lubricate the
transmission components with Jeep or Mopar Mer-
conŸ automatic transmission fluid or petroleum jelly
as indicated. Petroleum jelly should be used to prelu-
bricate thrust bearings, washers and races. It can
also be used to hold parts in position during assem-
bly.
Soak replacement clutch and brake pack com-
ponents in transmission fluid for at least 30
minutes before installation.Fig. 46 Removing Planetary And Brake Drum Thrust
Bearing And Race Assembly
Fig. 47 Removing Brake Drum Gasket
Fig. 48 Checking Rear Bushing Inside Diameter
21 - 214 AW-4 TRANSMISSION OVERHAULJ
Page 1822 of 2158
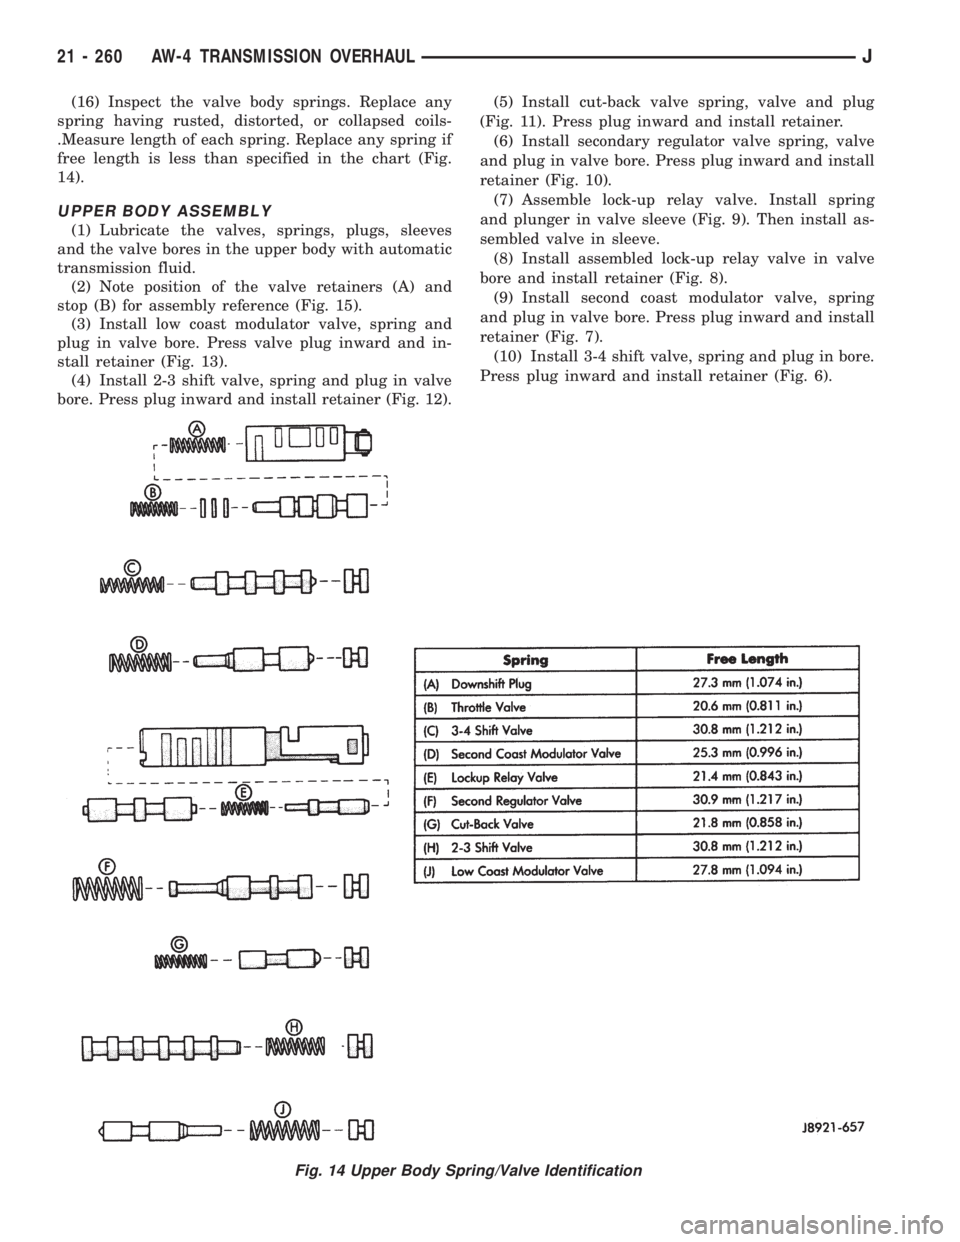
(16) Inspect the valve body springs. Replace any
spring having rusted, distorted, or collapsed coils-
.Measure length of each spring. Replace any spring if
free length is less than specified in the chart (Fig.
14).
UPPER BODY ASSEMBLY
(1) Lubricate the valves, springs, plugs, sleeves
and the valve bores in the upper body with automatic
transmission fluid.
(2) Note position of the valve retainers (A) and
stop (B) for assembly reference (Fig. 15).
(3) Install low coast modulator valve, spring and
plug in valve bore. Press valve plug inward and in-
stall retainer (Fig. 13).
(4) Install 2-3 shift valve, spring and plug in valve
bore. Press plug inward and install retainer (Fig. 12).(5) Install cut-back valve spring, valve and plug
(Fig. 11). Press plug inward and install retainer.
(6) Install secondary regulator valve spring, valve
and plug in valve bore. Press plug inward and install
retainer (Fig. 10).
(7) Assemble lock-up relay valve. Install spring
and plunger in valve sleeve (Fig. 9). Then install as-
sembled valve in sleeve.
(8) Install assembled lock-up relay valve in valve
bore and install retainer (Fig. 8).
(9) Install second coast modulator valve, spring
and plug in valve bore. Press plug inward and install
retainer (Fig. 7).
(10) Install 3-4 shift valve, spring and plug in bore.
Press plug inward and install retainer (Fig. 6).
Fig. 14 Upper Body Spring/Valve Identification
21 - 260 AW-4 TRANSMISSION OVERHAULJ
Page 1849 of 2158
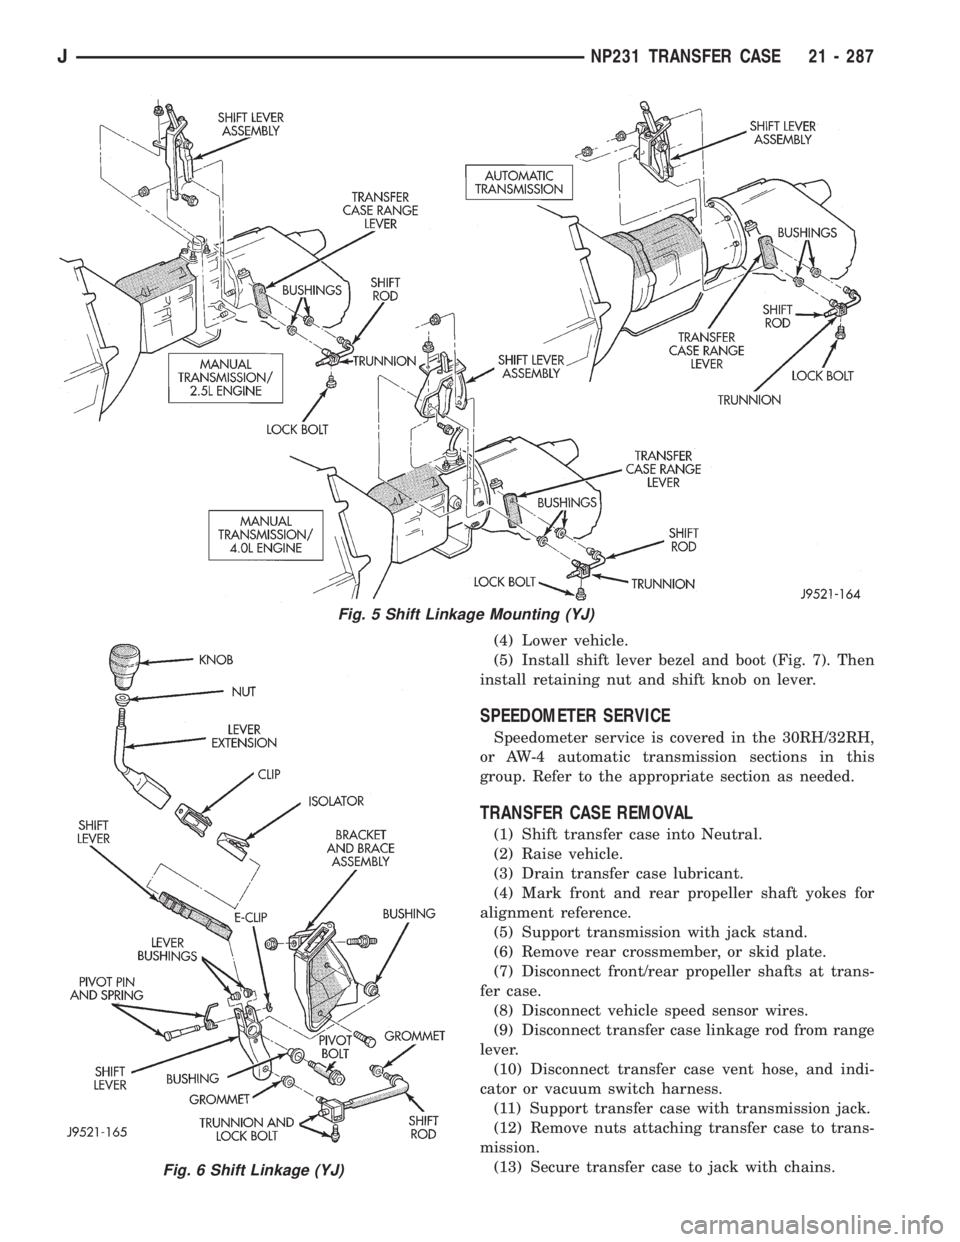
(4) Lower vehicle.
(5) Install shift lever bezel and boot (Fig. 7). Then
install retaining nut and shift knob on lever.
SPEEDOMETER SERVICE
Speedometer service is covered in the 30RH/32RH,
or AW-4 automatic transmission sections in this
group. Refer to the appropriate section as needed.
TRANSFER CASE REMOVAL
(1) Shift transfer case into Neutral.
(2) Raise vehicle.
(3) Drain transfer case lubricant.
(4) Mark front and rear propeller shaft yokes for
alignment reference.
(5) Support transmission with jack stand.
(6) Remove rear crossmember, or skid plate.
(7) Disconnect front/rear propeller shafts at trans-
fer case.
(8) Disconnect vehicle speed sensor wires.
(9) Disconnect transfer case linkage rod from range
lever.
(10) Disconnect transfer case vent hose, and indi-
cator or vacuum switch harness.
(11) Support transfer case with transmission jack.
(12) Remove nuts attaching transfer case to trans-
mission.
(13) Secure transfer case to jack with chains.
Fig. 5 Shift Linkage Mounting (YJ)
Fig. 6 Shift Linkage (YJ)
JNP231 TRANSFER CASE 21 - 287
Page 1862 of 2158
MAINSHAFT ASSEMBLY
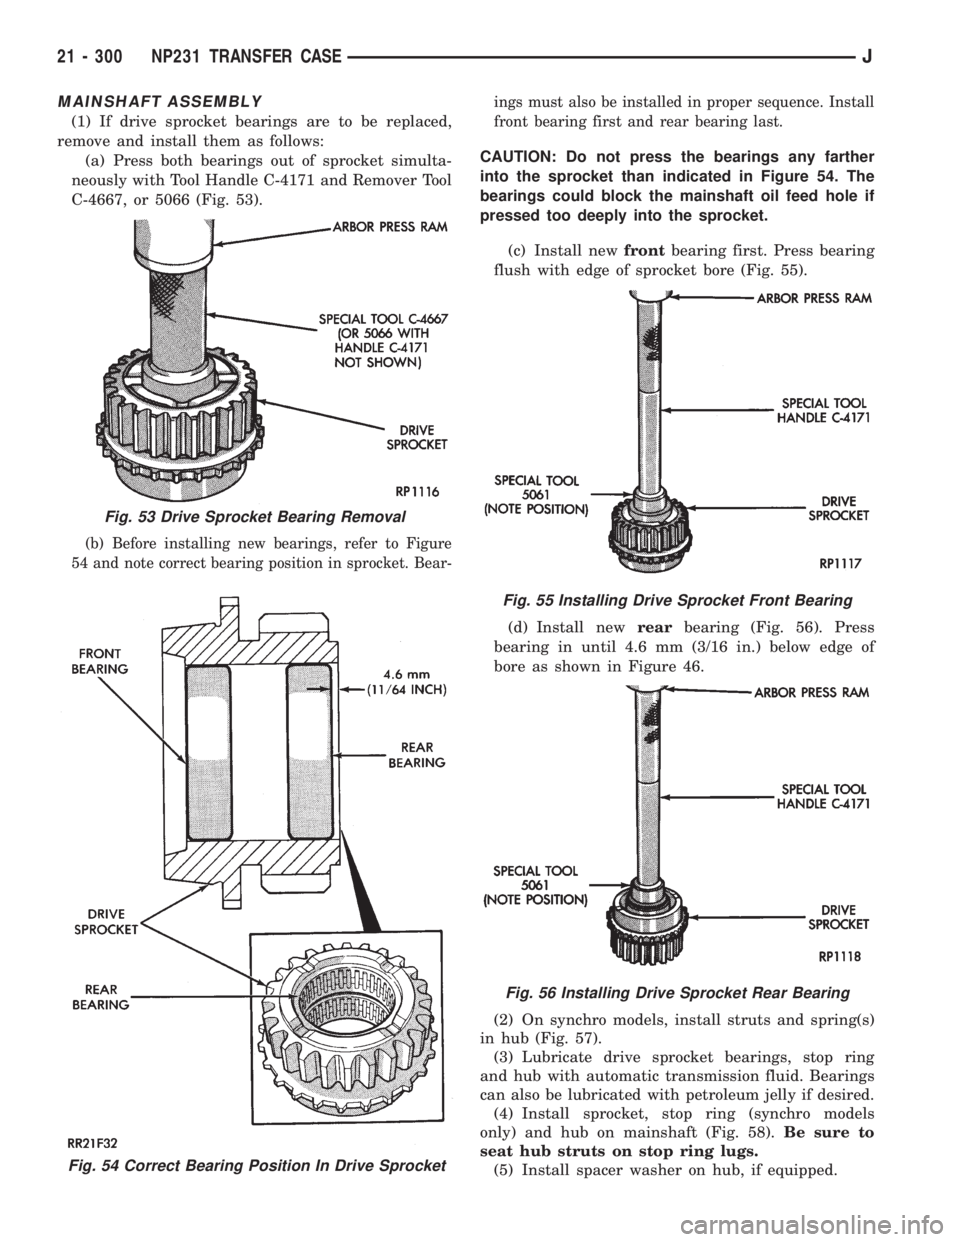
(1) If drive sprocket bearings are to be replaced,
remove and install them as follows:
(a) Press both bearings out of sprocket simulta-
neously with Tool Handle C-4171 and Remover Tool
C-4667, or 5066 (Fig. 53).
(b) Before installing new bearings, refer to Figure
54 and note correct bearing position in sprocket. Bear-ings must also be installed in proper sequence. Install
front bearing first and rear bearing last.
CAUTION: Do not press the bearings any farther
into the sprocket than indicated in Figure 54. The
bearings could block the mainshaft oil feed hole if
pressed too deeply into the sprocket.
(c) Install newfrontbearing first. Press bearing
flush with edge of sprocket bore (Fig. 55).
(d) Install newrearbearing (Fig. 56). Press
bearing in until 4.6 mm (3/16 in.) below edge of
bore as shown in Figure 46.
(2) On synchro models, install struts and spring(s)
in hub (Fig. 57).
(3) Lubricate drive sprocket bearings, stop ring
and hub with automatic transmission fluid. Bearings
can also be lubricated with petroleum jelly if desired.
(4) Install sprocket, stop ring (synchro models
only) and hub on mainshaft (Fig. 58).Be sure to
seat hub struts on stop ring lugs.
(5) Install spacer washer on hub, if equipped.
Fig. 54 Correct Bearing Position In Drive Sprocket
Fig. 53 Drive Sprocket Bearing Removal
Fig. 55 Installing Drive Sprocket Front Bearing
Fig. 56 Installing Drive Sprocket Rear Bearing
21 - 300 NP231 TRANSFER CASEJ