1995 JEEP XJ tow
[x] Cancel search: towPage 68 of 2158
The shock absorber bushings do not require any
type of lubrication. Do not lubricate the bushings to
reduce bushing noise. Grease or mineral oil-base lu-
bricants will deteriorate the bushing rubber.
The shock absorbers are not refillable or adjustable.
If a malfunction occurs, the shock absorber must be
replaced. To test a shock absorber, hold it in an up-
right position and force the piston into and out of the
cylinder four or five times. The action throughout
each stroke should be smooth and even.
SHOCK ABSORBER
REMOVAL
(1) Remove the nut, retainer and grommet from the
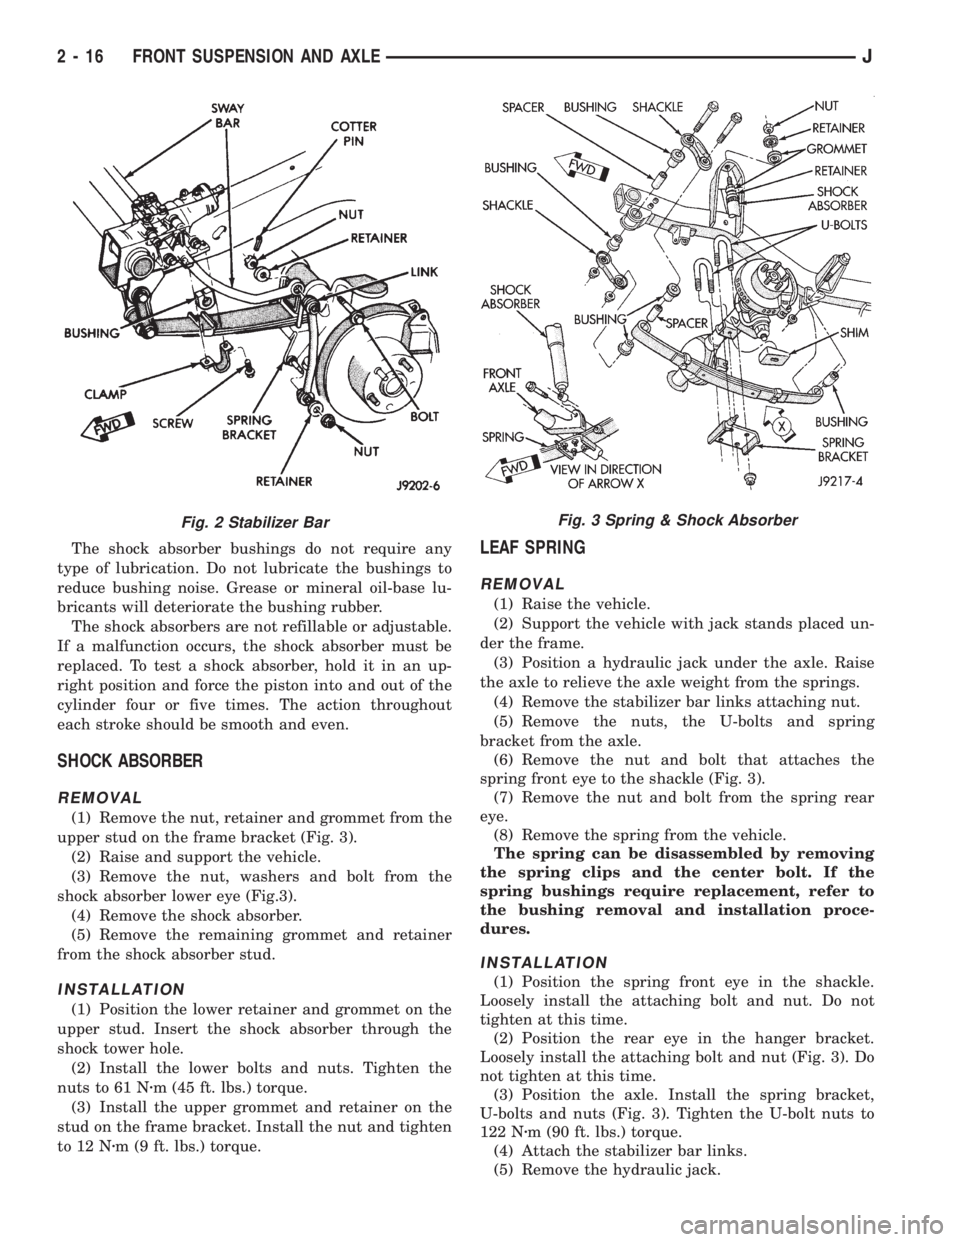
upper stud on the frame bracket (Fig. 3).
(2) Raise and support the vehicle.
(3) Remove the nut, washers and bolt from the
shock absorber lower eye (Fig.3).
(4) Remove the shock absorber.
(5) Remove the remaining grommet and retainer
from the shock absorber stud.
INSTALLATION
(1) Position the lower retainer and grommet on the
upper stud. Insert the shock absorber through the
shock tower hole.
(2) Install the lower bolts and nuts. Tighten the
nuts to 61 Nzm (45 ft. lbs.) torque.
(3) Install the upper grommet and retainer on the
stud on the frame bracket. Install the nut and tighten
to 12 Nzm (9 ft. lbs.) torque.
LEAF SPRING
REMOVAL
(1) Raise the vehicle.
(2) Support the vehicle with jack stands placed un-
der the frame.
(3) Position a hydraulic jack under the axle. Raise
the axle to relieve the axle weight from the springs.
(4) Remove the stabilizer bar links attaching nut.
(5) Remove the nuts, the U-bolts and spring
bracket from the axle.
(6) Remove the nut and bolt that attaches the
spring front eye to the shackle (Fig. 3).
(7) Remove the nut and bolt from the spring rear
eye.
(8) Remove the spring from the vehicle.
The spring can be disassembled by removing
the spring clips and the center bolt. If the
spring bushings require replacement, refer to
the bushing removal and installation proce-
dures.
INSTALLATION
(1) Position the spring front eye in the shackle.
Loosely install the attaching bolt and nut. Do not
tighten at this time.
(2) Position the rear eye in the hanger bracket.
Loosely install the attaching bolt and nut (Fig. 3). Do
not tighten at this time.
(3) Position the axle. Install the spring bracket,
U-bolts and nuts (Fig. 3). Tighten the U-bolt nuts to
122 Nzm (90 ft. lbs.) torque.
(4) Attach the stabilizer bar links.
(5) Remove the hydraulic jack.
Fig. 2 Stabilizer BarFig. 3 Spring & Shock Absorber
2 - 16 FRONT SUSPENSION AND AXLEJ
Page 70 of 2158

AXLE NOISE/VIBRATION DIAGNOSIS
INDEX
page page
Driveline Snap........................... 19
Gear and Bearing Noise.................... 18
General Information....................... 18Low Speed Knock......................... 19
Vibration................................ 19
GENERAL INFORMATION
Axle bearing problem conditions are usually caused
by:
²Insufficient or incorrect lubricant
²Foreign matter/water contamination
²Incorrect bearing preload torque adjustment
²Incorrect backlash (to tight)
When serviced, the bearings must be cleaned thor-
oughly. They should be dried with lint-free shop tow-
els.Never dry bearings with compressed air.
This will overheat them and brinell the bearing
surfaces. This will result in noisy operation af-
ter repair.
Axle gear problem conditions are usually the result
of:
²Insufficient lubrication
²Incorrect or contaminated lubricant
²Overloading (excessive engine torque) or exceeding
vehicle weight capacity
²Incorrect clearance or backlash adjustment
Insufficient lubrication is usually the result of a
housing cover leak. It can also be from worn axle
shaft or pinion gear seals. Check for cracks or porous
areas in the housing or tubes.
Using the wrong lubricant will cause overheating
and gear failure. Gear tooth cracking and bearing
spalling are indicators of this.
Axle component breakage is most often the result
of:
²Severe overloading
²Insufficient lubricant
²Incorrect lubricant
²Improperly tightened components
Overloading occurs when towing heavier than rec-
ommended loads. Component breakage can occur
when the wheels are spun excessively. Incorrect lu-
bricant quantity contributes to breakage. Loose dif-
ferential components can also cause breakage.
Incorrect bearing preload or gear backlash will not
result in component breakage. Mis-adjustment will
produce enough noise to cause service repair before a
failure occurs. If a mis-adjustment condition is not
corrected, component failure can result.
Excessive bearing preload may not be noisy. This
condition will cause high temperature which can re-
sult in bearing failure.
GEAR AND BEARING NOISE
GEAR NOISE
Axle gear noise can be caused by insufficient lubri-
cant. Incorrect backlash, tooth contact, or worn/dam-
aged gears can cause noise.
Gear noise usually happens at a specific speed
range. The range is 30 to 40 mph, or above 50 mph.
The noise can also occur during a specific type of
driving condition. These conditions are acceleration,
deceleration, coast, or constant load.
When road testing, accelerate the vehicle to the
speed range where the noise is the greatest. Shift
out-of-gear and coast through the peak-noise range.
If the noise stops or changes greatly, check for insuf-
ficient lubricant. Incorrect ring gear backlash, or
gear damage can cause noise changes.
Differential side and pinion gears can be checked
by turning the vehicle. They usually do not cause
noise in straight-ahead driving. These gears are
loaded during vehicle turns. If noise does occur dur-
ing vehicle turns, the side or pinion gears could be
worn or damaged. A worn pinion gear mate shaft can
also cause a snapping or a knocking noise.
BEARING NOISE
The axle shaft, differential and pinion gear bear-
ings can all produce noise when worn or damaged.
Bearing noise can be either a whining, or a growling
sound.
Pinion gear bearings have a constant-pitch noise.
This noise changes only with vehicle speed. Pinion
bearing noise will be higher because it rotates at a
faster rate. Drive the vehicle and load the differen-
tial. If bearing noise occurs the pinion rear bearing is
the source of the noise. If the bearing noise is heard
during a coast, front bearing is the source.
Worn, damaged differential bearings usually pro-
duce a low pitch noise. Differential bearing noise is
similar to pinion bearing. The pitch of differential
bearing noise is also constant and varies only with
vehicle speed.
2 - 18 FRONT SUSPENSION AND AXLEJ
Page 83 of 2158

SHIFT MOTORÐREMOVAL/DISASSEMBLY
(1) Disconnect the vacuum and wiring connector
from the shift housing.
(2) Remove indicator switch.
(3) Remove the shift motor housing cover, gasket
and shield from the housing (Fig. 11).
(4) Remove the E-clips from the shift motor hous-
ing and shaft. Remove shift motor and shift fork from
the housing (Fig. 12).
(5) Remove the O-ring seal from the shift motor
shaft.
(6) Clean and inspect all components. If any com-
ponent is excessively worn or damaged, it should be
replaced.
ASSEMBLY/INSTALLATION
(1) Install a new O-ring seal on the shift motor
shaft.
(2) Insert the shift motor shaft through the hole in
the housing and shift fork. The shift fork offset
should be toward the differential.(3) Install the E-clips on the shift motor shaft and
housing.
(4) Install the shift motor housing gasket and
cover.Ensure the shift fork is correctly guided
into the shift collar groove.
(5) Install the shift motor housing shield and at-
taching bolts. Tighten the bolts to 11 Nzm (101 in.
lbs.) torque.
(6) Add 148 ml (5 ounces) of API grade GL 5 hy-
poid gear lubricant to the shift motor housing. Add
lubricant through indicator switch mounting hole.
(7) Install indicator switch, electrical connector
and vacuum harness.
INTERMEDIATE AXLE SHAFTÐREMOVAL/
DISASSEMBLY
Service to the Disconnect axle seals and bearing re-
quire the use of Tool Set 6288 (J34659) and Seal In-
staller 6228.
(1) Remove the vacuum motor housing. Refer to
Shift Motor Removal in this section.
(3) Remove the outer axle shaft. Refer to Hub
Bearing and Axle Shaft in this section.
(4) Remove shift collar and intermediate axle
shaft.
(5) Remove the inner axle shaft seal from the shift
motor housing (Fig. 13).
(6) Remove the intermediate axle shaft bearing
(Fig. 14).
ASSEMBLY/INSTALLATION
(1) Position the bearing on installation tool. Seat
the bearing in the housing bore (Fig. 15).
(2) Clean the inside perimeter of the axle shaft
tube with fine crocus cloth.
(3) Apply a light film of oil to the inside lip of the
new axle shaft seal.
(4) Install the inner axle seal (Fig. 16, 17).
The axle shaft seal primary installation tool
6228-1 will only force the seal partially into the
Fig. 11 Shift Motor Housing and Shift Collar
Fig. 12 Vacuum Shift Motor ComponentsFig. 13 Axle Shaft Inner Seal Removal
JFRONT SUSPENSION AND AXLE 2 - 31
Page 89 of 2158
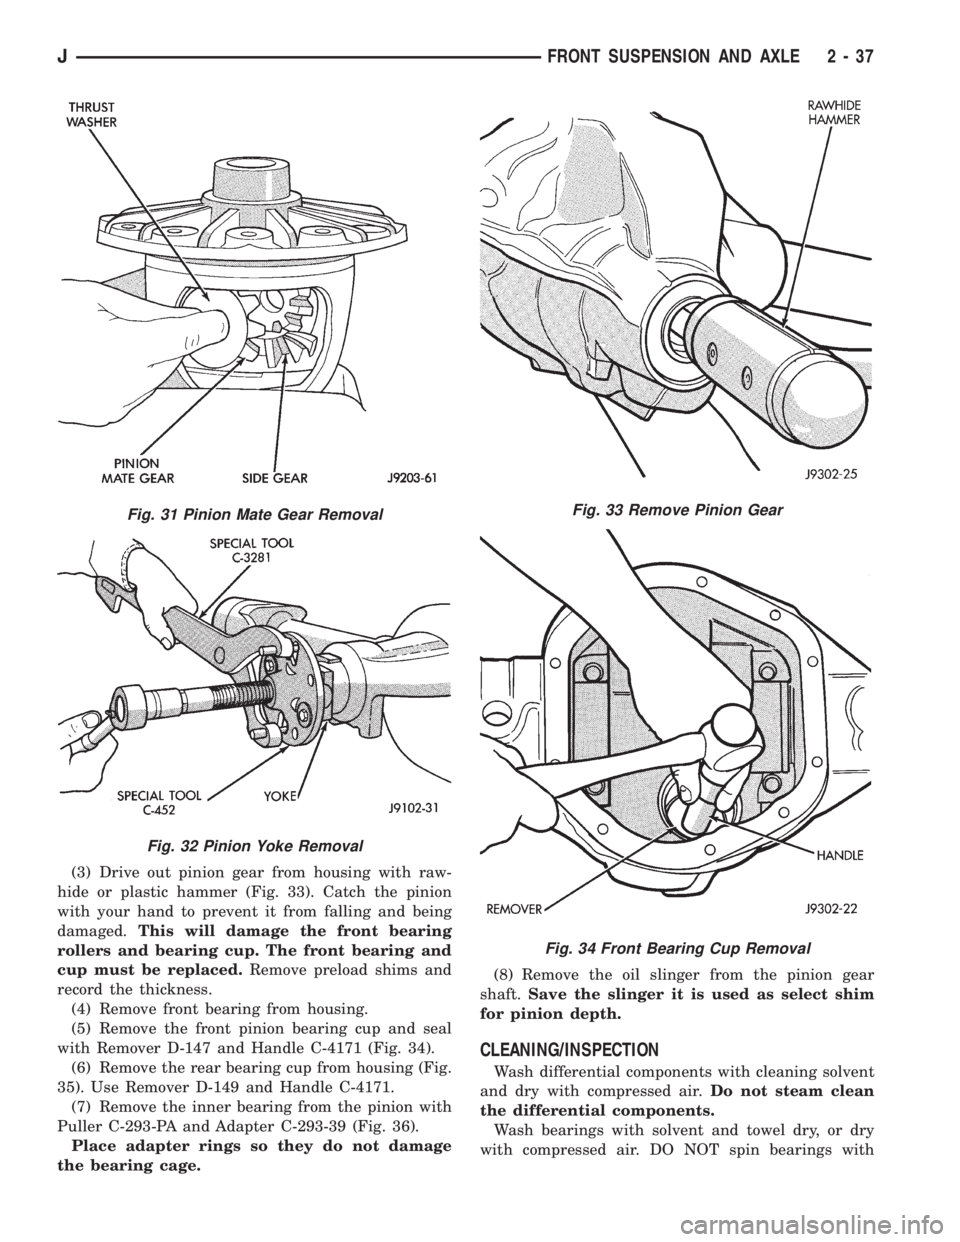
(3) Drive out pinion gear from housing with raw-
hide or plastic hammer (Fig. 33). Catch the pinion
with your hand to prevent it from falling and being
damaged.This will damage the front bearing
rollers and bearing cup. The front bearing and
cup must be replaced.Remove preload shims and
record the thickness.
(4) Remove front bearing from housing.
(5) Remove the front pinion bearing cup and seal
with Remover D-147 and Handle C-4171 (Fig. 34).
(6) Remove the rear bearing cup from housing (Fig.
35). Use Remover D-149 and Handle C-4171.
(7) Remove the inner bearing from the pinion with
Puller C-293-PA and Adapter C-293-39 (Fig. 36).
Place adapter rings so they do not damage
the bearing cage.(8) Remove the oil slinger from the pinion gear
shaft.Save the slinger it is used as select shim
for pinion depth.
CLEANING/INSPECTION
Wash differential components with cleaning solvent
and dry with compressed air.Do not steam clean
the differential components.
Wash bearings with solvent and towel dry, or dry
with compressed air. DO NOT spin bearings with
Fig. 31 Pinion Mate Gear Removal
Fig. 32 Pinion Yoke Removal
Fig. 33 Remove Pinion Gear
Fig. 34 Front Bearing Cup Removal
JFRONT SUSPENSION AND AXLE 2 - 37
Page 110 of 2158
AXLE NOISE/VIBRATION DIAGNOSIS
INDEX
page page
Driveline Snap........................... 10
Gear and Bearing Noise..................... 9
General Information........................ 9
Limited Slip Differential..................... 10Low Speed Knock......................... 10
Rear Axle Alignment....................... 10
Vibration................................ 10
GENERAL INFORMATION
Axle bearing problem conditions are usually caused
by:
²Insufficient or incorrect lubricant
²Foreign matter/water contamination
²Incorrect bearing preload torque adjustment
²Incorrect backlash (to tight)
When serviced, the bearings must be cleaned thor-
oughly. They should be dried with lint-free shop tow-
els.Never dry bearings with compressed air.
This will overheat them and brinell the bearing
surfaces. This will result in noisy operation af-
ter repair.
Axle gear problem conditions are usually the result of:
²Insufficient lubrication
²Incorrect or contaminated lubricant
²Overloading (excessive engine torque) or exceeding
vehicle weight capacity
²Incorrect clearance or backlash adjustment
Insufficient lubrication is usually the result of a
housing cover leak. It can also be from worn axle
shaft or pinion gear seals. Check for cracks or porous
areas in the housing or tubes.
Using the wrong lubricant will cause overheating
and gear failure. Gear tooth cracking and bearing
spalling are indicators of this.
Axle component breakage is most often the result of:
²Severe overloading
²Insufficient lubricant
²Incorrect lubricant
²Improperly tightened components
Overloading occurs when towing heavier than rec-
ommended loads. Component breakage can occur
when the wheels are spun excessively. Incorrect lu-
bricant quantity contributes to breakage. Loose dif-
ferential components can also cause breakage.
Incorrect bearing preload or gear backlash will not
result in component breakage. Mis-adjustment will
produce enough noise to cause service repair before a
failure occurs. If a mis-adjustment condition is not
corrected, component failure can result.
Excessive bearing preload may not be noisy. This
condition will cause high temperature which can re-
sult in bearing failure.
GEAR AND BEARING NOISE
GEAR NOISE
Axle gear noise can be caused by insufficient lubri-
cant. Incorrect backlash, tooth contact, or worn/dam-
aged gears can cause noise.
Gear noise usually happens at a specific speed
range. The range is 30 to 40 mph, or above 50 mph.
The noise can also occur during a specific type of
driving condition. These conditions are acceleration,
deceleration, coast, or constant load.
When road testing, accelerate the vehicle to the
speed range where the noise is the greatest. Shift
out-of-gear and coast through the peak-noise range.
If the noise stops or changes greatly, check for insuf-
ficient lubricant. Incorrect ring gear backlash, or
gear damage can cause noise changes.
Differential side and pinion gears can be checked
by turning the vehicle. They usually do not cause
noise in straight-ahead driving. These gears are
loaded during vehicle turns. If noise does occur dur-
ing vehicle turns, the side or pinion gears could be
worn or damaged. A worn pinion gear mate shaft can
also cause a snapping or a knocking noise.
BEARING NOISE
The axle shaft, differential and pinion gear bear-
ings can all produce noise when worn or damaged.
Bearing noise can be either a whining, or a growling
sound.
Pinion gear bearings have a constant-pitch noise.
This noise changes only with vehicle speed. Pinion
bearing noise will be higher because it rotates at a
faster rate. Drive the vehicle and load the differen-
tial. If bearing noise occurs the pinion rear bearing is
the source of the noise. If the bearing noise is heard
during a coast, front bearing is the source.
Worn, damaged differential bearings usually pro-
duce a low pitch noise. Differential bearing noise is
similar to pinion bearing. The pitch of differential
bearing noise is also constant and varies only with
vehicle speed.
Axle shaft bearings produce noise and vibration
when worn or damaged. The noise generally changes
when the bearings are loaded. Road test the vehicle.
Turn the vehicle sharply to the left and to the right.
JREAR SUSPENSION AND AXLES 3 - 9
Page 114 of 2158

MODEL 35 AXLE
INDEX
page page
Axle Shaft............................... 16
Axle Shaft Seal and Bearing................. 17
Backlash and Contact Pattern Analysis......... 27
Cleaning/Inspection........................ 20
Differential Assembly....................... 21
Differential Disassembly.................... 18
Differential Measurement and Installation........ 25
Differential Removal....................... 18
Drive Axle Assembly ReplacementÐXJ Vehicles . . 14Drive Axle Assembly ReplacementÐYJ Vehicles . . 14
Final Assembly........................... 29
General Information....................... 13
Lubricant Change......................... 13
Lubricant Specifications..................... 13
Pinion Gear Depth Information............... 21
Pinion Measurement and Assembly............ 22
Pinion Removal/Disassembly................. 19
Pinion Shaft Seal Replacement............... 15
GENERAL INFORMATION
The Model 35 housing has an iron center casting
(differential housing) with axle shaft tubes extending
from either side. The tubes are pressed into and
welded to the differential housing to form a one-piece
axle housing.
The integral type housing, hypoid gear design has
the centerline of the pinion set below the centerline
of the ring gear.
The axle has a vent hose to relieve internal pres-
sure caused by lubricant vaporization and internal
expansion.
The axles are equipped with semi-floating axle
shafts, meaning that loads are supported by the axle
shaft and bearings. The axle shafts are retained by
C-clips in the differential side gears.
The cover provides a means for servicing the differ-
ential without removing the axle.
Axles may be equipped with drum or disc brakes.
The axles that are equipped with ABS brake have a
tone ring pressed on the axle shaft. Use care when
removing axle shafts as NOT to damage the tone
wheel or the sensor.
The Model 35 axle has the assembly part number
and gear ratio listed on a tag. The tag is attached to
the housing cover. Build date identification codes are
stamped on the axle shaft tube cover side.
The differential case is a one-piece design. The dif-
ferential pinion mate shaft is retained with a
threaded roll pin. Differential bearing preload and
ring gear backlash is adjusted by the use of spacer
shims. Pinion bearing preload is set and maintained
by the use of a collapsible spacer.
For complete drive axle assembly removal
and installation refer to Drive Axle Assembly
Replacement in this Group.
LUBRICANT SPECIFICATIONS
Multi-purpose, hypoid gear lubricant should be
used for Model 35 axle. The lubricant should haveMIL-L-2105C and API GL 5 quality specifications.
MOPAR Hypoid Gear Lubricant conforms to both of
these specifications.
²Lubricant for Model 35 axle is a thermally stable
SAE 80W-90 gear lubricant.
²Lubricant for Model 35 axle with Trailer Tow is
SAE 75W-140 SYNTHETIC gear lubricant.
²Trac-Lok differentials add 4 oz. of friction modifier.
²Lubricant quantity is 1.66 L (3.50 pts.).
Refer to Group 0, Lubrication and Maintenance for
additional information.
CAUTION: If axle is submerged in water, lubricant
must be replaced immediately to avoid possible
premature axle failure.
LUBRICANT CHANGE
The gear lubricant will drain quicker if the vehicle
has been recently driven.
(1) Raise and support the vehicle.
(2) Remove the lubricant fill hole plug from the dif-
ferential housing cover.
(3) Remove the differential housing cover and
drain the lubricant from the housing.
(4) Clean the housing cavity with a flushing oil,
light engine oil or lint free cloth.Do not use water,
steam, kerosene or gasoline for cleaning.
(5) Remove the sealant from the housing and cover
surfaces.
(6) Apply a bead of MOPARtSilicone Rubber Seal-
ant to the housing cover (Fig. 1).Allow the sealant
to cure for a few minutes.
Install the housing cover within 5 minutes af-
ter applying the sealant. If not installed the
sealant must be removed and another bead ap-
plied.
(7) Install the cover and any identification tag.
Tighten the cover bolts to 41 Nzm (30 ft. lbs.) torque.
(8) Refill differential with Mopar Hypoid Gear Lu-
bricant to bottom of the fill plug hole.
JREAR SUSPENSION AND AXLES 3 - 13
Page 117 of 2158
CAUTION: Exercise care during the bearing preload
torque adjustment. Do not over-tighten, or loosen
and then re-tighten the nut. Do not exceed the bear-
ing preload torque. The collapsible preload spacer
on the shaft will have to be replaced. The bearing
preload torque will be re-adjusted afterward.
(4) Install a socket and inch-pound torque wrench
on the pinion nut.
(5) Rotate the shaft with the torque wrench and
note the torque.
The required preload torque is equal to the
amount recorded during removal plus an addi-
tional 0.56 Nzm (5 in. lbs.).
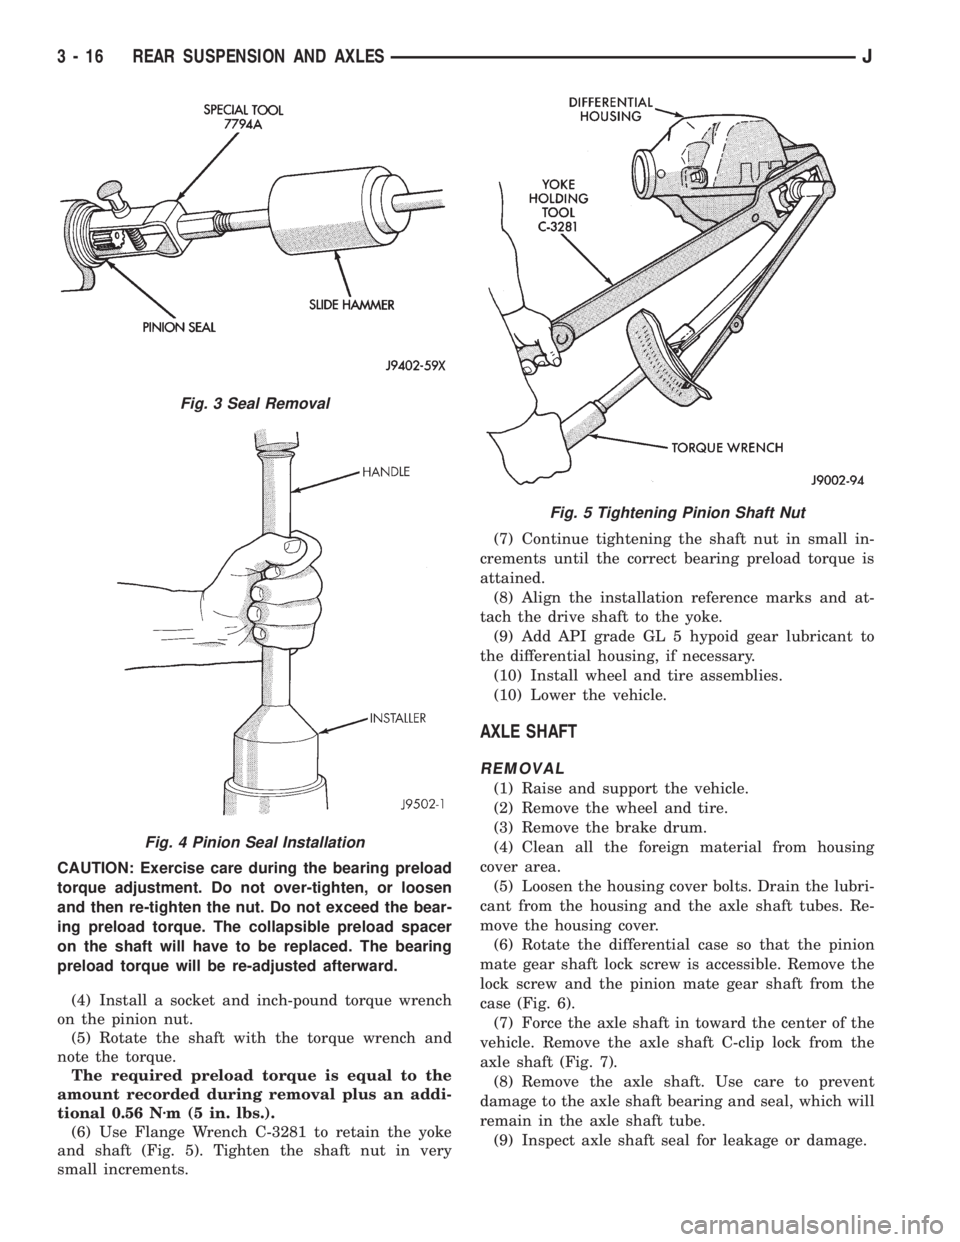
(6) Use Flange Wrench C-3281 to retain the yoke
and shaft (Fig. 5). Tighten the shaft nut in very
small increments.(7) Continue tightening the shaft nut in small in-
crements until the correct bearing preload torque is
attained.
(8) Align the installation reference marks and at-
tach the drive shaft to the yoke.
(9) Add API grade GL 5 hypoid gear lubricant to
the differential housing, if necessary.
(10) Install wheel and tire assemblies.
(10) Lower the vehicle.
AXLE SHAFT
REMOVAL
(1) Raise and support the vehicle.
(2) Remove the wheel and tire.
(3) Remove the brake drum.
(4) Clean all the foreign material from housing
cover area.
(5) Loosen the housing cover bolts. Drain the lubri-
cant from the housing and the axle shaft tubes. Re-
move the housing cover.
(6) Rotate the differential case so that the pinion
mate gear shaft lock screw is accessible. Remove the
lock screw and the pinion mate gear shaft from the
case (Fig. 6).
(7) Force the axle shaft in toward the center of the
vehicle. Remove the axle shaft C-clip lock from the
axle shaft (Fig. 7).
(8) Remove the axle shaft. Use care to prevent
damage to the axle shaft bearing and seal, which will
remain in the axle shaft tube.
(9) Inspect axle shaft seal for leakage or damage.
Fig. 3 Seal Removal
Fig. 4 Pinion Seal Installation
Fig. 5 Tightening Pinion Shaft Nut
3 - 16 REAR SUSPENSION AND AXLESJ
Page 121 of 2158
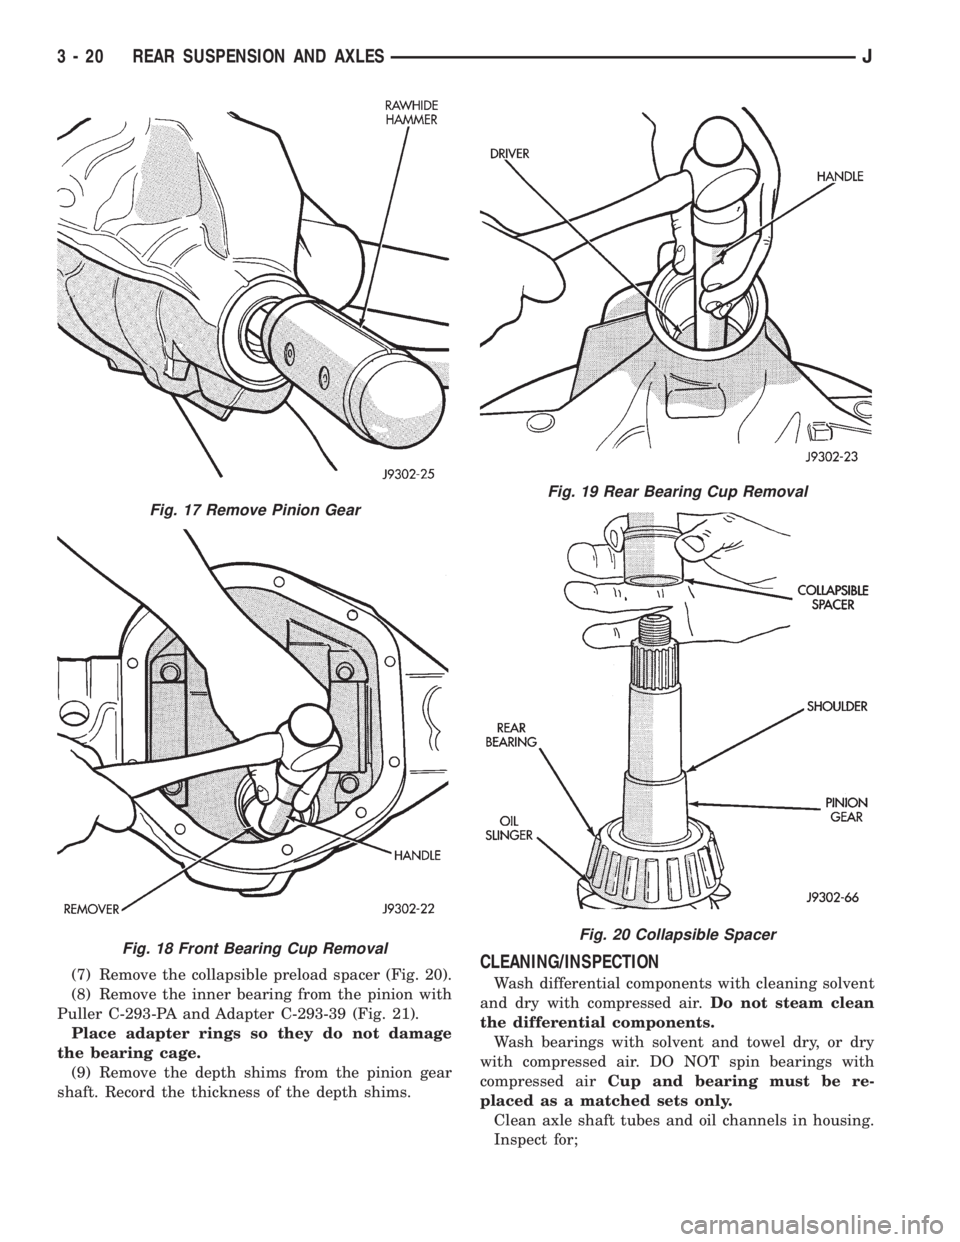
(7) Remove the collapsible preload spacer (Fig. 20).
(8) Remove the inner bearing from the pinion with
Puller C-293-PA and Adapter C-293-39 (Fig. 21).
Place adapter rings so they do not damage
the bearing cage.
(9) Remove the depth shims from the pinion gear
shaft. Record the thickness of the depth shims.CLEANING/INSPECTION
Wash differential components with cleaning solvent
and dry with compressed air.Do not steam clean
the differential components.
Wash bearings with solvent and towel dry, or dry
with compressed air. DO NOT spin bearings with
compressed airCup and bearing must be re-
placed as a matched sets only.
Clean axle shaft tubes and oil channels in housing.
Inspect for;
Fig. 17 Remove Pinion Gear
Fig. 18 Front Bearing Cup Removal
Fig. 19 Rear Bearing Cup Removal
Fig. 20 Collapsible Spacer
3 - 20 REAR SUSPENSION AND AXLESJ