1995 JEEP XJ air conditioning
[x] Cancel search: air conditioningPage 639 of 2158
In the M2 position, the blower motor supplies volt-
age to the resistor block on circuit C6. From circuit
C6 voltage flows through two resistors to the blower
motor on circuit C1.
In the HIGH position, the blower motor switch con-
nects directly to the blower motor on circuit C1. Volt-
age does not pass through the resistor block.
Circuit Z1 provides ground for the blower motor.
AIR CONDITIONING OPERATION
When the A/C-heater control switch is moved to an
A/C position or the defrost position, the Powertrain
Control Module (PCM) receives the A/C select signal
on circuit C90. Circuit C90 connects to cavity 28 of
the PCM.
Circuit also C90 splices to the low pressure switch
and to supply battery voltage to the coil side of the
A/C compressor clutch relay. If the low pressure
switch is closed, circuit C90 connects to circuit C21.
Circuit C21 supplies battery voltage to the A/C cy-
cling switch. Circuit C91 from the A/C cycling switch
provides the A/C request signal to the PCM. Circuit
C91 connects to cavity 27 of the PCM. Circuit Z1 pro-
vides ground for the A/C cycling switch.
After receiving the A/C request signal, the PCM
supplies ground for the A/C compressor clutch relay
on circuit C13. Circuit F12 from fuse 11 in the PDC
supplies battery voltage to the contact side of the A/C
compressor clutch relay. When the PCM grounds the
relay, the contacts close and connect circuit F12 to
circuit C3. Circuit C3 feeds the A/C compressor
clutch.
Also, after receiving the A/C request signal, the
PCM supplies ground for the coil side of the radiator
fan relay on circuit C27 (4.0L engine). Circuit C27
connects to cavity 31 of the PCM. Circuit F12 sup-
plies battery voltage to the coil side of the relay.
When the PCM grounds the coil side of the radia-
tor fan relay, the contacts close and connects circuit
F141 from fuse 4 in the PDC to circuit C25. Circuit
C25 feeds the radiator fan motor. Circuit Z1 provides
ground for the motor.
HELPFUL INFORMATION
Circuit A14 from PDC fuse 2 powers circuit F141
through fuse 15 in the PDC.
RADIATOR FAN RELAY AND MOTOR
In the START or RUN positions, the ignition
switch connects circuit A1 from fuse 6 in the Power
Distribution Center (PDC) to circuit A21. Circuit A21
powers a bus bar in the PDC that feeds circuit F12
through fuse 11. Circuit F12 feeds the coil side of the
radiator fan relay (4.0L engine).
The PCM supplies ground for the coil side of the
radiator fan relay on circuit C27 (4.0L engine). Cir-
cuit C27 connects to cavity 31 of the PCM.
When the PCM grounds the coil side of the radia-
tor fan relay, the contacts close and connects circuit
F141 from fuse 15 in the PDC to circuit C25. Circuit
C25 feeds the radiator fan motor. Circuit Z1 provides
ground for the radiator fan motor.
HELPFUL INFORMATION
Circuit A14 from PDC fuse 2 powers circuit F141
through fuse 15 in the PDC.
DIAGRAM INDEX
Component Page
A/C Compressor Clutch.....................8W-42-4
A/C Compressor Clutch Relay................8W-42-4
A/C Cycling Switch.......................8W-42-4
A/C Low Pressure Switch...................8W-42-4
A/C Mode Select Switch....................8W-42-5
Blower Motor...........................8W-42-3
Blower Motor Switch......................8W-42-3
Blower Motor Resistor.....................8W-42-3
Fuse 2 (PDC)...........................8W-42-5
Fuse 5 (Fuse Block).....................8W-42-3, 5
Fuse 6 (PDC).........................8W-42-3, 5
Fuse 11 (PDC)..........................8W-42-4
Fuse 15 (PDC)..........................8W-42-5
Heater Mode Switch.......................8W-42-3
Ignition Switch......................8W-42-3, 4, 5
Powertrain Control Module..................8W-42-4
Radiator Fan Motor.......................8W-42-5
Radiator Fan Relay.......................8W-42-5
8W - 42 - 2 8W-42 AIR CONDITIONING/HEATERÐXJ VEHICLESJ
Page 819 of 2158
WIRING DIAGRAMS
CONTENTS
page page
8W-01 GENERAL INFORMATIONÐWIRING
DIAGRAMS...................... 8W-01-1
8W-10 FUSE/FUSE BLOCK........... 8W-10-1
8W-11 POWER DISTRIBUTION........ 8W-11-1
8W-15 GROUND DISTRIBUTION....... 8W-15-1
8W-20 CHARGING SYSTEM.......... 8W-20-1
8W-21 STARTING SYSTEM........... 8W-21-1
8W-30 FUEL/IGNITION.............. 8W-30-1
8W-31 TRANSMISSION CONTROLS.... 8W-31-1
8W-32 ANTI-LOCK BRAKES........... 8W-32-1
8W-33 VEHICLE SPEED CONTROL..... 8W-33-1
8W-40 INSTRUMENT CLUSTER....... 8W-40-1
8W-41 HORN/CIGAR LIGHTER........ 8W-41-1
8W-42 AIR CONDITIONING/HEATER.... 8W-42-1
8W-44 INTERIOR LIGHTING.......... 8W-44-1
8W-47 AUDIO SYSTEM.............. 8W-47-18W-48 HEATED REAR WINDOW....... 8W-48-1
8W-49 OVERHEAD CONSOLE.......... 8W-49-1
8W-50 FRONT LIGHTING............ 8W-50-1
8W-51 REAR LIGHTING............. 8W-51-1
8W-52 TURN SIGNALS.............. 8W-52-1
8W-53 WIPERS.................... 8W-53-1
8W-54 TRAILER TOW................ 8W-54-1
8W-60 POWER WINDOWS............ 8W-60-1
8W-61 POWER DOOR LOCKS......... 8W-61-1
8W-62 POWER MIRRORS............ 8W-62-1
8W-63 POWER SEAT................ 8W-63-1
8W-70 SPLICE INFORMATION........ 8W-70-1
8W-80 CONNECTOR PIN OUTS....... 8W-80-1
8W-90 CONNECTOR LOCATIONS...... 8W-90-1
8W-95 SPLICE LOCATIONS........... 8W-95-1
HOW TO USE THIS GROUP
The purpose of this group is to show the electrical
circuits in a clear, simple fashion and to make trou-
bleshooting easier. Components that work together
are shown together. All electrical components used in
a specific system are shown on one diagram. The feed
for a system is shown at the top of the page. All
wires, connectors, splices, and components are shown
in the flow of current to the bottom of the page. Wir-
ing which is not part of the circuit represented is ref-
erenced to another page/section, where the complete
circuit is shown. In addition, all switches, compo-
nents, and modules are shown in theat rest posi-
tion with the doors closed and the key removed
from the ignition.
If a component is part of several different circuits,
it is shown in the diagram for each. For example, the
headlamp switch is the main part of the exterior
lighting, but it also affects the interior lighting and
the chime warning system.
It is important to realize that no attempt is
made on the diagrams to represent components
and wiring as they appear on the vehicle. For
example, a short piece of wire is treated the
same as a long one. In addition, switches and
other components are shown as simply as pos-
sible, with regard to function only.
The wiring diagram show circuits for all wheel-
bases. If there is a difference in systems or compo-
nents between wheel-bases, an identifier is placed
next to the component.
SECTION IDENTIFICATION
Sections in Group 8W are organized by sub-sys-
tems. The sections contain circuit operation descrip-
tions, helpful information, and system diagrams. The
intention is to organize information by system, con-
sistently from year to year.
CONNECTOR LOCATIONS
Section 8W-90 contains Connector Location illus-
trations. The illustrations contain the connector
number and component identification. Connector Lo-
cation charts in Section 8W-90 reference the illustra-
tion number for components and connectors.
Section 8W-80 shows each connector and the cir-
cuits involved with that connector. The connectors
are identified using the number on the Diagram
pages.
SPLICE LOCATIONS
Splice Location charts in Section 8W-70 show the
entire splice, and provide references to other sections
the splice serves.
Section 8W-95 contains illustrations that show the
general location of the splices in each harness. The
illustrations show the splice by number, and provide
a written location.
JWIRING DIAGRAMSÐXJ-RHD 8W - 1 - 1
Page 907 of 2158
AIR CONDITIONING/HEATER
CONTENTS
page page
A/C-HEATER SYSTEM...................... 1 HEATERSYSTEM......................... 1
GENERAL INFORMATION
This section of the wiring diagrams is divided into
two sub-sections; Heater, and A/C and Heater. Whenreferring to the circuit descriptions or wiring dia-
grams, ensure that you use the correct sub-section.
HEATER SYSTEM
BLOWER MOTOR
In the RUN or ACCESSORY position, the ignition
switch connects circuit A1 from fuse 6 in the PDC to
circuit A48. Circuit A48 supplies battery voltage to
fuse 4 in the fuse block. Fuse 4 supplies power to the
heat mode switch on circuit C7.
Circuit C43 from the heat mode switch splices to
supply voltage to the blower motor switch and the
blower motor resistor block. The blower motor switch
sets blower motor speed to HIGH, M1, M2, or LOW.
When the blower motor switch is in the LOW posi-
tion, circuit C43 from the heat mode supplies voltage
to the resistor block. Voltage does not pass through
the blower motor switch in the LOW position.
In the M1 position, the blower motor switch sup-
plies voltage to the resistor block on circuit C4. Fromcircuit C4, voltage passes through three resistors in
the resistor block to the blower motor on circuit C1.
In the M2 position, the blower motor supplies volt-
age to the resistor block on circuit C6. From circuit
C6 voltage flows through two resistors to the blower
motor on circuit C1.
In the HIGH position, the blower motor switch con-
nects directly to the blower motor on circuit C1. Volt-
age does not pass through the resistor block in the
HIGH position.
Circuit Z1 provides ground for the blower motor.
DIAGRAM INDEX
AC/HEATER SYSTEM
GENERAL INFORMATION
Several fuses supply power for the air conditioning/
heater system. In the START or RUN positions, the
ignition switch connects circuit A1 from fuse 6 in the
Power Distribution Center (PDC) to circuit A21. Cir-
cuit A21 powers a bus bar in the PDC that feeds cir-
cuit F12 through fuse 11. Circuit F12 feeds the
contact side of the A/C compressor clutch relay and
the coil side of the radiator fan relay.
In the RUN or ACCESSORY position, the ignition
switch connects circuit A1 from fuse 6 in the PDC to
circuit A48. Circuit A48 supplies battery voltage tofuse 4 in the fuse block. Fuse 4 supplies power to the
A/C-Heater control switch on circuit C7.
Fuse 15 in the PDC supplies battery voltage to the
contact side of the radiator fan relay on circuit F141.
Circuit A14 from fuse 2 in the PDC powers PDC fuse
15.
BLOWER MOTOR
In the RUN or ACCESSORY position, the ignition
switch connects circuit A1 from fuse 6 in the PDC to
circuit A48. Circuit A48 supplies battery voltage to
J8W-42 AIR CONDITIONING/HEATERÐXJ-RHD 8W - 42 - 1
Page 908 of 2158
fuse 4 in the fuse block. Fuse 4 supplies power to the
A/C-Heater control switch on circuit C7.
Circuit C43 from the A/C-heater switch splices to
supply voltage to the blower motor switch and the
blower motor resistor block. The blower motor switch
sets blower motor speed to HIGH, M1, M2, or LOW.
When the blower motor switch is in the LOW posi-
tion, circuit C43 from the A/C-Heater switch supplies
voltage to the resistor block. Voltage does not pass
through the blower motor switch in the LOW position
In the M1 position, the blower motor switch sup-
plies voltage to the resistor block on circuit C4. From
circuit C4, voltage passes through three resistors in
the resistor block to the blower motor on circuit C1.
In the M2 position, the blower motor supplies volt-
age to the resistor block on circuit C6. From circuit
C6 voltage flows through two resistors to the blower
motor on circuit C1.
In the HIGH position, the blower motor switch con-
nects directly to the blower motor on circuit C1. Volt-
age does not pass through the resistor block in the
HIGH position.
Circuit Z1 provides ground for the blower motor.
AIR CONDITIONING OPERATION
When the A/C-heater control switch is moved to an
A/C position or the defrost position, the Powertrain
Control Module (PCM) receives the A/C select signal
on circuit C90. Circuit C90 connects to cavity 28 of
the PCM.
Circuit also C90 splices to the low pressure switch
and to supply battery voltage to the coil side of the
A/C compressor clutch relay. If the low pressure
switch is closed, circuit C90 connects to circuit C21.
Circuit C21 supplies battery voltage to the A/C cy-
cling switch. Circuit C91 from the A/C cycling switch
provides the A/C request signal to the PCM. Circuit
C91 connects to cavity 27 of the PCM. Circuit Z1 pro-
vides ground for the A/C cycling switch.
After receiving the A/C request signal, the PCM
supplies ground for the A/C compressor clutch relay
on circuit C13. Circuit F12 from fuse 11 in the PDC
supplies battery voltage to the contact side of the A/C
compressor clutch relay. When the PCM grounds the
relay, the contacts close and connect circuit F12 to
circuit C3. Circuit C3 feeds the A/C compressor
clutch.
Also after receiving the A/C request signal, the
PCM supplies ground for the coil side of the radiator
fan relay on circuit C27 (4.0L engine). Circuit C27
connects to cavity 31 of the PCM. Circuit F12 sup-
plies battery voltage to the coil side of the relay.When the PCM grounds the coil side of the radia-
tor fan relay, the contacts close and connect circuit
F141 from fuse 15 in the PDC to circuit C25. Circuit
C25 feeds the radiator fan motor. Circuit Z1 provides
ground for the motor.
HELPFUL INFORMATION
Circuit A14 from PDC fuse 2 powers circuit F141
through fuse 15 in the PDC.
RADIATOR FAN RELAY AND MOTOR
In the START or RUN positions, the ignition
switch connects circuit A1 from fuse 6 in the Power
Distribution Center (PDC) to circuit A21. Circuit A21
powers a bus bar in the PDC that feeds circuit F12
through fuse 11. Circuit F12 feeds the coil side of the
radiator fan relay.
The PCM supplies ground for the coil side of the
radiator fan relay on circuit C27. Circuit C27 con-
nects to cavity 31 of the PCM.
When the PCM grounds the coil side of the radia-
tor fan relay, the contacts close and connect circuit
F141 from fuse 15 in the PDC to circuit C25. Circuit
C25 feeds the radiator fan motor. Circuit Z1 provides
ground for the radiator fan motor.
HELPFUL INFORMATION
Circuit A14 from PDC fuse 2 powers circuit F141
through fuse 15 in the PDC.
DIAGRAM INDEX
Component Page
A/C Compressor Clutch.....................8W-42-4
A/C Compressor Clutch Relay................8W-42-4
A/C Cycling Switch.......................8W-42-4
A/C Low Pressure Switch...................8W-42-4
A/C Mode Select Switch....................8W-42-5
Blower Motor...........................8W-42-3
Blower Motor Switch......................8W-42-3
Blower Motor Resistor.....................8W-42-3
Fuse 2 (PDC)...........................8W-42-5
Fuse 4 (Fuse Block).....................8W-42-3, 5
Fuse 6 (PDC).......................8W-42-3, 4, 5
Fuse 11 (PDC)..........................8W-42-4
Fuse 15 (PDC)..........................8W-42-5
Heater Mode Switch.......................8W-42-3
Ignition Switch......................8W-42-3, 4, 5
Powertrain Control Module..................8W-42-4
Radiator Fan Motor.......................8W-42-5
Radiator Fan Relay.......................8W-42-5
8W - 42 - 2 8W-42 AIR CONDITIONING/HEATERÐXJ-RHDJ
Page 1094 of 2158
WIRING DIAGRAMS
CONTENTS
page page
8W-01 GENERAL INFORMATIONÐWIRING
DIAGRAMS...................... 8W-01-1
8W-10 FUSE/FUSE BLOCK........... 8W-10-1
8W-11 POWER DISTRIBUTION........ 8W-11-1
8W-15 GROUND DISTRIBUTION....... 8W-15-1
8W-20 CHARGING SYSTEM.......... 8W-20-1
8W-21 STARTING SYSTEM........... 8W-21-1
8W-30 FUEL/IGNITION.............. 8W-30-1
8W-31 TRANSMISSION CONTROLS.... 8W-31-1
8W-32 ANTI-LOCK BRAKES.......... 8W-32-1
8W-40 INSTRUMENT CLUSTER....... 8W-40-1
8W-41 HORN/CIGAR LIGHTER........ 8W-41-18W-42 AIR CONDITIONING/HEATER.... 8W-42-1
8W-44 INTERIOR LIGHTING.......... 8W-44-1
8W-47 AUDIO SYSTEM.............. 8W-47-1
8W-48 HEATED REAR WINDOW....... 8W-48-1
8W-50 FRONT LIGHTING............ 8W-50-1
8W-51 REAR LIGHTING............. 8W-51-1
8W-52 TURN SIGNALS.............. 8W-52-1
8W-53 WIPERS.................... 8W-53-1
8W-70 SPLICE INFORMATION........ 8W-70-1
8W-80 CONNECTOR PIN OUTS....... 8W-80-1
8W-90 CONNECTOR LOCATIONS...... 8W-90-1
8W-95 SPLICE LOCATIONS........... 8W-95-1
HOW TO USE THIS GROUP
The purpose of this group is to show the electrical
circuits in a clear, simple fashion and to make trou-
bleshooting easier. Components that work together
are shown together. All electrical components used in
a specific system are shown on one diagram. The feed
for a system is shown at the top of the page. All
wires, connectors, splices, and components are shown
in the flow of current to the bottom of the page. Wir-
ing which is not part of the circuit represented is ref-
erenced to another page/section, where the complete
circuit is shown. In addition, all switches, compo-
nents, and modules are shown in theat rest posi-
tion with the doors closed and the key removed
from the ignition.
If a component is part of several different circuits,
it is shown in the diagram for each. For example, the
headlamp switch is the main part of the exterior
lighting, but it also affects the interior lighting and
the chime warning system.
It is important to realize that no attempt is
made on the diagrams to represent components
and wiring as they appear on the vehicle. For
example, a short piece of wire is treated the
same as a long one. In addition, switches and
other components are shown as simply as pos-
sible, with regard to function only.
The wiring diagram show circuits for all wheel-
bases. If there is a difference in systems or compo-
nents between wheel-bases, an identifier is placed
next to the component.
SECTION IDENTIFICATION
Sections in Group 8W are organized by sub-sys-
tems. The sections contain circuit operation descrip-
tions, helpful information, and system diagrams. The
intention is to organize information by system, con-
sistently from year to year.
CONNECTOR LOCATIONS
Section 8W-90 contains Connector Location illus-
trations. The illustrations contain the connector
number and component identification. Connector Lo-
cation charts in Section 8W-90 reference the illustra-
tion number for components and connectors.
Section 8W-80 shows each connector and the cir-
cuits involved with that connector. The connectors
are identified using the number on the Diagram
pages.
SPLICE LOCATIONS
Splice Location charts in Section 8W-70 show the
entire splice, and provide references to other sections
the splice serves.
Section 8W-95 contains illustrations that show the
general location of the splices in each harness. The
illustrations show the splice by number, and provide
a written location.
JWIRING DIAGRAMSÐÐYJ VEHICLES 8W - 1 - 1
Page 1168 of 2158
AIR CONDITIONING/HEATER
CONTENTS
page page
HEATER AND AIR CONDITIONING........... 2 HEATERSYSTEM......................... 1
GENERAL INFORMATION
This section of the wiring diagrams is divided into
two sub-sections; Heater, and A/C-Heater. When re-
ferring to the circuit descriptions or wiring diagrams,
ensure that you use the correct sub-section.
HEATER SYSTEM
HEATER
In the RUN position, the ignition switch connects
circuit A1 from fuse 4 in the Power Distribution Cen-
ter (PDC) to circuit A22. Circuit A22 powers a bus
bar in the fuse block that supplies voltage to circuit
C1 through fuse 12.
A heater-off switch in circuit C1 opens when the
heater controls are in the VENT position. When the
heater-off switch closes, circuit C1 supplies battery
voltage to the blower motor switch. The switch sets
blower motor speed to HIGH, MEDIUM, LOW or
OFF.
The switch connects to the blower motor resistor
block in the LOW and MEDIUM positions and di-
rectly to the blower motor in the HIGH position. The
resistor block contains two resistors connected in se-
ries. Circuit C7 connects the resistor block to the
blower motor.
From the blower motor resistor block, circuit C7 is
double crimped at the HIGH terminal of the blower
motor switch. Circuit C7 continues to the blower mo-
tor from the blower motor switch.
When the blower motor switch is in the LOW posi-
tion, it supplies voltage to the resistor block on cir-
cuit C4. From circuit C4, voltage passes through both
resistors in the resistor block to the blower motor on
circuit C7.In the MEDIUM position, the blower motor sup-
plies voltage to the resistor block on circuit C5. From
circuit C5 voltage flows through one resistor to the
blower motor on circuit C7.
In the HIGH position, the blower motor switch con-
nects directly to the blower motor on circuit C7. Volt-
age does not pass through the resistor block.
Circuit Z1 provides ground for the blower motor.
HELPFUL INFORMATION
²Check fuse 4 in the PDC.
²Check fuse 12 in the fuse block.
DIAGRAM INDEX
Component Page
Blower Motor...........................8W-42-3
Blower Motor Resistor.....................8W-42-3
Blower Motor Switch......................8W-42-3
Fuse 4 (PDC)...........................8W-42-3
Fuse 12 (Fuse Block)......................8W-42-3
Heater Switch...........................8W-42-3
Ignition Switch..........................8W-42-3
J8W-42 AIR CONDITIONING/HEATERÐYJ VEHICLES 8W - 42 - 1
Page 1169 of 2158
AIR CONDITIONING AND HEATER
GENERAL INFORMATION
On vehicles built with the 2.5L engine, the electri-
cal system has provisions for dealer installed air con-
ditioning. The provisions consist of two connectors
which include circuitry for:
²Circuit C1 - Ignition feed
²Circuit C21 - Blower motor switch
²Circuit C91 - A/C request signal
²Circuit C20 - A/C select signal
²Circuit C13 - Ground for coil side of A/C compres-
sor clutch relay
²Circuit G5 - Battery voltage for coil side of A/C
compressor clutch relay
A/C COMPRESSOR
When the ignition switch is in the RUN position it
connects circuit A1 from fuse 4 in the Power Distri-
bution Center (PDC) to circuit A22. Circuit A22 sup-
plies battery voltage to fuse 12 in the fuse block.
Fuse 12 powers circuit C1.
Circuit C1 supplies battery voltage to the A/C
blower switch. Circuit C21 connects the A/C blower
switch to the A/C low pressure switch.
When the operator selects A/C operation, the A/C
blower switch provides the A/C request signal to cav-
ity 27 of the Powertrain Control Module (PCM) on
circuit C91. At the same time, the blower switch sup-
plies voltage through the A/C thermostat to circuit
C21.
Circuit C21 supplies voltage to the A/C low pres-
sure switch. When the A/C low pressure switch
closes, circuit C20 provides battery voltage to the
contact side of the A/C compressor clutch relay and
provides the A/C select signal to the PCM. Circuit
C20 is double crimped at the contact side of the re-
lay. The C20 circuit branch from the relay supplies
the A/C select input to cavity 28 of the PCM.
After receiving the A/C request signal, the PCM en-
ergizes the A/C compressor clutch relay by providing
ground for the coil side of the relay on circuit C13.
Circuit C13 connects to cavity 34 of the PCM.
Circuit G5 from fuse 9 in the fuse block supplies
voltage to the coil side of the relay. In the START or
RUN positions the ignition switch connects circuit A1
from fuse 4 in the PDC with circuit A21. Circuit A21
connects to the fuse block bus bar that powers circuit
C5 through fuse 9.
When the PCM energizes the A/C compressor
clutch relay, the relay switches from its normally
grounded position to connect circuit C20 to circuit
C3. Circuit C3 supplies voltage to the case grounded
A/C compressor clutch.
HELPFUL INFORMATION
²Circuit G5 is double crimped at the coil side of the
A/C compressor clutch relay. The G5 branch from the
relay continues to the back-up lamp switch.
²Circuit Z1 provides ground for the A/C compressor
clutch relay when the relay is in its normally
grounded position.
A/C-HEATER BLOWER MOTOR
When the ignition switch is in the RUN position it
connects circuit A1 from fuse 4 in the Power Distri-
bution Center (PDC) to circuit A22. Circuit A22 sup-
plies battery voltage to fuse 12 in the fuse block.
Fuse 12 powers circuit C1.
Circuit C1 supplies battery voltage to the A/C
blower switch. In the LOW position, the A/C blower
switch supplies voltage to the low speed brush of the
blower motor. In the MEDIUM position, the switch
supplies voltage to the medium speed bush of the
blower motor. In the HIGH position, the switch sup-
plies voltage to the high speed brush of the blower
motor.
The blower motor has a field jumper. The ground
circuit for the blower motor connects to the cigar
lighter. Circuit Z1 provides ground for the blower mo-
tor and the cigar lighter.
HELPFUL INFORMATION
²Check fuse 4 in the PDC.
²Check fuse 12 in the fuse block.
DIAGRAM INDEX
Component Page
A/C Compressor Clutch.....................8W-42-4
A/C Compressor Clutch Relay................8W-42-4
A/C Thermostat..........................8W-42-5
Blower Motor...........................8W-42-5
Blower Motor Switch......................8W-42-5
Fuse 4 (PDC).........................8W-42-4, 6
Fuse 7 (Fuse Block).......................8W-42-6
Fuse 9 (Fuse Block).....................8W-42-4, 6
Fuse 12 (Fuse Block)....................8W-42-4, 6
Ignition Switch........................8W-42-4, 6
Powertrain Control Module.................8W-42-4, 6
8W - 42 - 2 8W-42 AIR CONDITIONING/HEATERÐYJ VEHICLESJ
Page 1297 of 2158
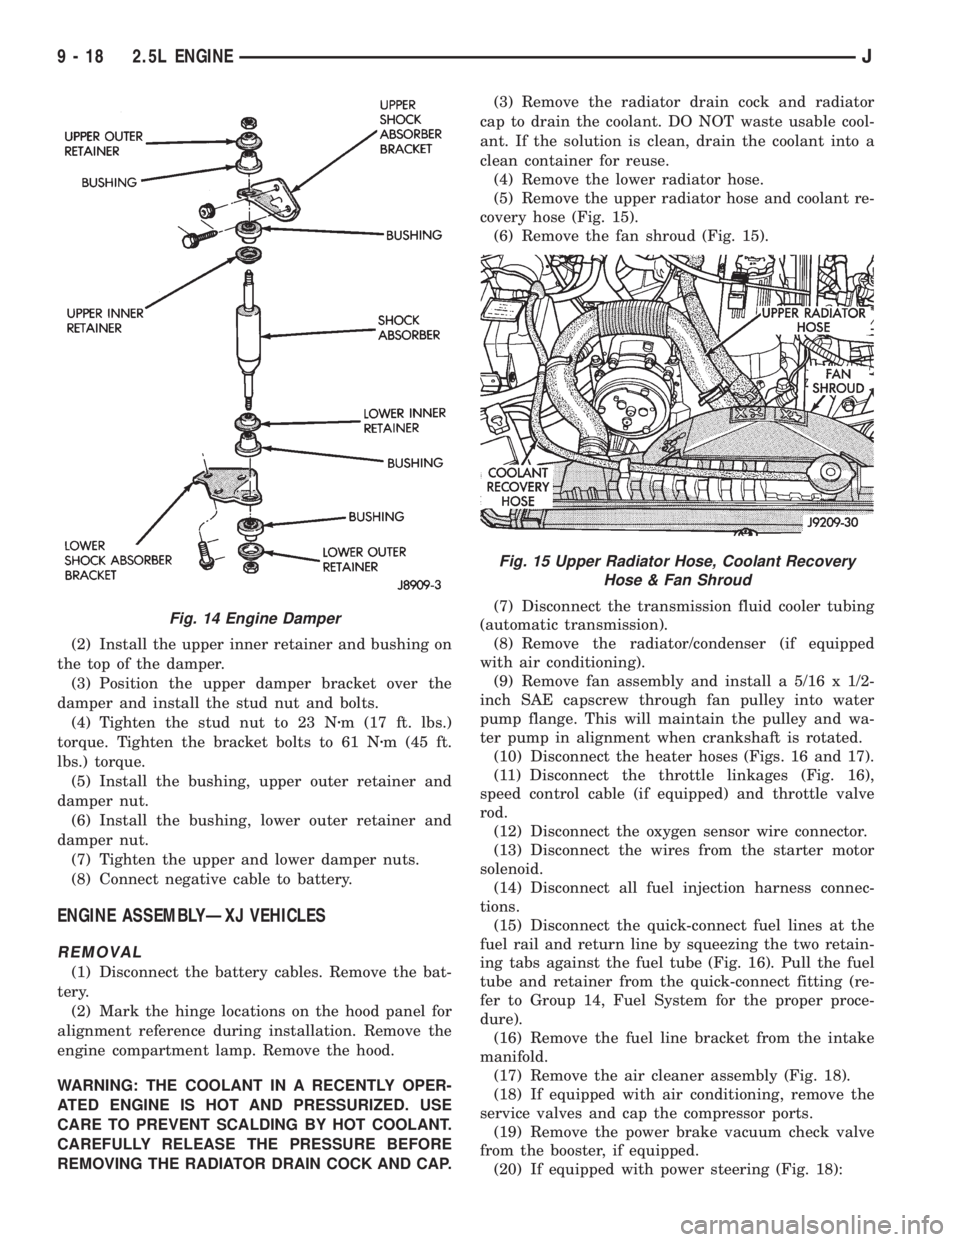
(2) Install the upper inner retainer and bushing on
the top of the damper.
(3) Position the upper damper bracket over the
damper and install the stud nut and bolts.
(4) Tighten the stud nut to 23 Nzm (17 ft. lbs.)
torque. Tighten the bracket bolts to 61 Nzm (45 ft.
lbs.) torque.
(5) Install the bushing, upper outer retainer and
damper nut.
(6) Install the bushing, lower outer retainer and
damper nut.
(7) Tighten the upper and lower damper nuts.
(8) Connect negative cable to battery.
ENGINE ASSEMBLYÐXJ VEHICLES
REMOVAL
(1) Disconnect the battery cables. Remove the bat-
tery.
(2) Mark the hinge locations on the hood panel for
alignment reference during installation. Remove the
engine compartment lamp. Remove the hood.
WARNING: THE COOLANT IN A RECENTLY OPER-
ATED ENGINE IS HOT AND PRESSURIZED. USE
CARE TO PREVENT SCALDING BY HOT COOLANT.
CAREFULLY RELEASE THE PRESSURE BEFORE
REMOVING THE RADIATOR DRAIN COCK AND CAP.(3) Remove the radiator drain cock and radiator
cap to drain the coolant. DO NOT waste usable cool-
ant. If the solution is clean, drain the coolant into a
clean container for reuse.
(4) Remove the lower radiator hose.
(5) Remove the upper radiator hose and coolant re-
covery hose (Fig. 15).
(6) Remove the fan shroud (Fig. 15).
(7) Disconnect the transmission fluid cooler tubing
(automatic transmission).
(8) Remove the radiator/condenser (if equipped
with air conditioning).
(9) Remove fan assembly and install a 5/16 x 1/2-
inch SAE capscrew through fan pulley into water
pump flange. This will maintain the pulley and wa-
ter pump in alignment when crankshaft is rotated.
(10) Disconnect the heater hoses (Figs. 16 and 17).
(11) Disconnect the throttle linkages (Fig. 16),
speed control cable (if equipped) and throttle valve
rod.
(12) Disconnect the oxygen sensor wire connector.
(13) Disconnect the wires from the starter motor
solenoid.
(14) Disconnect all fuel injection harness connec-
tions.
(15) Disconnect the quick-connect fuel lines at the
fuel rail and return line by squeezing the two retain-
ing tabs against the fuel tube (Fig. 16). Pull the fuel
tube and retainer from the quick-connect fitting (re-
fer to Group 14, Fuel System for the proper proce-
dure).
(16) Remove the fuel line bracket from the intake
manifold.
(17) Remove the air cleaner assembly (Fig. 18).
(18) If equipped with air conditioning, remove the
service valves and cap the compressor ports.
(19) Remove the power brake vacuum check valve
from the booster, if equipped.
(20) If equipped with power steering (Fig. 18):
Fig. 14 Engine Damper
Fig. 15 Upper Radiator Hose, Coolant Recovery
Hose & Fan Shroud
9 - 18 2.5L ENGINEJ