Page 39 of 240
Gauges
Speedometer
U.S. Models This shows your speed in miles per hour (mph). The smaller inner
numbers are the speed in kilometers
per hour (km/h).
Canadian Models
This shows your speed in kilometers per hour (km/h). The smaller inner
numbers are the speed in miles per
hour (mph).
Trip Meter
This meter shows the number of miles (U.S.) or kilometers (Canada)driven since you last reset it. To
reset it, push the trip meter reset
button.
Odometer
The odometer shows the total dis- tance your car has been driven. It
measures miles in U.S. models and
kilometers in Canadian models. It is illegal under federal law (in the
U.S.) and provincial regulations (inCanada) to disconnect, reset, or alter
the odometer with the intent to change the number of miles or
kilometers indicated.
Instruments and Controls
FUEL GAUGE
SPEEDOMETER
TRIP METERTEMPERATURE
GAUGE
MAINTENANCE REQUIRED
INDICATOR ODOMETER
TRIP METER
RESET BUTTONProCarManuals.comMain Menu Table of Contents s t
Page 40 of 240

Gauges
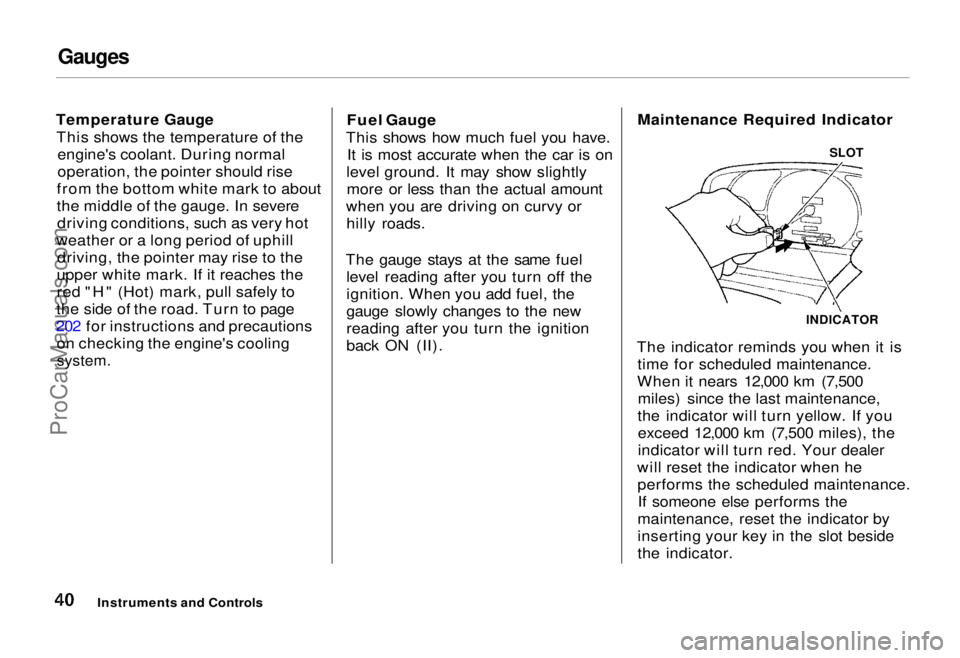
Temperature Gauge This shows the temperature of the engine's coolant. During normal
operation, the pointer should rise
from the bottom white mark to about
the middle of the gauge. In severe driving conditions, such as very hot
weather or a long period of uphill driving, the pointer may rise to the
upper white mark. If it reaches the
red "H" (Hot) mark, pull safely to
the side of the road. Turn to page
202 for instructions and precautions on checking the engine's cooling
system.
Fuel Gauge
This shows how much fuel you have. It is most accurate when the car is on
level ground. It may show slightly more or less than the actual amount
when you are driving on curvy or hilly roads.
The gauge stays at the same fuel level reading after you turn off the
ignition. When you add fuel, the
gauge slowly changes to the new
reading after you turn the ignition
back ON (II). Maintenance Required Indicator
The indicator reminds you when it is time for scheduled maintenance.
When it nears 12,000 km (7,500 miles) since the last maintenance,
the indicator will turn yellow. If you exceed 12,000 km (7,500 miles), the
indicator will turn red. Your dealer
will reset the indicator when he performs the scheduled maintenance.If someone else performs the
maintenance, reset the indicator by
inserting your key in the slot beside
the indicator.
Instruments and Controls
INDICATOR
SLOTProCarManuals.comMain Menu Table of Contents s t
Page 68 of 240
Parking Brake, Digital Clock
Parking Brake
To apply the parking brake, pull the lever up fully. To release it, pull upslightly, push the button, and lower
the lever. The parking brake light on
the instrument panel should go out
when the parking brake is fully
released (see page 36). If you try to drive the car without releasing the
parking brake, the ABS cannot work
properly.
Driving the car with the parking brake
applied can damage the rear brakes
and axles.
Digital Clock
The digital clock displays the time with the ignition switch ON (II).
To set the clock:
1. Turn the ignition switch ON (II) to display the time.
Instruments and Controls NOTICE
HOUR
MIN
RESET
PARKING BRAKE LEVERProCarManuals.comMain Menu Table of Contents s t
Page 69 of 240
Digital Clock, Beverage Holder
2. Press and hold the HOUR button until the hour advances to the
desired time.
3. Press and hold the MIN. button until the numbers advance to thedesired time.
You can use the RESET button to quickly set the time to the nearest
hour. If the displayed time is before
the half hour, pressing the RESET
button sets the clock back to the
previous hour. If the displayed time
is after the half hour, pressing the RESET button sets the clock for-
ward to the beginning of the next
hour. For example: 1:06 would RESET backward to
1:00.
1:52 would RESET forward to 2:00.
Beverage Holder
To use the front beverage holder, pull on the front. Push the holder all
the way in to close it. The beverage holder for the second
seat passengers is located in the
armrest on each rear door.
The third seat also has a beverage holder in each side panel.
CONTINUED
Instruments and ControlsProCarManuals.comMain Menu Table of Contents s t
Page 75 of 240

Comfort and Convenience Features
The heating and air conditioning
system in your car provides a com-
fortable driving environment in all
weather conditions.
The audio sound system is very
versatile. To get the most from this system, take the time to learn what
the controls do.
Some models have an anti-theft
audio system that requires a code
number to enable it. Heating and Cooling........................ 76
What Each Control Does............ 78
How to Use the System............... 79
Controlling Air Flow
Direction............................... 79
Ventilation................................ 79
To Cool with A/C.................... 80
To Heat..................................... 80
To Heat and Dehumidify with Air Conditioning.......... 81
To Defog and Defrost............. 82
To Turn Everything Off ............. 82
Rear A/C Unit.............................. 83
Audio System (US EX and
Canadian EX).......................... 84
AM/FM/Cassette Stereo Audio System...................................... 84
Operating the Radio.................... 85
Finding the Radio Station........... 85
Presetting..................................... 86
Adjusting the Sound.................... 87
Radio Frequencies....................... 88Operating the Cassette Player... 89
Cassette Search Functions......... 90
Caring for Cassettes.................... 91 Audio System (US EX).................... 92
AM/FM/Cassette Stereo Audio
System....................................... 92
Operating the Radio.................... 93
Finding the Radio Station........... 93
Presetting..................................... 94
Adjusting the Sound.................... 96 Radio Frequencies....................... 97Operating the Cassette Player... 98
Cassette Search Functions......... 99
Caring for Cassettes.................. 100
Operating the CD Player.......... 101
CD Error Indications................. 104
Caring for the Cassette Player..... 105
Theft Protection............................. 106
Comfort and Convenience FeaturesProCarManuals.comMain Menu s t
Page 84 of 240
Audio System
AM/FM/Cassette Stereo Audio
System
For U.S. LX and Canadian models
Your Honda audio system is easy to use, and will give clear AM/FM
reception. The preset buttons allow
you to select six stations on AM andtwelve stations on FM.
The cassette system uses Dolby B ®
* noise reduction to give
excellent sound reproduction. The
system also senses when a metal or
chromium-dioxide (CrO2) tape is
being played and adjusts accordingly.
* Dolby noise reduction manufac-
tured under license from Dolby Laboratories Licensing Corporation.
"DOLBY" and the double-D symbol are trademarks of Dolby
Laboratories Licensing Corporation. PWR/VOL KNOB
CASSETTE SLOT
AM/FM
BUTTON
PRESET
BUTTONS
Comfort and Convenience FeaturesProCarManuals.comMain Menu Table of Contents s t
Page 85 of 240

Audio System
Operating the Radio
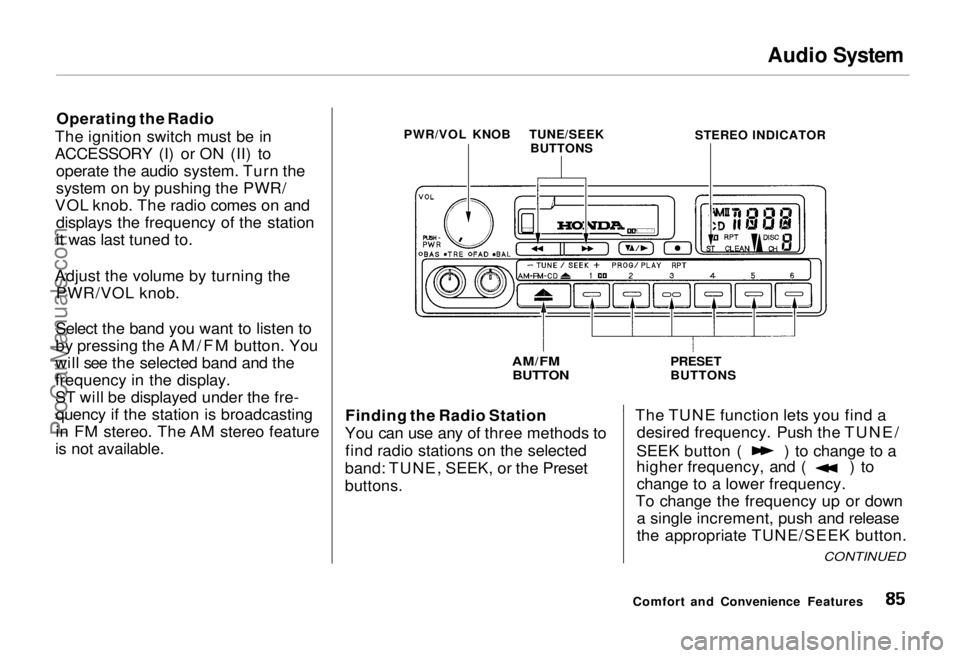
The ignition switch must be in
ACCESSORY (I) or ON (II) to operate the audio system. Turn the
system on by pushing the PWR/
VOL knob. The radio comes on and displays the frequency of the station
it was last tuned to.
Adjust the volume by turning the PWR/VOL knob.
Select the band you want to listen to
by pressing the AM/FM button. You
will see the selected band and the
frequency in the display.
ST will be displayed under the fre- quency if the station is broadcasting
in FM stereo. The AM stereo feature
is not available. Finding the Radio Station
You can use any of three methods to find radio stations on the selected
band: TUNE, SEEK, or the Preset
buttons.
The TUNE function lets you find a
desired frequency. Push the TUNE/ SEEK button ( ) to change to a
higher frequency, and ( ) to
change to a lower frequency.
To change the frequency up or down a single increment, push and release
the appropriate TUNE/SEEK button.
Comfort and Convenience Features
PWR/VOL KNOB
AM/FM
BUTTON
PRESET
BUTTONS
STEREO INDICATOR
TUNE/SEEK
BUTTONS
CONTINUEDProCarManuals.comMain Menu Table of Contents s t
Page 86 of 240

Audio System
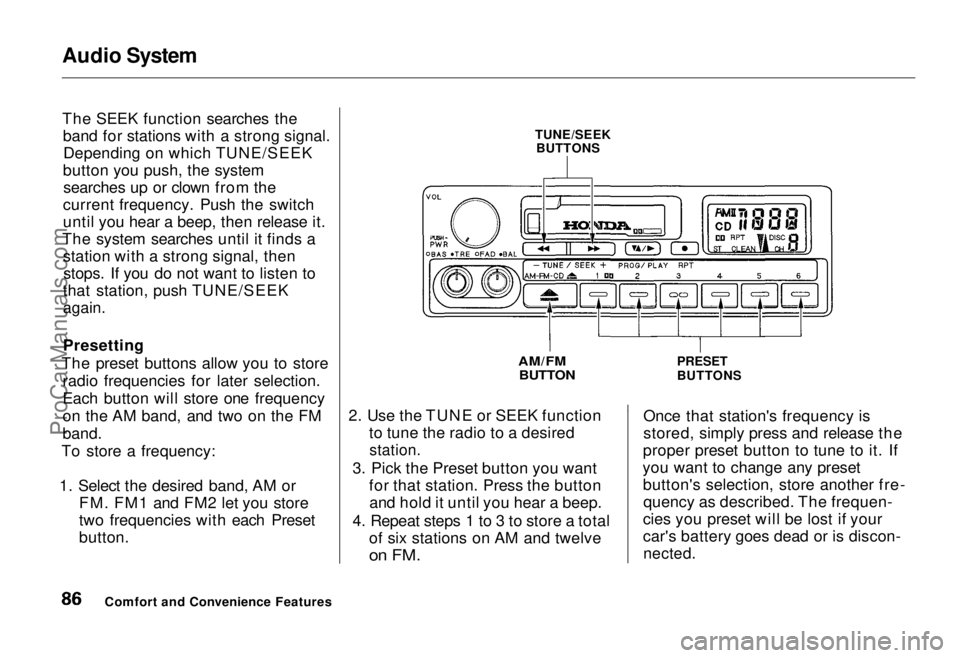
The SEEK function searches the
band for stations with a strong signal.Depending on which TUNE/SEEK
button you push, the system searches up or clown from the
current frequency. Push the switch
until you hear a beep, then release it.
The system searches until it finds a station with a strong signal, thenstops. If you do not want to listen to
that station, push TUNE/SEEK
again.
Presetting
The preset buttons allow you to store radio frequencies for later selection.
Each button will store one frequency
on the AM band, and two on the FM
band.
To store a frequency:
1. Select the desired band, AM or FM. FM1 and FM2 let you store
two frequencies with each Preset
button. 2. Use the TUNE or SEEK function
to tune the radio to a desired
station.
3. Pick the Preset button you want for that station. Press the buttonand hold it until you hear a beep.
4. Repeat steps 1 to 3 to store a total of six stations on AM and twelve
on FM.
Once that station's frequency is
stored, simply press and release the
proper preset button to tune to it. If
you want to change any preset button's selection, store another fre-quency as described. The frequen-
cies you preset will be lost if your
car's battery goes dead or is discon-
nected.
Comfort and Convenience Features TUNE/SEEK
BUTTONS
AM/FM BUTTON
PRESET
BUTTONSProCarManuals.comMain Menu Table of Contents s t