1995 HONDA ODYSSEY high beam
[x] Cancel search: high beamPage 35 of 240
Indicator Lights
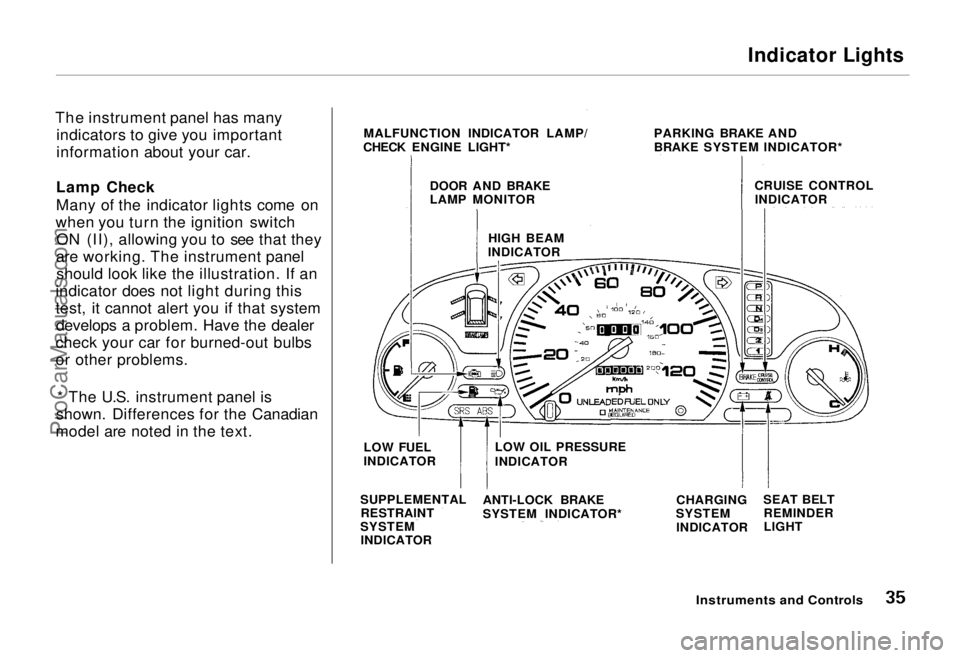
The instrument panel has many indicators to give you important
information about your car.
Lamp Check
Many of the indicator lights come on
when you turn the ignition switch ON (II), allowing you to see that they
are working. The instrument panel should look like the illustration. If an
indicator does not light during this
test, it cannot alert you if that system develops a problem. Have the dealer
check your car for burned-out bulbs
or other problems.
* The U.S. instrument panel is
shown. Differences for the Canadian
model are noted in the text.
Instruments and Controls
MALFUNCTION INDICATOR LAMP/
CHECK ENGINE LIGHT* PARKING BRAKE AND
BRAKE SYSTEM INDICATOR*
CRUISE CONTROLINDICATOR
DOOR AND BRAKE
LAMP MONITOR
HIGH BEAM
INDICATOR
LOW FUEL
INDICATOR
SUPPLEMENTAL RESTRAINT
SYSTEM INDICATOR LOW OIL PRESSURE
INDICATOR
ANTI-LOCK BRAKE
SYSTEM INDICATOR* CHARGING
SYSTEM
INDICATOR SEAT BELT
REMINDER
LIGHTProCarManuals.comMain Menu Table of Contents s t
Page 38 of 240
Indicator Lights
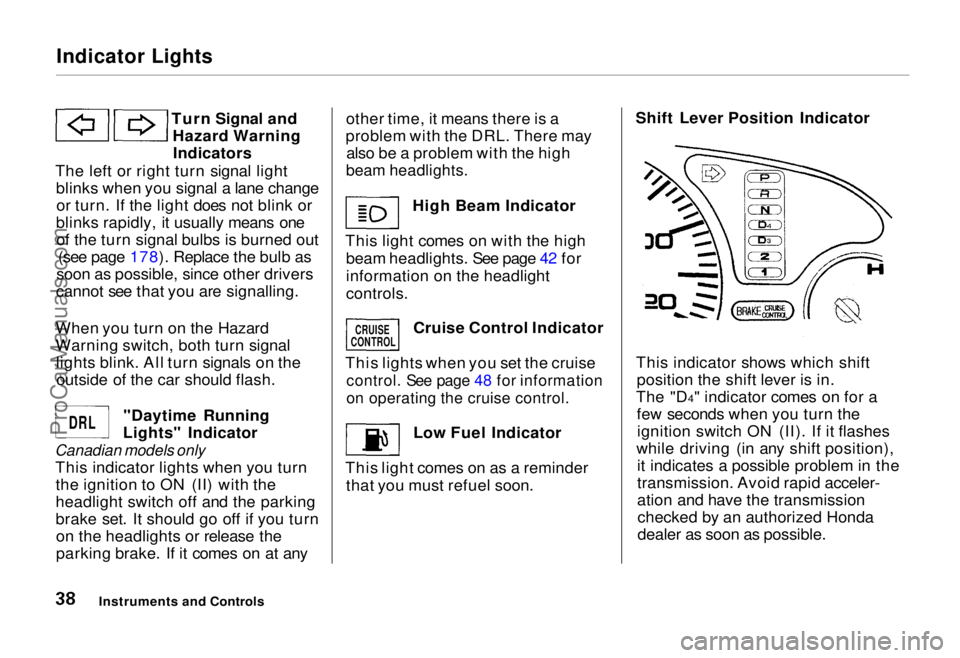
Turn Signal andHazard WarningIndicators
The left or right turn signal light blinks when you signal a lane changeor turn. If the light does not blink or
blinks rapidly, it usually means one of the turn signal bulbs is burned out (see page 178). Replace the bulb as
soon as possible, since other drivers
cannot see that you are signalling.
When you turn on the Hazard
Warning switch, both turn signal lights blink. All turn signals on theoutside of the car should flash.
"Daytime Running
Lights" Indicator
Canadian models only
This indicator lights when you turnthe ignition to ON (II) with the
headlight switch off and the parking
brake set. It should go off if you turnon the headlights or release the
parking brake. If it comes on at any other time, it means there is a
problem with the DRL. There may also be a problem with the high
beam headlights.
High Beam Indicator
This light comes on with the high beam headlights. See page 42 for
information on the headlight
controls.
Cruise Control Indicator
This lights when you set the cruise
control. See page 48 for information
on operating the cruise control.
Low Fuel Indicator
This light comes on as a reminder that you must refuel soon. Shift Lever Position Indicator
This indicator shows which shift position the shift lever is in.
The "D4" indicator comes on for a few seconds when you turn theignition switch ON (II). If it flashes
while driving (in any shift position), it indicates a possible problem in the
transmission. Avoid rapid acceler-
ation and have the transmissionchecked by an authorized Honda
dealer as soon as possible.
Instruments and Controls
CRUISE
CONTROL
DRL
ProCarManuals.comMain Menu Table of Contents s t
Page 41 of 240
Controls Near the Steering Wheel
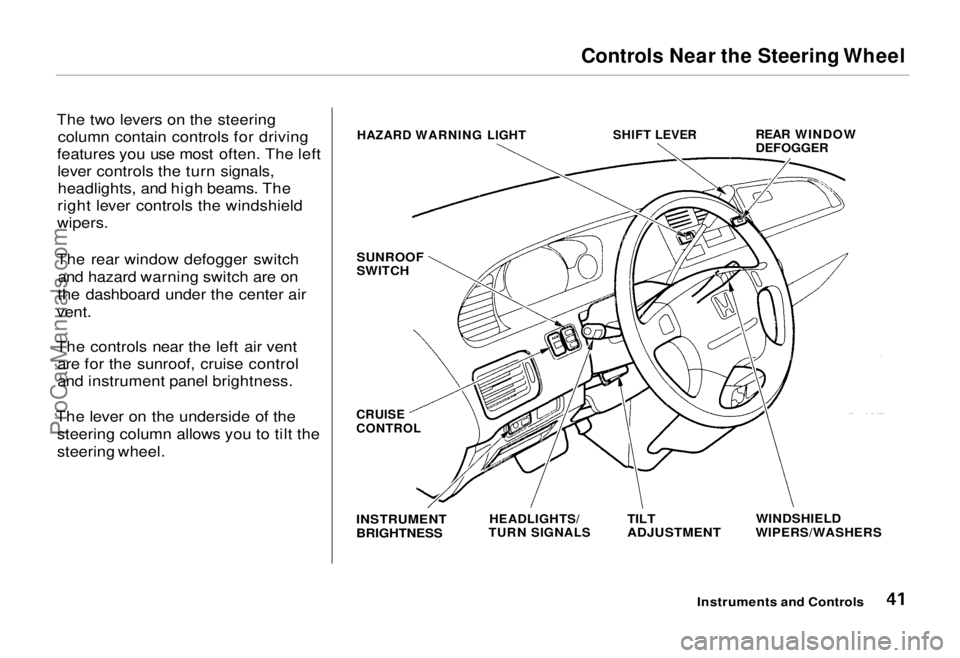
The two levers on the steering column contain controls for driving
features you use most often. The left lever controls the turn signals,headlights, and high beams. The
right lever controls the windshield
wipers.
The rear window defogger switch and hazard warning switch are on
the dashboard under the center air
vent.
The controls near the left air vent are for the sunroof, cruise control
and instrument panel brightness.
The lever on the underside of the steering column allows you to tilt the
steering wheel.
Instruments and Controls
HAZARD WARNING LIGHT
SHIFT LEVER
REAR WINDOW
DEFOGGER
SUNROOF
SWITCH
WINDSHIELD
WIPERS/WASHERS
TILT
ADJUSTMENT
HEADLIGHTS/
TURN SIGNALS
INSTRUMENT
BRIGHTNESS
CRUISE
CONTROLProCarManuals.comMain Menu Table of Contents s t
Page 42 of 240
Controls Near the Steering Wheel
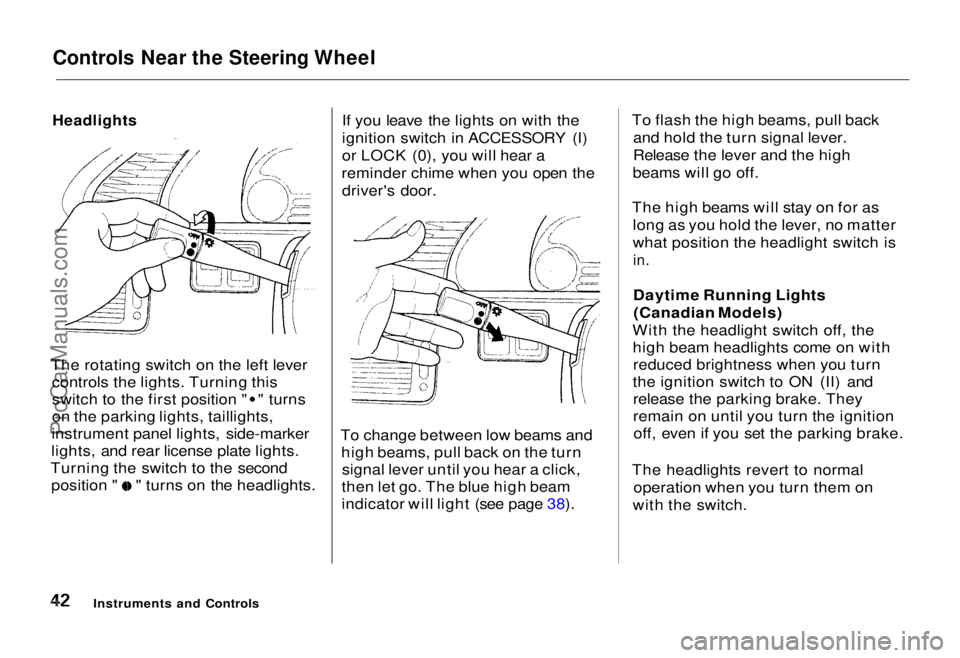
The rotating switch on the left lever controls the lights. Turning this switch to the first position " " turns
on the parking lights, taillights,
instrument panel lights, side-marker
lights, and rear license plate lights.
Turning the switch to the second position " " turns on the headlights. If you leave the lights on with the
ignition switch in ACCESSORY (I)
or LOCK (0), you will hear a
reminder chime when you open the driver's door.
To change between low beams and high beams, pull back on the turnsignal lever until you hear a click,
then let go. The blue high beam
indicator will light (see page 38). To flash the high beams, pull back
and hold the turn signal lever.
Release the lever and the high
beams will go off.
The high beams will stay on for as long as you hold the lever, no matter
what position the headlight switch is
in.
Daytime Running Lights(Canadian Models)
With the headlight switch off, the high beam headlights come on withreduced brightness when you turn
the ignition switch to ON (II) and release the parking brake. They
remain on until you turn the ignitionoff, even if you set the parking brake.
The headlights revert to normal operation when you turn them on
with the switch.
Instruments and Controls
HeadlightsProCarManuals.comMain Menu Table of Contents s t
Page 174 of 240
Lights
Check the operation of your car's
exterior lights at least once a month.
A burned out bulb can create an unsafe condition by reducing your
car's visibility and the ability to
signal your intentions to other
drivers.
Check the following:
Headlights (low and high beam)
Parking lights
Taillights Brake lights
High-mount brake light
Turn signals Back-up lights
Hazard light function
License plate light
Side marker lights
Daytime running lights (Canadian cars)
If you find any bulbs are burned out,
replace them as soon as possible. Refer to the chart on page 219 to
determine what type of replacement
bulb is needed. Headlight Aiming
The headlights were properly aimed when your car was new. You shouldcheck their aim if you regularly carry
heavy items in the cargo area or pull a trailer. Each headlight assembly
has horizontal and vertical adjust-
ment indicators. These are set to
their "0" positions after the
headlights are aimed at the factory.
To check these settings: 1. Make sure the fuel tank is full. Park the car on level ground.
2. The driver or someone who weighs the same should be sittingin the driver's seat for all checksand adjustments.
Load your car with the items you
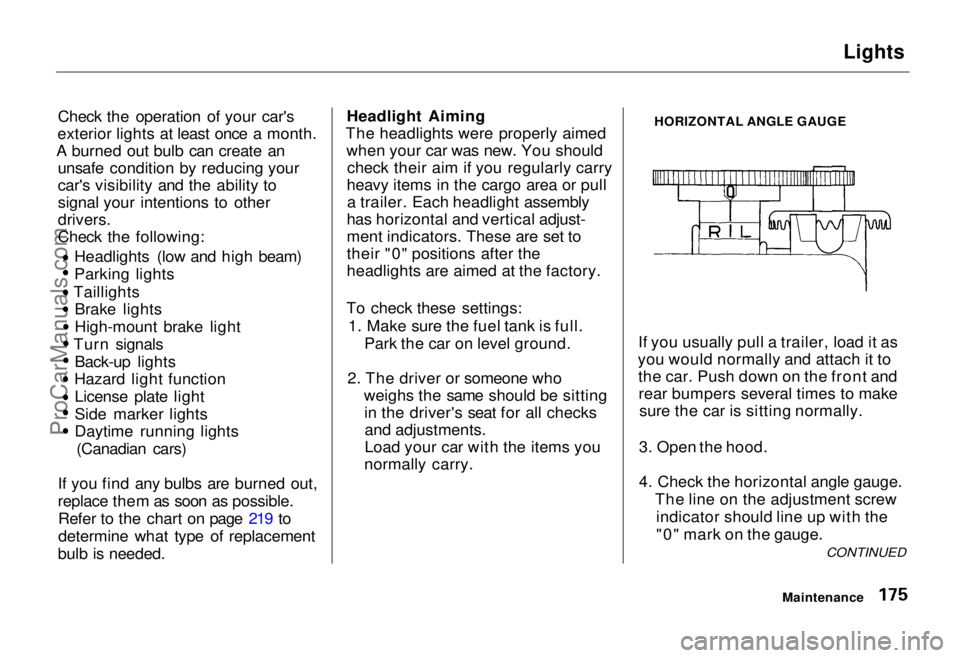
normally carry. HORIZONTAL ANGLE GAUGE
If you usually pull a trailer, load it as
you would normally and attach it to the car. Push down on the front andrear bumpers several times to make sure the car is sitting normally.
3. Open the hood.
4. Check the horizontal angle gauge. The line on the adjustment screwindicator should line up with the
"0" mark on the gauge.
Maintenance
CONTINUEDProCarManuals.comMain Menu Table of Contents s t
Page 235 of 240
Index
Flashers, Hazard Warning.............. 45
Flat Tire, Changing a.................... 193
Fluids Automatic Transmission........... 155
Brake........................................... 156
Power Steering........................... 157
Windshield Washer................... 154
FM Stereo Radio Reception...................................... 87
Folding the Second Seats ............... 60
Folding the Third Seats.................. 62
Foreign Countries, Driving in...... 109
Four-way Flashers........................... 45
Front End, Towing by Emergency Wrecker................. 213
Fuel.................................................. 108
Fill Door and Cap....................... 110
Gauge............................................ 40Octane Requirement................. 108
Oxygenated................................ 108
Tank, Filling the......................... 110
Fuses, Checking the...................... 209 Gas Mileage, Improving................ 114
Gasohol........................................... 108
Gasoline.......................................... 108
Gauge............................................ 40
Octane Requirement................. 108
Tank, Filling the......................... 110
Gas Station Procedures................. 110
Gauges
Engine Coolant Temperature .... 40
Fuel................................................ 40
Gearshift Lever Positions............. 120
Glass Cleaning............................... 188
Glove Box......................................... 55
Halogen Headlight Bulbs.............. 177
Hazard Warning Flashers............... 45
Headlights......................................... 42 Aiming......................................... 175
Daytime Running Lights............. 42
High Beam Indicator................... 38
High Beams, Turning on............ 42
Low Beams, Turning on ............. 42
Reminder Chime.......................... 42
Replacing Halogen Bulbs ......... 177
Turning on.................................... 42
Head Restraints............................... 58
Heating and Cooling........................ 76
High Altitude, Starting at.............. 119
High-Low Beam Switch .................. 42
Hood, Opening the ........................ 111
Horn.................................................. 51
Hot Coolant, Warning about........ 151
Hydroplaning.................................. 127
Identification Number, Vehicle.... 216
If Your Car Has to be Towed....... 213
Ignition
Keys............................................... 51
Switch............................................ 52
Timing Control System............. 225
Indicator Lights, Instrument
Panel.............................................. 35
Infant Restraint................................ 22
Inflation, Proper Tire .................... 170
Inside Mirror.................................... 66
Inspection, Tire.............................. 171ProCarManuals.comMain Menu s t Main Menu s t