1995 HONDA ODYSSEY transmission
[x] Cancel search: transmissionPage 1 of 240

Odyssey 1995 Online Reference Owner's Manual
Use these links (and links throughout this manual) to navigate through\
this reference.
For a printed owner's manual, click on authorized manuals or go to www.h\
elminc.com.
Contents
Introduction ........................................................................\
............................................................... i
A Few Words About Safety........................................................................\
....................................... ii
Driver and Passenger Safety ........................................................................\
.................................... 3
Proper use and care of your vehicle's seat belts, and Supplemental Restr\
aint System.
Instruments and Control s........................................................................\
........................................ . 33
Instrume nt panel indicator and gauge, and how to use dashboard and steering colu\
mn controls.
Comfort and Convenience Features ........................................................................\
..................... . 75
How to operate the climate control system, the audio system, and other c\
onvenience features.
Before Driving........................................................................\
..........................................................107
What gasoline to use, how to break -in your new vehicle, and how to load luggage and other cargo.
Driving ........................................................................\
......................................................................117
The proper way to start the engine, shift the transmission, and park, pl\
us towing a trailer.
Maintenance........................................................................\
.............................................................135
The Maintenance Schedule shows you when you need to take you r vehicle to the dealer.
Appearance Car e........................................................................\
..................................................... .183
Tips on cleaning and protecting your vehicle. Things to look for if your\
vehicle ever needs body repairs.
Taking Care of the Unexpecte d........................................................................\
..............................191
This section covers several problems motorists sometimes experience, an d how to handle them.
Technical Informatio n........................................................................\
.............................................215
ID numbers, dimensions, capacities, and technical information.
Warranty and Customer Relations (U.S. and Canada)................................................................227
A summary of the warranties covering your new Acura, and how to contact \
us.
Authorized Manu als (U.S. only)
........................................................................\
............................. .
233
How to order manuals and other technical literature.
Index ........................................................................\
........................ ...................................................... I
Service Information Summary
A summary of information you need when you pull up to the fuel pump.
Owner's Identification Form
ProCarManuals.com
Page 38 of 240
Indicator Lights
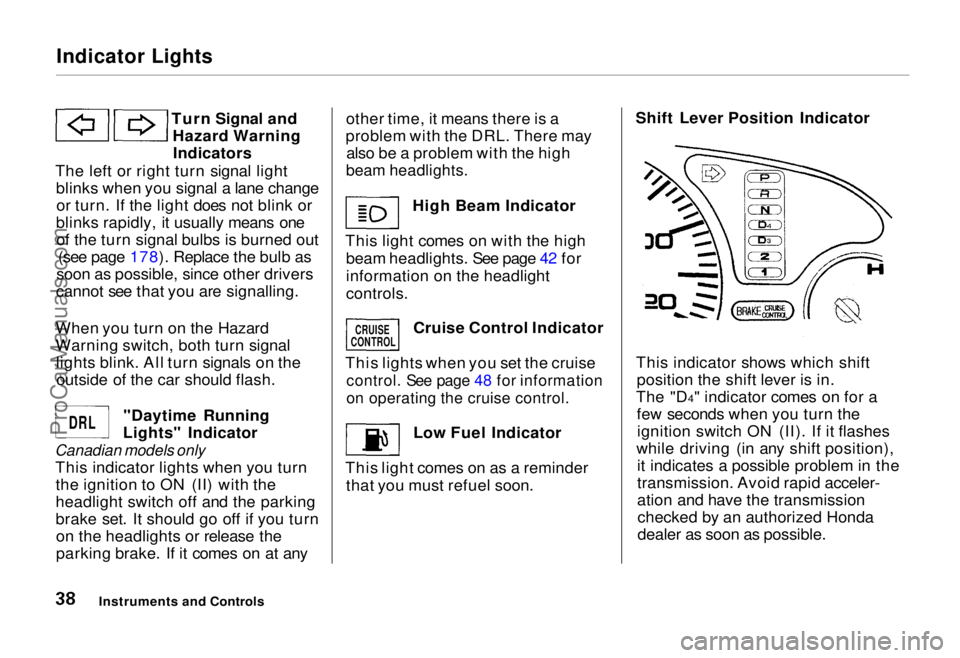
Turn Signal andHazard WarningIndicators
The left or right turn signal light blinks when you signal a lane changeor turn. If the light does not blink or
blinks rapidly, it usually means one of the turn signal bulbs is burned out (see page 178). Replace the bulb as
soon as possible, since other drivers
cannot see that you are signalling.
When you turn on the Hazard
Warning switch, both turn signal lights blink. All turn signals on theoutside of the car should flash.
"Daytime Running
Lights" Indicator
Canadian models only
This indicator lights when you turnthe ignition to ON (II) with the
headlight switch off and the parking
brake set. It should go off if you turnon the headlights or release the
parking brake. If it comes on at any other time, it means there is a
problem with the DRL. There may also be a problem with the high
beam headlights.
High Beam Indicator
This light comes on with the high beam headlights. See page 42 for
information on the headlight
controls.
Cruise Control Indicator
This lights when you set the cruise
control. See page 48 for information
on operating the cruise control.
Low Fuel Indicator
This light comes on as a reminder that you must refuel soon. Shift Lever Position Indicator
This indicator shows which shift position the shift lever is in.
The "D4" indicator comes on for a few seconds when you turn theignition switch ON (II). If it flashes
while driving (in any shift position), it indicates a possible problem in the
transmission. Avoid rapid acceler-
ation and have the transmissionchecked by an authorized Honda
dealer as soon as possible.
Instruments and Controls
CRUISE
CONTROL
DRL
ProCarManuals.comMain Menu Table of Contents s t
Page 117 of 240
Driving
This section gives you tips on starting the engine under various
conditions, and how to operate the
automatic transmission. It also includes important information on
your car's braking system and facts
you need if you are planning to tow a trailer.
Preparing to Drive......................... 118
Starting the Engine........................ 119
Starting in Cold Weather at High Altitude ..................... 119
Automatic Transmission............... 120 Shift Lever Positions................. 120
Maximum Speeds...................... 123
Shift Lock Release..................... 123
The Braking System...................... 124 Brake Wear Indicators.............. 124
Brake System Design................ 124
Anti-lock Brakes........................ 125
Driving in Bad Weather................ 126
Towing a Trailer............................ 128
DrivingProCarManuals.comMain Menu s t
Page 120 of 240
Automatic Transmission
Your Honda's transmission has fourforward speeds, and is electronically
controlled for smoother shifting. Italso has a "lock-up" torque converter
for better fuel economy. You may
feel what seems like another shift
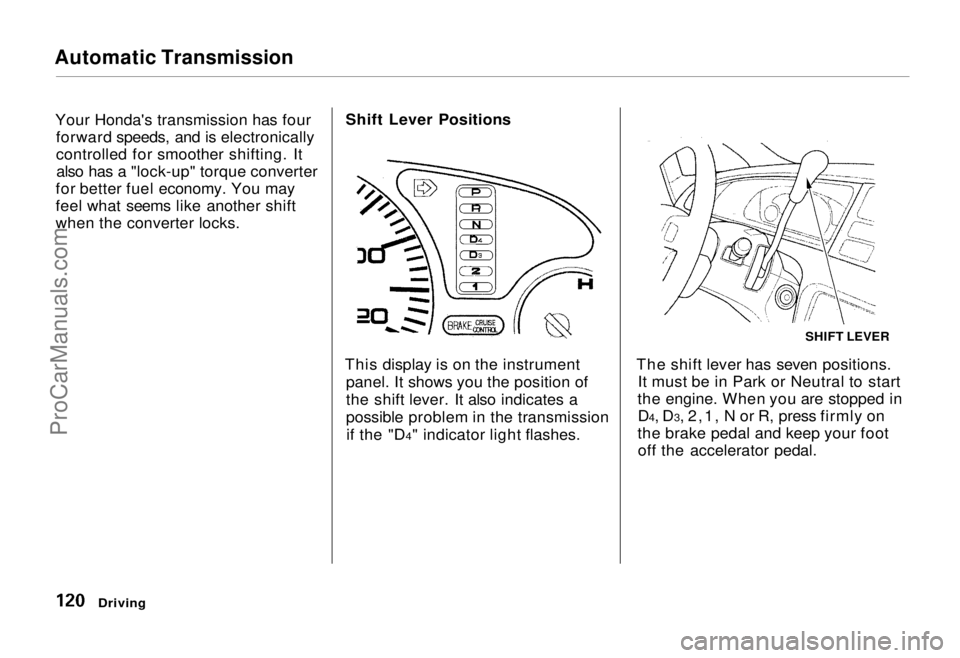
when the converter locks. Shift Lever Positions
This display is on the instrument panel. It shows you the position of
the shift lever. It also indicates a
possible problem in the transmissionif the "D4" indicator light flashes. The shift lever has seven positions.
It must be in Park or Neutral to start
the engine. When you are stopped in D4, D3, 2,1, N or R, press firmly on
the brake pedal and keep your foot off the accelerator pedal.
Driving
SHIFT LEVERProCarManuals.comMain Menu Table of Contents s t
Page 121 of 240
Automatic Transmission
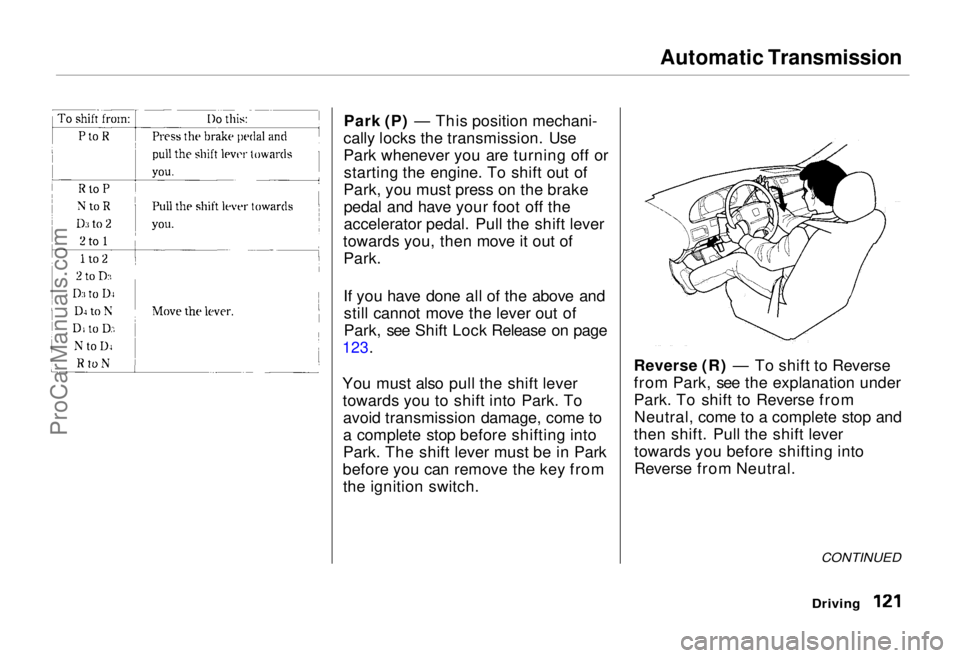
Park (P) — This position mechani-
cally locks the transmission. Use
Park whenever you are turning off or starting the engine. To shift out of
Park, you must press on the brake pedal and have your foot off the
accelerator pedal. Pull the shift lever
towards you, then move it out of Park.
If you have done all of the above andstill cannot move the lever out of
Park, see Shift Lock Release on page
123.
You must also pull the shift lever towards you to shift into Park. Toavoid transmission damage, come to
a complete stop before shifting into
Park. The shift lever must be in Park
before you can remove the key from the ignition switch. Reverse (R) — To shift to Reverse
from Park, see the explanation under
Park. To shift to Reverse from
Neutral, come to a complete stop and
then shift. Pull the shift lever towards you before shifting into
Reverse from Neutral.
CONTINUED
DrivingProCarManuals.comMain Menu Table of Contents s t
Page 122 of 240
Automatic Transmission
Neutral (N) — Use Neutral if youneed to restart a stalled engine, or if
it is necessary to stop briefly with
the engine idling. Shift to Park posi-
tion if you need to leave the car for
any reason. Press on the brake pedal
when you are moving the shift lever from Neutral to another gear.
Drive (D4) — Use this position for
your normal driving. The transmis-sion automatically selects a suitable
gear for your speed and acceleration.
You may notice the transmission shifting up at higher speeds when
the engine is cold. This helps the engine warm up faster.
Drive (D3) —This position is similar
to D4, except only the first three
gears are selected. Use D3 when
towing a trailer in hilly terrain, or to
provide engine braking when going down a steep hill. D3 can also keep
the transmission from cycling between third and fourth gears in stop-and-go driving.
For faster acceleration when" in D3 or
D4, you can get the transmission to
automatically downshift by pushing
the accelerator pedal to the floor.
The transmission will shift down one or two gears, depending on your
speed.
Second (2) — To shift to Second,
pull the shift lever towards you, then shift to the lower gear. This position
locks the transmission in second
gear. It does not downshift to first
gear when you come to a stop. Second gives you more power when
climbing, and increased engine
braking when going down steep hills. Use second gear when starting out
on a slippery surface or in deep snow.It will help reduce wheelspin.
Whenever you move the shift lever to a lower gear, the transmissiondownshifts only if the engine's redline will not be exceeded in the
lower gear.
First (1) — To shift from Second to
First, pull the shift lever towards you,
then shift to the lower gear. With the
lever in this position, the transmis- sion locks in First gear. By upshift-
ing and downshifting through 1,2,
D3 and D4, you can operate this
transmission much like a manual transmission without a clutch pedal.
DrivingProCarManuals.comMain Menu Table of Contents s t
Page 123 of 240
Automatic Transmission
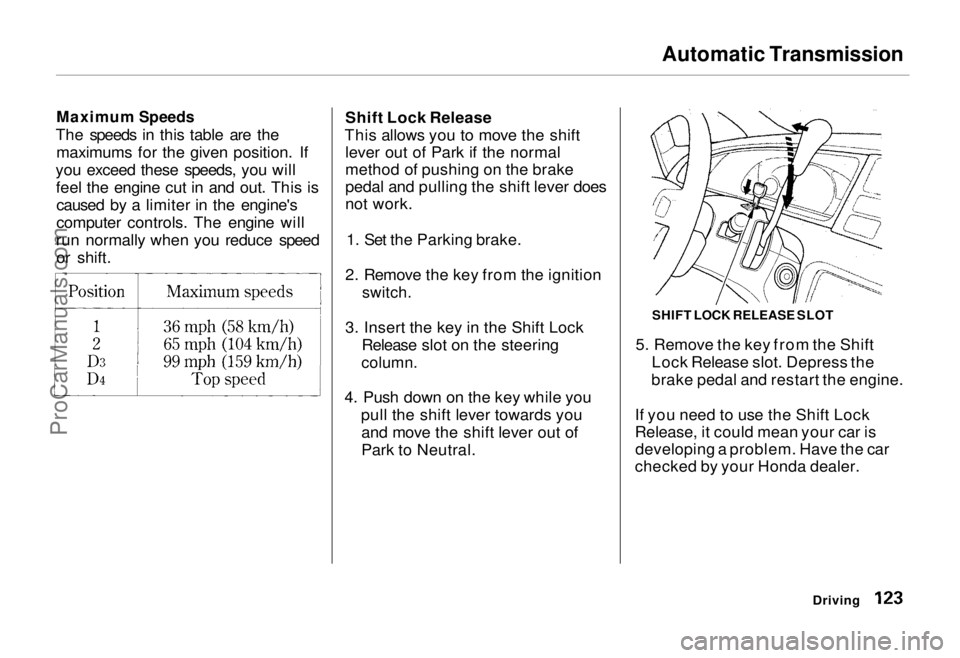
Maximum Speeds
The speeds in this table are the maximums for the given position. If
you exceed these speeds, you will feel the engine cut in and out. This iscaused by a limiter in the engine's
computer controls. The engine will
run normally when you reduce speed or shift. Shift Lock Release
This allows you to move the shift lever out of Park if the normal
method of pushing on the brake
pedal and pulling the shift lever does
not work.
1. Set the Parking brake.
2. Remove the key from the ignition
switch.
3. Insert the key in the Shift Lock Release slot on the steering
column.
4. Push down on the key while you pull the shift lever towards youand move the shift lever out of
Park to Neutral. 5. Remove the key from the Shift
Lock Release slot. Depress the
brake pedal and restart the engine.
If you need to use the Shift Lock
Release, it could mean your car is developing a problem. Have the car
checked by your Honda dealer.
Driving
SHIFT LOCK RELEASE SLOTProCarManuals.comMain Menu Table of Contents s t
Page 132 of 240
Towing a Trailer
Towing Safety
Your car will not stop as quickly witha trailer in tow. Leave extra distance
between your car and other vehicles.
Avoid braking or turning suddenly.
This could cause the trailer to
jackknife or possibly turn over.
Keep in mind that your total vehicle
is now much longer. Leave more
room when making turns. The trailer
tracks a smaller arc than the car and can hit or run over something that
the car misses. When passing another vehicle, make sure the
trailer is clear before changing lanes. The car/trailer combination is more
affected by crosswinds and buffeting.
When being passed by a large
vehicle, keep a constant speed and steer straight ahead. If there is too
much wind buffeting, slow down to
get out of the other vehicle's air
turbulence.
Towing a trailer puts an extra load on your car. You should have your
car serviced according to the "Maintenance schedule under severe
driving conditions" on page 141. This extra load is magnified when
you are driving in hilly terrain.
Watch the temperature gauge closely when climbing hills. If it gets
near the hot area, turn off the air
conditioning (if it is on). If this does
not reduce the heat, it may be
necessary to pull to the side of the
road and wait for the engine to cool.If the automatic transmission shifts
frequently between 3rd and 4th gears, put it in D3. This will help
prevent the transmission from overheating. Help keep the brakes
from overheating by shifting to a lower gear when going downhill.
DrivingProCarManuals.comMain Menu Table of Contents s t