1995 HONDA ODYSSEY brake light
[x] Cancel search: brake lightPage 68 of 240
Parking Brake, Digital Clock
Parking Brake
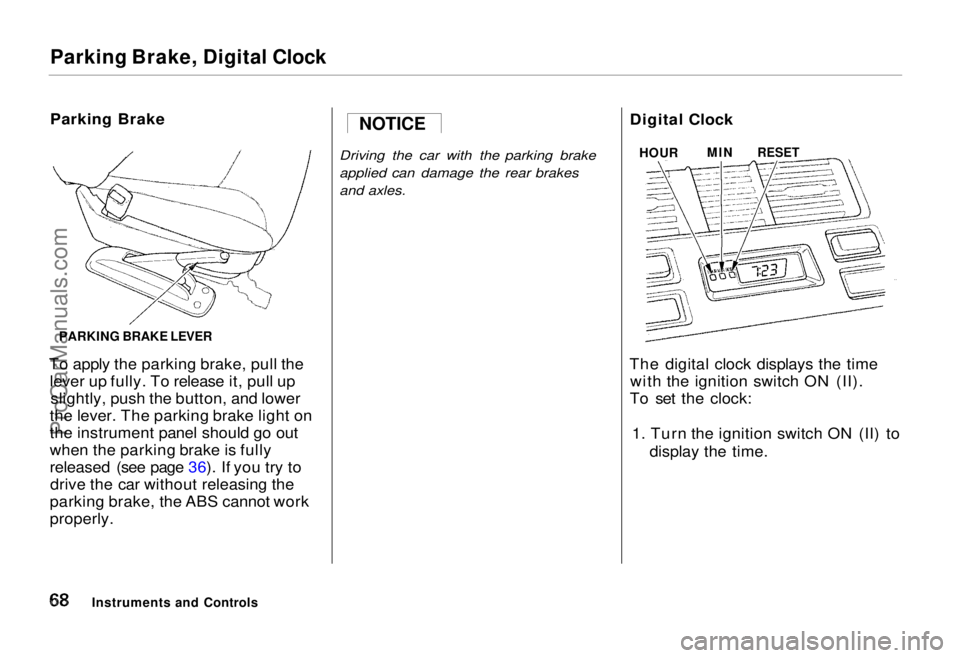
To apply the parking brake, pull the lever up fully. To release it, pull upslightly, push the button, and lower
the lever. The parking brake light on
the instrument panel should go out
when the parking brake is fully
released (see page 36). If you try to drive the car without releasing the
parking brake, the ABS cannot work
properly.
Driving the car with the parking brake
applied can damage the rear brakes
and axles.
Digital Clock
The digital clock displays the time with the ignition switch ON (II).
To set the clock:
1. Turn the ignition switch ON (II) to display the time.
Instruments and Controls NOTICE
HOUR
MIN
RESET
PARKING BRAKE LEVERProCarManuals.comMain Menu Table of Contents s t
Page 111 of 240
Service Station Procedures
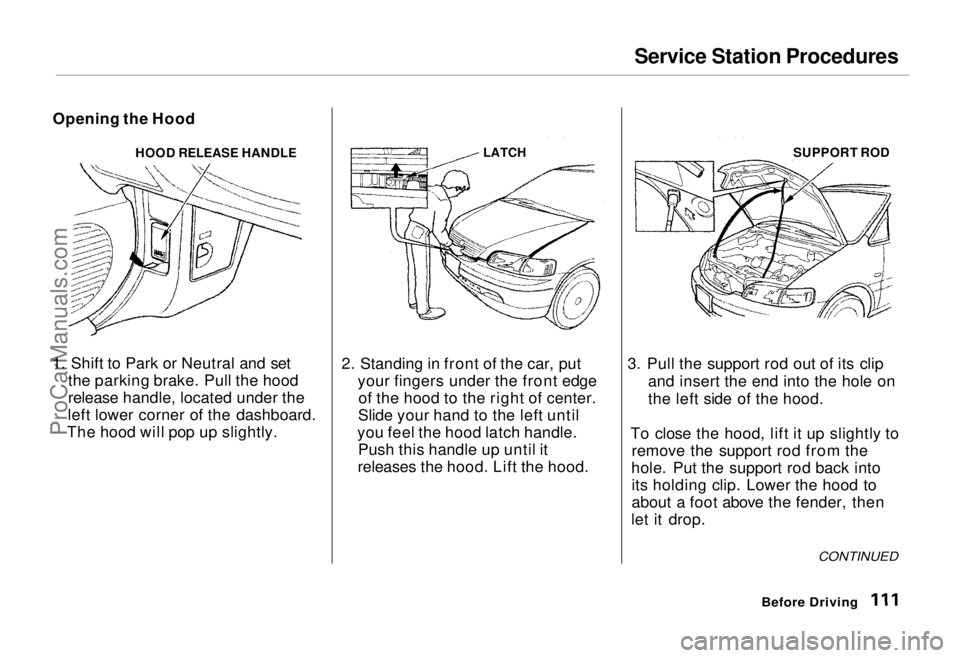
Opening the Hood HOOD RELEASE HANDLE
1. Shift to Park or Neutral and set the parking brake. Pull the hood
release handle, located under the
left lower corner of the dashboard.
The hood will pop up slightly.
LATCH
2. Standing in front of the car, put your fingers under the front edgeof the hood to the right of center.
Slide your hand to the left until
you feel the hood latch handle. Push this handle up until it
releases the hood. Lift the hood. SUPPORT ROD
3. Pull the support rod out of its clip and insert the end into the hole on
the left side of the hood.
To close the hood, lift it up slightly to remove the support rod from the
hole. Put the support rod back into its holding clip. Lower the hood to
about a foot above the fender, then
let it drop.
Before Driving
CONTINUEDProCarManuals.comMain Menu Table of Contents s t
Page 120 of 240
Automatic Transmission
Your Honda's transmission has fourforward speeds, and is electronically
controlled for smoother shifting. Italso has a "lock-up" torque converter
for better fuel economy. You may
feel what seems like another shift
when the converter locks. Shift Lever Positions
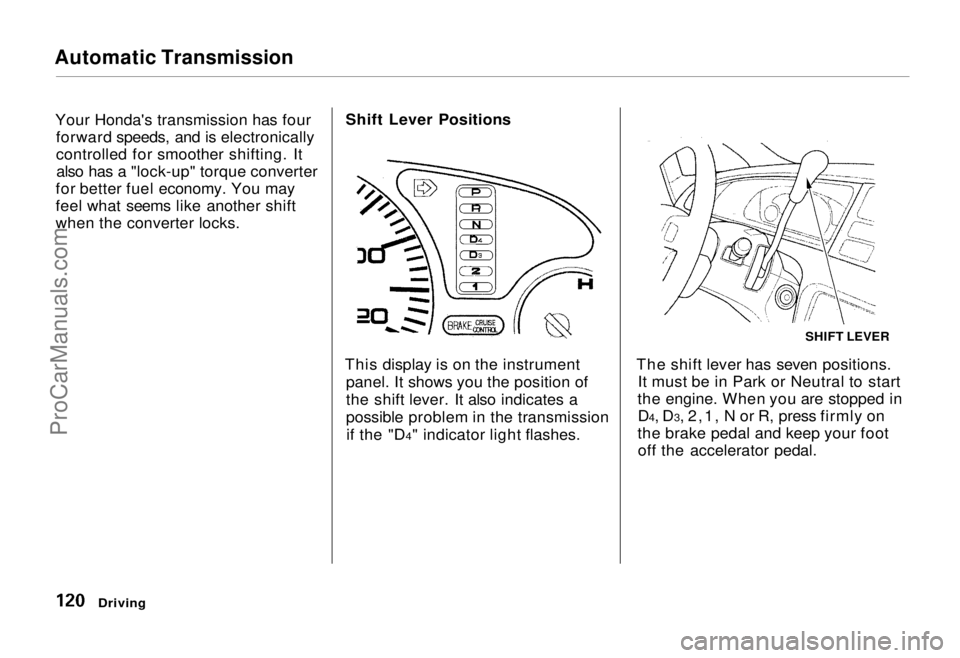
This display is on the instrument panel. It shows you the position of
the shift lever. It also indicates a
possible problem in the transmissionif the "D4" indicator light flashes. The shift lever has seven positions.
It must be in Park or Neutral to start
the engine. When you are stopped in D4, D3, 2,1, N or R, press firmly on
the brake pedal and keep your foot off the accelerator pedal.
Driving
SHIFT LEVERProCarManuals.comMain Menu Table of Contents s t
Page 124 of 240
The Braking System
Your Honda is equipped with disc brakes at all four wheels. The
braking system is power-assisted to reduce the effort needed on the
brake pedal.
Put your foot on the brake pedal only
when you intend to brake. Resting
your foot on the pedal keeps the brakes applied lightly, causing them
to build up heat. Heat build-up canreduce how well your brakes work. It
also keeps your brake lights on all
the time, confusing drivers behind
you.
Constant application of the brakes
when going down a long hill builds up heat and reduces their effective-
ness. Use the engine to assist the
brakes by downshifting to a lower
gear and taking your foot off the accelerator pedal. Check your brakes after driving
through deep water. Apply the
brakes moderately to see if they feel normal. If not, apply them gently and
frequently until they do. Since a
longer distance is needed to stop
with wet brakes, be extra cautious and alert in your driving.
Brake Wear Indicators
All four brakes have audible brake wear indicators.
When the brake pads need replacing, you will hear a distinctive metallic "screeching" sound when you apply
the brakes. If you do not have the
brake pads replaced, they will begin screeching all the time.
Your brakes may sometimes squeal or squeak when you apply them
lightly. Do not confuse this with the
brake wear indicators. They make a
very audible "screeching". Brake System Design
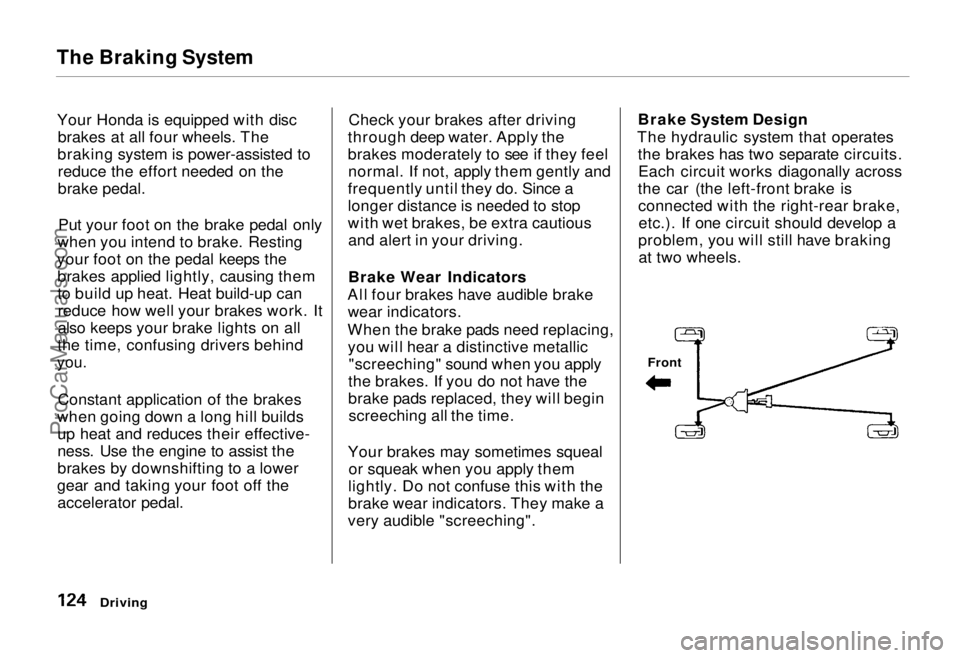
The hydraulic system that operates the brakes has two separate circuits.Each circuit works diagonally across
the car (the left-front brake is connected with the right-rear brake,etc.). If one circuit should develop a
problem, you will still have braking at two wheels.
Driving
FrontProCarManuals.comMain Menu Table of Contents s t
Page 125 of 240
The Braking System
If this happens, you will immediately
notice that the brake pedal goes down much farther and you need to
press on it much harder. A much
longer distance will be needed to stop the car.
Slow the car by downshifting to a
lower gear and removing your foot
from the accelerator pedal. Pull to the side of the road as soon as it issafe. Because of the longer stopping
distance needed, brake system
failure is very hazardous. It is best to
have your car towed, but if you must drive the car in this condition, be
extremely cautious. Have your car
repaired as soon as possible.
Anti-lock Brakes
All U.S. models and the Canadian six-passenger model have an Anti-lockBrake System (ABS) as standard
equipment. It is optional on the
Canadian seven-passenger model.
ABS helps you maintain steering control. It does this by helping you to
prevent the wheels from locking up and skidding.
The ABS is always "On". It requires no special effort or driving technique.
You will feel a pulsation in the brake pedal when the ABS activates.
Activation varies with the amount of traction your tires have. On dry
pavement, you will need to press on
the brake pedal very hard before you
feel the pedal pulsation that means
the ABS has activated. However, youmay feel the ABS activate immedi-
ately if you are trying to stop on
snow or ice. Under all conditions, the
ABS is helping to prevent the wheels from locking so you can retainsteering control. You should con-
tinue to press on the brake pedal
with the same force.
You may feel a slight movement of the brake pedal just after you start
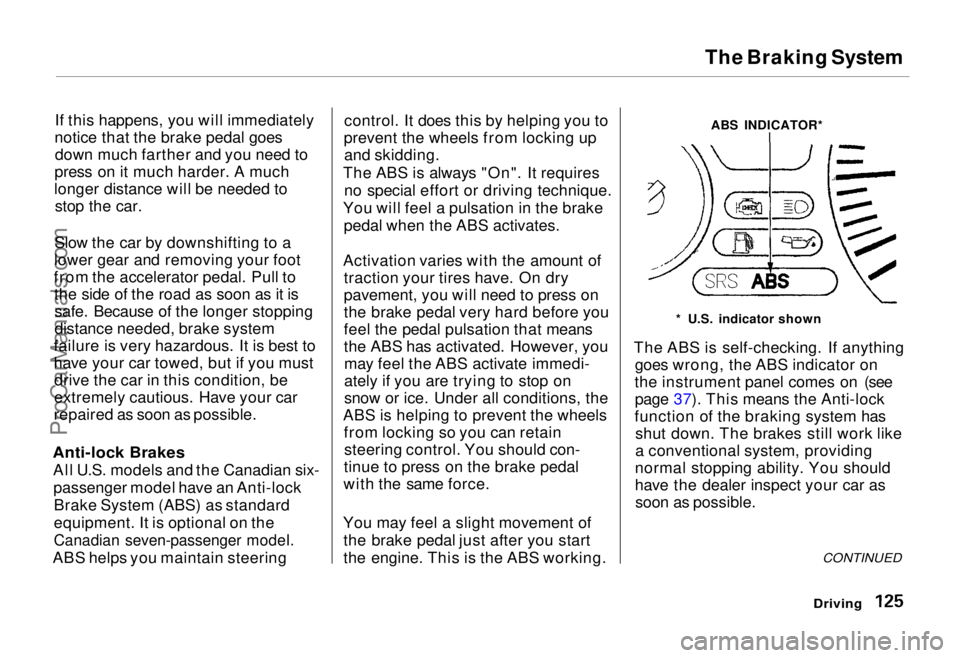
the engine. This is the ABS working. ABS INDICATOR*
* U.S. indicator shown
The ABS is self-checking. If anything goes wrong, the ABS indicator on
the instrument panel comes on (see page 37). This means the Anti-lock
function of the braking system has shut down. The brakes still work like
a conventional system, providing
normal stopping ability. You should
have the dealer inspect your car as soon as possible.
CONTINUED
DrivingProCarManuals.comMain Menu Table of Contents s t
Page 131 of 240
Towing a Trailer
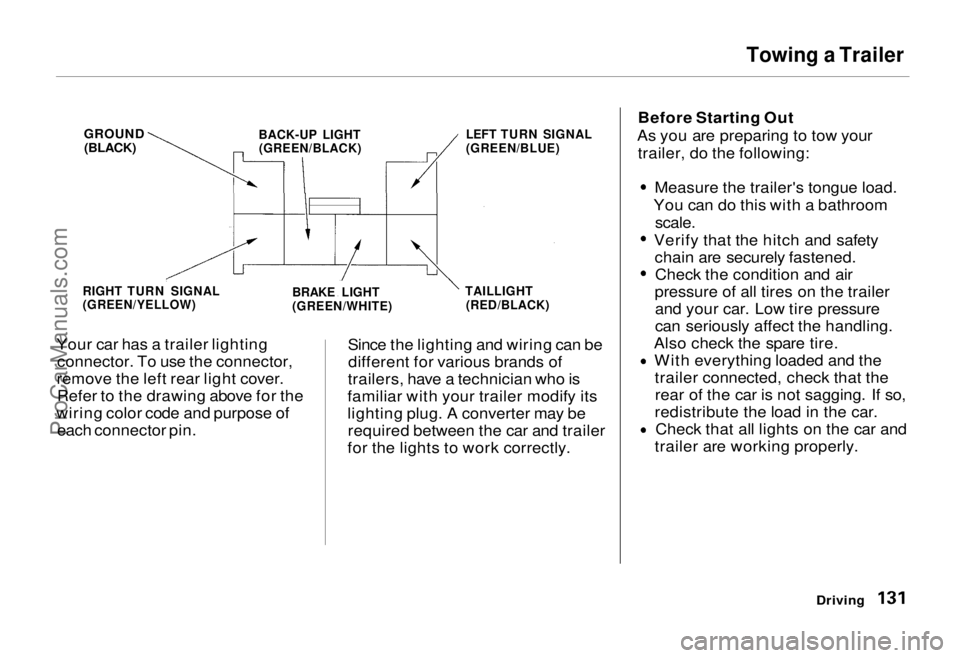
Your car has a trailer lighting connector. To use the connector,
remove the left rear light cover. Refer to the drawing above for the
wiring color code and purpose of each connector pin. Since the lighting and wiring can be
different for various brands of
trailers, have a technician who is
familiar with your trailer modify its
lighting plug. A converter may be required between the car and trailer
for the lights to work correctly. Before Starting Out
As you are preparing to tow your trailer, do the following:
Measure the trailer's tongue load.
You can do this with a bathroom
scale.
Verify that the hitch and safety chain are securely fastened.Check the condition and air
pressure of all tires on the trailer and your car. Low tire pressure
can seriously affect the handling.
Also check the spare tire. With everything loaded and thetrailer connected, check that therear of the car is not sagging. If so,
redistribute the load in the car. Check that all lights on the car and
trailer are working properly.
Driving
RIGHT TURN SIGNAL
(GREEN/YELLOW)
BRAKE LIGHT
(GREEN/WHITE)TAILLIGHT
(RED/BLACK) LEFT TURN SIGNAL
(GREEN/BLUE)
BACK-UP LIGHT
(GREEN/BLACK)
GROUND
(BLACK)ProCarManuals.comMain Menu Table of Contents s t
Page 134 of 240
Maintenance
This section explains why it is important to keep your car well
maintained and to follow basic
maintenance safety precautions.
This section also includes Maintenance Schedules for normal
driving and severe driving conditions,
a Maintenance Record, and
instructions for simple maintenance
tasks you may want to take care of
yourself.
If you have the skills and tools
required to perform more complex
maintenance tasks on your Honda,
you may want to purchase the Service Manual. See page 233 for
information on how to obtain a copy, or see your Honda dealer.
Maintenance Safety....................... 136
Maintenance Schedule.................. 138
Maintenance Record..................... 142
Periodic Checks............................. 144
Fluid Locations............................... 145
Engine Oil....................................... 146
Checking Engine Oil................. 146
Adding......................................... 146
Recommended Oil..................... 147
Additives..................................... 148
Oil and Filter Changes.............. 148
Cooling System.............................. 150
Checking the Engine Coolant
Level........................................ 150
Adding Engine Coolant............. 151
Replacing Engine Coolant........ 152
Windshield Washers..................... 154
Automatic Transmission Fluid..... 155
Brake Fluid..................................... 156
Brake System............................. 156
Anti-lock Brake System............ 157
Power Steering............................... 157
Air Cleaner..................................... 158
Spark Plugs..................................... 160
Replacement............................... 160
Specification............................... 161
Battery............................................ 162
Windshield Wipers........................ 165
Air Conditioning............................. 168 Drive Belts...................................... 169
Tires................................................ 169 Inflation....................................... 170
Inspection................................... 171
Maintenance............................... 171
Tire Rotation.............................. 172 Replacing Tires and Wheels .... 172
Wheels and Tires....................... 173
Winter Driving........................... 173 Snow Tires.............................. 174
Tire Chains............................. 174
Lights.............................................. 175 Headlight Aiming...................... 175
Replacing Bulbs......................... 177
Storing Your Car............................ 182
MaintenanceProCarManuals.comMain Menu s t
Page 143 of 240
Periodic Checks
You should check the following items at the specified intervals. If
you are unsure of how to perform any check, turn to the page given. Engine oil level — Check every
time you fill the fuel tank. See
page 112.
Engine coolant level — Check the
radiator reserve tank every time
you fill the fuel tank. See page 113.
Windshield washer fluid — Check the level in the reservoir monthly.If weather conditions cause you to
use the washers frequently, check
the reservoir each time you stop
for fuel. See page 154. Automatic transmission — Check
the fluid level monthly. See page
155.
Brakes and power steering —
Check the fluid level monthly. See
page 156.
Tires — Check the tire pressure
monthly. Examine the tread for
wear and foreign objects. See page
169.
Battery — Check its condition and
the terminals for corrosion monthly. See page 162. Air conditioning — Check its
operation weekly. See page 168. Lights — Check the operation of
the headlights, parking lights,
taillights, high-mount brake light,
turn signals, brake lights, and
license plate lights monthly. See
page 175.
Maintenance
ProCarManuals.comMain Menu Table of Contents s t