1995 GMC SIERRA wheel torque
[x] Cancel search: wheel torquePage 83 of 488
A CAUTION:
Shifting out of PARK (f) or NEUTRAL (N) while your engine is
“racing” (running at high speed) is dangerous. Unless your foot
is firmly on the brake pedal, your vehicle could move very
rapidly.
You could lose control and hit people or objects. Don’t
shift out of
PARK (P) or NEUTRAL (N) while your engine is
racing.
NOTICE:
Damage to your transmission caused by shifting out of PARK
(P) or NEUTRAL (N) with the engine racing isn’t covered by
your warranty.
AUTOMATIC OVERDRIVE (a) - This position is for normal
driving. If you need more power for passing, and you’re:
- Going less than about 35 mph (56 km/h), push your accelerator
pedal about halfway down.
the way down.
You’ll shift down to the next gear and have more power.
- Going about 35 mph (56 kdh) or more, push the accelerator all
0 should not be used when towing a trailer, carrying a heavy load,
driving on steep hills, or for off-road driving. Select THIRD
GEAR
(3) when operating the vehicle under any of these
conditions.
THIRD GEAR (3) - This is like 63, but you never go into Overdrive.
You should use
THIRD GEAR (3) when towing a trailer. carrying a
heavy load, driving on steep hills, or
for off-road driving.
0 SECOND GEAR (2) - This position gives you more power but lower
fuel economy. You can use
SECOND GEAR (2) on hills. It can help
control
your speed as you go down steep mountain roads, but then you
would also want
to use your brakes off and on.
If you manually select SECOND GEAR (2), the transmission will drive
in second gear. You may use this feature for reducing torque to the rear
wheels when you are trying
to start your vehicle from a stop on
slippery road surfaces.
2-21
ProCarManuals.com
Page 92 of 488
Leaving Your Vehicle With the Engine Running
(Automatic Transmission Models
Only)
A CAUTION:
It can be dangerous to leave your vehicle with the engine
running. Your vehicle could move suddenly if the shift lever
is
not fully in PARK (P) with the parking brake firmly set. If you
have four-wheel drive with a manual transfer case shift lever
and your transfer case is in
NEUTRAL (N), your vehicle will be
free to roll, even if your shift lever is in PARK
(P). So be sure the
transfer case
is in a drive gear - not in NEUTRAL (N). And, if
you leave the vehicle with the engine running, it could overheat
and even catch fire.
You or others could be injured. Don’t leave
your vehicle with the engine running unless you have to.
If you have to leave your vehicle with the engine running, be sure your
vehicle is in PARK (P) and your parking brake is firmly set before you leave
it. After you’ve moved the shift lever into the PARK (P) position, hold the
regular brake pedal down. Then. see
if you can move the shift lever away
from PARK (P) without first pulling
it toward you.
If
you can, it means that the shift lever wasn’t fully locked into PARK (P).
Torque Lock (Automatic Transmission)
If you are parking on a hill and you don’t shift your transmission into PARK
(P) properly, the weight of the vehicle may put too much force on the
parking pawl in the transmission.
You may find it difficult to pull the shift
lever out of PARK (P). This is called “torque lock.” To prevent torque lock,
set the parking brake and then shift into PARK (P) properly before you
leave the driver’s seat.
To find out how, see “Shifting Into PARK (P)” in the
Index.
When you are ready to drive, move the shift lever out
of PARK (P) before
you release the parking brake.
If “torque lock” does occur, you may need to have another vehicle push
yours
a little uphill to take some of the pressure from the transmission, so
you can pull the shift lever out of PARK (P).
2-30
ProCarManuals.com
Page 261 of 488
Tighten Clockwise Tightening Sequence
t
40
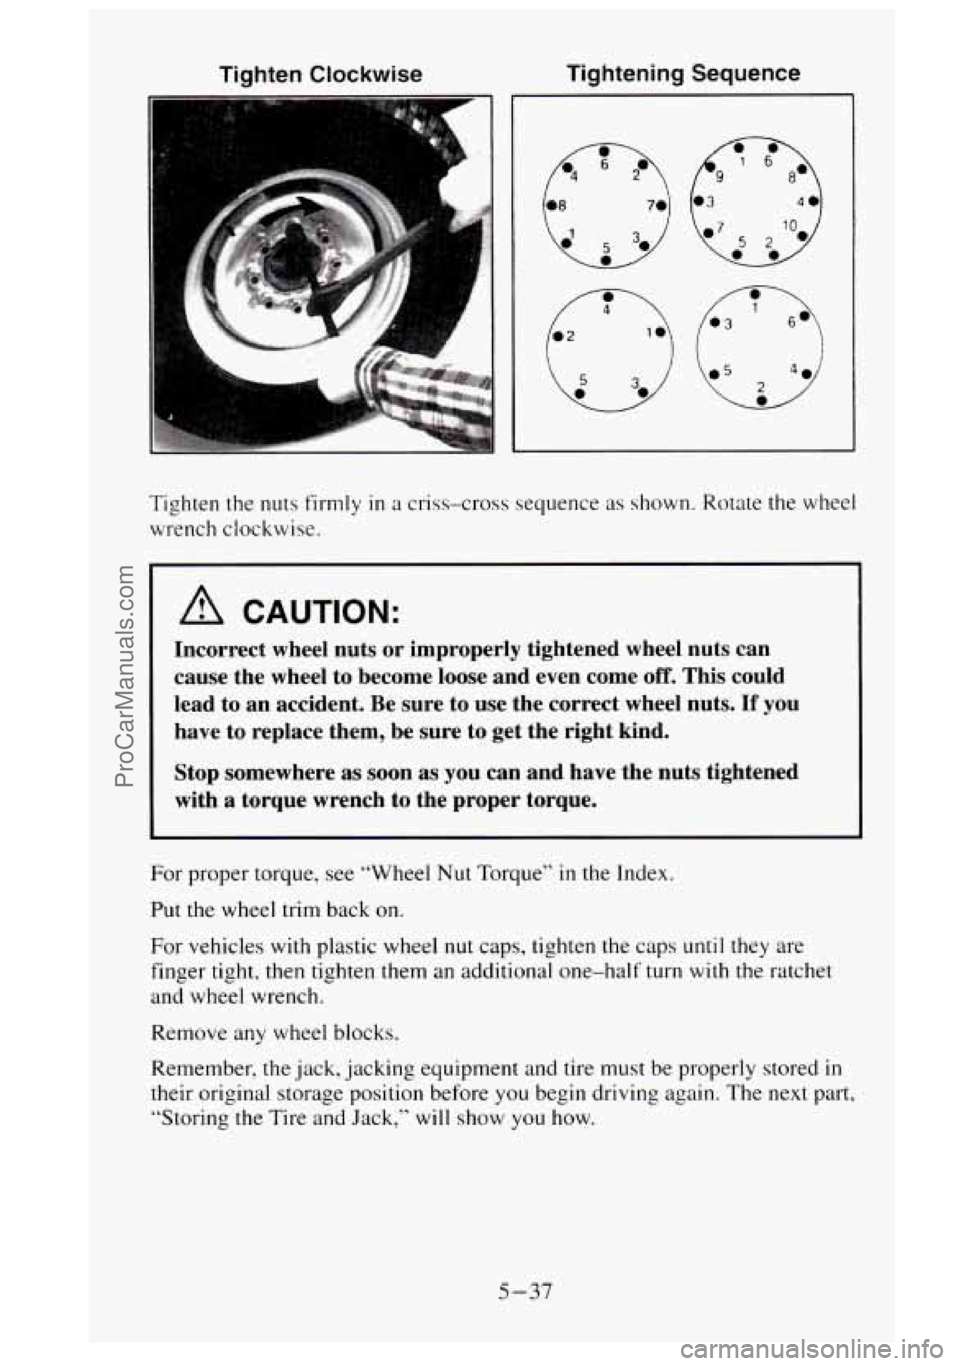
Tighten the
nuts firmly in a criss-cross sequence as shown. Rotate the wheel
wrench clockwise.
A CAUTION:
Incorrect wheel nuts or improperly tightened wheel nuts can
cause the wheel to become loose and even come
off. This could
lead to an accident. Be sure to use the correct wheel nuts.
If you
have to replace them, be sure to get the right kind.
Stop somewhere
as soon as you can and have the nuts tightened
with
a torque wrench to the proper torque.
For proper torque, see “Wheel Nut Torque” in the Index.
Put the wheel trim back on.
For vehicles with plastic wheel
nut caps, tighten the caps until they are
finger tight, then tighten them an additional one-half turn
with the ratchet
and wheel wrench.
Remove any wheel blocks.
Remember, the jack, jacking equipment and tire must be properly stored
in
their original storage position before you begin driving again. The next part,
“Storing the Tire and Jack,”
will show you how.
5-37
ProCarManuals.com
Page 327 of 488
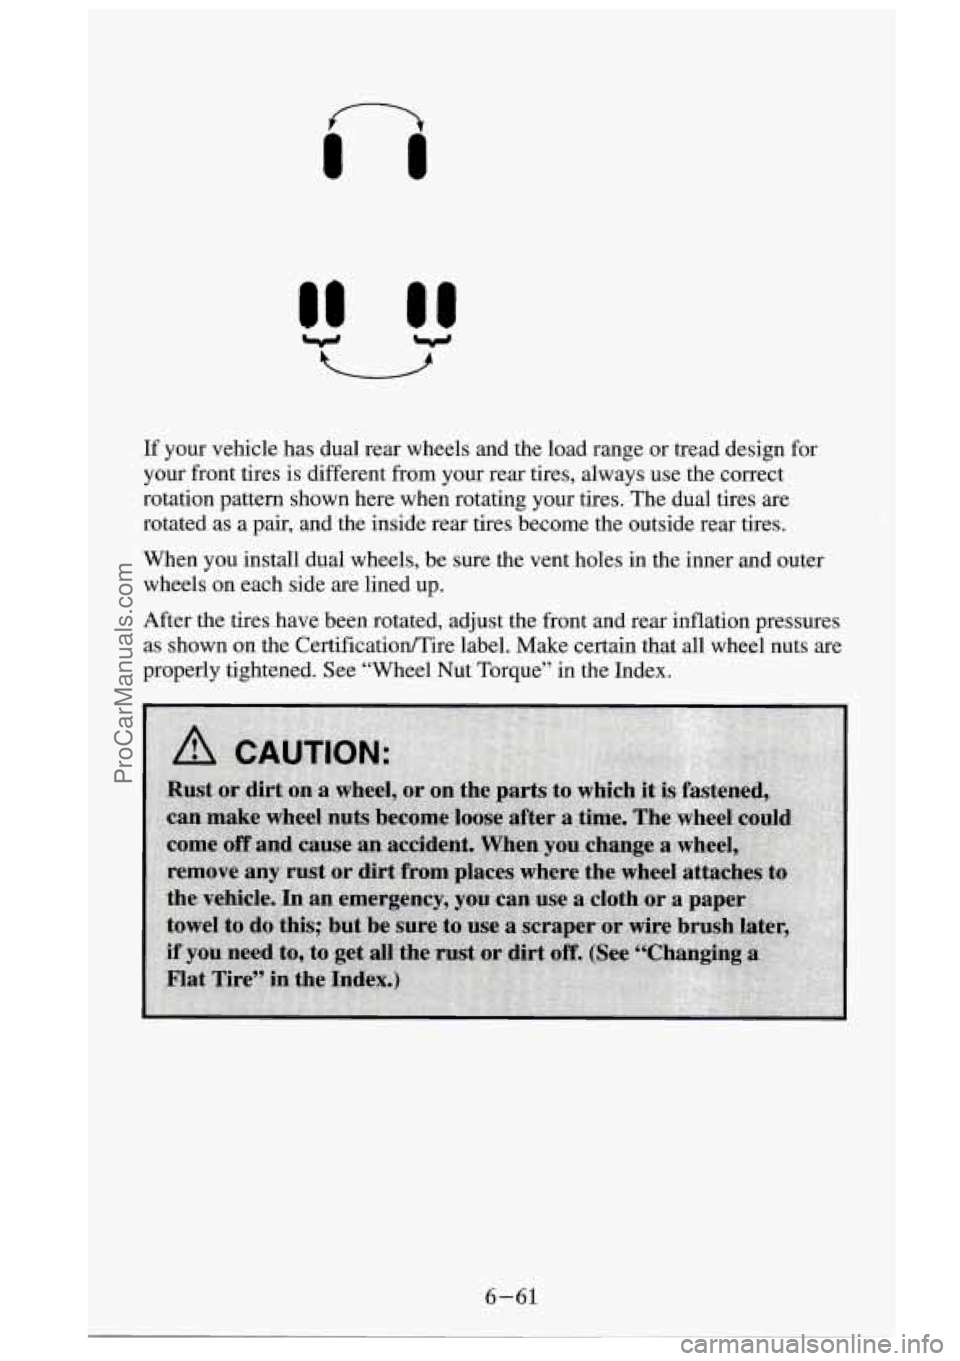
If your vehicle has dual rear wheels and the load range or tread design for
your front tires is different from your rear tires, always use the correct
rotation pattern shown here when rotating your tires. The dual tires are
rotated as a pair, and the inside rear tires become the outside rear tires.
When you install dual wheels, be sure the vent holes in the inner and outer
wheels
on each side are lined up.
After the tires have been rotated, adjust the front and rear inflation pressures
as shown on the Certificatioflire label. Make certain that all wheel nuts are
properly tightened. See “Wheel Nut Torque” in the Index.
6-61
ProCarManuals.com
Page 328 of 488
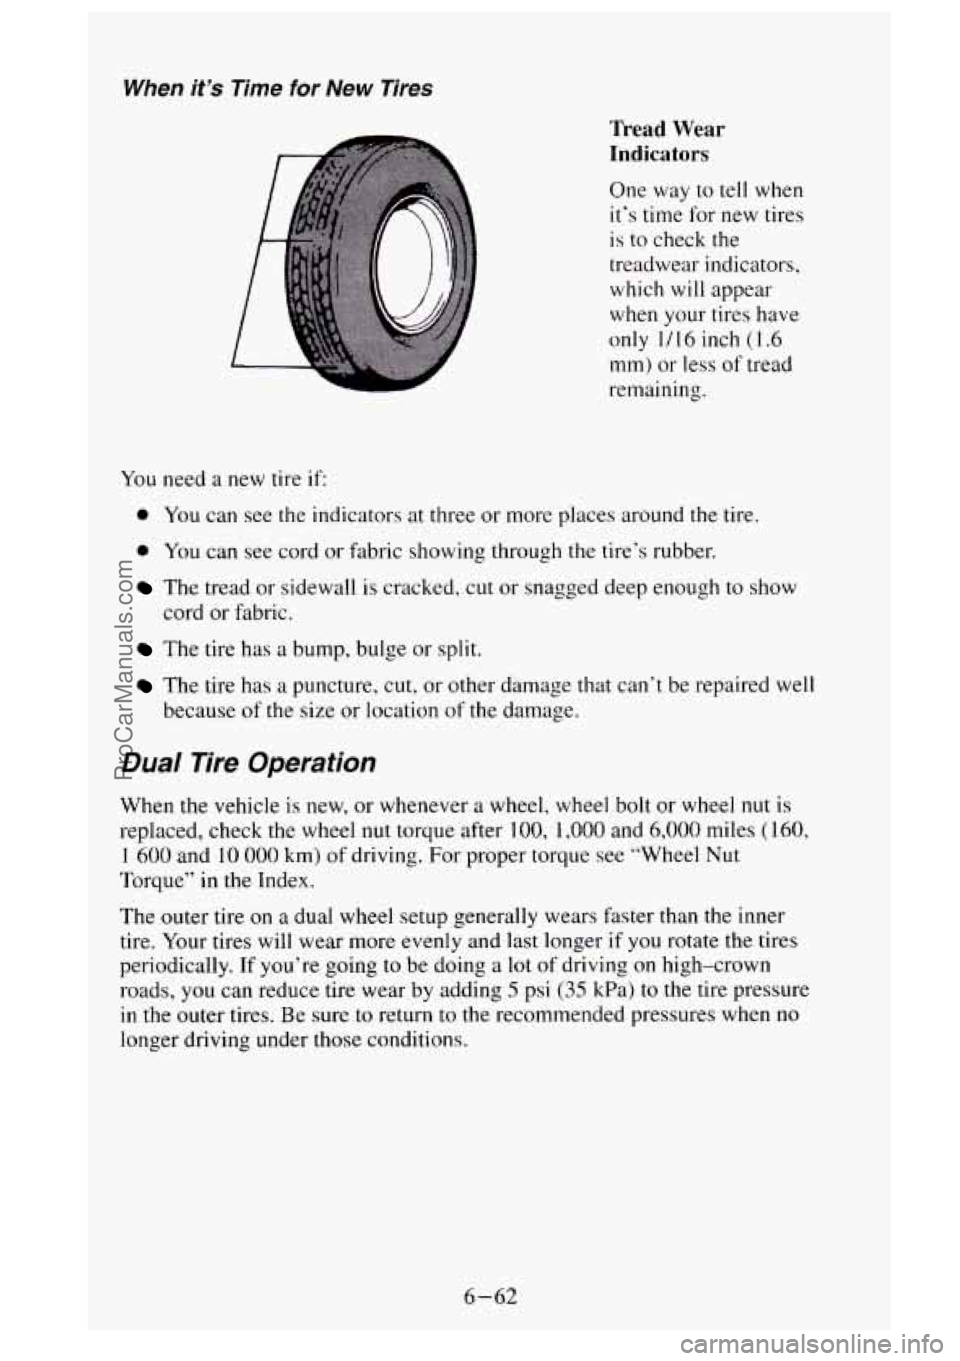
When it’s Time for New Tires
You need a new tire if:
Tread Wear
Indicators
One way to tell when
it’s time for new tires
is to check the
treadwear indicators,
which will appear
when your tires have
only
1/16 inch (1.6
mm)
or less of tread
remaining.
0 You can see the indicators at three or more places around the tire.
0 You can see cord or fabric showing through the tire’s rubber.
The tread or sidewall is cracked, cut or snagged deep enough to show
cord
or fabric.
The tire has a bump, bulge or split.
The tire has a puncture, cut, or other damage that can‘t be repaired well
because
of the size or location of the damage.
Dual Tire Operation
When the vehicle is new, or whenever a wheel, wheel bolt or wheel nut is
replaced, check the wheel
nut torque after 100, 1,000 and 6,000 miles (160,
1 600 and 10 000 km) of driving. For proper torque see “Wheel Nut
Torque” in the Index.
The outer tire
on a dual wheel setup generally wears faster than the inner
tire. Your tires will wear more evenly and last longer
if you rotate the tires
periodically. If you’re going to be doing
a lot of driving on high-crown
roads, you can reduce tire wear by adding
5 psi (35 kPa) to the tire pressure
in the outer tires. Be sure to return
to the recommended pressures when no
longer driving under those conditions.
6-62
ProCarManuals.com
Page 332 of 488
Whenever a wheel, wheel bolt or wheel nut is replaced on a dual wheel
setup, check the wheel nut torque after 100, 1,000 and 6,000 miles ( 160,
1 600 and 10 000 km) of driving. For proper torque, see “Wheel Nut
Torque” in the Index.
Used Replacement Wheels
A CAUTION:
Putting a used wheel on your vehicle is dangerous. You can’t
know
how it’s been used or how many miles it’s been driven. It
could fail suddenly and cause an accident. If you have to replace
a wheel use a new GM original equipment wheel.
7
c
‘ire Chains
NOTICE:
If your vehicle has dual wheels or LT265/75R16 size tires, don’t
use tire chains; they can damage your vehicle.
If you don’t have dual wheels or if you have a tire size other
than
LT26975R16, use tire chains only where legal and only
when you must. Use chains that are the proper size for your
tires. Install them on the tires of the rear axle.
Don’t use chains on the tires
of the front axle.
Tighten them
as tightly as possible with the ends securely
fastened. Drive slowly and follow the chain manufacturer’s
instructions. If you can hear the chains contacting your vehicle,
stop and retighten them. If the contact continues, slow down
until it stops. Driving too fast
or spinning the wheels with chains
on
will damage your vehicle.
6-66
ProCarManuals.com
Page 348 of 488
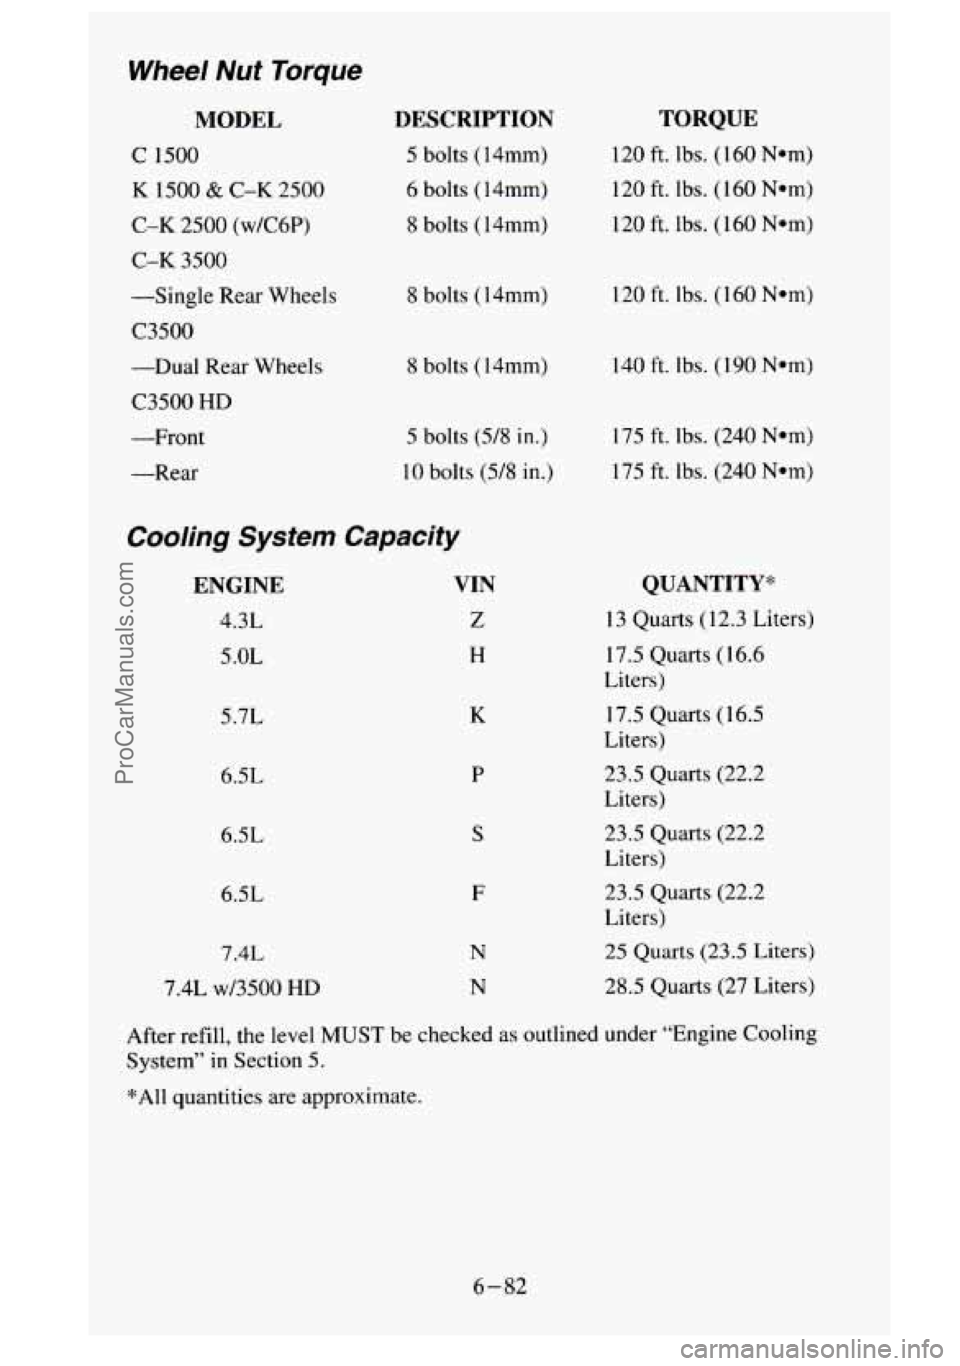
Wheel Nut Torque
MODEL
C 1500
K 1500 & C-K 2500
C-K 2500
(w/CGP)
C-K 3500
-Single Rear Wheels
C3500
-Dual Rear Wheels
C3500 HD
-Front
-Rear
DESCRIPTION
5 bolts ( 14mm)
6 bolts (14mm)
8 bolts ( 14mm)
8 bolts ( 14mm)
8 bolts (14rnm)
5 bolts (518 in.)
10 bolts (5/8 in.)
Cooling System Capacity
ENGINE
4.3L
5 .OL
5.7L
6.5L
6.5L
6.5L
7.4L
7.4L w/3500
HD
VIN
Z
H
K
P
S
F
N
N
TORQUE
120 ft. lbs. (1 60 Nmm)
120 ft. lbs. (160 Nmm)
120 ft. lbs. (160 Nom)
120
ft. lbs. (1 60 Nom)
140 ft. lbs. ( 190 Nmm)
175 ft. lbs. (240 Nom)
175 ft. lbs. (240 Nom)
QUANTITY*
13 Quarts (12.3 Liters)
17.5 Quarts (16.6
Liters)
17.5 Quarts (16.5
Liters)
23.5 Quarts (22.2
Liters)
23.5 Quarts (22.2
Liters)
23.5 Quarts (22.2
Liters)
25
Quarts (23.5 Liters)
28.5
Quarts (27 Liters)
After refill, the level
MUST be checked as outlined under “Engine Cooling
System”
in Section 5.
*All quantities are approximate.
6-82
ProCarManuals.com
Page 449 of 488
Part B: Owner Checks and Services
Listed below are owner checks and services which should be performed at
the intervals specified to help ensure the safety, dependability and emission
control performance of your vehicle.
Be sure any necessary repairs are completed at once. Whenever any fluids
or lubricants are added to your vehicle, make sure they are the proper ones,
as shown in Part D.
At the First 100, 1,000 and 6,000 Miles (160, I 600 and
IO 000 km)
For vehicles with dual wheels, check dual wheel nut torque. For proper
torque, see “Wheel
Nut Torque’’ in the Index.
At Each Fuel Fill
Engine Oil Level
Check the engine oil level and add the proper oil if necessary. See “Engine
Oil”
in the Index for further details.
Engine Coolant Level
Check the engine coolant level and add the proper coolant mix if necessary.
See ”Coolant”
in the Index for further details.
Windshield Washer Fluid Level
Check the windshield washer fluid level in the windshield washer tank and
add the proper fluid if necessary. See ”Windshield Washer Fluid” in the
Index for further details.
At Least Once a Month
Tire Inflation
Check tire inflation. Make sure tires are inflated to the pressures specified
on the Certification/Tire label which is located on the rear edge of the
driver’s door or on the incomplete vehicle document in the cab. See “Tires”
in the Index for further details.
7-93
ProCarManuals.com