Page 6 of 340
Downloaded from www.Manualslib.com manuals search engine Bli
In 1932 Chevrolet introduced the
Synchro-Mesh transmission and
offered a host
of
accessories-including such
niceties as a clock!
I I I The legacy of America’s favorite I I I I I sportscar began in 1953, when 319
I launched the first use of a fiberglass
I I hand-assembled white Corvettes
I I I
body in a production cal: I I
I
I
I
-,-,,,,-,,,,,,J
Page 12 of 340
Downloaded from www.Manualslib.com manuals search engine Move the lever under the front seat to unlock it. Slide
the seat to where you want it. Then release the lever and
try to move the seat with your body, to make sure the
seat is locked into place.
Driver’s Seat Manual Lumbar Support
(Convertible with White Vinyl Seats Only)
The manual lumbar support control is located at the
front
of the driver’s seat, toward the right. Turn the knob
clockwise or counterclockwise
to increase or decrease
the amount
of support to your lower back.
Reclining Front Seatbacks
To adjust the seatback, lift the lever on the outer side of
the seat and move the seatback to where you want it.
Release the lever
to lock the seatback. Pull up on the
lever and the seat will go to an upright position.
1-2
Page 93 of 340
Downloaded from www.Manualslib.com manuals search engine Lamp Controls
I I
The band on the turn signal/multifunction lever controls
your vehicle’s lamps.
0 Parking Lamps
Side Marker Lamps
0 Taillamps
e Instrument Panel Lamps
0: HEADLAMPS: This position will turn on the
following:
Headlamps
0 Parking Lamps
Side Marker Lamps
Taillamps
Instrument Panel Lamps
Turn the
band clockwise all the way to turn the lamps
off.
Lamps On Reminder
If you open the driver’s door with the ignition off and
the lamps on, you will hear a warning chime.
2-37
Page 97 of 340

Downloaded from www.Manualslib.com manuals search engine Illuminated EntryLExit System
When you open either front door, or open a rear door,
the lamps inside your vehicle will go
on. These lamps
will fade off after about
40 seconds, or when the ignition
is turned on.
If the ignition has been off for less than two minutes,
the lamps inside your vehicle will stay on for about
15 seconds to provide an illuminated exit when you
remove the key from the ignition.
After you exit the vehicle and all of the doors have been
closed,
the lamps will stay on for an additional four
seconds before fading
off.
Battery Rundown Protection
Your Chevrolet is equipped with a Battery Rundown
Protection feature designed
to protect your vehicle’s
battery.
When any interior lamp (trunk, reading, dome, glove
box, etc.) is left
on and the ignition is turned OFF, the
Battery Rundown Protection system will automatically
turn the lamp
off after 20 minutes. This will avoid
draining the battery. This system does not protect
against leaving on the headlamps.
To reactivate the interior lamps, either:
The ignition must be turned on,
The activated lamp switch must be turned off, then
on, OR
A door must be opened.
The Battery
Rundown Protection feature will also be
activated when any door is
left open.
If your vehicle is left with the ignition off for over
24 days, the battery power to the clock and audio
system will turn off to reduce the battery drain. When
the ignition is turned on again, battery power will be
resupplied. Under these conditions it will be necessary
to reset the clock and audio system settings.
2-41
Page 99 of 340
Downloaded from www.Manualslib.com manuals search engine Power Remote Control Mirrors (Option) Convex Outside Mirror
The mirror control is Your passenger’s side mirror is convex.
located
On the driver’s A convex mirror’s surface is curved so you can see more
or counterclockwise to
Rotate the control clockwise
from the driver’s seat.
Then move the control in the direction you want the
mirror to move. Adjust each mirror
so you can just see
the side
of your vehicle when you are sitting in a
comfortable driving position.
The mirror is a spring loaded breakaway design.
2-43
Page 127 of 340
Downloaded from www.Manualslib.com manuals search engine 0 Section 3 Comfort Controls and Audio Svstems J
In this section you’ll find out how to operate the comfort
control systems and audio systems offered with your
Chevrolet. Be sure
to read about the particular system
supplied with your vehicle.
Climate Control System
With this system, you can control the ventilation and
heating
in your vehicle. Your
vehicle also has the flow-through ventilation
system described later
in this section.
System Controls
Fan Knob
The left knob selects the force of air you want. To turn
the fan off, turn the mode knob all the way
counterclockwise.
In any other setting, the fan will run
continuously. The fan must
be on to run the air
conditioning compressor.
Temperature Knob
The center knob changes the temperature of the air
coming through
the system. Turn this knob toward the
red (clockwise) for warmer air. Turn it toward blue
(counterclockwise) for cooler air.
3-1
Page 131 of 340

Downloaded from www.Manualslib.com manuals search engine Ventilation Tips
0
0
0
Keep the hood and front air inlet free of ice, snow or
any other obstruction, such
as leaves. The heater and
defroster will work far better, reducing the chance
of
fogging the inside of your windows.
When you enter
a vehicle in cold weather, adjust the
mode knob
to FLOOR and the fan to the highest
speed for
a few moments before driving off. This
helps clear the intake ducts of snow and moisture
and reduces the chance
of fogging the inside of your
windows.
Keep the air path under the front seats cle.ar of
objects. This helps air circulate throughout your
vehicle.
Audio Systems
Your Delco@ audio system has been designed to operate
easily and give years of listening pleasure.
You will get
the most enjoyment out of
it if you ac mint yourself
with
it first. Find out what your Delco 9s system can do
and how
to operate all its controls, to be sure you’re
getting the most
out of the advanced engineering that
went into
it.
Setting the Clock
No matter which audio system you have in your vehicle,
setting the clock is easy.
1.
2.
With the ignition on and the radio on or off, press
SET. The SET indicator will appear on the digital
screen for five seconds.
You must begin to set the clock to the correct hour
and minute during those five seconds.
If your audio system does not have a CD player:
0 Press the SEEK down arrow to set the hour.
Press the SEEK up arrow to set the minute.
If your audio system has
a CD player:
0 Press SCAN to set the hour.
Press the SEEK up or down arrows to decrease or
increase the minutes.
3-5
Page 132 of 340

Downloaded from www.Manualslib.com manuals search engine ! AWM Stereo Radio
TUNE BASS
LSCANJ ~ PAM - FM
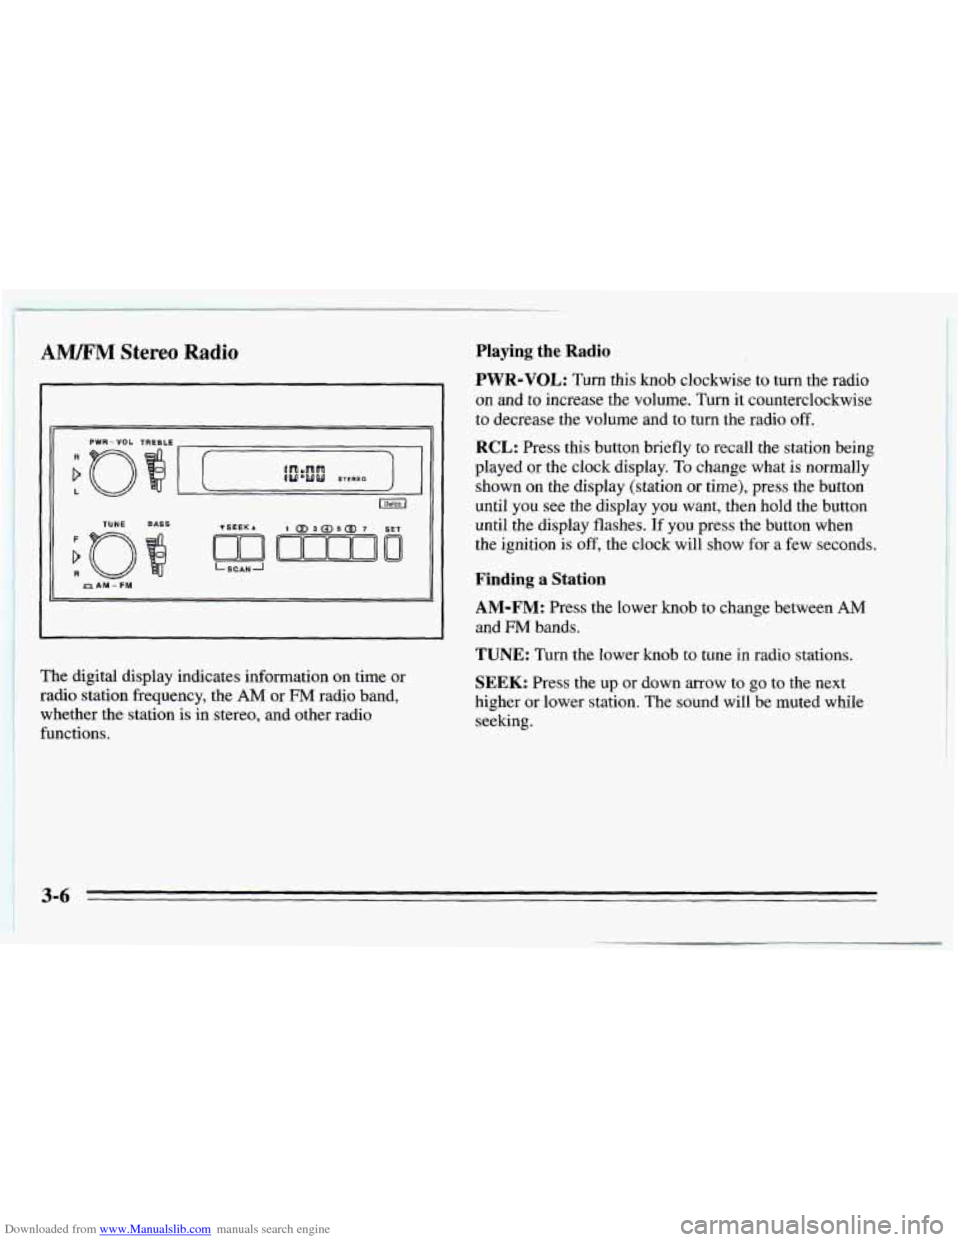
~ The digital display indicates information on time or ~ radio station frequency, the AM or FM radio band,
whether the station is in stereo, and other radio
functions.
Playing the Radio
PWR-VOL: Turn this knob clockwise to turn the radio
on and to increase the volume. Turn it counterclockwise
to decrease the volume and to turn the radio off.
RCL: Press this button briefly to recall the station being
played or the clock display.
To change what is normally
shown on the display (station
or time), press the button
until you see the display
you want, then hold the button
until the display flashes.
If you press the button when
the ignition
is off, the clock will show for a few seconds.
Finding a Station
AM-FM: Press the lower knob to change between AM
and FM bands.
TUNE: Turn the lower knob to tune in radio stations.
SEEK: Press the up or down arrow to go to the next
higher or lower station. The sound will be muted while
seeking.
3-6