1995 CHEVROLET CAMARO buttons
[x] Cancel search: buttonsPage 60 of 388
Downloaded from www.Manualslib.com manuals search engine 4 8
1
c
c
-w
I
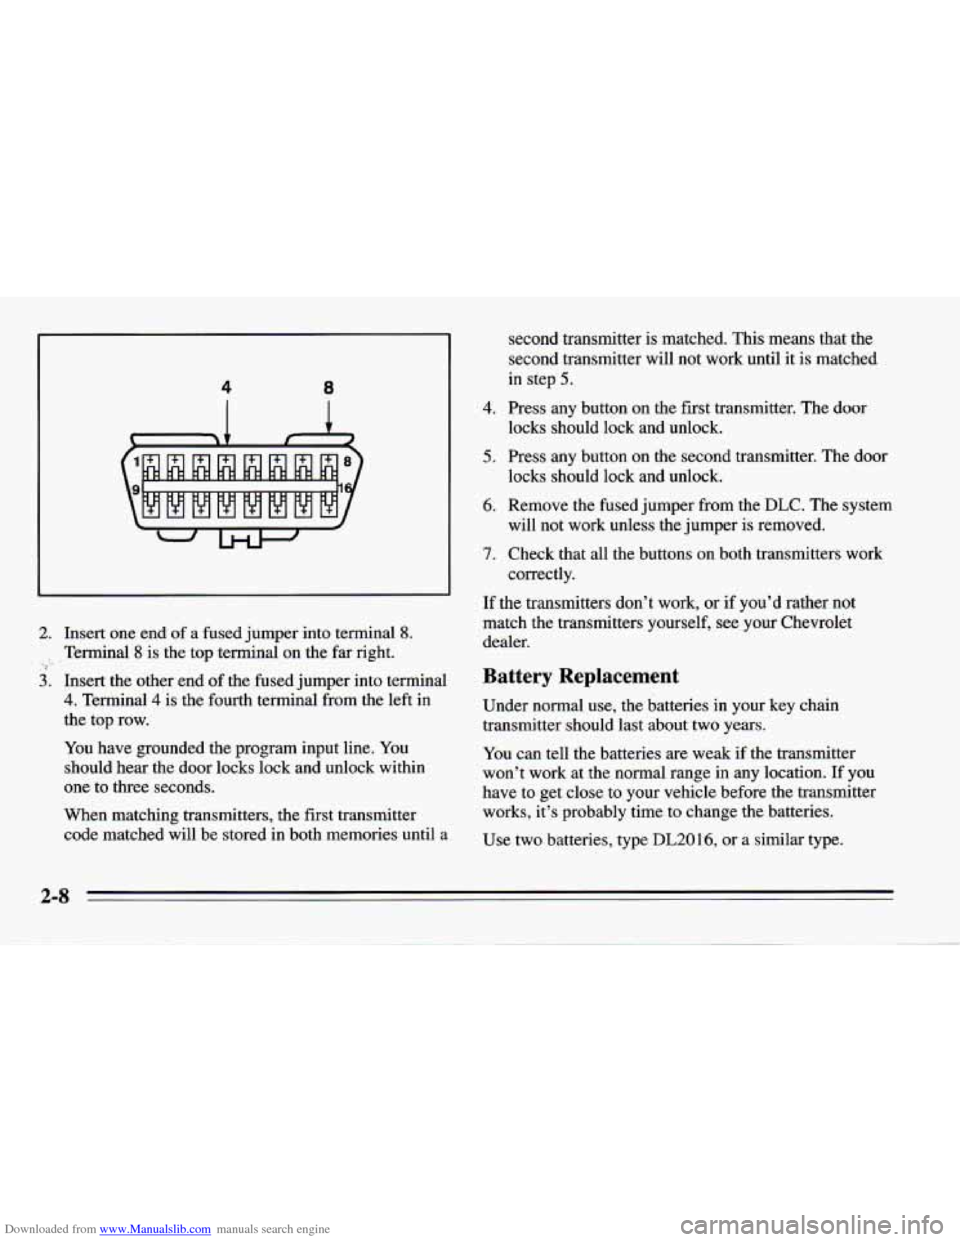
2. Insert one end of a fused jumper into terminal 8.
, Terminal 8 is the top terminal on the far right. ,> ,_ .
3. Insert the other end of the fused jumper into terminal
4. Terminal 4 is the fourth terminal from the left in
the top row.
You have grounded the program input line. You
should hear the door locks lock and unlock within
one to three seconds.
When matching transmitters, the first transmitter
code matched will be stored in both memories until a second
transmitter is matched.
This means that the
second transmitter will not work until it is matched
in step
5.
4. Press any button on the first transmitter. The door
locks should lock and unlock.
5. Press any button on the second transmitter. The door
locks should lock and unlock.
6. Remove the fused jumper from the
DLC. The system
7. Check that all the buttons on both transmitters work
will not work unless the
jumper is removed.
correctly.
If the transmitters don’t work,
or if you’d rather not
match the transmitters yourself, see your Chevrolet
dealer.
Battery Replacement
Under normal use, the batteries in your key chain
transmitter should last about two years.
You can tell the batteries are weak if the transmitter
won’t work at the normal range
in any location. If you
have to get close to your vehicle before the transmitter
works, it’s probably time to change the batteries.
Use two batteries, type
DL20 16, or a similar type.
Page 108 of 388
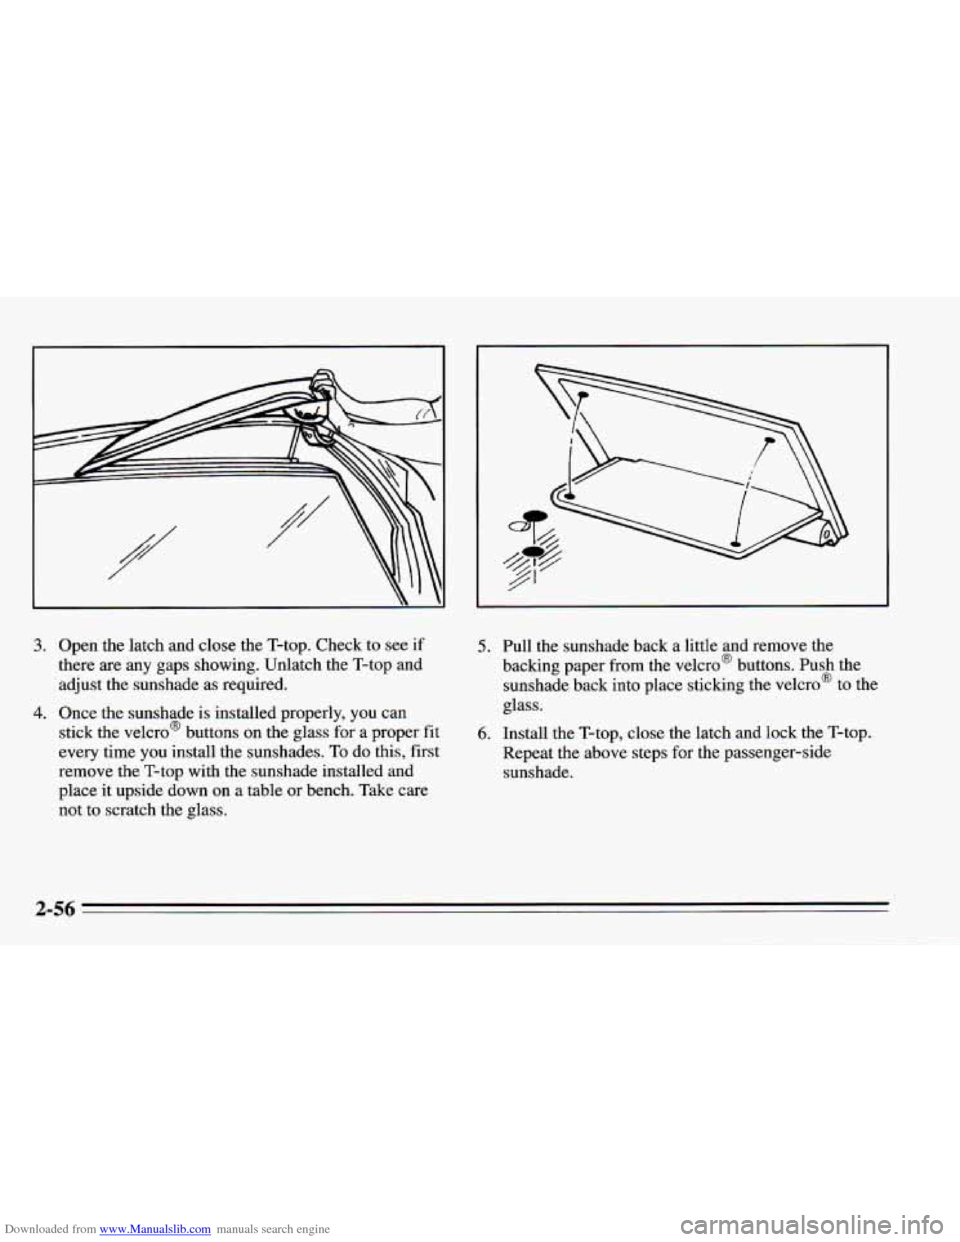
Downloaded from www.Manualslib.com manuals search engine 3. Open the latch and close the T-top. Check to see if
there are any gaps showing. Unlatch the T-top and
adjust the sunshade as required.
stick the Velcro@ buttons on the glass for a proper fit
every time you install the sunshades. To do this, first
remove the T-top with the sunshade installed and
place it upside down on a table or bench. Take care
not to scratch the glass.
4. Once the sunshade is installed properly, you can
5. Pull the sunshade back a little and remove the
backing paper from the Velcro@ buttons. Push the sunshade back into place sticking the Velcro@ to the
glass.
Repeat the above steps for the passenger-side
sunshade.
6. Install the T-top, close the latch and lock the T-top.
Page 145 of 388
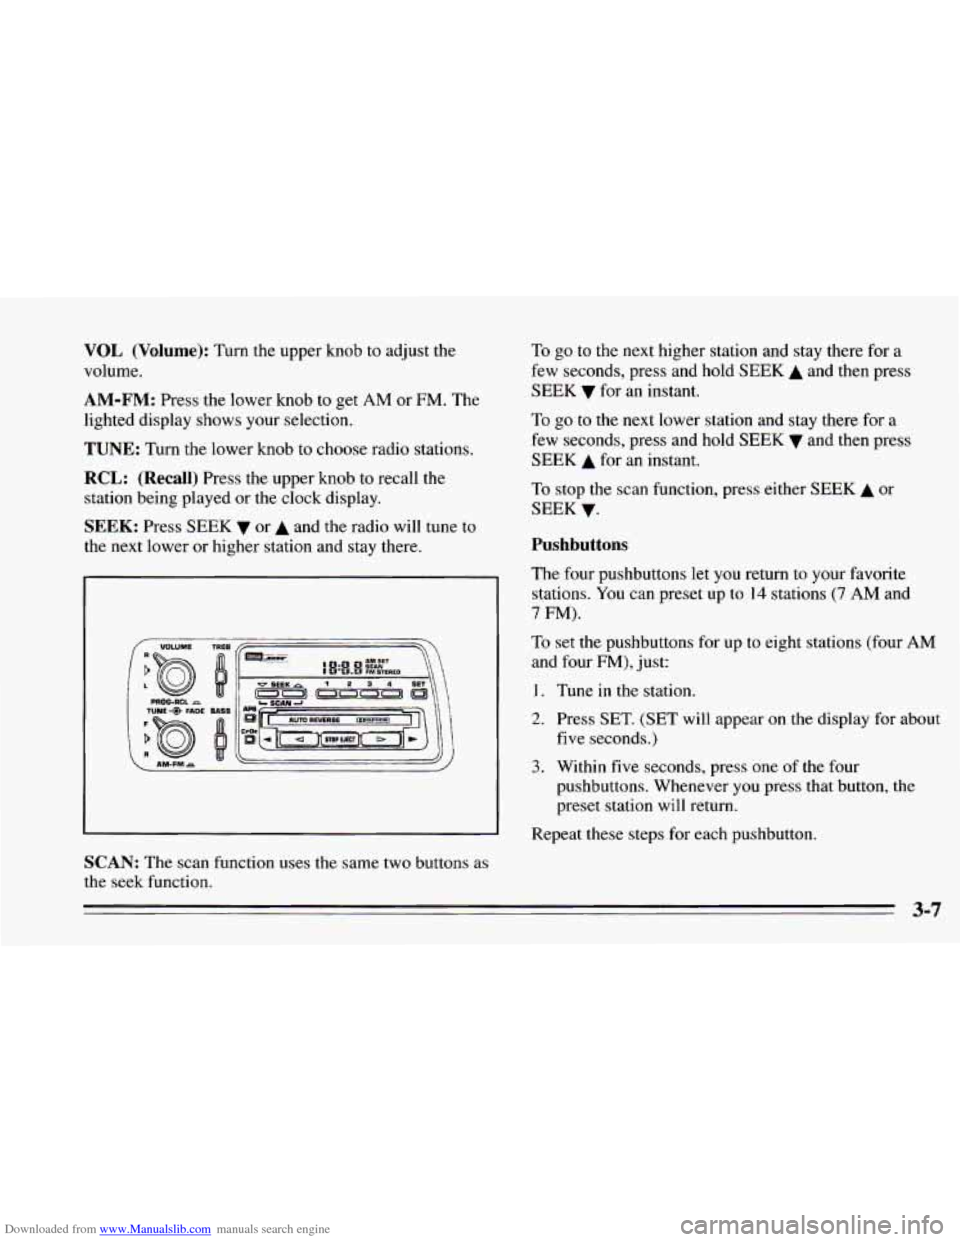
Downloaded from www.Manualslib.com manuals search engine VOL (Volume): Turn the upper knob to adjust the
volume.
AM-FM: Press the lower knob to get AM or FM. The
lighted display shows your selection.
TUNE: Turn the lower knob to choose radio stations.
RCL: (Recall) Press the upper knob to recall the
station being played or the clock display.
SEEK: Press SEEK v or A and the radio will tune to
the next lower or higher station and stay there.
I TUNE FADE EAS~
SCAN: The scan function uses the same two buttons as
the seek function. To
go to the next higher station and stay there for a
few seconds, press and hold
SEEK A and then press
SEEK
v for an instant.
To go to the next lower station and stay there for
a
few seconds, press and hold SEEK v and then press
SEEK A for an instant.
To stop
the scan function, press either SEEK A or
SEEK
v.
Pushbuttons
The four pushbuttons let you return to your favorite
stations. You can preset up to
14 stations (7 AM and
7 FM).
To set the pushbuttons for up to eight stations (four AM
and four FM), just:
1. Tune in the station.
2. Press SET. (SET will appear on the display for about
3. Within five seconds, press one of the four
five
seconds.)
pushbuttons. Whenever you press that button, the
preset station will return.
Repeat these steps for each pushbutton.
3-7
Page 146 of 388
Downloaded from www.Manualslib.com manuals search engine You can preset three more stations on each band by
pressing
a pair of buttons next to each other at the same
time. Just:
1. Tune in the station.
2. Press SET (SET will appear on the display for about
five seconds.)
3. Within five seconds, press two pushbuttons next to
each other at the same time. Whenever
you press that
pair
of buttons, the preset station will return.
Repeat these steps for each pair of pushbuttons.
Setting the Tone
Bass: Slide the BASS lever up to hear more bass.
Treble: Slide the TREB lever up to hear more treble.
If a station is weak and noisy, move TREB down to
reduce the noise.
Adjusting the Speakers
Balance:
Turn the balance control behind the upper
knob
to move the sound between the right and left
speakers.
Fade: Turn the fade control behind the lower knob to
move the sound between the front and rear speakers.
The Delco/Bose premium speaker system includes
five
speakers. It does include speakers in the panel behind
the grilles next
to the rear seat.
To Play a Cassette Tape
Your tape player is built to work best with tapes that are
30 to 45 minutes long on each side. Tapes longer than
that are
so thin they may not work well in this player.
The longer side with the tape visible goes
in first. If you
hear nothing or hear just a garbled sound, it may not be
in squarely. Press STOP-EJECT to remove the tape and
start over.
Once the tape is playing, use the upper and lower knobs
just
as you do for the radio. The arrows show which side
of the tape is playing.
Press
4 or to rapidly rewind or advance the tape.
Press STOP-EJECT half way to stop the tape.
3-8
Page 149 of 388
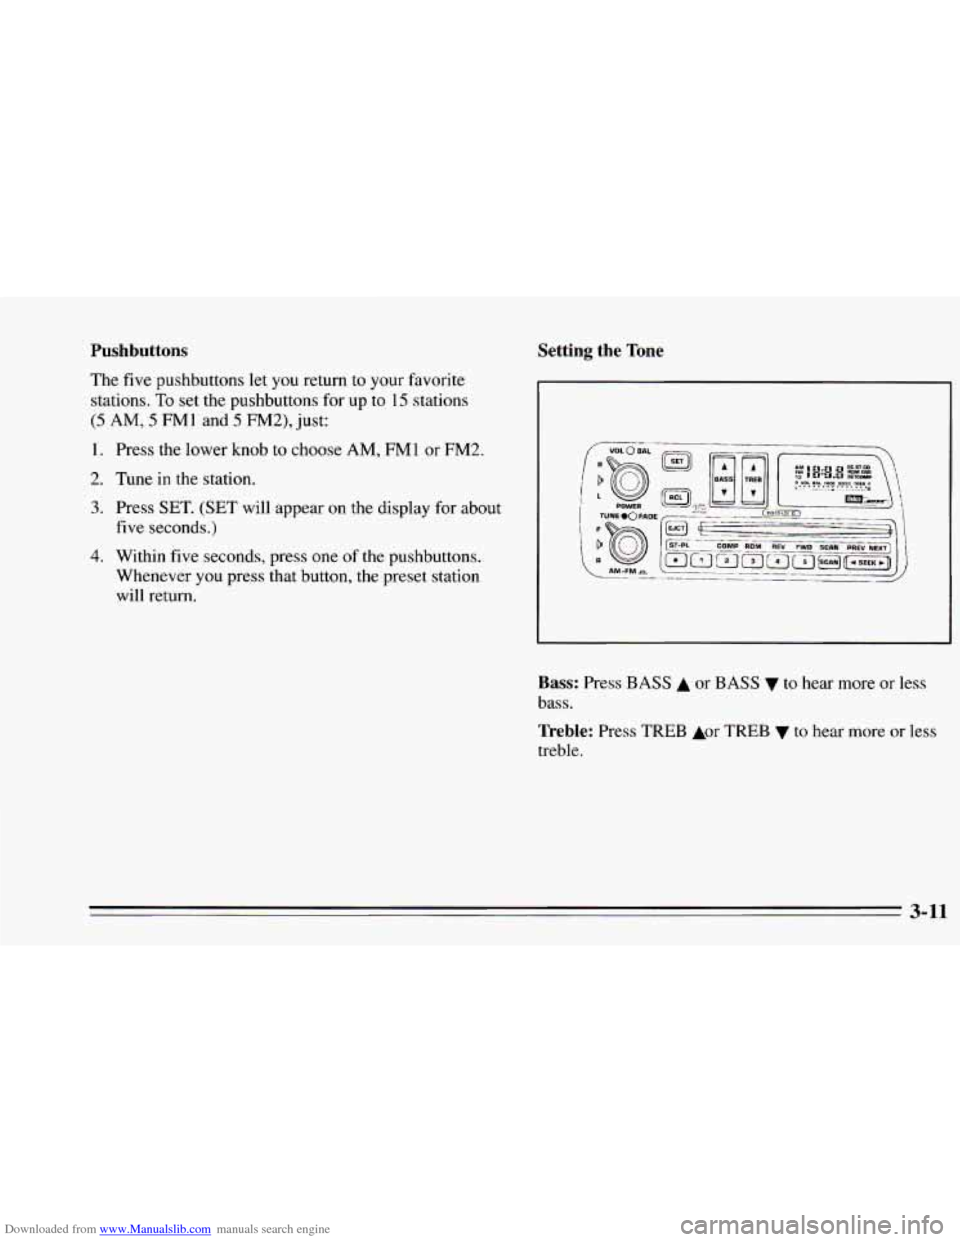
Downloaded from www.Manualslib.com manuals search engine Pushbuttons
The five pushbuttons let you return to your favorite
stations.
To set the pushbuttons for up to 15 stations
(5 AM, 5 FMl and 5 FM2), just:
Setting the Tone
1.
2.
3.
4.
Press the lower knob to choose AM, FMl or FM2.
Tune
in the station.
Press SET. (SET will appear on the display for about
five seconds.)
Within five seconds, press one
of the pushbuttons.
Whenever you press that button, the preset station
will return.
Bass: Press BASS A or BASS v to hear more or less
bass.
Treble: Press TREB Aor TREB v to hear more or less
treble.
3-11
Page 152 of 388
Downloaded from www.Manualslib.com manuals search engine Setting Your Security Code
The instructions below tell you how to enter a security
code into the system. If your vehicle loses battery power
for any reason, you must enter the security code again
before the system will turn on.
1.
2.
3.
4.
5.
6.
7.
Write down any six-digit number and keep it in a
safe place.
Turn the ignition switch to the ACC or RUN
position.
Turn the audio system
off.
Press and hold pushbuttons 1 and 4 together until
You are now ready
to enter your security code. Don’t
wait more than
15 seconds between steps.
Press
SET and “000” will appear on the display.
Press
SCAN and hold it until the first digit of the
code appears.
Press SEEK
4 or SEEK b and hold until the second
and third digits
of your code appears. Release the
button.
‘&---” shows on the display.
8. Press the lower knob and “OOO” will appear. Now you
are ready to enter
the last three digits of your code.
9. Press SCAN and hold until the fourth digit of your
10. Press SEEK 4 or b and hold until the fifth and sixth
code appears.
Release the button.
digits of your code appears. Release the button.
seconds, and then
“000” will appear.
11.
Press
the lower knob. rEP will appear for five
12. For verification, repeat steps 6 through 11. If “SEC”
appears, your audio system is secured. If
“---” shows
on the display, your system is not secured. You must
restart
the entire procedure again from step 4.
Shutting Off the Theft-Deterrent Feature
If your audio system is secured (SEC shows on display)
and you wish to disable
it, enter your security code as
follows, pausing
no more than 15 seconds between steps:
1. Turn the ignition on. Make sure the audio system is
2. Press pushbuttons 1 and 4 together until SEC shows
off. The time
will show
on the display.
on the display.
3-14