Page 17 of 34
17-13
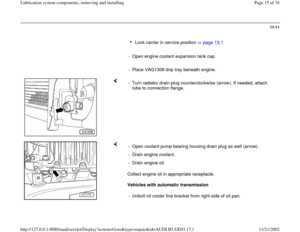
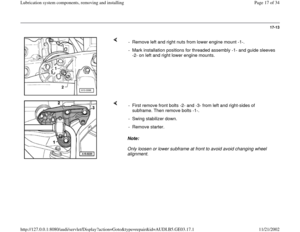
- Remove left and right nuts from lower engine mount -1-.
- Mark installation positions for threaded assembly -1- and guide sleeves
-2- on left and right lower engine mounts.
Note:
Only loosen or lower subframe at front to avoid avoid changing wheel
alignment. - First remove front bolts -2- and -3- from left and right-sides of
subframe. Then remove bolts -1-.
- Swing stabilizer down.
- Remove starter.
Pa
ge 17 of 34 Lubrication s
ystem com
ponents, removin
g and installin
g
11/21/2002 htt
p://127.0.0.1:8080/audi/servlet/Dis
play?action=Goto&t
yp
e=re
pair&id=AUDI.B5.GE03.17.1
Page 18 of 34
17-14
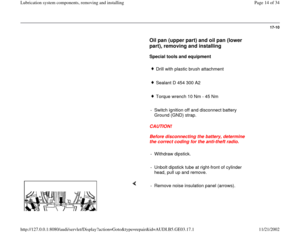
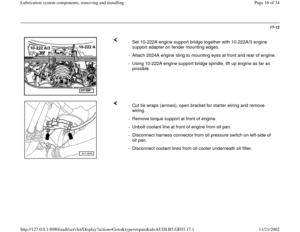
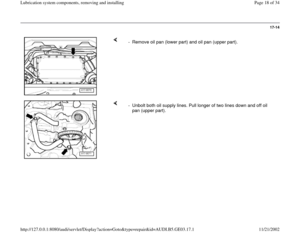
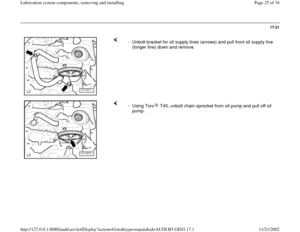
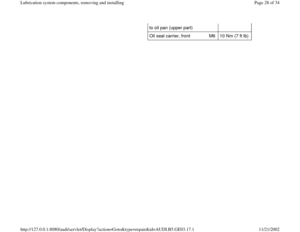
- Remove oil pan (lower part) and oil pan (upper part).
- Unbolt both oil supply lines. Pull longer of two lines down and off oil
pan (upper part).
Pa
ge 18 of 34 Lubrication s
ystem com
ponents, removin
g and installin
g
11/21/2002 htt
p://127.0.0.1:8080/audi/servlet/Dis
play?action=Goto&t
yp
e=re
pair&id=AUDI.B5.GE03.17.1
Page 19 of 34
17-15
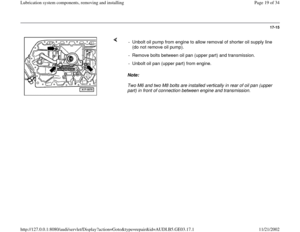
Note:
Two M6 and two M8 bolts are installed vertically in rear of oil pan (upper
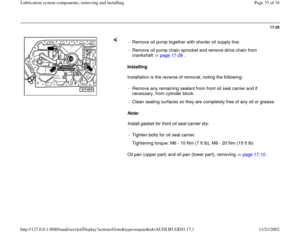
part) in front of connection between engine and transmission. - Unbolt oil pump from engine to allow removal of shorter oil supply line
(do not remove oil pump).
- Remove bolts between oil pan (upper part) and transmission.
- Unbolt oil pan (upper part) from engine.
Pa
ge 19 of 34 Lubrication s
ystem com
ponents, removin
g and installin
g
11/21/2002 htt
p://127.0.0.1:8080/audi/servlet/Dis
play?action=Goto&t
yp
e=re
pair&id=AUDI.B5.GE03.17.1
Page 20 of 34
17-16
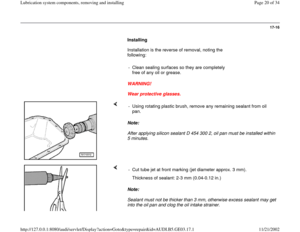
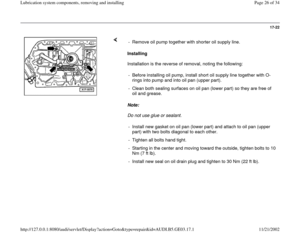
Installing
Installation is the reverse of removal, noting the
following:
- Clean sealing surfaces so they are completely
free of any oil or grease.
WARNING!
Wear protective glasses.
Note:
After applying silicon sealant D 454 300 2, oil pan must be installed within
5 minutes. - Using rotating plastic brush, remove any remaining sealant from oil
pan.
Note:
Sealant must not be thicker than 3 mm, otherwise excess sealant may get
into the oil pan and clog the oil intake strainer. - Cut tube jet at front marking (jet diameter approx. 3 mm).
Thickness of sealant: 2-3 mm (0.04-0.12 in.)
Pa
ge 20 of 34 Lubrication s
ystem com
ponents, removin
g and installin
g
11/21/2002 htt
p://127.0.0.1:8080/audi/servlet/Dis
play?action=Goto&t
yp
e=re
pair&id=AUDI.B5.GE03.17.1
Page 21 of 34
.
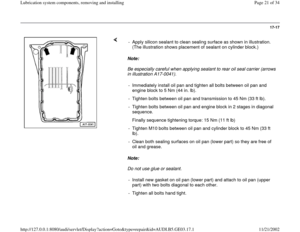
Note:
Do not use glue or sealant. - Apply silicon sealant to clean se")
17-17
Note:
Be especially careful when applying sealant to rear oil seal carrier (arrows
in illustration A17-0041).
Note:
Do not use glue or sealant. - Apply silicon sealant to clean sealing surface as shown in illustration.
(The illustration shows placement of sealant on cylinder block.)
- Immediately install oil pan and tighten all bolts between oil pan and
engine block to 5 Nm (44 in. lb).
- Tighten bolts between oil pan and transmission to 45 Nm (33 ft lb).
- Tighten bolts between oil pan and engine block in 2 stages in diagonal
sequence.
Finally sequence tightening torque: 15 Nm (11 ft lb)
- Tighten M10 bolts between oil pan and cylinder block to 45 Nm (33 ft
lb).
- Clean both sealing surfaces on oil pan (lower part) so they are free of
oil and grease.
- Install new gasket on oil pan (lower part) and attach to oil pan (upper
part) with two bolts diagonal to each other.
- Tighten all bolts hand tight.
Pa
ge 21 of 34 Lubrication s
ystem com
ponents, removin
g and installin
g
11/21/2002 htt
p://127.0.0.1:8080/audi/servlet/Dis
play?action=Goto&t
yp
e=re
pair&id=AUDI.B5.GE03.17.1
Page 22 of 34
17-18
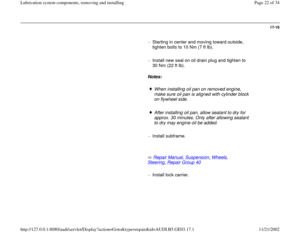
- Starting in center and moving toward outside,
tighten bolts to 10 Nm (7 ft lb).
- Install new seal on oil drain plug and tighten to
30 Nm (22 ft lb).
Notes:
When installing oil pan on removed engine,
make sure oil pan is aligned with cylinder block
on flywheel side.
After installing oil pan, allow sealant to dry for
approx. 30 minutes. Only after allowing sealant
to dry may engine oil be added.
- Install subframe.
Repair Manual, Suspension, Wheels,
Steering, Repair Group 40
- Install lock carrier.
Pa
ge 22 of 34 Lubrication s
ystem com
ponents, removin
g and installin
g
11/21/2002 htt
p://127.0.0.1:8080/audi/servlet/Dis
play?action=Goto&t
yp
e=re
pair&id=AUDI.B5.GE03.17.1
Page 23 of 34
17-19
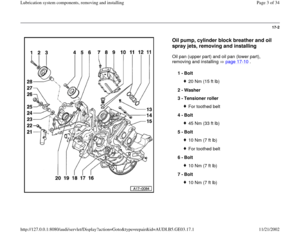
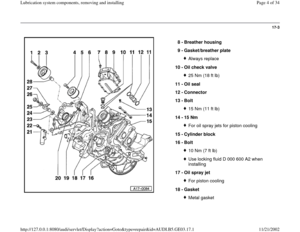
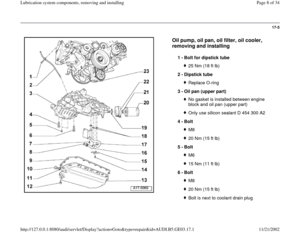
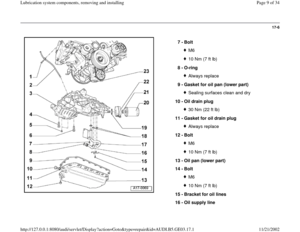
Oil pump, removing and installing
- Remove noise insulation panel (arrows).
- Drain engine oil.
- Collect engine oil in appropriate receptacle.
Vehicles with automatic transmission - Unbolt both stabilizer mounting brackets -2- from subframe.
- Lower stabilizer not more than 10 cm (3.94 in.) and secure using wire.
- Unbolt oil cooler line bracket from right-side of oil pan.
Pa
ge 23 of 34 Lubrication s
ystem com
ponents, removin
g and installin
g
11/21/2002 htt
p://127.0.0.1:8080/audi/servlet/Dis
play?action=Goto&t
yp
e=re
pair&id=AUDI.B5.GE03.17.1
Page 24 of 34
17-20
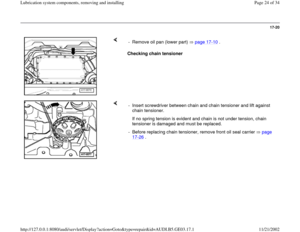
Checking chain tensioner - Remove oil pan (lower part) page 17
-10
.
- Insert screwdriver between chain and chain tensioner and lift against
chain tensioner.
If no spring tension is evident and chain is not under tension, chain
tensioner is damaged and must be replaced.
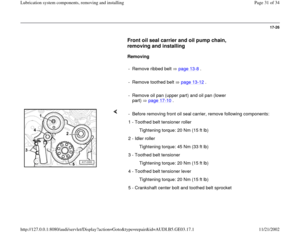
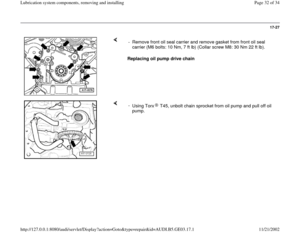
- Before replacing chain tensioner, remove front oil seal carrier page
17
-26
.
Pa
ge 24 of 34 Lubrication s
ystem com
ponents, removin
g and installin
g
11/21/2002 htt
p://127.0.0.1:8080/audi/servlet/Dis
play?action=Goto&t
yp
e=re
pair&id=AUDI.B5.GE03.17.1


 and oil pan (upper part).
- Unbolt both oil supply lines. Pull longer of two lines down and off oil
pan (upper part).
Pa
ge 18 of 34 Lubrication s
y")
 in front of connection between engine and transmission. - Unbolt oil pump from engine to allow")

.
- Install new seal on oil drain plug and tighten to
30 Nm (22 ft lb).
Notes:
Wh")
.
- Drain engine oil.
- Collect engine oil in appropriate receptacle.
Vehicles with automatic trans")
 page 17
-10
.
- Insert screwdriver between chain and chain tensioner and lift against
chain tensioner.
If no spring")