1994 OLDSMOBILE SILHOUETTE lights
[x] Cancel search: lightsPage 157 of 276
During your trip, check occasionally to
be sure that the load is secure, and that
the lights and
any trailer brakes are still
working.
Following Distance
Stay at least twice as far behind the
vehicle ahead as you would when
driving your vehicle without a trailer.
This can help you avoid situations that
require heavy braking and sudden
turns.
Passing
You’ll need more passing distance up
ahead when you’re towing a trailer.
And, because you’re a good deal longer,
you’ll need to go much farther beyond
the passed vehicle before you can return
to your lane.
Backing Up
Hold the bottom of the steering wheel
with one hand. Then, to move the
trailer to the left, just move that hand to
the left.
To move the trailer to the right,
move your hand to the right. Always back up
slowly and, if possible, have
someone guide you.
Making Turns
When you’re turning with a trailer,
make wider turns than normal. Do this
so your trailer won’t strike soft
shoulders, curbs, road signs, trees, or
other objects. Avoid jerky or sudden
maneuvers. Signal well in advance.
Turn Signals When Towing a
Trailer
When you tow a trailer, your vehicle has
to have a different turn signal flasher
and extra wiring. The green arrows on
your instrument panel will flash
whenever you signal a turn or lane
change. Properly hooked up, the trailer
lights will
also flash, telling other
drivers you’re about to turn, change
lanes or stop.
When towing a trailer, the green arrows
on your instrument panel will flash for
turns even
if the bulbs on the trailer are
burned out. Thus, you may think
drivers behind you are seeing your signal
when they are not.
It’s important
to check occasionally to be sure the
trailer bulbs are still working.
Driving On Grades
Reduce speed and shift to a lower gear
before you start down a long or steep
downgrade. If you don’t
shift down, you
might have to use your brakes
so much
that they would get hot and
no longer
work well.
On a long uphill grade, shift down and
reduce your speed to around
45 mph
(70 lwh) to reduce the possibility of
engine and transaxle overheating.
If you are towing a trailer that weighs
more than
1,000 pounds (454 kg), and
you have an automatic transaxle with
Overdrive, you may prefer to drive in
D
instead of Overdrive (or, as you need to,
a lower gear). This will minimize heat
build-up and extend the life of your
transaxle.
n
ProCarManuals.com
Page 160 of 276
Problems on the Road
158
I Hazard Warning Flashers
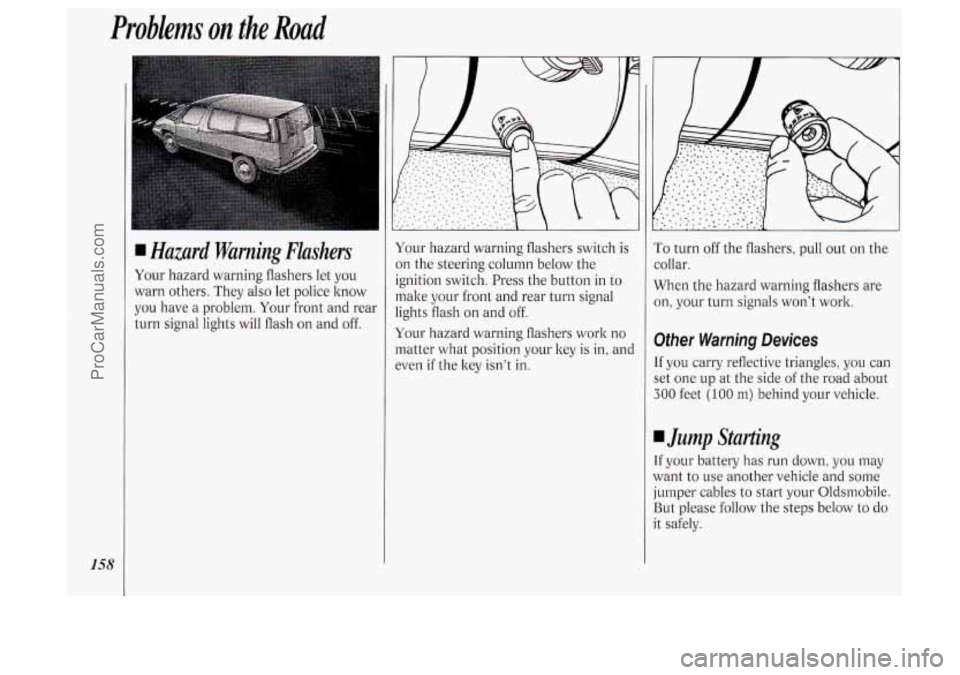
Your hazard warning flashers let you
warn others. They also let police know
you have a problem. Your front and rear
turn signal lights will flash on and off. Your
hazard warning flashers switch is
on the steering column below the
ignition switch. Press the button in to
make your front and rear turn signal
lights flash on and off.
Your hazard warning flashers work no
matter what position your key
is in, and
even
if the key isn’t in.
To turn off the flashers, pull out on the
collar.
When the hazard warning flashers are
on, your turn signals won’t work.
Other Warning Devices
If you carry reflective triangles, you can
set one up at the side of the road about
300 feet (100 m) behind your vehicle.
I Jump Starting
If your battery has run down, you may
want to use another vehicle and some
jumper cables
to start your Oldsrnobile.
But please follow the steps below to do
it safely.
ProCarManuals.com
Page 161 of 276

NOTICE:
Ignoring these steps could result in
costly damage to your vehicle that
wouldn’t be covered by your
warranty. Trying to start your
Oldsmobile by pushing or pulling it
won’t work, and it could damage
your vehicle.
To Jump Start Your Oldsmobile:
1. Check the other vehicle. It must have
a 12-volt battery with a negative
ground system.
NOTICE:
If the other system isn’t a 12-volt
system with a negative ground,
both vehicles can be damaged.
2. Get the vehicles close enough so the
jumper cables can reach, but be sure
the vehicles aren’t touching each
other. If they are, it could cause a
ground connection
you don’t want.
You wouldn’t be able to start your
Oldsmobile, and the bad grounding
could damage the electrical systems.
You could be injured if the vehicles
roll. Set the parking brake firmly on
each vehicle. Put an automatic
transaxle in
P (Park) or a manual
transaxle in
N (Neutral).
3. Turn off the ignition on both
vehicles. Turn off all lights that aren’t
needed, and radios. This will avoid
sparks and help save both batteries.
And it could save your radio!
NOTICE:
If you leave your radio on, it could
be badly damaged. The repairs
wouldn’t be covered by your
warranty.
4. Open the hoods and locate the
batteries.
Find the positive
(+) and negative (-)
terminals on each battery.
159
ProCarManuals.com
Page 199 of 276
How to Add Fluid
Refer to the Maintenance Schedule to
determine what kind of transaxle fluid
to use. See
Recommended Fluids and
Lubricants
in the Index.
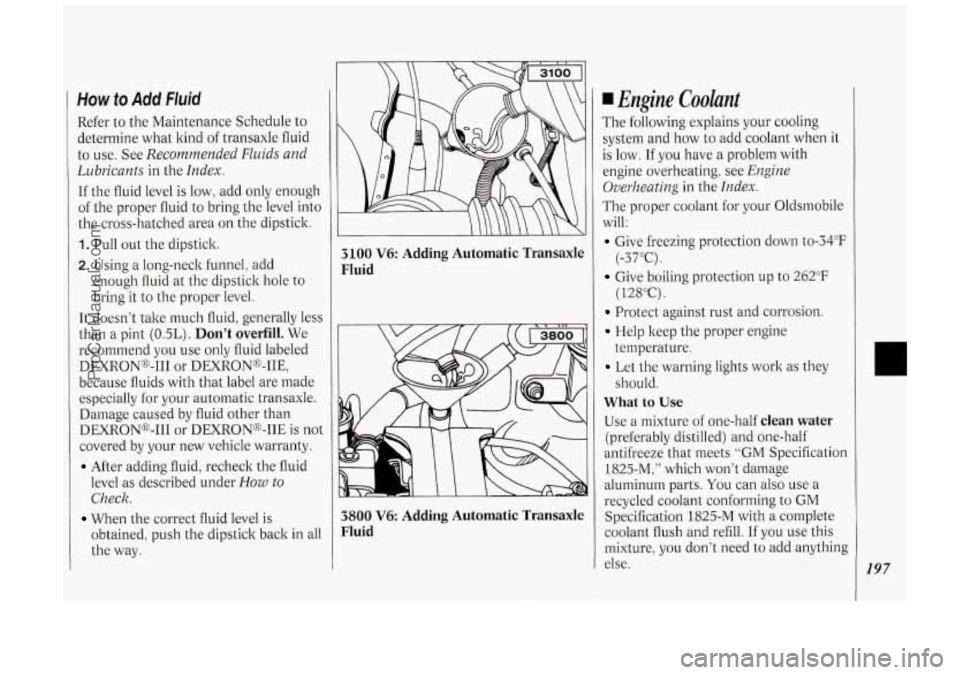
If the fluid level is low, add only enough
of the proper fluid to bring the level into
the cross-hatched area
on the dipstick.
1. Pull out the dipstick.
2. Using a long-neck funnel: add
enough fluid at the dipstick hole to
bring it to the proper level.
It doesn’t take much fluid, generally less
than a pint
(OSL). Don’t overfill. We
recommend you use only fluid labeled
DEXRONo-I11 or DEXRON@-IIE,
because fluids with that label are made
especially for your automatic transaxle.
Damage caused by fluid other than
DEXRONo-I11 or DEXRONB-IIE is not
covered by your new vehicle warranty.
After adding fluid, recheck the fluid
level as described under
How to
Check.
obtained, push the dipstick back in all
the way.
When the correct fluid level is
3100 V6: Adding Automatic Transaxle
Fluid
3800 V6: Adding Automatic Transaxle
Fluid
Engine Coolant
The following explains your cooling
system and how to add coolant when it
is
low. If you have a problem with
engine overheating, see
Engine
Overheating
in the Index.
The proper coolant for your Oldsmobile
will:
Give freezing protection down to-34”F
Give boiling protection up to 262°F
Protect against rust and corrosion.
Help keep the proper engine
Let the warning lights work as they
What to Use
Use a mixture of one-half clean water
(preferably distilled) and one-half
antifreeze that meets
“GM Specification
1825-M:” which won’t damage
aluminum parts.
You can also use a
recycled coolant conforming to
GM
Specification 1825-M with a complete
coolant flush and refill.
If you use this
mixture,
you don’t need to add anything
else.
(-37°C).
( 12SoC).
temperature. should.
197
ProCarManuals.com
Page 207 of 276
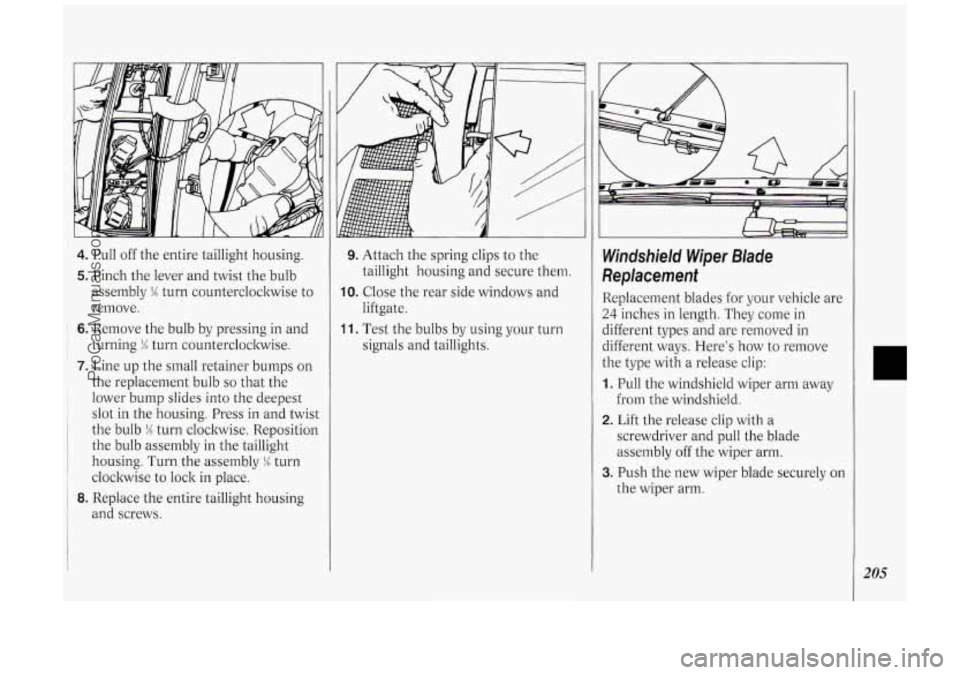
4. Pull off the entire taillight housing.
5. Pinch the lever and twist the bulb
assembly
M turn countercloclwise to
remove.
~ 6. Remove the bulb by pressing in and
1 turning % turn counterclockwise.
7. Line up the small retainer bumps on
the replacement bulb
so that the
1 lower bump slides into the deepest
' slot in the housing. Press in and twist
the bulb
!4 turn clockwise. Reposition
the bulb assembly in the taillight
housing. Turn the assembly
M turn
clockwise to lock in place.
' 8. Replace the entire taillight housing
and screws.
9. Attach the spring clips to the
taillight housing and secure them.
liftgate.
signals and taillights.
IO. Close the rear side windows and
11. Test the bulbs by using your turn
Windshield Wiper Blade
Replacement
Replacement blades for your vehicle are
24 inches in length. They come in
different types and are removed in
different ways. Here's how to remove
the type with a release clip:
1. Pull the windshield wiper arm away
from the windshield.
2. Lift the release clip with a
screwdriver and pull the blade
assembly off the wiper arm.
the wiper arm.
3. Push the new wiper blade securely on
205
ProCarManuals.com
Page 225 of 276
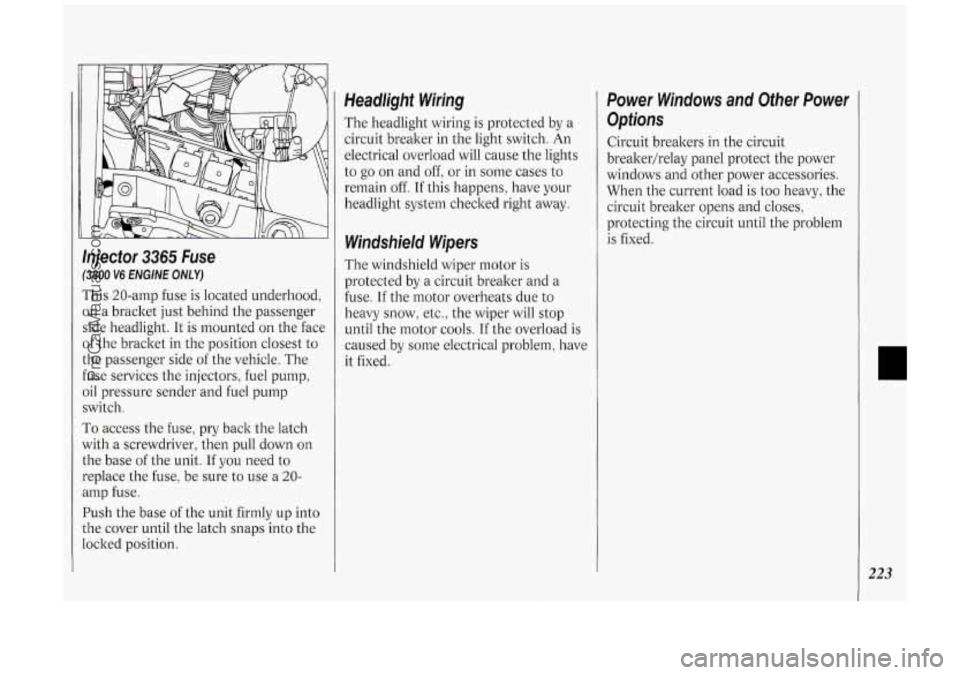
Injector 3365 Fuse
(3800 V6 ENGINE ONLY)
This 20-amp fuse is located underhood,
on a bracket just behind the passenger
side headlight. It is mounted on the face
of the bracket in the position closest to
the passenger side of the vehicle. The
fuse services the injectors, fuel pump,
oil pressure sender and fuel pump
switch.
To access the fuse, pry back the latch
with a screwdriver, then pull down on
the base
of the unit. If you need to
replace the fuse, be sure to use a 20-
amp fuse.
Push the base of the unit firmly up into
the cover until the latch snaps into the
locked position.
Headlight Wiring
The headlight wiring is protected by a
circuit breaker in the light switch. An
electrical overload will cause the lights
to go on and off: or
in some cases to
remain off. If this happens, have your
headlight system checked right away.
Windshield Wipers
The windshield wiper motor is
protected by a circuit breaker and a
fuse.
If the motor overheats due to
heavy snow, etc., the wiper will stop
until the motor cools.
If the overload is
caused by some electrical problem, have
it fixed.
Power Windows and Other Power
Options
Circuit breakers in the circuit
breakerhelay panel protect the power
windows and other power accessories.
When the current load is too heavy, the
circuit breaker opens and closes,
protecting the circuit until the problem
is fixed.
223
ProCarManuals.com
Page 230 of 276
~ Service & Appearance .... Care
228
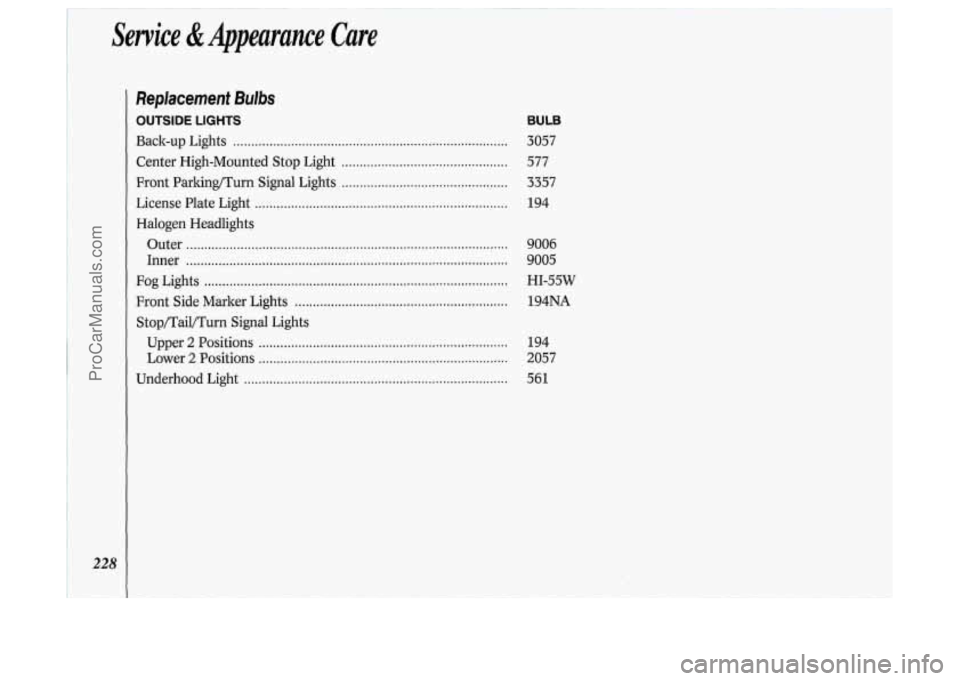
Replacement Bulbs
OUTSIDE LIGHTS
Back-up
Lights ........................................................................\
....
Center High-Mounted Stop Light ..............................................
Front Parkinflurn Signal Lights ..............................................
License Plate Light ......................................................................
Halogen Headlights
Outer
........................................................................\
.................
Inner ........................................................................\
.................
Fog Lights ........................................................................\
............
Front Side Marker Lights ...........................................................
Stop/Tail/Turn Signal Lights
Upper
2 Positions .....................................................................
Lower 2 Positions .....................................................................
Underhood Light ........................................................................\
.
BULB
3057
577
3357
194
9006
9005
HI-55W 194NA
194
2057
561
.
ProCarManuals.com
Page 231 of 276
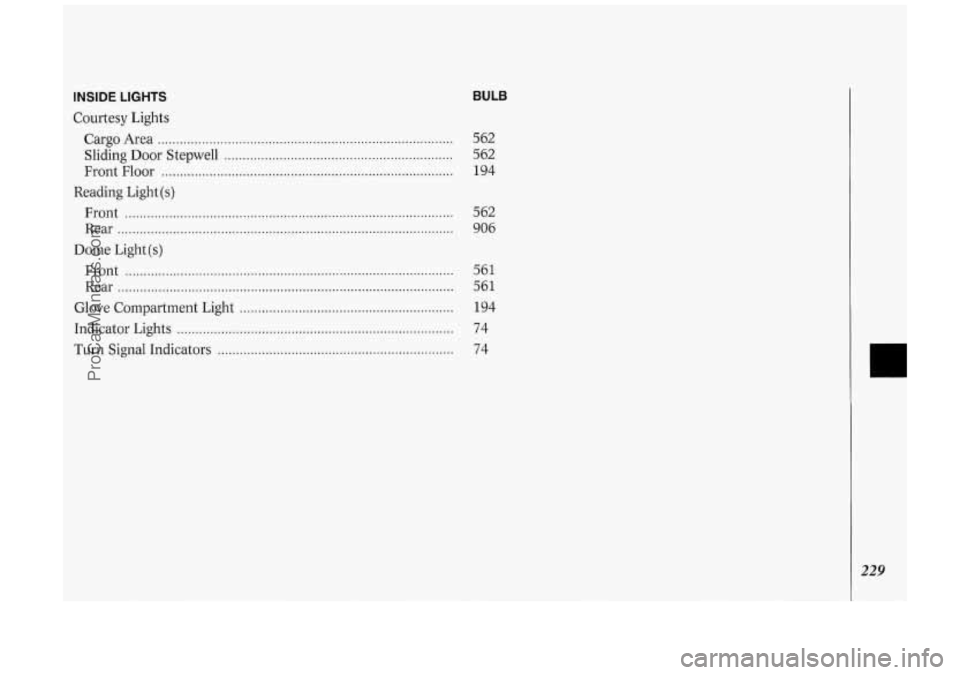
INSIDE LIGHTS
Courtesy Lights
BULB
Cargo Area ........................................................................\
........ 562
Front Floor
........................................................................\
....... 194
Sliding
Door Stepwell
.............................................................. 562
Reading Light
(s)
Front ........................................................................\
................. 562
Rear
........................................................................\
................... 906
Dome Light
(s)
Front ........................................................................\
................. 561
Rear
........................................................................\
................... 561
Glove Compartment Light
.......................................................... 194
Indicator Lights
........................................................................\
... 74
Turn Signal Indicators
................................................................ 74
229
ProCarManuals.com