Page 756 of 1708
REAR SUSPENSION (DOUBLE-WISHBONE) UPPER ARM Removal I Inspection I Installation 1. Jack up the rear of the vehicle and support it with safety stands. 2. Remove in the order shown in the figure. 3. lnspect all parts and repair or replace as necessary. 4. Install in the reverse order of removal. 5. Loosely tighten the upper arm bolts. Tighten all other nuts and bolts to the specified torques. 6. Lower the vehicle. 7. With the vehicle unloaded, tighten the upper arm bolts to the specified torques. 8. Adjust the rear wheel alignment. (Refer to page R-9.) REPLACE 1. Wheel and tire 2. Upper arm lnspect for damage and cracks 3. Upper arm bushing lnspect for deterioration and wear Gartner Banana
Page 758 of 1708

R REAR SUSPENSION (DOUBLE-WISHBONE) CROSSMEMBER Removal I Inspection I Installation 1. Jack up the vehicle and support it with safety stands. 2. Remove the wheels and tires. d 3. Remove the differential and the power plant frame. (Refer to section M.) 4. Lower the crossmember and other suspension parts as an assembly, and then separate the parts. 5. Remove in the order shown in the figure. 6. lnspect parts and repair or replace as necessary. 7. Install in the reverse order of removal. 8. Loosely tighten the stabilizer bracket, upper arm, and lower arm bolts. Tighten all other nuts and bolts to the specified torques. 9. Lower the vehicle. 10. With the vehicle unloaded, tighten the stabilizer bracket, upper arm, and lower arm bolts to the specified torques. 11. Adjust the rear wheel alignment. (Refer to page R-9.) 12. Bleed the air from the brake system. (Refer to section P.) 13. Adjust the parking brake lever stroke. (Refer to section P.) 1. Differential mounting pipe 6. Shock absorber bolt 2. Parking brake cable 7. Stabilizer bracket Removal / Installation . . . . . . . . . Section P 8. Upper arm bolt 3. Brake pipe 9. Adjusting cam bolt Removal / Installation . . . . . . . . . Section P 10. Rear crossmember assembly 4. Brake pipe joint Inspect for damage 5. Battery cable bracket Gartner Banana
Page 1122 of 1708

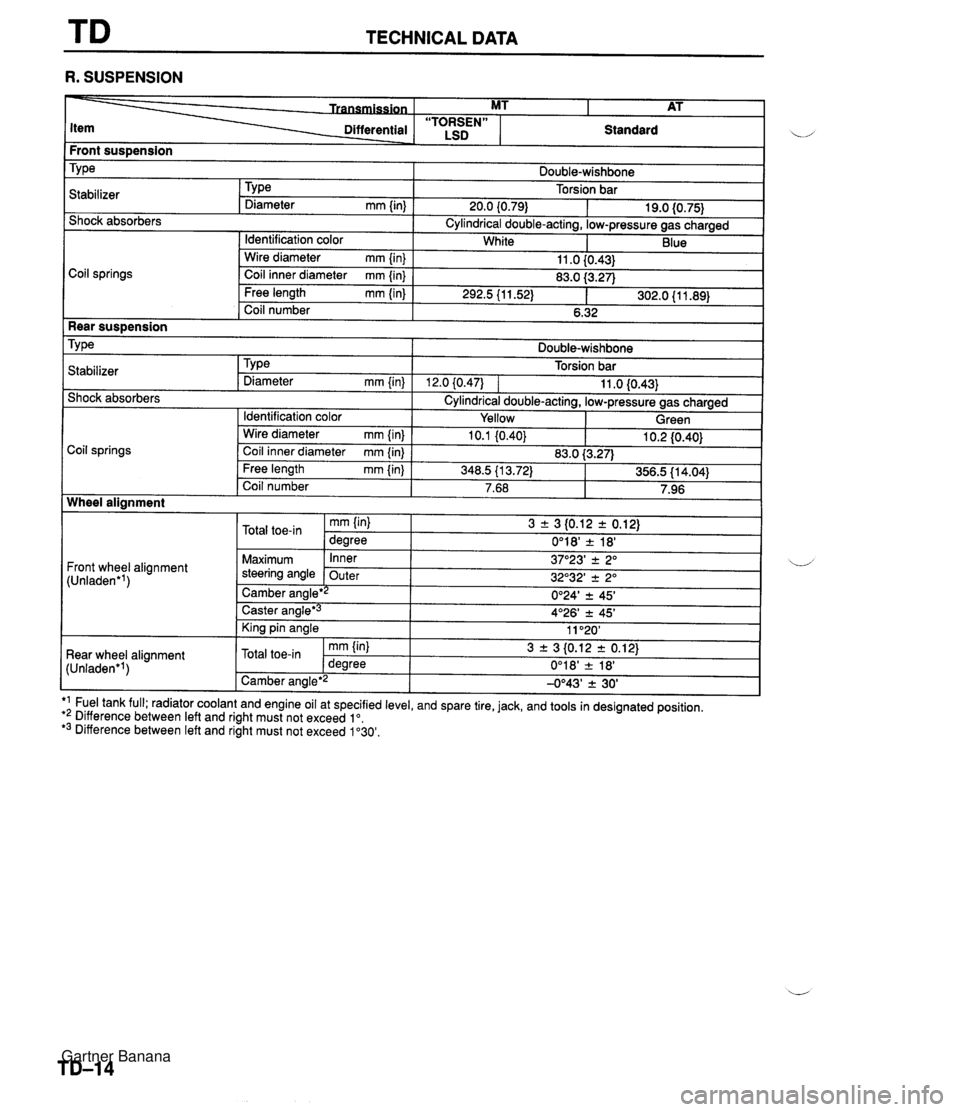
TECHNICAL DATA R. SUSPENSION Front sus~ension I i/ Differential - . - ~- Coil springs MT I AT Shock absorbers "TORSEN" LSD TY ~a Cylindrical double-acting, low-pressure gas charged Standard Stabilizer Double-wishbone Torsion bar Wire diameter mm {in) Coil inner diameter mm {in} Rear suspension Tv~e I Double-wishbone TY pe Diameter mm {in) 20.0 (0.79) I Identification color 11 .O {0.43} 83.0 f3.27) . . Free length mm {in) Coil number 19.0 {0.75} . . 292.5 (1 1.52) 1 302.0 {I 1.89) 6.32 I - . I1 . ,I . , I Shock absorbers Cylindrical double-acting, low-pressure gas charged White I I Identification color I Yellow I Green I Blue Torsion bar 12.0 (0.471 1 11 .O 10.43) .a Stabilizer TYPe Diameter mm {in) Coil springs Wheel alignment I Front wheel alignment (Unladen'') I I - Caster angle*3 King pin angle I tun'aoen 'I 1 Camber angle'2 -0°43' 2 30' I I - Wire diameter mm {in) Coil inner diameter mm {in) Free length mm {in} Coil number Maximum steering angle 4O26' -c 45' 11 "20' Rear wheel alignment ,, l-l_A_-*i, *1 Fuel tank full; radiator coolant and engine oil at specified level, and spare tire, jack, and tools in designated position. *2 Difference between left and right must not exceed lo. *3 Difference between left and right must not exceed 1'30'. 10.1 (0.40) Inner Outer 10.2 I0.40) mm (in) Camber ana~e*~ J 3 + 3 10.12 r 0.12) 0°18' 2 18' -. - 3 r 3 {0.12 2 0.12) 0'24' 2 45' 37O23' 2 2" 32O32' 2 2" Total toe-in 83.0 i3.27) U' mm {in} degree 348.5 113.72) Total toe-in 356.5 {I 4.04) dearee 7.68 0'18' & 18' 7.96 Gartner Banana
Page 1251 of 1708
GENERAL SERVICE INFORMATION SERVICE PRECAUTIONS ............................................ 2 JACKING AND SAFETY STAND POSITIONS ............ 8 VEHICLE LIFT (2-SUPPORT TYPE) POSITIONS ....... 8 TOW CABLE ATTACHMENT POSITIONS .................. 9 IDENTIFICATION NUMBER LOCATIONS ................... 9 VEHICLE DIMENSIONS ................................................ 10 WHEEL ALIGNMENT .................................................... 10 Gartner Banana
Page 1260 of 1708
GENERAL SERVICE INFORMATION VEHICLE DIMENSIONS d Measurement I I Overall height mm (in) I Overall length mm (in) Overall width mm (in) 3,948 (155.4) 1,676 (65.9) WHEEL ALIGNMENT Front wheel alignment (Unloaded*) 2,266 (89.2) 1,410 (55.5) 1,428 (56.2) Wheelbase mm (in) Rear wheel alignment (Unloaded*) Tread Total toe-in Front mrn (in) Rear mm (in) mm (in) degree Camber angle I 0'24' f 30' 3 + 3 (0.12 f 0.12) 0°18' + 18' Maximum steering angle Inner Outer I 37'23' f 2O 32O32' f 2O Caster angle * Fuel tank full; radiator coolant and engine oil at specified levels; and spare tire, jack, and tools in designated positions. 4O4Y f 45' 1 1°20' 3 * 3 (0.12 f 0.12) 0'18' + 18' King pin angle Camber angle Total toe-in -0'43' f 30' mm (in) degree Gartner Banana
Page 1262 of 1708
BODY DIMENSIONS V The front suspension is a MacPherson strut style. Adjustment of the front wheel alignment is limited to camber adjustment. The front wheel alignment is determined by accuracy of the body itself. Accurate measurement and dimensional accuracy based upon the body dimensions are required when repairs are made. EXPLANATION OF BODY DIMENSIONS PROJECTED DIMENSIONS Flat-plane dimensions are those dimensions as measured on a flat surface projected from certain designated standard points of the body. STRAIGHT-LINE DIMENSIONS (ACTUAL DIMENSIONS) w Actual dimensions are those dimensions actually measured in a straight line between two points. Note Before the work, adjust the body according to the standard measurements and check the fit with associating parts, then proceed with the work. Front fender installation nuts 7 I Projected dimensions (Flat-plane dimensions) Gartner Banana