Page 285 of 1708
F A/C CUT-OFF CONTROL SYSTEM D B AIC RE LAY SYSTEM INSPECTION 1. Turn the ignition switch ON. 2. Turn the blower switch and air conditioning sensor ON. 3. Start the engine. d 4. Verify that the A/C stops for approx. 2 sec. after the en- gine start. 5. Rotate the throttle link to fully open position. 6. Verify that the A/C stops for approx. 5 sec. after the throttle link to fully open position. 7. If not specified, inspect as following. PCME 1Q terminal voltage A/C relay Throttle position sensor AIC RELAY Inspection 1. Remove the A/C relay. 2. Check the continuity between the terminals of the relay. 3. If not specified, replace the A/C relay. B+: Battery positive voltage Terminal A - B Apply B+ B+ not applied Terminal C - D Yes No Gartner Banana
Page 290 of 1708
CONTROL SYSTEM CONTROL SYSTEM PREPARATION 49 9200 162 Engine Signal Monitor Self-Diagnosis Checker 49 GO1 8 904 Sheet For inspection of powertrain control module (engine) For inspection of heated oxygen sensor For inspection of powertrain control module (engine) 49 GO18 903 For inspection of Adapter powertrain harness control module 49 B019 9AO For inspection of System heated oxygen Selector sensor Gartner Banana
Page 293 of 1708
F CONTROL SYSTEM Inspection 1. Lift up the floormat in front of the passenger's seat. (Refer to section S.) ,i 1 USECONNECTORA TERMINALS /AANDB 2. Connect the SST (Engine Signal Monitor) between the powertrain control module (engine) and the wiring har- ness using the SST (Adapter) as shown. 3. Place the SST (Sheet) on the SST (Engine Signal Mon- itor). 4. Measure the voltage at each terminal. (Refer to pages F-148 to F-151.) 5. If any powertrain control module (engine) terminal volt- age is incorrect, check the input or output device and re- lated wiring. 6. If they are normal, replace the powertrain control module (engine). (Refer to pages F-145 to F-147.) Caution Applying voltage to SST terminals A or B will dam- age the SST. Gartner Banana
Page 294 of 1708
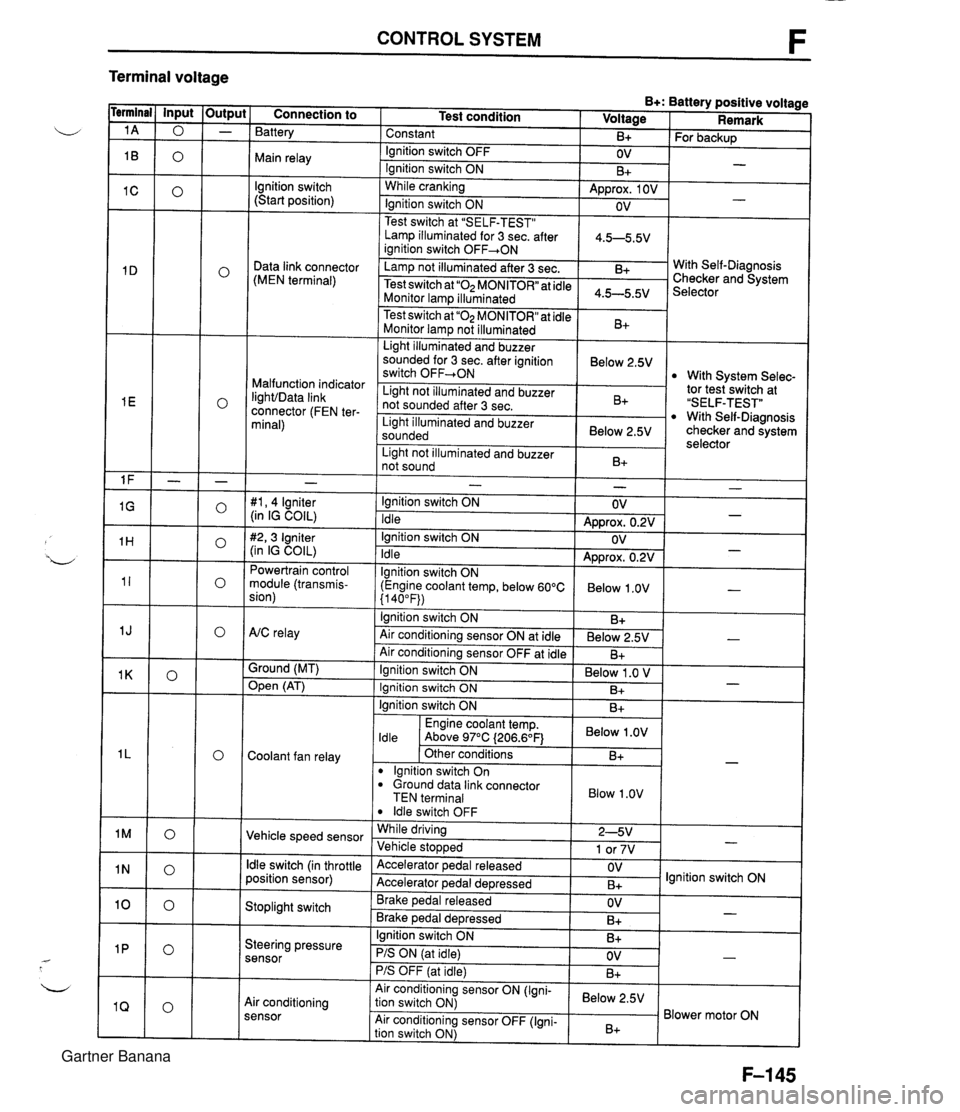
CONTROL SYSTEM F Terminal voltage B+: Battery positive voltage Test condition I Voltage I Remark - - - - - - - - - - - - - - - - - - Connection to Battery Constant Ignition switch OFF Main relay - B+ OV lgnition switch (Start position) For backup - Ignition switch ON While cranking Lamp illuminated for 3 sec. after 1 4.5-5.5V ianition switch OFF+ON 1 B+ Approx. 1 OV Ignition switch ON - - OV Data link connector (MEN terminal) Test switch at "SELF-TEST" .. Lamp not illuminated after 3 sec. Test switch at "02 MONITOR" at idle Monitor lam illuminated & 4.5-5.5v . . I Malfunction indicator IighVData link connector (FEN ter- minal) With Self-Diagnosis Checker and System Selector Test switch at "02 MONITOR" at idle Monitor lamp not illuminated Light illuminated and buzzer sounded for 3 sec. after ignition switch OFF-ON B+ tor tesiswitch at "SELF-TEST" With Self-Diagnosis checker and system selector Below 2.5V 1 Light illuminated and buzzer sounded 1 Below 2.5V I With System Selec- Light not illuminated and buzzer not sounded after 3 sec. I Light not illuminated and buzzer 1 n. 1 B+ not sound I D+ 1 - #I, 4 lgniter (in IG COIL) #2,3 Igniter (in IG COIL) Powertrain control module (transmis- sion) - Ignition switch ON Idle Ignition switch ON Idle lgnition switch ON (Engine coolant temp, below 60°C {I 40°F)) Ignition switch ON AtC relay Air conditioning sensor ON at idle Air conditioning sensor OFF at idle Ground (MT) - OV Approx. 0.2V OV Approx. 0.2V Below 1 .OV B+ Below 2.5V B+ - - - - , * Open (AT) - Ignition switch ON ( Below 1 .O V I Engine coolant temp. I Below .OV I ldle Above 97°C (206.6OF1 Ignition switch ON I I B+ Ignition switch ON Coolant fan relay B+ . - Other conditions lgnition switch On dround data link connector TEN terminal I Blow 1.0" I B+ Vehicle speed sensor ldle switch OFF While driving Vehicle sto~wed ldle switch (in throttle position sensor) 2-5V 1 or 7V . , Accelerator pedal released Accelerator ~edal de~ressed - Stoplight switch OV B+ Brake pedal released Brake ~edal deoressed lgnition switch ON Steering pressure sensor OV B+ I I - Ignition switch ON B+ - PIS ON (at idle) PIS OFF (at idle) Air conditioning sensor Air conditioning sensor ON (Igni- tion switch ON) Air conditioning sensor OFF (Igni- tion switch ON) OV B+ - Below 2.5V B+ Blower motor ON Gartner Banana
Page 301 of 1708
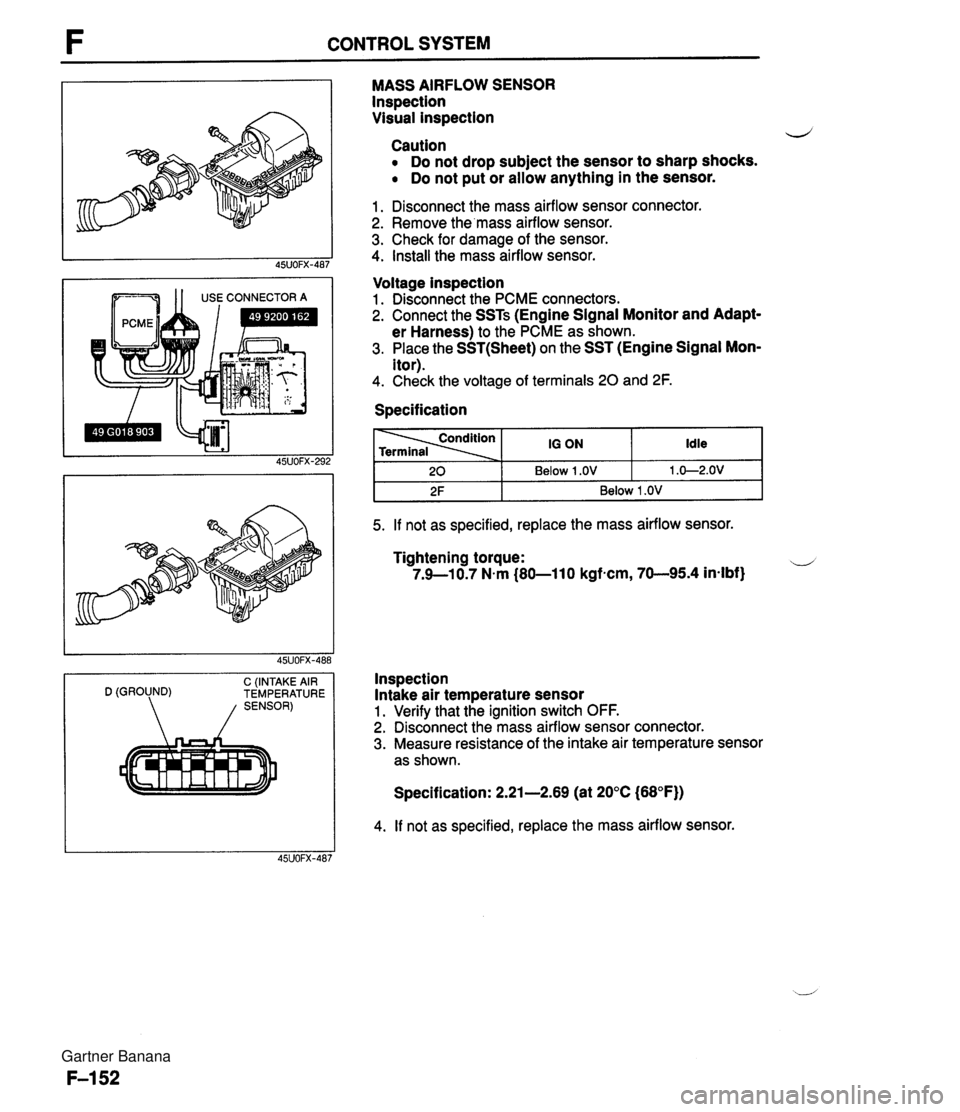
CONTROL SYSTEM --- 1 1 USE CONNECTOR A C (INTAKE AIR D (GROUND) TEMPERATURE MASS AIRFLOW SENSOR lnspection Visual inspection d Caution Do not drop subject the sensor to sharp shocks. Do not put or allow anything in the sensor. 1. Disconnect the mass airflow sensor connector. 2. Remove the'mass airflow sensor. 3. Check for damage of the sensor. 4. Install the mass airflow sensor. Voltage inspection 1. Disconnect the PCME connectors. 2. Connect the SSTs (Engine Signal Monitor and Adapt- er Harness) to the PCME as shown. 3. Place the SST(Sheet) on the SST (Engine Signal Mon- itor). 4. Check the voltage of terminals 20 and 2F. Specification I 2F I Below 1 .OV I 5. If not as specified, replace the mass airflow sensor. Idle 1 .O-2.OV 20 Tightening torque: u 7.9--10.7 N.m (80-11 0 kgfncm, 70-95.4 in-lbf} 10 ON Below 1 .OV Inspection Intake air temperature sensor 1. Verify that the ignition switch OFF. 2. Disconnect the mass airflow sensor connector. 3. Measure resistance of the intake air temperature sensor as shown. Specification: 2.21-2.69 (at 20°C (68°F)) 4. If not as specified, replace the mass airflow sensor. Gartner Banana
Page 302 of 1708
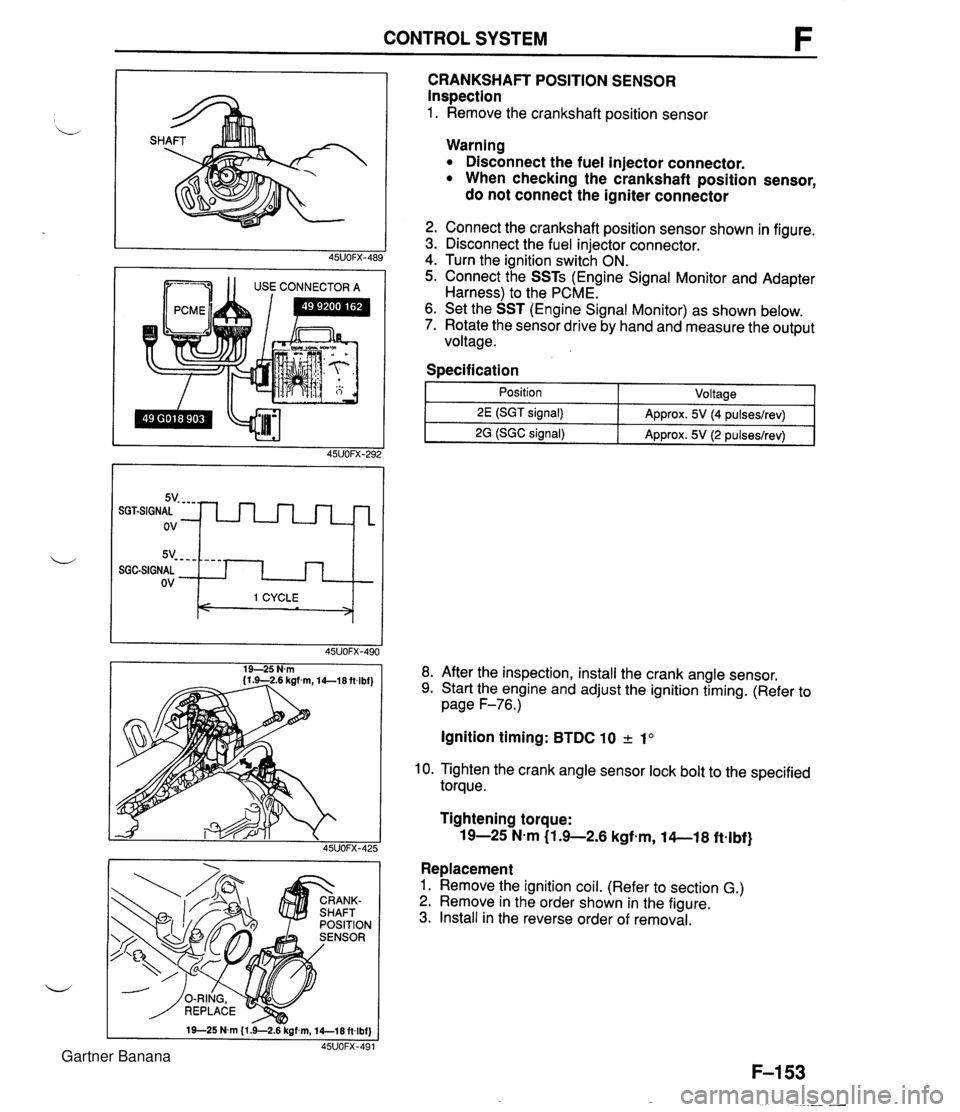
CONTROL SYSTEM 1 1 USE CONNECTOR A CRANKSHAFT POSITION SENSOR Inspection 1. Remove the crankshaft position sensor 5v- - - - SGGSIGNAL ov Warning Disconnect the fuel injector connector. When checking the crankshaft position sensor, do not connect the igniter connector - - - - I 1 CYCLE < > 2. Connect the crankshaft position sensor shown in figure. 3. Disconnect the fuel injector connector. 4. Turn the ignition switch ON. 5. Connect the SSTs (Engine Signal Monitor and Adapter Harness) to the PCME. 6. Set the SST (Engine Signal Monitor) as shown below. 7. Rotate the sensor drive by hand and measure the output voltage. Specification I 1 - Position - ~oltaael 8. After the inspection, install the crank angle sensor. 9. Start the engine and adjust the ignition timing. (Refer to page F-76.) 2E (SGT signal) 2G (SGC signal) Ignition timing: BTDC 10 2 1" Approx. 5V (4 pulseslrev) Approx. 5V (2 pulseslrev) 10. Tighten the crank angle sensor lock bolt to the specified torque. Tightening torque: 19-25 N-m (1 .+2.6 kgfem, 14-1 8 ftelbf} Replacement 1. Remove the ignition coil. (Refer to section G.) 2. Remove in the order shown in the figure. 3. Install in the reverse order of removal. Gartner Banana
Page 303 of 1708
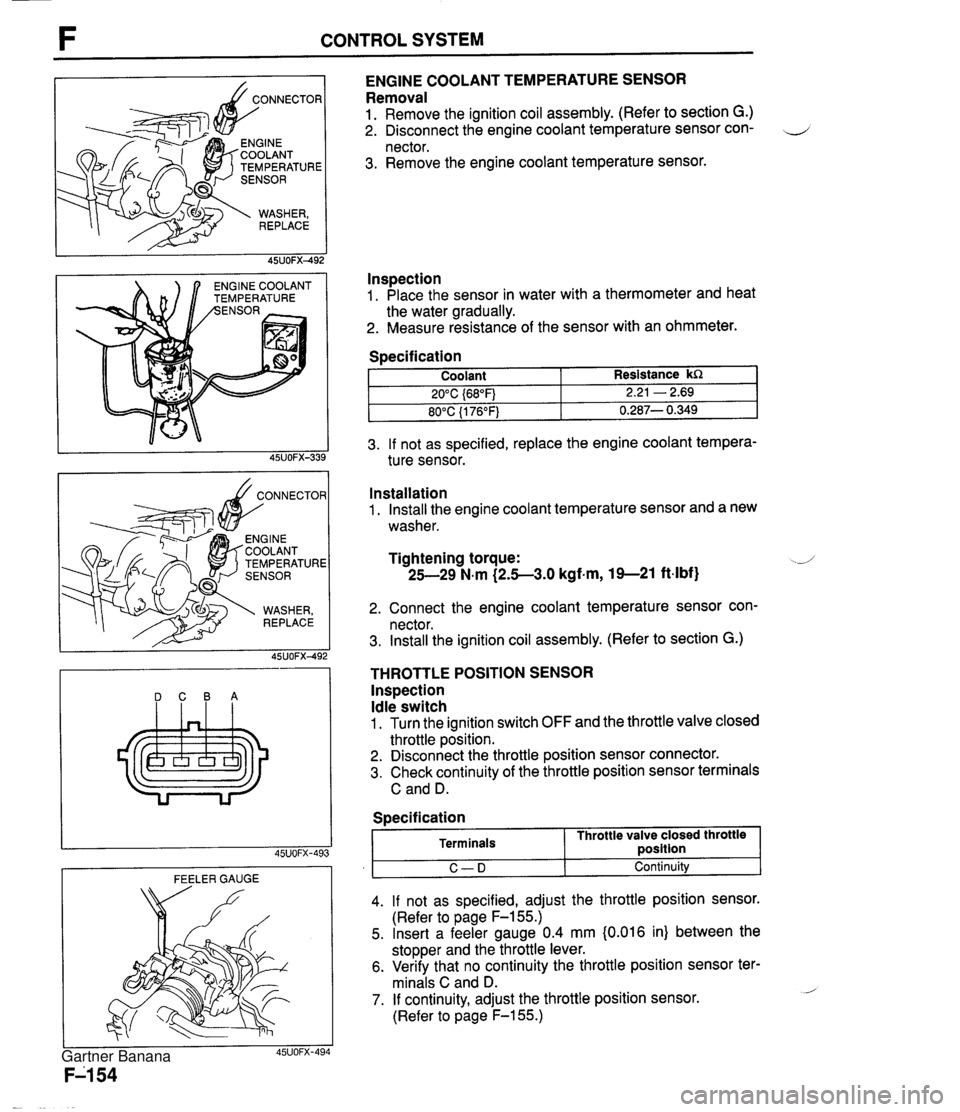
CONTROL SYSTEM TEMPERATURE NGlNE COOLANT EMPERATURE ENGINE COOLANT TEMPERATURE SENSOR Removal 1. Remove the ignition coil assembly. (Refer to section G.) 2. Disconnect the engine coolant temperature sensor con- 4 nector. 3. Remove the engine coolant temperature sensor. lnspection 1. Place the sensor in water with a thermometer and heat the water gradually. 2. Measure resistance of the sensor with an ohmmeter. 3. If not as specified, replace the engine coolant tempera- ture sensor. Specification DCBA Coolant 20°C {68"F) 80°C {I 76°F) FEELER GAUGE Resistance kR 2.21 - 2.69 0.287- 0.349 Installation 1. Install the engine coolant temperature sensor and a new washer. Tightening torque: -J 25-29 N.m (2.5-3.0 kgf-m, 19--21 ft-lbf) 2. Connect the engine coolant temperature sensor con- nector. 3. Install the ignition coil assembly. (Refer to section G.) THROTTLE POSITION SENSOR lnspection Idle switch 1. Turn the ignition switch OFF and the throttle valve closed throttle position. 2. Disconnect the throttle position sensor connector. 3. Check continuity of the throttle position sensor terminals C and D. I C-D I Continuity 4. If not as specified, adjust the throttle position sensor. (Refer to page F-155.) 5. Insert a feeler gauge 0.4 mm {0.016 in) between the stopper and the throttle lever. 6. Verify that no continuity the throttle position sensor ter- minals C and D. - 7. If continuity, adjust the throttle position sensor. (Refer to page F-155.) Specification Terminals Throttle valve closed throttle ~osition Gartner Banana
Page 305 of 1708
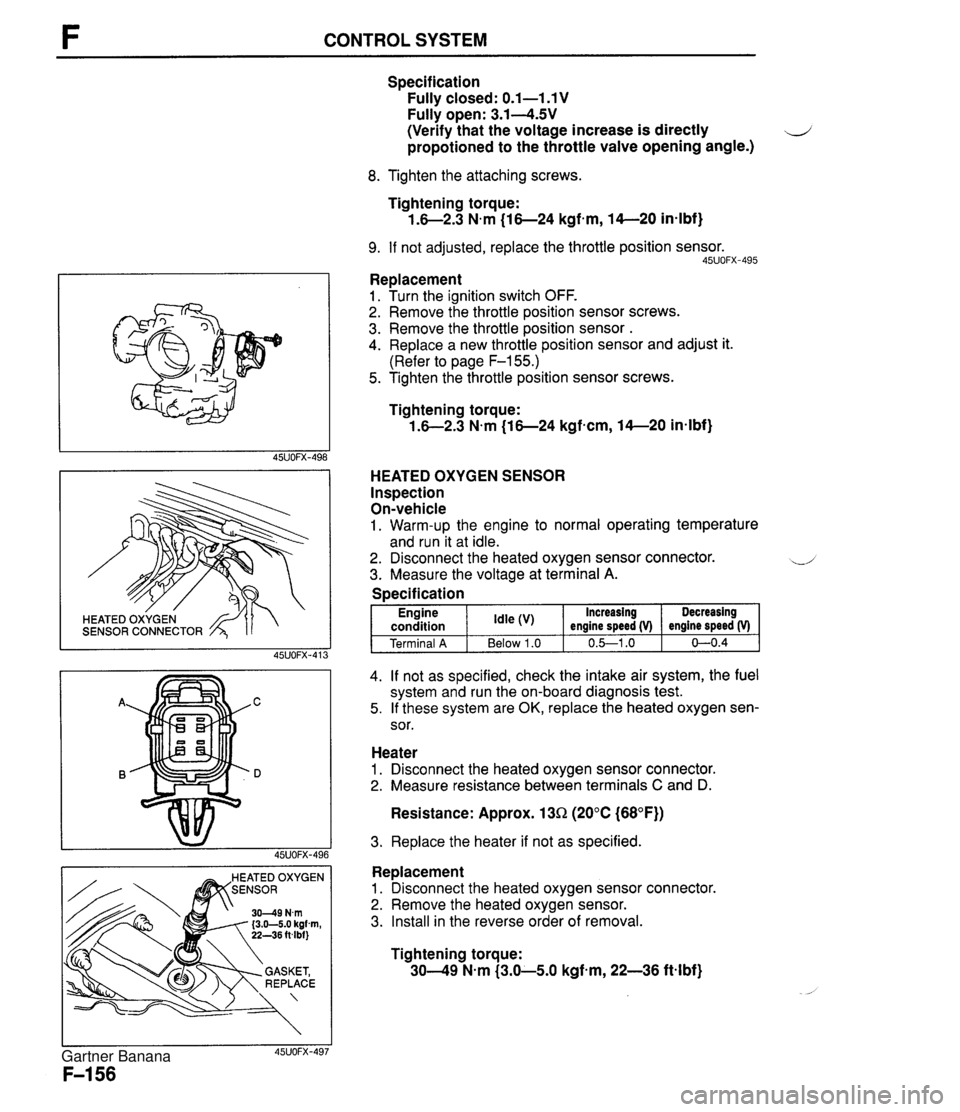
CONTROL SYSTEM SENSOR CONNECTOR EATED OXYGEN Specification Fully closed: 0.1-1.1 V Fully open: 3.14.5V (Verify that the voltage increase is directly d propotioned to the throttle valve opening angle.) 8. Tighten the attaching screws. Tightening torque: 1.6-2.3 N.m (16-24 kgfmm, 14-20 in-lbf} 9. If not adjusted, replace the throttle position sensor. 45UOFX-495 Replacement 1. Turn the ignition switch OFF. 2. Remove the throttle position sensor screws. 3. Remove the throttle position sensor . 4. Replace a new throttle position sensor and adjust it. (Refer to page F-155.) 5. Tighten the throttle position sensor screws. Tightening torque: 1.6-2.3 N.m (16-24 kgf-cm, 14-20 in-lbf} HEATED OXYGEN SENSOR Inspection On-vehicle 1. Warm-up the engine to normal operating temperature and run it at idle. 2. Disconnect the heated oxygen sensor connector. -.-' 3. Measure the voltage at terminal A. 4. If not as specified, check the intake air system, the fuel system and run the on-board diagnosis test. 5. If these system are OK, replace the heated oxygen sen- sor. Specification Heater 1. Disconnect the heated oxygen sensor connector. 2. Measure resistance between terminals C and D. Resistance: Approx. 13R (20°C (68°F)) Engine condition Terminal A 3. Replace the heater if not as specified. Increasing engine speed (V) 0.&1 .O Idle Below 1.0 Replacement 1. Disconnect the heated oxygen sensor connector. 2. Remove the heated oxygen sensor. 3. Install in the reverse order of removal. Decreasing engine speed (V) 0-0.4 Tightening torque: 3049 N-m (3.0-5.0 kgf-m, 22-36 ftlbf) Gartner Banana