Page 327 of 1413

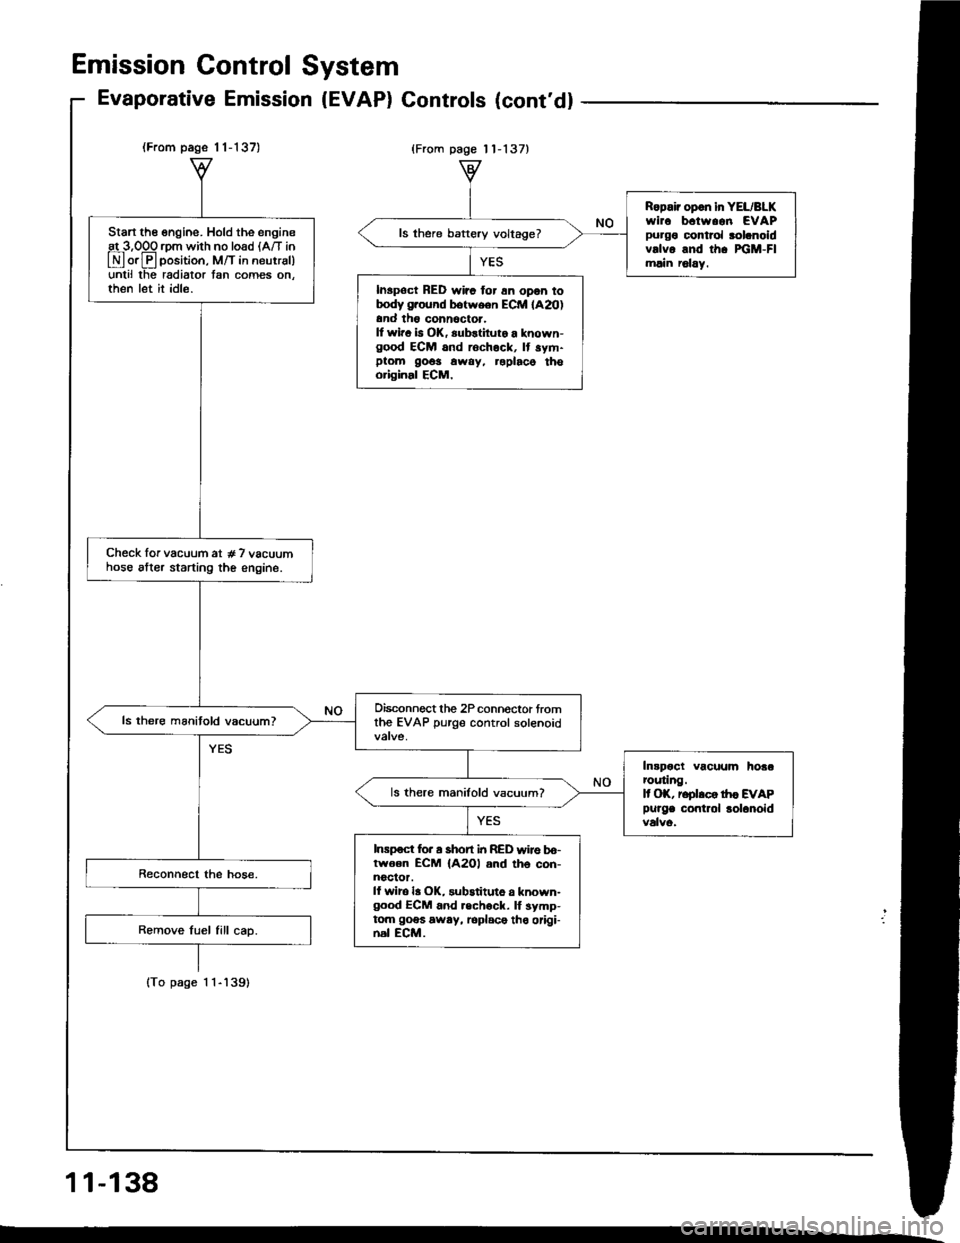
(From page 1 1-137)
lTo page 1 1-'l39)
Start the engine. Hold the engineat 3,OOO rom with no load lA/T in
E orE position, M/T in neutrsl)unlil lhe radiator tan comes on.then let it idle.
Check lor vacuum at # 7 vacuumhose alter starting the engine.
Oisconnect the 2P connoctor fromthe EVAP purge control solenoid
Intpoct vacuum hoaarcuting.It OK, reolrco tr|c EVAP
Purge contlol lolanoid
ls there manifold vacuum?
Inrpoct for a short i|t RED wire bo-lwoen ECM {A2Ol and th6 con-noclor.ll wiro la OK, substituto a known-good ECM 6nd .echock. lf symp-tom goes away, loplace tho origi-nal ECM.
Ropair opon in YEL/BLKwirc b.tw..n EVAPpurgo control rolanoidvrlvo and th. xiM-Flmlin r6lay.
ls there baftery voltage?
Inspoct RED wirc for 6n opon totrody g.ound botween ECM lA20)and th6 conn6ctor.It wir. b OK, substiluto a known-good ECM and rochock, It sym-ptom 9o6s away, roplaco thooriginal ECM,
Emission Gontrol System
Evaporative Emission (EVAP) Gontrols (cont'd)
{From page 11-137}
11-138
Page 328 of 1413
(F.om pdge 1l-138)
Connoct a vlcuum gaugo tocaniator purg! lir ho!o.
Stsn tho onginc lnd rai!. spo€dto 3,50O rpm.
Connect a vacuum gauge to thecsnister puag6 hos6 and raise thesngin€ spe€d to 3,500 rpm.
Do€a vocuum opp€ar on gougo
within 'l minuto?
Saa EVAP tso {ay vdv. t.!t ioconrDbta.Evapoardva ambdon coartaoL |.|ox.
Inapoct tha purga hosoand drronl. body potl
for pinch or blocklga.
VACUUM PRESSUREGAUGE O-4 In.HgoTJAZ-OOIOOOB
PURGE AIR HOSE
(cont'd)
11-139
Page 329 of 1413

Emission Control System
Evaporative Emission Controls
(cont'dl
Evaporativ€ Emission {EVAPI Two Way Valvo Tasting
l. Remove the tuel fill cao.
2. Remove vapor line trom the two way valve on the
fuel tank and connect to T-fitting trom vacuum
gauge ano vacuum pump as snown.
VACUUM/PRESSURE GAUGEoTJAZ-OOI OOOa
A973X-041-XXXXX
fT-FITTING
Apply vacuum slowly and continuously while watch-
ing the gauge.
Vacuum should stabilize momentarilv at 5-15
mmHg (0.2-0.6 in. Hg).
a It vacuum stabilizes (valve opensl below5mmHg(O.2 in.Hg) or above I 5 mmHg (O.6 in.Hg), install
a new valve and retest.
Move vacuum pump hose from vacuum to pressure
titting, and move vacuum gauge hose trom vacuum
to oressure side as shown.
Pressure should stabilize at 1O-35 mmHg (0.4- 1 .4
in. Hg).
a lf p.essure momentarily stabilizes {valve opensl
at 1O-35 mmHg (O.4- 1.4 in.Hg), the valve is
oK.
a lf pressure stabilizes below 10 mmHg {O.4 in.Hg)
or above 35 mmHg (1 .4 in.Hgl, install a new valve
and retest.
4.
J-.
fF . -,-/ asr^:
,T 4?e
Slowly pressurize the vapor line while watching thegauge.
11-140
Page 1091 of 1413

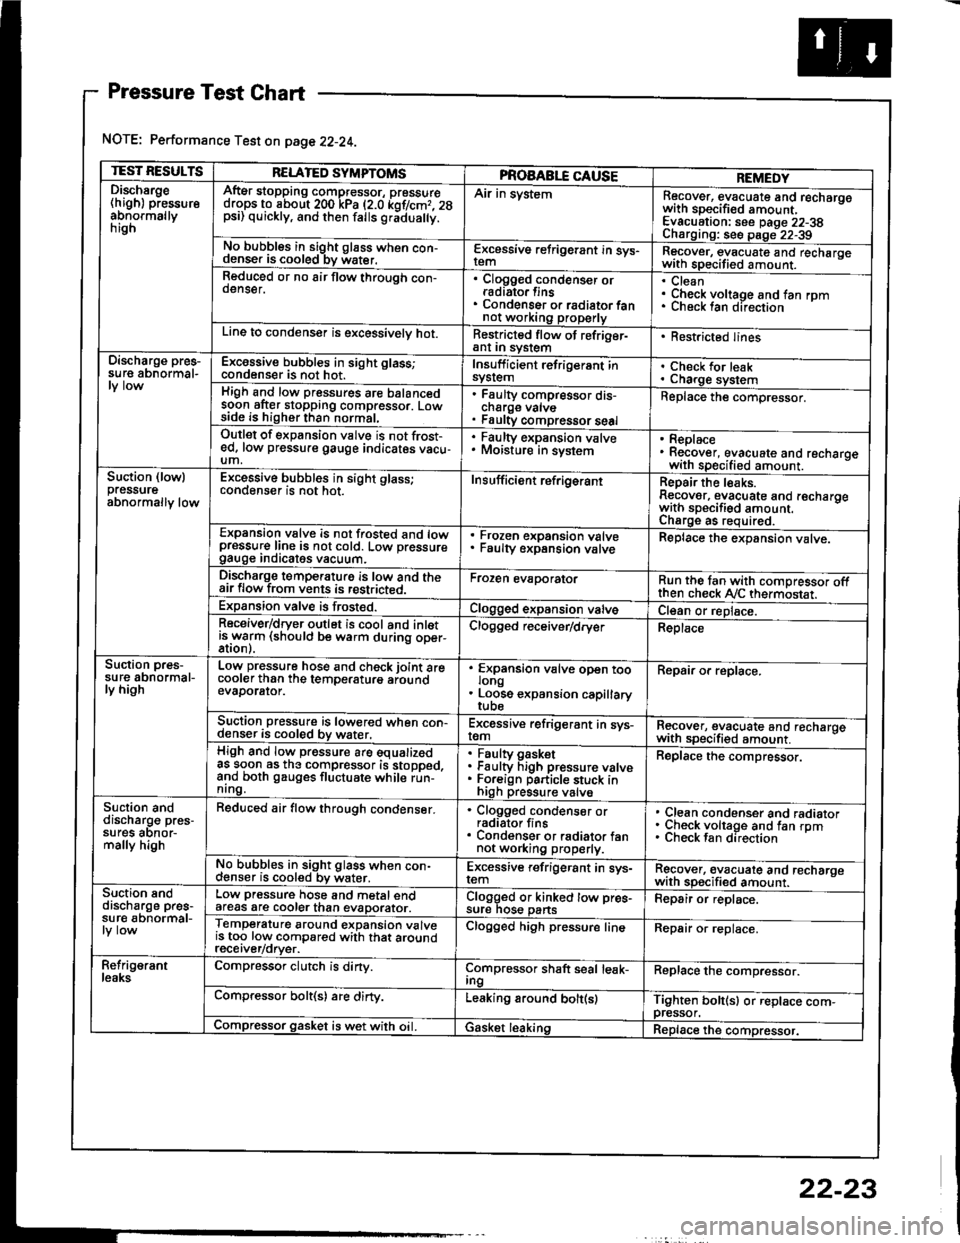
Pressure Test Chart
NOTE: Performance Test on page 22-24.
TEST RESULTSRELATED SYMPTOMSPROAABLE CAUSEREMEDYDischsrge(high) pressureabnormallynrgn
AftEr stopping compressor, pressuredrops to about 200 kPa (2.0 kof/cmr. 28psi) quickly, and then falls gr;dua y.
Air in systemRecover, evacuate and recharqowith sDecified amount. -
Evacuation: see Daqe 22-38Charoino: se6 D;op--2?-?qNo bubbles in sight g16ss when con-denser is cooled bv water.E-\cessive refrigerant in sys-Recover, evacuate and recharqewith specitied amount. -
Reduced or no air flow through con-oenser.Clogged condenser orradiato. finsCondenser o. radiator fannot working properly
CleanCheck voltage and fan rpmunecK lan ofeclton
Line to condenser is excessivelv hot.Restricted flow of refriger-ant In syslem. Restricted lines
Discharge pres-su re abnormal-Excossive bubbles in sight glass;condenser is not hot.Insuff icient refrigerant insyslemCheck for leakCharge systemHigh and low pressures are balancedsoon after stopping compressor. Lowside is higher than normal,
Faulty compressor dis-cnarge vaNsFaulty compressor seal
Replace the compressor.
Outlet of expansion vslve is not frost-ed, low pressure gauge indicates vacu-um,
. Faulty expansion valve. Moisture in sysiem. Replace. Recover, evacuate and recharoewith specified amount. -
Suction (lowlpressureabnormally low
Excessive bubbles in sight glass;conqenser rs not hot_Insuff icient ref rigerantReoair the leaks.Reaover, evacuate and recharoewith sDecifisd amount. -
Charqe as required.Expansion valve is not trosted and lowpressur€ line is not cold. Low pressuregauge Inorcates vacuum.
Frozen expansion valveFaulty expansion valveReplace the expansion valve.
Discharge temperaturg is low and theair flow from vents is restricted.Froren evaporatorRun the tan with comoressor oftthen check Ay'C thermostat.Expansion valve is frost€d.Clogged expansion valveCl€an or replace.Receiver/dryer outlet is cool and inletisrryarm (should be warm during oper-Clogged r€ceiver/dry€rReplace
Suction pres-su re abnormal-ly high
Low pressure hose and check joint arecooler than the temDeraturo aroundevaDorator.
'
ffin"nsion u"lu" oD"n too
. Loose expansion capillary
Repair or replace.
Suction pressure is lowered when con-denser is cooled by water,Excessive refrigerant in sys-remRecover, evacuate and recharqewith sDecifi€d amount. -
High and low pressure are equalizedas soon as the compressor is stopped,and both gauges fluctuate while run-nrng.
Faultv oasketFaulty Figh pressure valveForeign particle stuck inhigh pressure valve
Replace the compressor.
Suction anddischarg€ pres-sufes aonor-mally high
Reduced air flow through condenser.. Clogged condenser orradiator fins. Condenser or radiator fannot working properly.
Clean condenser and radiatorCheck voltage and fan rpmCheck fan direcrion
No bubbles in sight glass when con-cl€nser is cooled bv water.Excessive refrigerant in sys-remRgcover, €vacuate and recharoewith sp€cified amount.Suction snddischarge pres-su r€ abnormal-
Low pressure hose and metal endafeas are cooler than evaDorator.Clogged or kinked tow pre€-sure nos€ pansFepair or replace.
Temperature around expansion valveis too low compared with that aroundrecerver/orver.
Clogged high pressure lineRepair or replace.
Refrig€rantleaksCompressor clutch is dirty.Compressor shaft seal leak-IngReplace the comDressor.
Compressor bolt(s) are dirty.Leaking around bolt(s)Tighten bolt(sl or replace com-pressor.Compressor gasket is wet with oil. IGasket leakingReplace the compressor.
22-23