Page 975 of 1413
Seats
Front Seat Cover RePlacement
CAUTION: Wear gloves to removo and install the 36at
cov€rs.
NOTE: Take care not to tear the seams or damage the
seat covers.
Soat-back covor lomoval:
1. Slide the Jront seat forwa.d and told the seat-back
forward.
2. Remove the hooks and fasteners. then fold the seat-
back cover back.
FASTE]IIER
FASTENER
Remove the headrest and headrest guide.
HEAOREST
SEAT.BACK
Scr€w location,
,e, I
Yi
cJ/
4. Remove the lumbar support knob.
ilff-]s)
\
fH".,
5. Remove the seat-back cover by releasing the inside
chps.
Cllp removrl:
6. Pull back the edge of the seat-back cover all the way
around, then release the clips.
20-106
-�
Page 977 of 1413
Seats
Rear Seat Replacement
Hatchback
NOTE: Take care not to scratch the seat covers and
body.
1. Fold the seat-backs {orward.
2. Remove the clips, then fold the trunk mat.
V: Clip locations, 14
I
+ |
v/J
20-108
(see page 20-1Og)
SEAT.BACKS
TRUNK MAT
3. Remove the cliD pin on each side.
Slide the seat-backs outward, then remove the seat-
backs from the pivot bracket.
SEAT.BACK
SEAT-BACK PIVOTBRACKET
CLIP PIN
Page 979 of 1413
Seats
Rear Seat Replacement (cont'd)
Sedan
NOTE: Take care not to scratch the seal covers and
booy.
1. Fold the seat-back forward.
2. Remove the clips.
V : Clip locations, I
SEAT-8ACK
l
/-.;- I----+tl l---M- I
/ /,/
TRUNK MAT
SEAT-BACK
20-110
3. Detach the hook, then remove the trunk mat.
TRUNKMAT
a-^I{ \
Nry
YHOOK
SEAT.BACK
TRUNKMAT
4. Remove the bolts. then remove the seat-back.
V : Eolt locations, 4
REAR SEAT LAICH/LOCK CYLINDER{see page 2O-'l 1 1l
REAR SEATPIVOT BRACKET(see page 2O-1 1 1)
REAR SEATPIVOT BRACKET
I
I gel?"Til.*,,", i
E 7.2 tbt'trl I" -----r"
SEAT.BACK
Page 981 of 1413

8. lnstallation is the reverse ot the removal procedure
NOTE:
a Make sure the seat-back locks securely.
a It necessary, adiust the rear seal latch and
seat-back.
a BeJore sttaching the seat-back, side bolsters and
seat cushion, make sure there are no twlsts or
kinks in the rear seat belts and center belt
a When installing the seat cushion, slip the seat belt
buckles through the slits in the seat cushion.
1.
2.
SEAT-BACK
Seats
Rear Seat Replacement (cont'd)Rear Seat Cover RePlacement
CAUTION: Wear glov€s to l€movo and install tho seat
covgls.
NOTE:
a Take care not to tear the seams or damage the seat
covels,
a Remove the cliDs as shown.
Soat-back cover romoval:
Hatchback
Remove the seat-back (see page 20-108).
Remove the latch cover and latch collar (see page
20-109).
Remove allthe clips trom the back of the seat-back,
then loosen the seat-back cover.
SEAT.BACKCOVER
4.Pull back the edge of the seat-back cover all the way
around, then release the clips.
ilg
E
F]
CLIP
SEAT-BACK
CLIP
20-112
Page 983 of 1413
Seats
Rear Seat Cover Replacement
the
(cont'd)
S6dan
1.Remove the seat cushion (see page 20-1 1 1).
Remove all the clips from under the seat cushion,
then loosen the seat cushion cover
SEAT CUSHIONCOVER
Pull back the edge of the seat cushion cover all
way around. then release the clips.
SEAT CUSHIONCOVER
Installation is the reverse of the removal procedure.
NOTE:
a To prevent wrinkles when installing a seat cover.
mark sure the material is stretched evenlY over
the pad before securing all the clips.
a Replace the released clips with new ones.
UPHOLSTERY RING PLIERSCommercially available.
{Cover sid6}
)rir
ry"M
CLIP
t)llll
CLIPS
20-114
Page 1006 of 1413

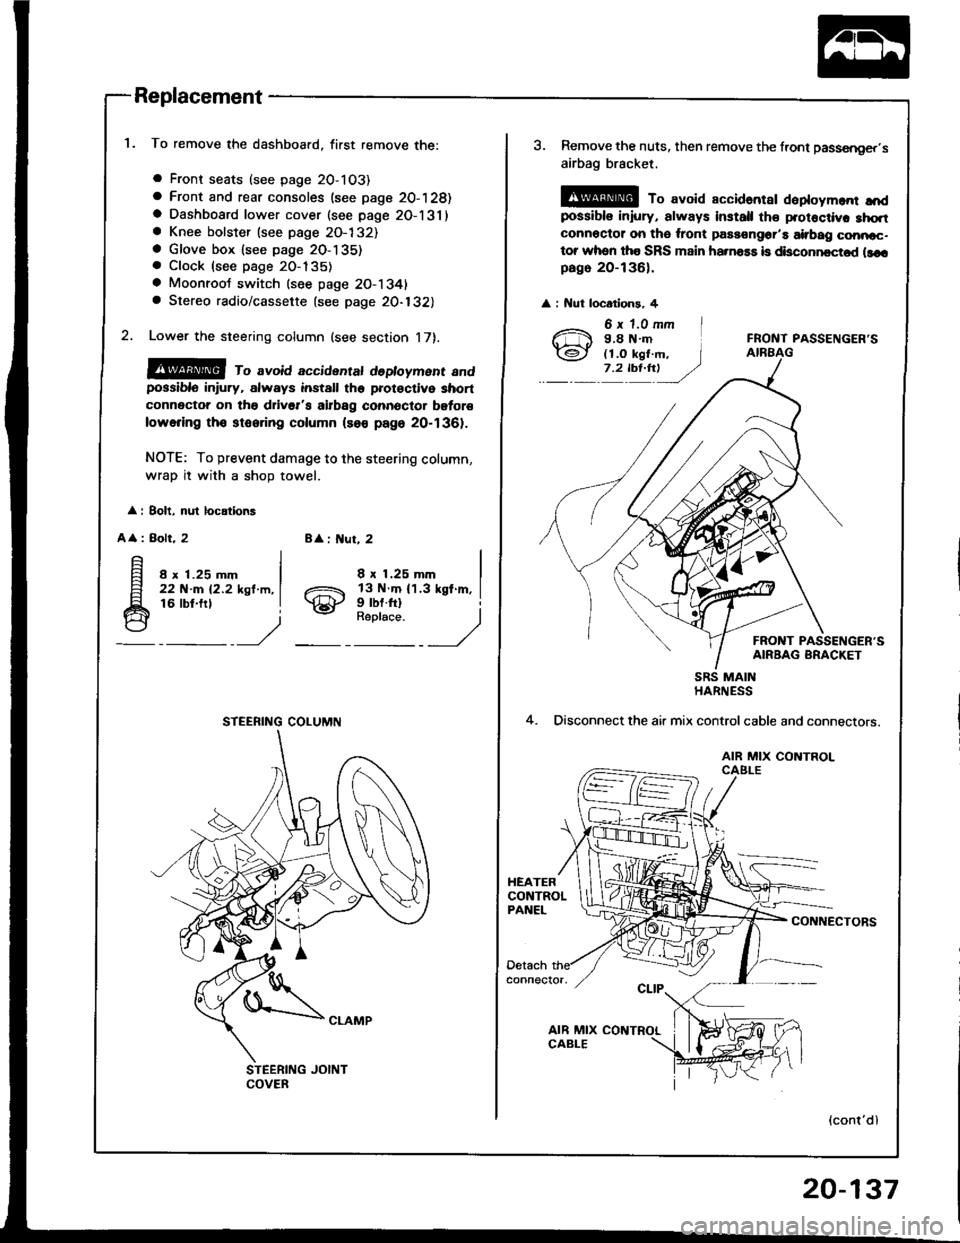
Replacement
To remove the dashboard, first remove the:
a Front seats (see page 2O-103)
a Front and rear consoles (see page 20-128)a Dashboard lower cover (see page 2O-131)a Knee bolster (see page 2O-132)a Glove box lsee page 2O-135). Clock (see page 20-135)
a Moonroot switch (see page 20-1341a Stereo radio/cassette {see page 20-132)
Lower the steering column (see section 17).
@@ ro avoid accidentat dedoyment andpossiblo in ury, always install the prot€ctive short
connector on tho drivsr's airbag connector bgtor€
lowering tho stooring column (so€ page 20-1361.
NOTE: To prevent damage to the steering column,
wrap it with a shoD towel.
: 8olt, nul locations
A
: Bolt, 28 : ut, 2
8 x 1.25 mm22 N-m 12.2 ksl.m,16 lbt.frl
8 x 1.25 mm
gill$"'l
STEERING COLUMN
3. Remove the nuts, then remove the front passsnger,s
airbag bracket,
@ To avoid accidantar daploym.nr ",'dpossibls iniury, always install th€ protoctiv. 3hqtconnoctor on tho ,ront passongor'a airbag conncc-tor whon tha SRS main ha.na$ is disconncctod llcrpago 20-136).
: Nut locatlons, 4
FRONT PASSENGER'S
FRONT PASSENGER'SAIRBAG BRACKET
4.
SRS MAINHARNESS
Disconnect the air mix controlcable and connectors.
AIR MIX CONTROLCAELE
CONNECTORS
(cont'dl
20-137