1994 CHEVROLET SUBURBAN wheel torque
[x] Cancel search: wheel torquePage 78 of 385
- Going about 35 mph (56 km/h) or more, push the accelerator all
the way down.
You’ll shift down to the next gear and have more power.
@ should not be used when towing a trailer, carrying a heavy load,
driving on steep hills, or for
off road driving. Select “D” (third gear)
when operating the vehicle under any of these conditions.
D (Third Gear)
This is like @, but you never go into Overdrive. You should use when
towing a trailer, carrying a heavy load, driving on steep hills, or for
off-road driving.
2 (Second Gear)
This position gives you more power but lower fuel economy. You can
use
“2” on hills. It can help control your speed as you go down steep
mountain roads, but then you would also want to use your brakes
off
and on. If you manually select “2”, the transmission will drive in
second gear.
You may use this feature for reducing torque to the rear
wheels when you are trying to start your vehicle from
a stop on
slippery road surfaces.
1 (First Gear)
This position gives you even more power (but lower fuel economy)
than
“2.” You can use it on very steep hills, or in deep snow or mud. If
the selector lever
is put in “1,” the transmission won’t shift into first
gear until the vehicle is going slowly enough.
NOTICE:
If your rear wheels can’t rotate, don’t try to drive. This might
happen if you were stuck in very deep sand or mud or were up
against
a solid object. You could damage your transmission.
Also, if you stop when going uphill, don’t hold your vehicle there
with only the accelerator pedal. This could overheat and damage
the transmission. Use your brakes
or shift into “P” Park to hold
your vehicle in position on
a hill.
2-23
ProCarManuals.com
Page 84 of 385
5. Remove the key and take it with you. If you can walk away from your
vehicle with the ignition key in
your hand, your vehicle is in “P”
(Park).
If
you have to leave your vehicle with the engine running, be sure your
vehicle
is in “P’ (Park) and your parking brake is firmly set before you
leave it. If
you have four-wheel drive with a manual transfer case shift
lever, be sure that
the transfer case is in a drive gear - not in “N” (Neutral).
After
you’ve moved the shift lever into the “P” (Park) position, hold the
regular brake pedal down. Then, see if
you can move the shift lever away
from “P” (Park) without first pulling it toward you. If
you can, it means that
the shift lever wasn’t fully locked into
“I?” (Park).
Torque Lock (Automatic Transmission)
If you are parking on a hill and you don’t shift your transmission into “P”
(Park) properly, the weight of the vehicle may put
too much force on the
parking pawl in the transmission. You may find it difficult to pull the shift
lever
out of “P” (Park). This is called “torque lock.’’ To prevent torque lock,
set the parking brake and then shift into
“P’ (Park) properly before you
leave the driver’s seat. To find out how, see “Shifting Into ‘P’ (Park)” in the
Index.
When
you are ready to drive, move the shift lever out of “P” (Park)
BEFORE you release the parking brake.
If “torque lock”
does occur, you may need to have another vehicle push
yours a little uphill to take some
of the pressure from the transmission, so
you can pull the shift lever out of “F”’ (Park).
2-29 ProCarManuals.com
Page 239 of 385
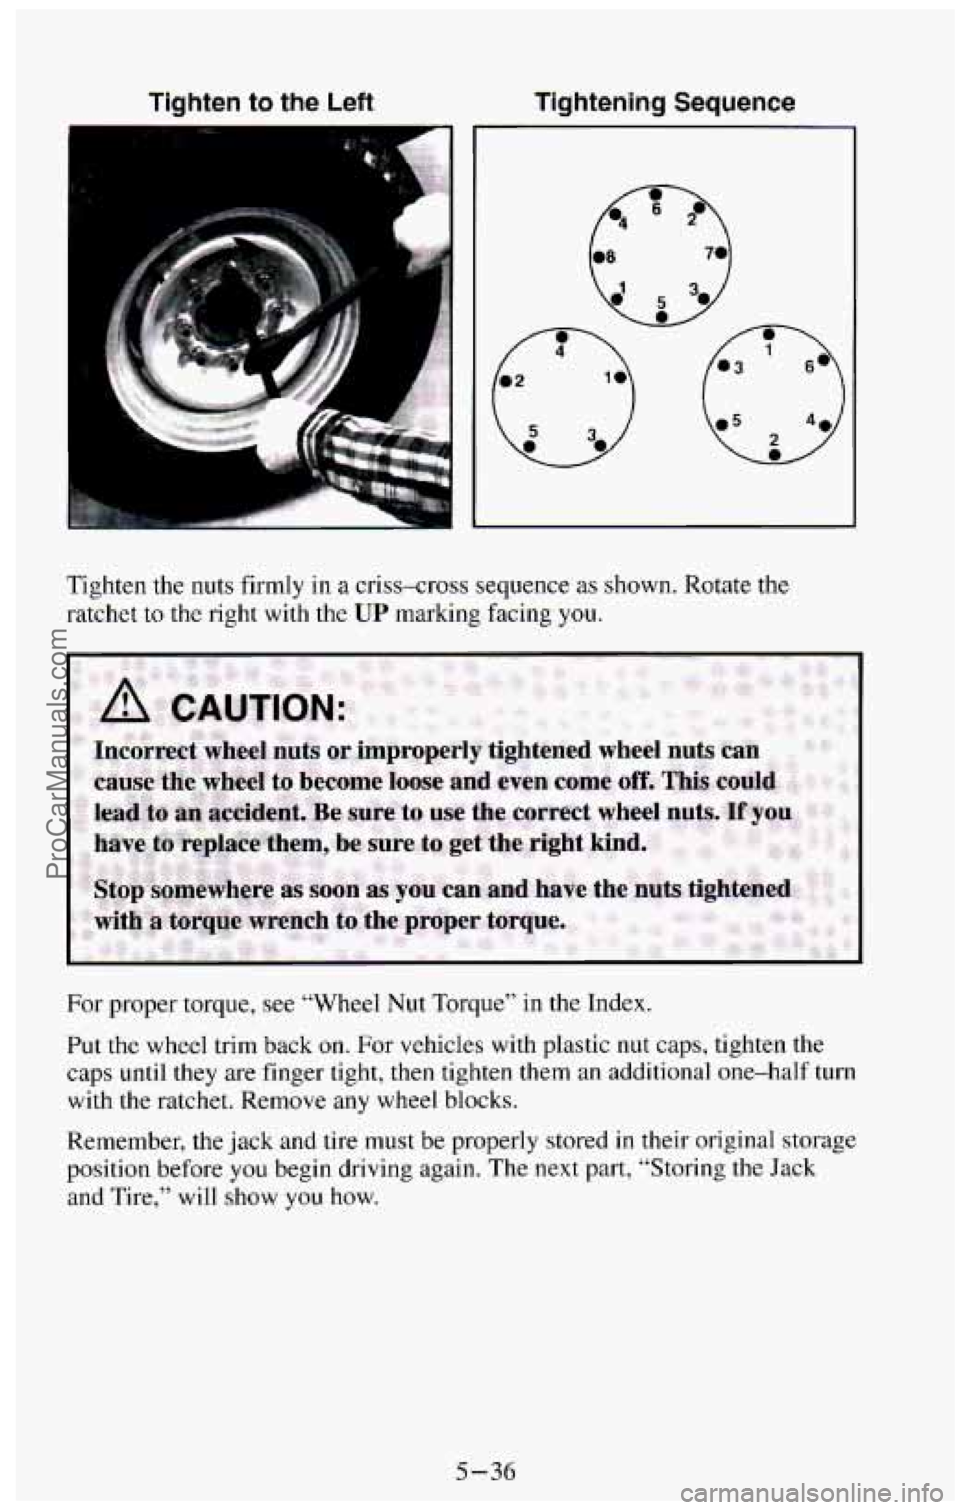
Tiqhten to the Left Tightening Sequence
Tighten the nuts firmly in a criss-cross sequence as shown. Rotate the
ratchet
to the right with the UP marking facing you.
For proper torque, see “Wheel Nut Torque” in the Index.
Put the wheel trim back on.
For vehicles with plastic nut caps, tighten the
caps until they are finger tight, then tighten them
an additional one-half turn
with the ratchet. Remove any wheel blocks.
Kernember, the jack and tire must be properly stored
in their original stbfige
position before you begin driving again. The
next part, “Storing the Jack
and Tire,” will show you how.
5-36
ProCarManuals.com
Page 292 of 385
Wheel Nut Torque
For vehicles with dual wheels, when the vehicle, wheel or fasteners are new,
have the torque set at
the first 100, 1,000 and 6,000 miles (160, 1600 and
9600 km). Use the torque specified in the appropriate Specification Chart
later
in this section.
Single Belt Accessory Drive
If your new vehicle uses a serpentine belt, it is lighter, and more durable
than systems with several belts.
The belt
ruIl 'li'vkf br iir6und the pulleys or^ the engine. A tensione'r'n'iay be
used to keep the belt tight at all times. The tensioner also makes replacing
the belt easier
if you need to replace the belt, be sure to get the correct
replacement belt. Your dealership
or parts supplier can help you with this.
The Accessory Drive Belt Routing label on your vehicle will show you how
to route the belt your vehicle uses.
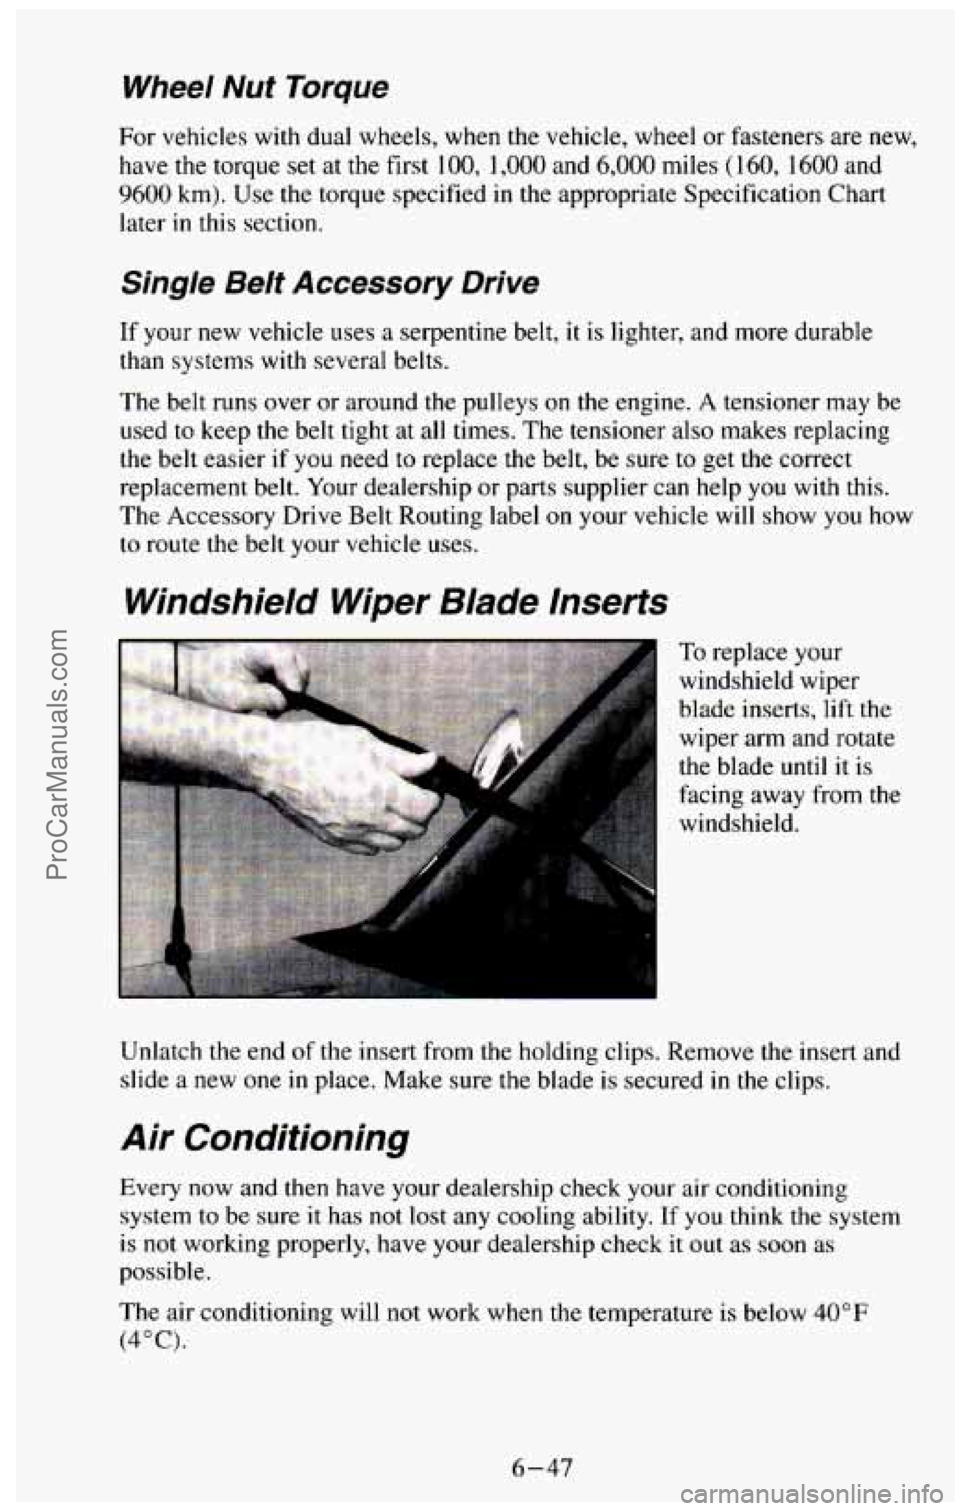
Windshield Wiper Blade lnserts
To replace your
windshield wiper
blade inserts, lift the
wiper arm and rotate
the blade until
it is
facing
away from the
windshield.
Unlatch the end
of the insert from the holding clips. Remove the insert and
slide
a new one in place. Make sure the blade is secured in the clips.
Air Conditioning
Every now and then have your dealership check your air conditioning
system to be sure
it has not lost any cooling ability. If you think the system
is not working properly, have your dealership check it out as soon as
possible.
The air conditioning will not work when the temperature
is below 40°F
(4°C).
6-47
ProCarManuals.com
Page 309 of 385
Special Tire lnflation
If you have 16 inch tires on your vehicle, and:
- You’ll be driving for very long at speeds of 66 mph (105 kdh) to
75 mph (120 km/h) where legal, inflate tires to 10 psi (70 kPa)
more than the recommended cold inflation pressures.
- You’ll be driving for very long at speeds of 76 mph ( 120 kdh) to
85 mph (1 35 kdh) where legal, cold inflation pressures should be
increased by
10 psi (70 kPa) and you must also reduce axle load
capacity by 10%.
Do not drive over 85 mph (135 km/h) even if
it’s legal.
Inflation pressures should never exceed 10 psi (70 kPa) above the
inflation specified for the maximum load
of the tire.
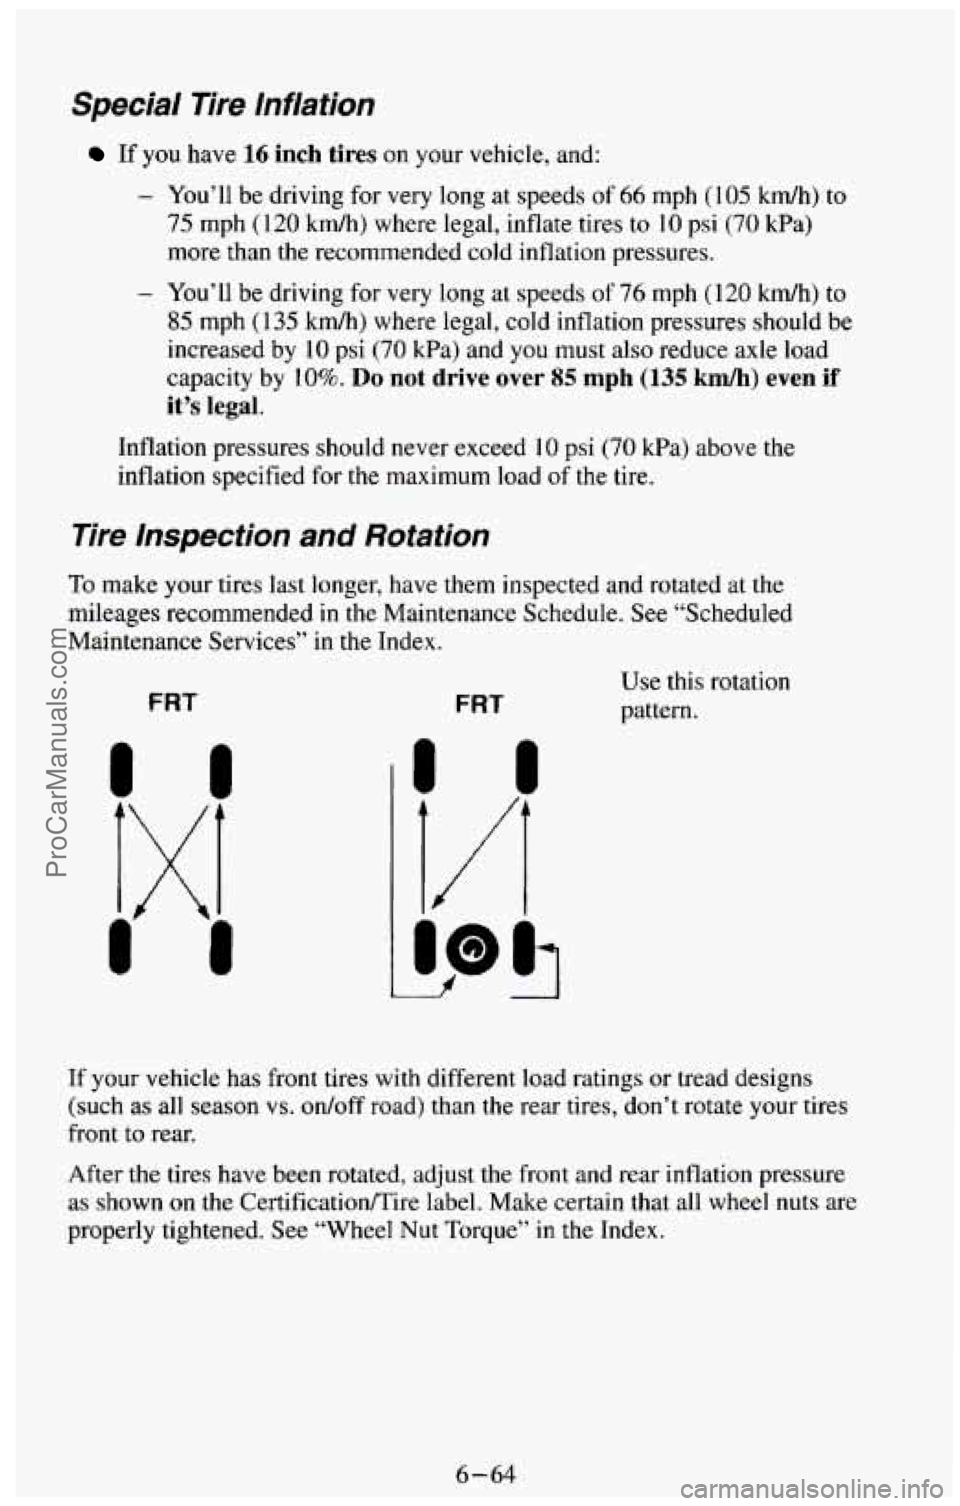
Tire lnspection and Rotation
To make your tires last longer, have them inspected and rotated at the
mileages recommended
in the Maintenance Schedule. See “Scheduled
Maintenance Services” in the Index.
FRT FRT
Use this rotation
pattern.
If your vehicle has front tires with different load ratings or tread designs
(such
as all season vs. on/off road) than the rear tires, don’t rotate your tires
front
to rear.
After the tires have been rotated, adjust the front and rear inflation pressure
as shown on the Certificationmire label. Make certain that all wheel nuts are
properly tightened. See “Wheel Nut Torque” in the Index.
6-64
ProCarManuals.com
Page 326 of 385
Specification Charts
Replacement Parts
Replacement part numbers listed in this section are based on the latest
information available
at the time of printing, and are subject to change. If a
part listed in this manual
is not the same as the part used in your vehicle
when
it was built, or if you have any questions, please contact your GM
truck dealer.
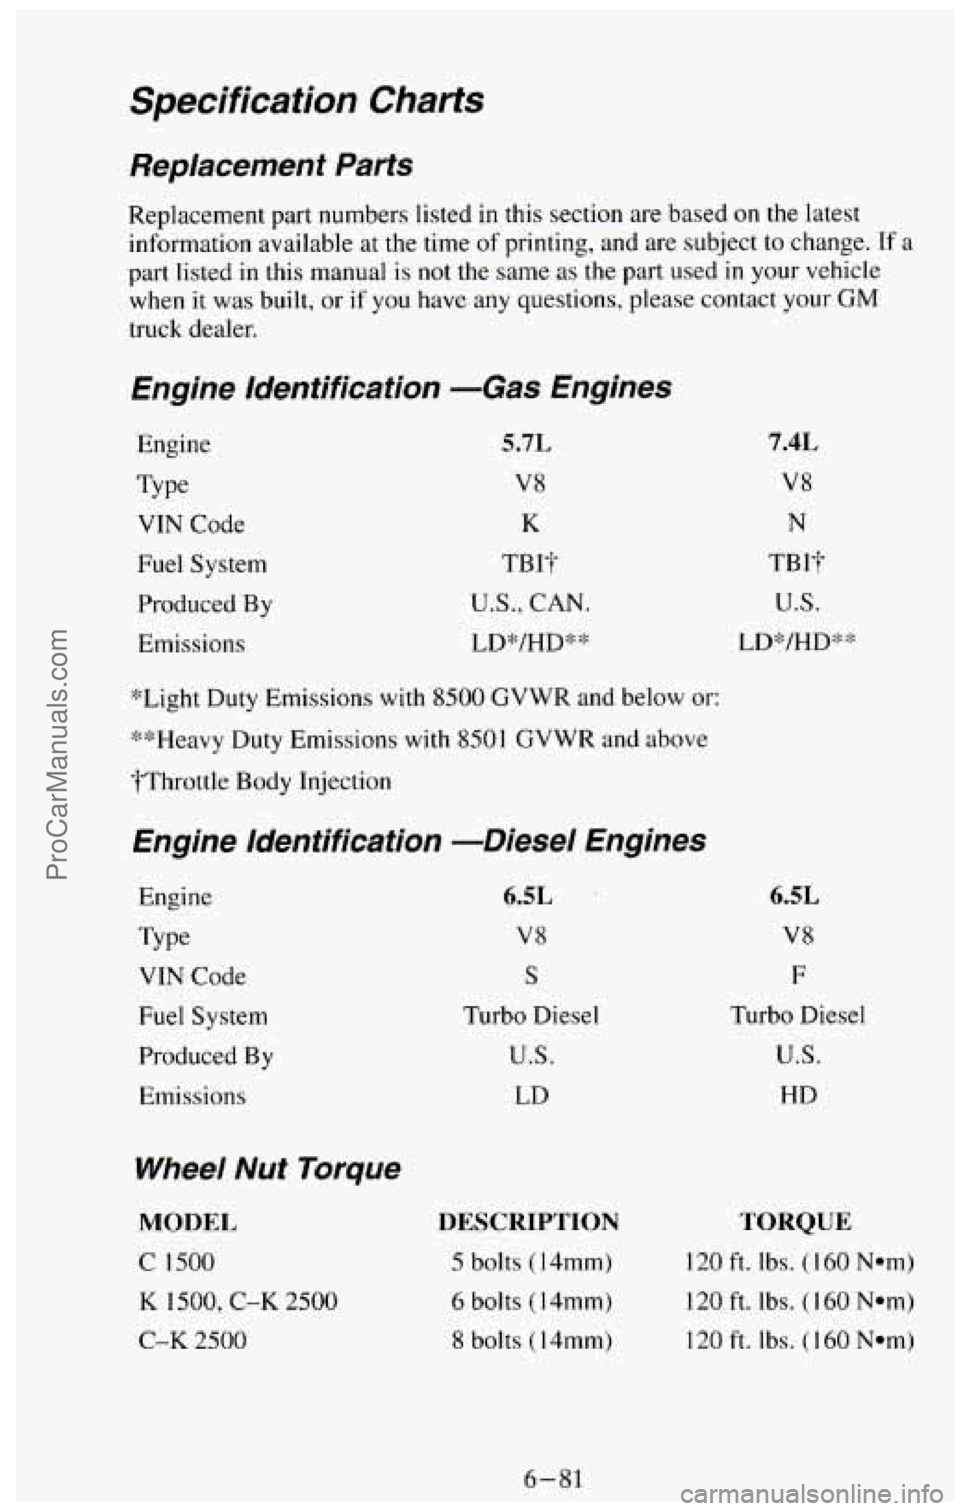
Engine Identification -Gas Engines
Engine
Type VIN Code
Fuel System
Produced By
Emissions
5.7L
V8
K
TBIT
U.S., CAN.
JJD*/HD**
“Light Duty Emissions with
8500 GVWR and below or:
**Heavy Duty Emissions with 8501 GVWR and above
?Throttle Body Injection
Engine Identification -Diesel Engines
Engine
Type VIN Code
Fuel System
Produced By
Emissions
Wheel Nut Torque
MODEL
C 1500
K 1500, C-K 2500
C-K 2500
6.5L
V8
S
Turbo Diesel
U.S.
LD
DESCRIPTION
5 bolts (14mm)
6 bolts (14mm)
8 bolts (14mm)
6.5L
V8
F
Turbo Diesel
U.S.
HD
TORQUE
120 ft. lbs. (1 60 Nom)
120 ft. lbs. ( 1 60 Nom)
I20 ft. Ibs. (I 60 Nom)
6-81
ProCarManuals.com
Page 354 of 385
2 I. THERMOSTATICALLY CONTROLLED ENGINE COOLING FAN INSPECTIONAI/
- (If so equipped.) Inspect all hoses and
ducts for proper hook-up. Be sure the valve works properly.
22. EXHAUST PRESSURE REGULATOR VALVE INSPECTION” -
Check that the valve works properly, Correct any binding. Inspect
hoses for cracks, chafing or decay. Replace parts as needed.
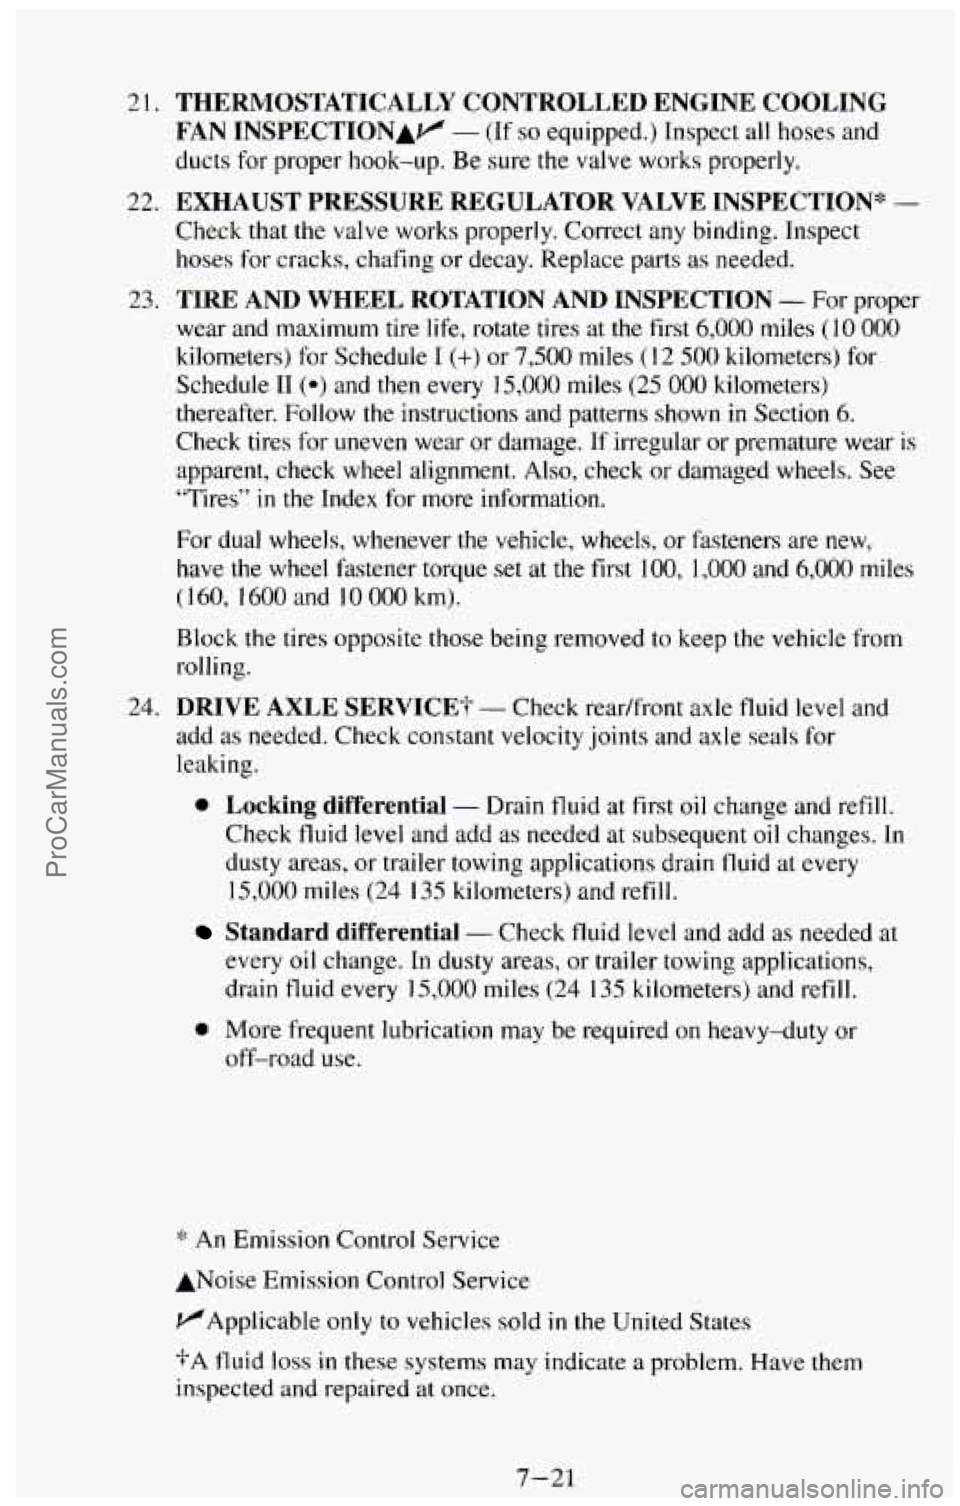
23. TIRE AND WHEEL ROTATION AND INSPECTION - For proper
wear and maximum tire life, rotate tires at the first 6,000 miles
(10 000
kilometers) for Schedule
I (+) or 7,500 miles (12 500 kilometers) for
Schedule
I1 (0) and then every 15,000 miles (25 000 kilometers)
thereafter. Follow the instructions and patterns shown
in Section 6.
Check tires for uneven wear or damage. If irregular or premature wear is
apparent, check wheel alignment. Also, check or damaged wheels. See
“Tires”
in the Index for more information.
For dual wheels, whenever the vehicle, wheels, or fasteners are new,
have the wheel fastener torque
set at the first 100, 1,000 and 6,000 miles
( 160, 1600 and 10 000 km).
Block the tires opposite
those being removed to keep the vehicle from
rolling.
24.
DRIVE AXLE SERVICE? - Check readfront axle fluid level and
add
as needed. Check constant velocity joints and axle seals for
leaking.
0 Locking differential - Drain fluid at first oil change and refill.
Check fluid
level and add as needed at subsequent oil changes. In
dusty areas, or trailer towing applications drain fluid at every
15,000 miles (24 135 kilometers) and refill.
Standard differential - Check fluid level and add as needed at
every oil change. In dusty areas, or trailer towing applications,
drain fluid every
15,000 miles (24 135 kilometers) and refill.
0 More frequent lubrication may be required on heavy-duty or
off-road
use.
:i: An Emission Control Service
ANoise Emission Control Service
VApplicable
only to vehicles sold in the United States
+A fluid
loss in these systems may indicate a problem. Have them
inspected and repaired
at once.
7-21 ProCarManuals.com
Page 383 of 385
T
Tachometer ..................................................... 2-74
Tailgate
......................................................... 2-8
Theft
.......................................................... 2-10
Thermostat
..................................................... 6-40
Tiltwheel ...................................................... 2-37
Tires
.......................................................... 6-62
Balancing
................................................... 6-67
Chains ...................................................... 6-69
Flat
........................................................ 5-24
HubCapsandWheelNutCaps
.................................. 5-32
Loading
..................................................... 6-59
New ........................................................ 6-66
Pressure
..................................................... 6-62
Spare (See “Spare Tire”)
Uniform Tire Quality Grading
................................... 6-66
Towing
A Trailer ................................................ 4-36
Following Distance
............................................ 441
ChangingaFlat ............................................... 5-25
Inspection and Rotation ........................................ 6-64
TorqueLock
.................................................... 2-27
Backingup
.................................................. 6-41
Hitches
..................................................... 4-39
Maintenance
................................................. 4-44
TowingYourVehicle
.............................................. 5-7
TrailerBrakes
................................................... 4-40
Towing
..................................................... 4-36
Wiring Harness
............................................... 2-80
Trailering Package ............................................... 6-61
Transfer Case
.............................................. 2-33, 6-34
Transmission Automatic
................................................... 2-14
Five-SpeedManual
........................................... 2-14
Fluid
....................................................... 6-28
Fluid, ToAdd
................................................ 6-31
Four-wheel (See “Four-wheel Drive”)
Fluid,
To Check
............................................... 6-28
ShiftLight
................................................... 2-25
Tripodometer
.................................................. 2-65
Vehicle
Damage Warnings ............................................... vii
Identification Number .......................................... 6-78
Loading
................................................ 4-12. 6-59
Storage
..................................................... 649
Symbols ...................................................... vii
AirVents ..................................................... 3-3
Tips
......................................................... 3-2
Voltmeter
...................................................... 2-77
Ventilation System
................................................ 3-2
9 ProCarManuals.com