1994 CHEVROLET SUBURBAN oil pressure
[x] Cancel search: oil pressurePage 10 of 385

These symbols are on some of your controls:
I I Windshield Wiper
rl
i Rear Window
Washer Windshield
Washer Windshield
Defroster
1
3c
Rear
Window
Defogger Ventilating Fan
These symbols are used on
warning and indicator lights:
Engine Coolant
Temperature
BRAKE
I Brake
I p3
Baftery Charging
System
Fuel
ANTI-
I LOCK
I 4 Wheel
Anti-Lock
I RELEASE
Parking Brake Release
I\J
Rear Window Wiper
Hatch
Release
I
Engine Oil
Pressure
I SHIFT
1 Shift Light
ix
ProCarManuals.com
Page 72 of 385

3. If this light does not come on, or the instant the light goes off, turn your
ignition key to
START. When the engine starts, let go of the key.
NOTICE:
Holding your key in “Start” for longer than 15 seconds at a time
will cause your battery to be drained much sooner. And the
excessive heat can damage your starter motor.
4. If the engine does not start after 15 seconds of cranking, turn the
ignition key to
OFF. Wait one minute for the starter to cool, then try
the same steps again.
If you’re trying to start your engine after you’ve run out of fuel, follow the
steps
in “Running Out of Fuel” (see “Diesel Fuel Requirements and Fuel
System”
in the Index).
When your engine
is cold, let it run for a few minutes before you move your
vehicle. This lets oil pressure build up. Your engine
will sound louder when
it’s cold.
NOTICE:
If you’re not in an idling vehicle and the engine overheats, you
wouldn’t be there to see the coolant temperature gage. This
could damage your vehicle. Don’t let your engine run when
you’re not in your vehicle.
Cold Weather Starting (Diesel Engine)
The following tips will help you get good starting in cold weather.
Use
SAE low-30 oil when the outside temperature drops below freezing.
When the outside temperature drops below 0°F
(-I S’C), use your engine
coolant heater.
If
you park your vehicle in a garage, you shouldn’t need to use the coolant
heater
until the garage temperature goes below 0°F (-1 Sac), no matter how
cold
it is outside.
2- 17
ProCarManuals.com
Page 127 of 385
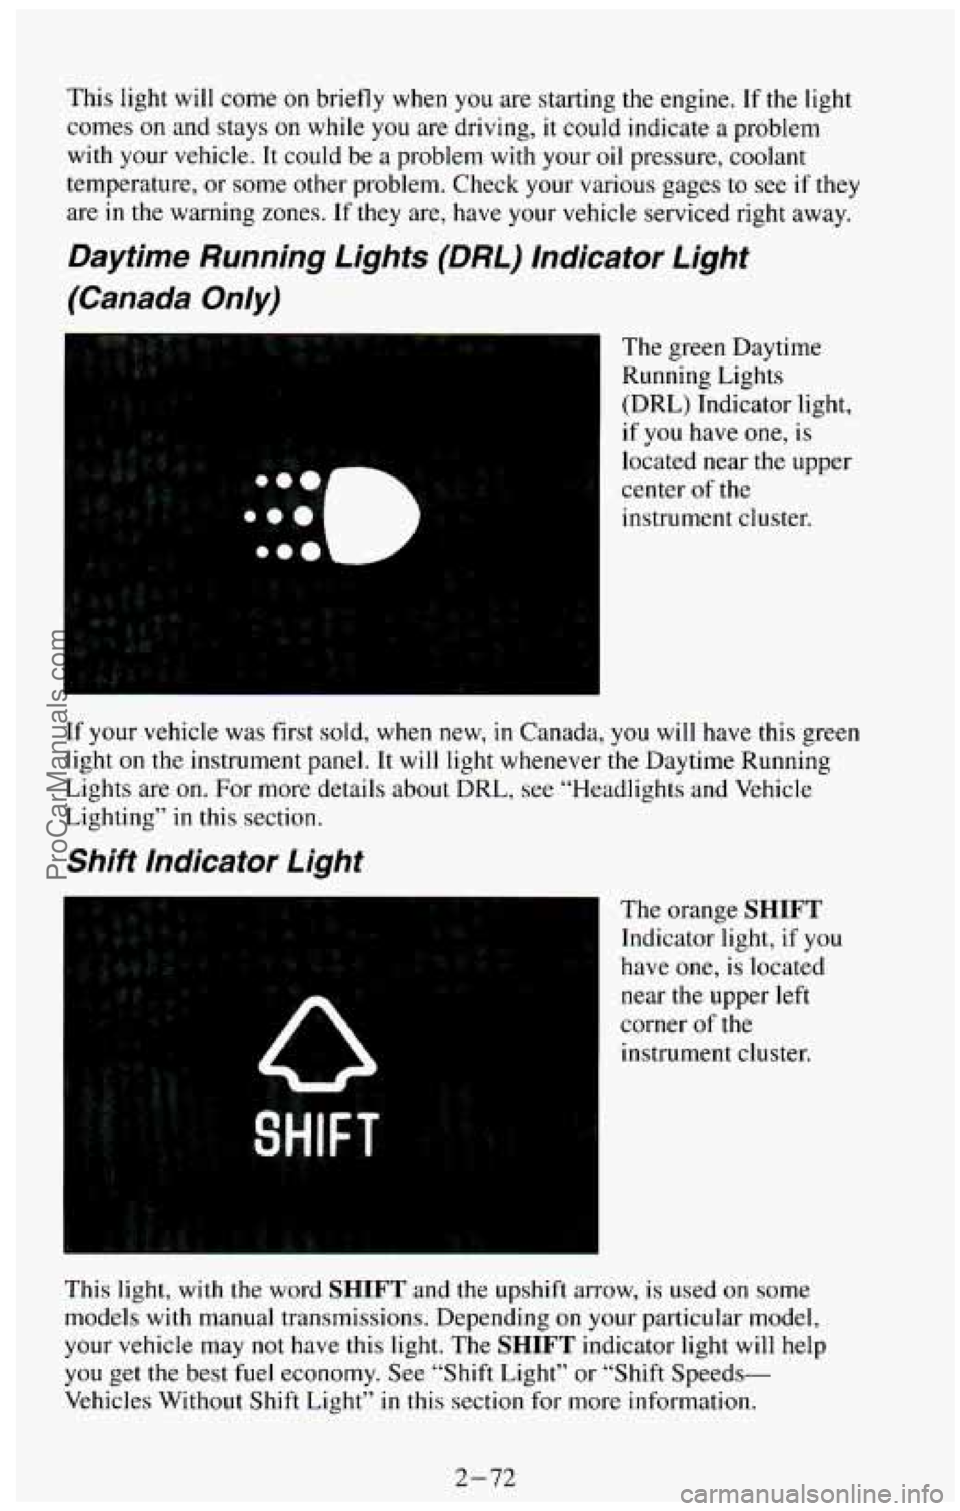
This light will come on briefly when you are starting the engine. If the light
comes
on and stays on while you are driving, it could indicate a problem
with your vehicle. It could be a problem with your oil pressure, coolant
temperature, or some other problem. Check your various gages to see
if they
are
in the warning zones. If they are, have your vehicle serviced right away.
Daytime Running Lights (DRL) Indicator Light
(Canada Only)
The green Daytime
Running Lights
(DRL) Indicator light,
if you have one,
is
located near the upper
center of the
instrument cluster.
If your vehicle was first sold, when new,
in Canada, you will have this green
light on the instrument panel. It will light whenever the Daytime Running
Lights are on.
For more details about DRL, see “Headlights and Vehicle
Lighting” in this section.
Shift Indicator Light
The orange SHIFT
Indicator light, if you
have one, is located
near the upper left
corner
of the
instrument cluster.
This light, with the word
SHIFT and the upshift arrow, is used on some
models with manual transmissions. Depending
on your particular model,
your vehicle may not have this light. The SHIFT indicator light will help
you get the best fuel economy. See “Shift Light” or “Shift Speeds-
Vehicles Without Shift Light”
in this section for more information.
2-72
ProCarManuals.com
Page 129 of 385
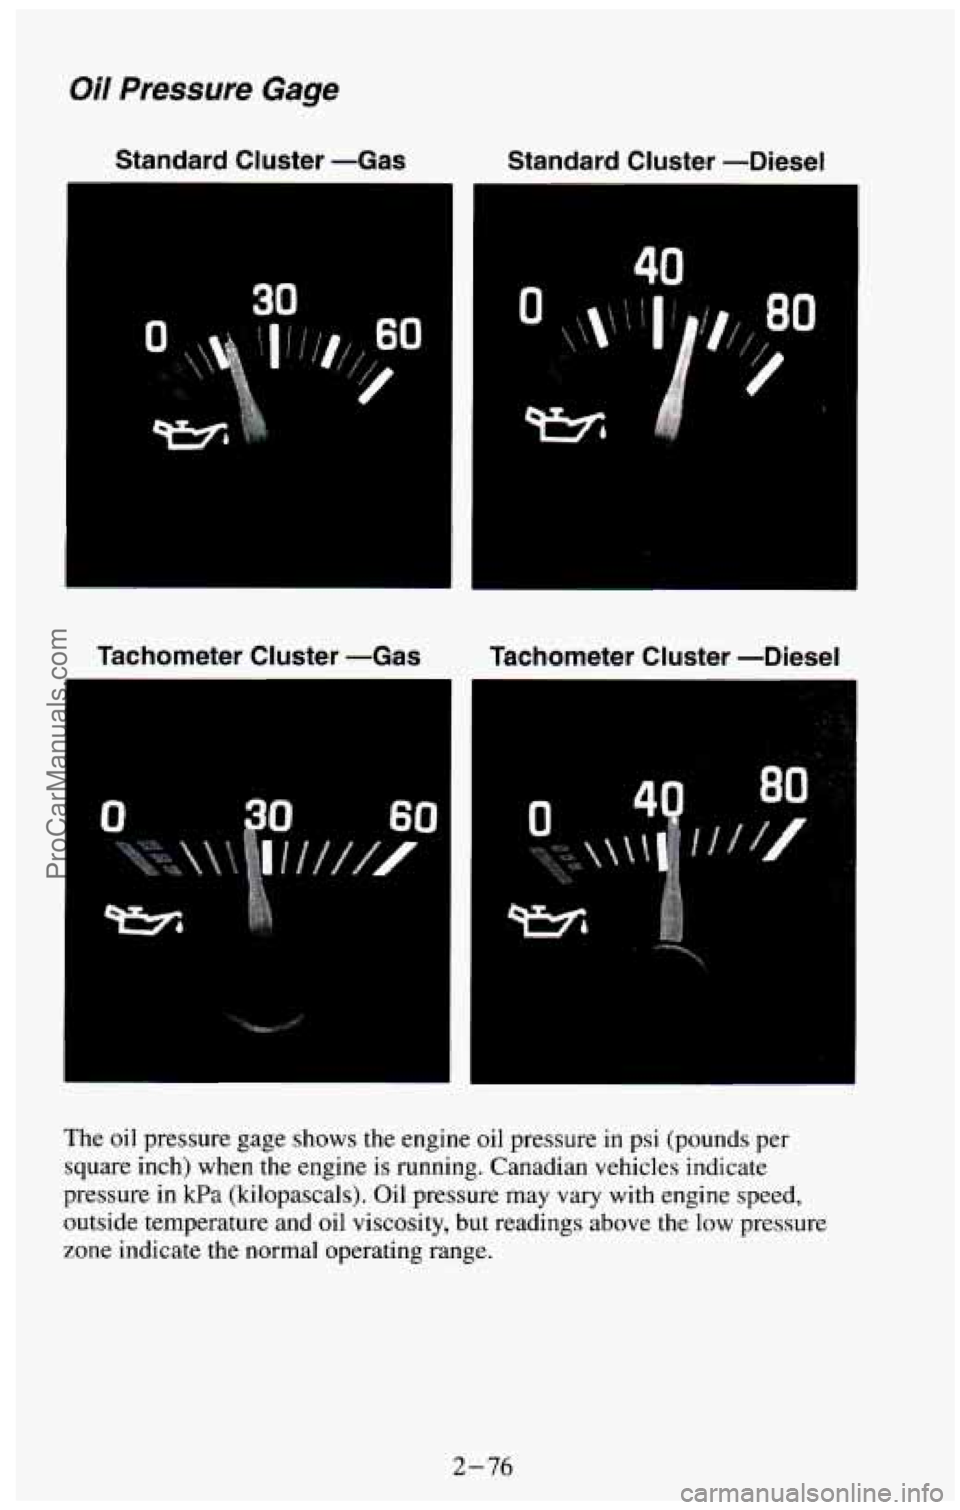
Oil Pressure Gage
Standard Cluster -Gas Standard Cluster -Diesel
40
Tachometer Cluster -Gas Tachometer Cluster -Diesel
The oil pressure gage shows the engine oil pressure in psi (pounds per
square inch) when the engine is running. Canadian vehicles indicate
pressure in
kPa (kilopascals). Oil pressure may vary with engine speed,
outside temperature and oil viscosity,
but readings above the low pressure
zone indicate the normal operating range.
2-76
ProCarManuals.com
Page 132 of 385
A reading in the low pressure zone may be caused by a dangerously low oil
level or other problem causing low oil pressure. Check your oil as soon as
possible.
I NOTICE:
Damage to your engine from neglected oil problems can be
costly and
is not covered by your warranty.
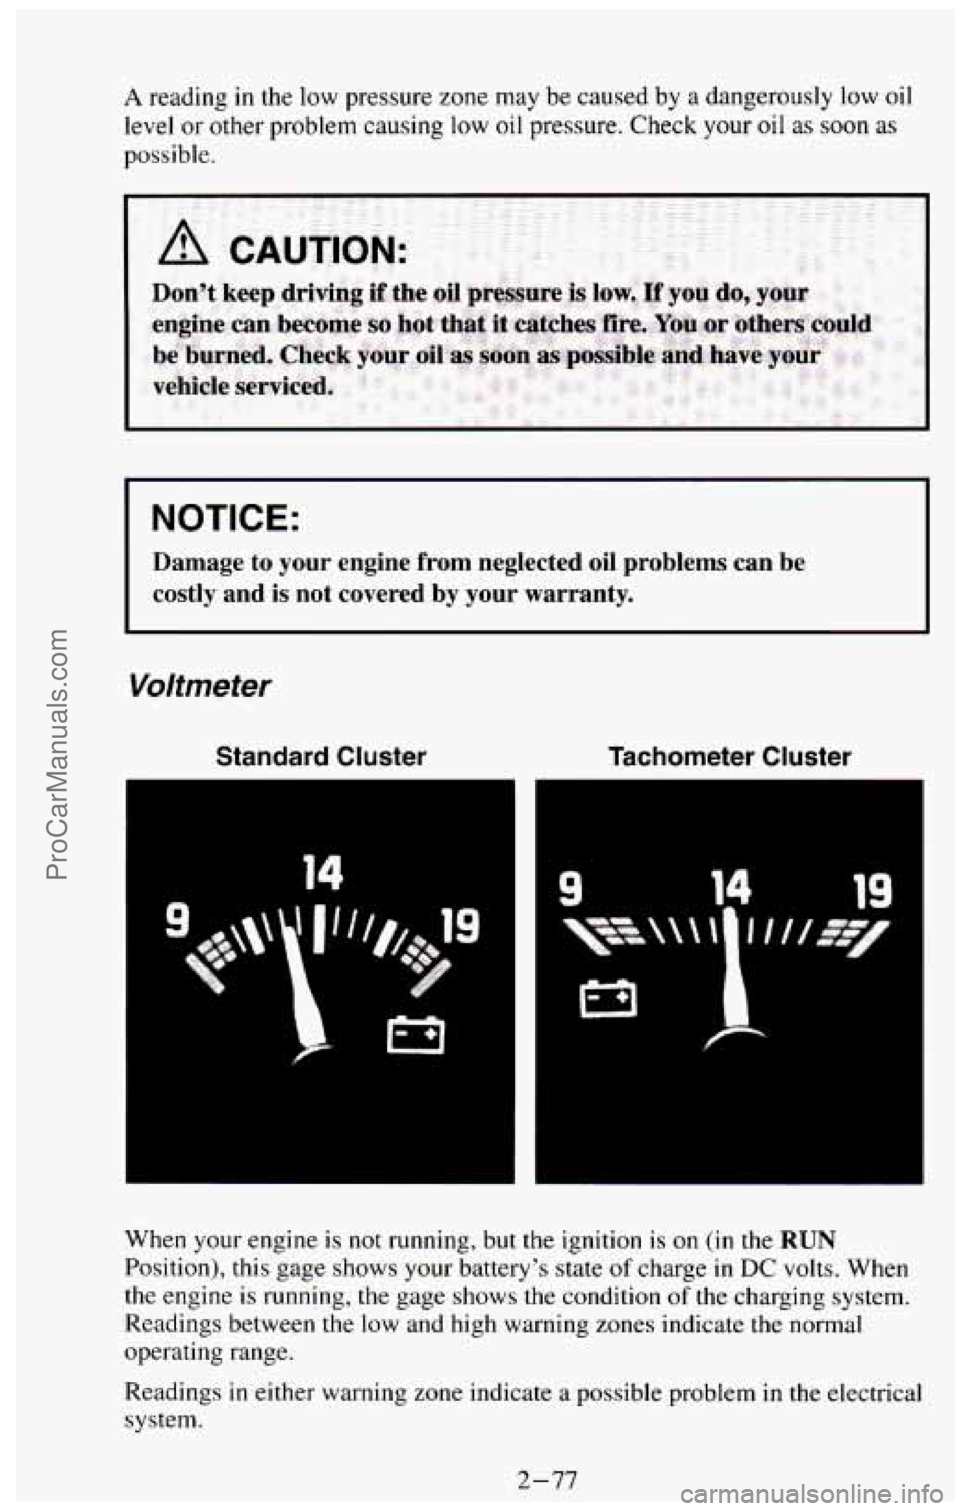
Voltmeter
Standard Cluster Tachometer Cluster
14
When your engine is not running, but the ignition is on (in the RUN
Position), this gage shows your battery’s state of charge in DC volts. When
the engine is running, the gage shows the condition
of the charging system.
Readings between the
low and high warning zones indicate the normal
operating range.
Readings
in either warning zone indicate a possible problem in the electrical
system.
2-77
ProCarManuals.com
Page 316 of 385
Using Foam-Type Cleaner on Fabric
Vacuum and brush the area to remove any loose dirt.
Always clean a whole trim panel or section. Mask surrounding trim
Mix Multi-Purpose Powdered Cleaner following the directions on the
along
stitch or welt lines.
container label.
Use suds only and apply with a clean sponge.
Don’t saturate the material.
Don’t rub it roughly.
As soon as you’ve cleaned the section, use a sponge to remove me
suds.
Rinse the section with a clean, wet sponge.
Wipe off what’s left with a slightly damp paper towel or cloth.
0 Then dry it immediately with a blow dryer or a heat lamp.
NOTICE:
Be careful with a hair dryer or heat lamp. You could scorch the
fabric.
0 Wipe with a clean cloth.
Using Solvent-Type Cleaner on Fabric
First, see if you have to use solvent-type cleaner at all. Some spots and
stains will clean off better with just water and mild soap.
If
you need to use a solvent:
Gently scrape excess soil from the trim material with a clean, dull knife
or scraper. Use very little cleaner, light pressure and clean cloths
(preferably cheesecloth). Cleaning should start at the outside of
the
stain, “feathering” toward the center. Keep changing to a clean section
of the cloth.
When you clean a stain from fabric, immediately dry the area with an
air hose, hair dryer, or heat lamp to help prevent a cleaning ring. (See
the previous NOTICE.)
6-71
ProCarManuals.com
Page 351 of 385
Explanation Of Scheduled Maintenance Services
Below are explanations of the services listed in the maintenance charts.
The proper fluids and lubricants to
use are listed in this section. Make sure
whoever services your vehicle uses these.
All parts should be replaced and
all necessary repairs done before you or anyone else drives the vehicle.
1. ENGINE OIL AND OIL FILTER CHANGE* -ALWAYS USE SH
ENERGY CONSERVIJTG TI (GASOLINE ENGINE) OR CF-4/SH
(DIESEL ENGINE) QUALITY OILS OF THE PROPER VISCOSITY.
To determine the preferred viscosity oil for your vehicle’s engine
(e.g.
SAE 5W-30 or low-30), see “Engine Oil” in the Index.
2. CHASSIS LUBRICATION - Lubricate the front suspension, king
pin bushings, steering linkage, transmission, and transfer case shift
linkage, parking brake cable guides, rear driveline center splines and
front axle propshaft splines, brake pedal springs, and clutch pedal
springs at the intervals specified.
Ball joints and king pin bushings should not be lubricated unless their
temperature is
10°F (-12”C), or higher. When the weather is cold, let
them warm up before lubrication or they could be damaged.
Also, be sure to check all the vehicle fluid levels at this time.
3. CLUTCH FORK BALL STUD LUBRICATION (5-SPEED
MANUAL TRANSMISSION
WITH DEEP LOW ) - Not
applicable to utility or wagon models.
4. COOLING SYSTEM SERVICE*? - Drain, flush and refill system
with new coolant. See “Engine Coolant’’
in the Index for the proper
coolant and mixture to use
in your vehicle.
Also inspect the hoses and replace them
if they are cracked, swollen, or
deteriorated. Tighten all
hose clamps (except constant tension clamps).
Remove debris and clean
the outside of the radiator and air
conditioning condenser. Wash the radiator
neck. To ensure proper
operation, pressure test the radiator and cap.
5. AIR CLEANER FILTER REPLACEMENT* - Replace at every
30,000 miles (50 000 km) or more often under dusty conditions. Ask
your dealer for the proper replacement intervals
for your driving
conditions.
6. FRONT WHEEL BEARING REPACK (2-WHEEL DRIVE
ONLY)
- Clean and repack the front wheel bearings at each brake
relining, or at the specified interval, whichever comes first.
4’ An Emission Control Service
*A fluid loss in these systems may indicate a problem. Have them
inspected and repaired at once.
7- 18
ProCarManuals.com
Page 354 of 385
2 I. THERMOSTATICALLY CONTROLLED ENGINE COOLING FAN INSPECTIONAI/
- (If so equipped.) Inspect all hoses and
ducts for proper hook-up. Be sure the valve works properly.
22. EXHAUST PRESSURE REGULATOR VALVE INSPECTION” -
Check that the valve works properly, Correct any binding. Inspect
hoses for cracks, chafing or decay. Replace parts as needed.
23. TIRE AND WHEEL ROTATION AND INSPECTION - For proper
wear and maximum tire life, rotate tires at the first 6,000 miles
(10 000
kilometers) for Schedule
I (+) or 7,500 miles (12 500 kilometers) for
Schedule
I1 (0) and then every 15,000 miles (25 000 kilometers)
thereafter. Follow the instructions and patterns shown
in Section 6.
Check tires for uneven wear or damage. If irregular or premature wear is
apparent, check wheel alignment. Also, check or damaged wheels. See
“Tires”
in the Index for more information.
For dual wheels, whenever the vehicle, wheels, or fasteners are new,
have the wheel fastener torque
set at the first 100, 1,000 and 6,000 miles
( 160, 1600 and 10 000 km).
Block the tires opposite
those being removed to keep the vehicle from
rolling.
24.
DRIVE AXLE SERVICE? - Check readfront axle fluid level and
add
as needed. Check constant velocity joints and axle seals for
leaking.
0 Locking differential - Drain fluid at first oil change and refill.
Check fluid
level and add as needed at subsequent oil changes. In
dusty areas, or trailer towing applications drain fluid at every
15,000 miles (24 135 kilometers) and refill.
Standard differential - Check fluid level and add as needed at
every oil change. In dusty areas, or trailer towing applications,
drain fluid every
15,000 miles (24 135 kilometers) and refill.
0 More frequent lubrication may be required on heavy-duty or
off-road
use.
:i: An Emission Control Service
ANoise Emission Control Service
VApplicable
only to vehicles sold in the United States
+A fluid
loss in these systems may indicate a problem. Have them
inspected and repaired
at once.
7-21 ProCarManuals.com