Page 296 of 385
NOTICE:
Avoid touching the bulb or letting it come in contact with
anything damp. Oil from
your skin or moisture on the bulb can
cause the bulb to explode when it is turned on. If either comes in
contact with the bulb, clean
it with alcohol or a suitable
degreaser and wipe the bulb dry.
Composite Headlights
.' --6n k
'I
i 1. Remove the two
screws at the top
of the radiator
support.
2. Pull the headlight
lens assembly
out.
3. Unplug the
electrical
connector.
4. Turn the bulb to
the left and
remove it.
5. Put the new bulb in the lens assembly and turn it to the right until it is
6. Plug in the electrical connector.
7. Put the headlight lens assembly back into the vehicle. Install and
tight.
tighten the two screws.
6-51
ProCarManuals.com
Page 297 of 385

Front Parkingnurn Signal Lights with
Sealed Beam Headlights
1. Remove the two screws at the inside edge of the parkinghurn signal
light assembly.
2. Remove the light assembly by swinging it out from the inside edge and
3. Squeeze the tab on the side of the light socket while turning the socket
sliding
it out at the outside edge.
to the left.
4. Pull the socket out of the light assembly.
5. Push in gently on the bulb, turn it to the left and remove it from the
socket.
6. Put the new bulb in the socket, gently press in on the bulb and turn it to
the right until it is tight.
right until it
locks.
7. Put the socket back into the light assembly and turn it socket to the
8. Put the parkinghrn signal light assembly back into the vehicle and
tighten the screws.
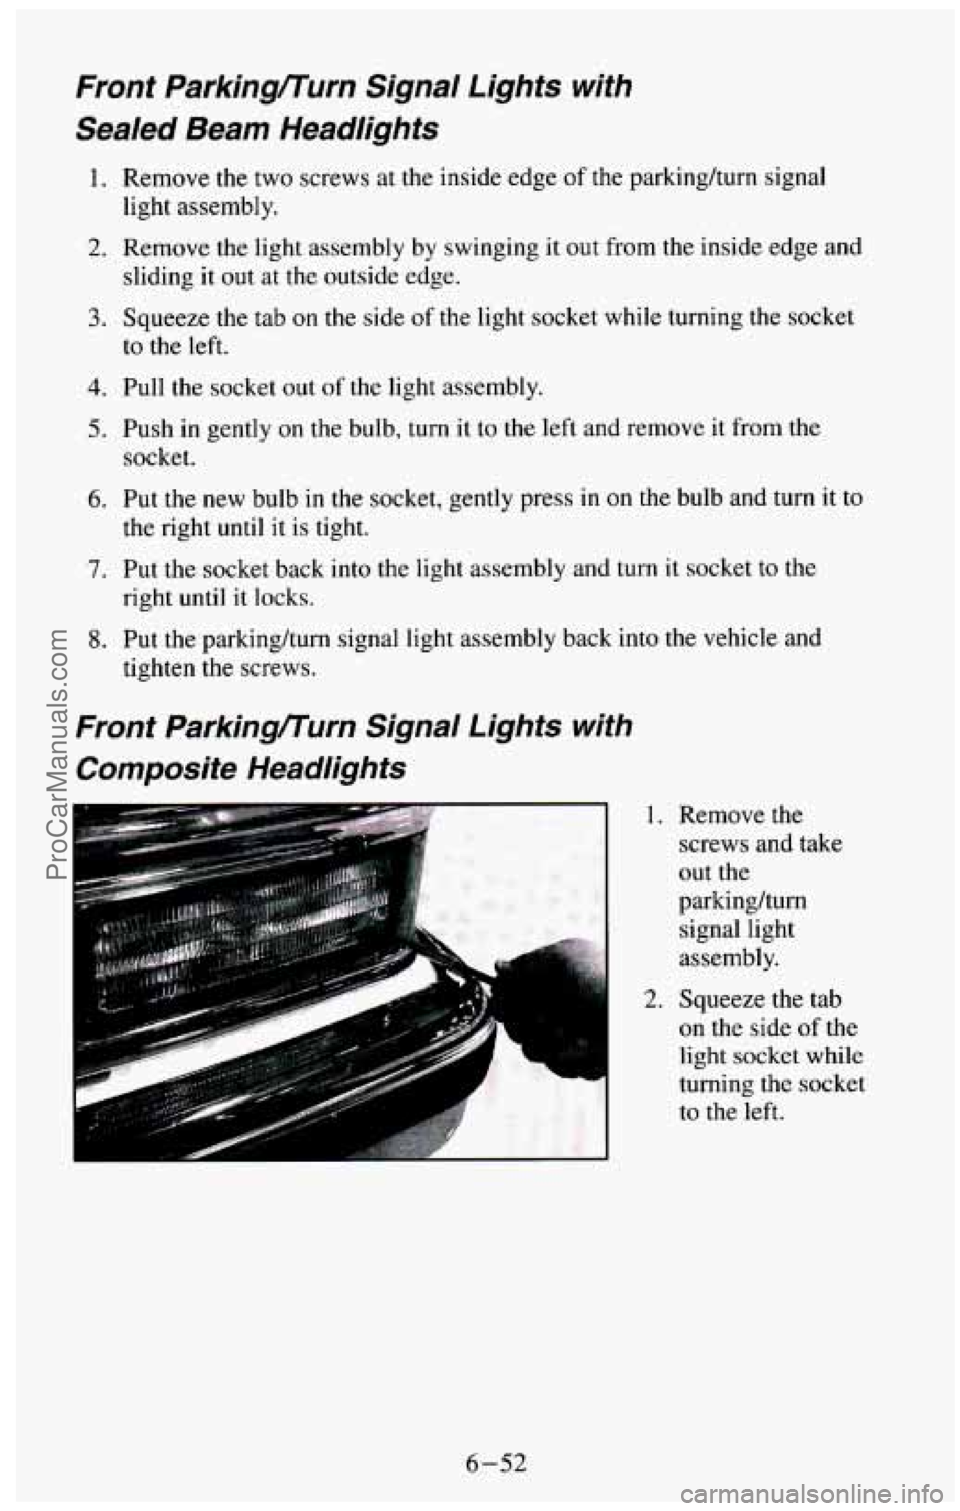
Front Parkingnurn Signal Lights with
Composite Headlights
1. Remove the screws and take
out the
parkinghum signal light
assembly.
2. Squeeze the tab
on the side of the
light socket while
turning
the socket
to the left.
6-52
ProCarManuals.com
Page 298 of 385
the left and
remove it from
the socket.
5. Put the new bulb in the socket, gently press in on the bulb and turn it to
6. Put the socket back into the light assembly and turn it socket to the
7. Put the parking/turn signal light assembly back into the vehicle and
the right until
it is tight.
right until it locks.
tighten the screws.
Side Marker Lights with Sealed Beam
and Composite Headlights
1. Remove the screws and pull
out the
parking/tum signal light
assembly.
2. Reach through the opening and
turn the side
marker bulb socket to the left
and remove it.
6-53
- ProCarManuals.com
Page 299 of 385
3. Pull the bulb straight out
of the
socket.
4. Put a new bulb
into the socket
and push it in
until it is tight.
5. Put the socket back into the side marker assembly and turn it to the
right to tighten it.
6. Replace the parking/turn signal light assembly and tighten the screws.
Roof Marker Lights
1. Remove the
screws and lift
off
the lens.
2. Pull the bulb
straight out
of the
socket.
3. Put a new bulb into the socket and push it in until it is tight.
4. Replace the lens and tighten the screws.
6-54
ProCarManuals.com
Page 300 of 385
Center High Mount Stop/amp (CHMSL)
“,Gar-& ... “B 3 The individual bulbs
in the
CHMSL are not
replaceable. See your
dealer for assistance.
Rear Lights
1. Open the tailgate or rear doors.
2. Remove the two black plastic plugs in the rear light
holes.
I 3.
assembly access
Remove the two
rear light
assembly screws
inside the fender
and pull out the
light assembly. You may want to
use a magnetic
screwdriver when
removing the
screws.
6-55
ProCarManuals.com
Page 301 of 385

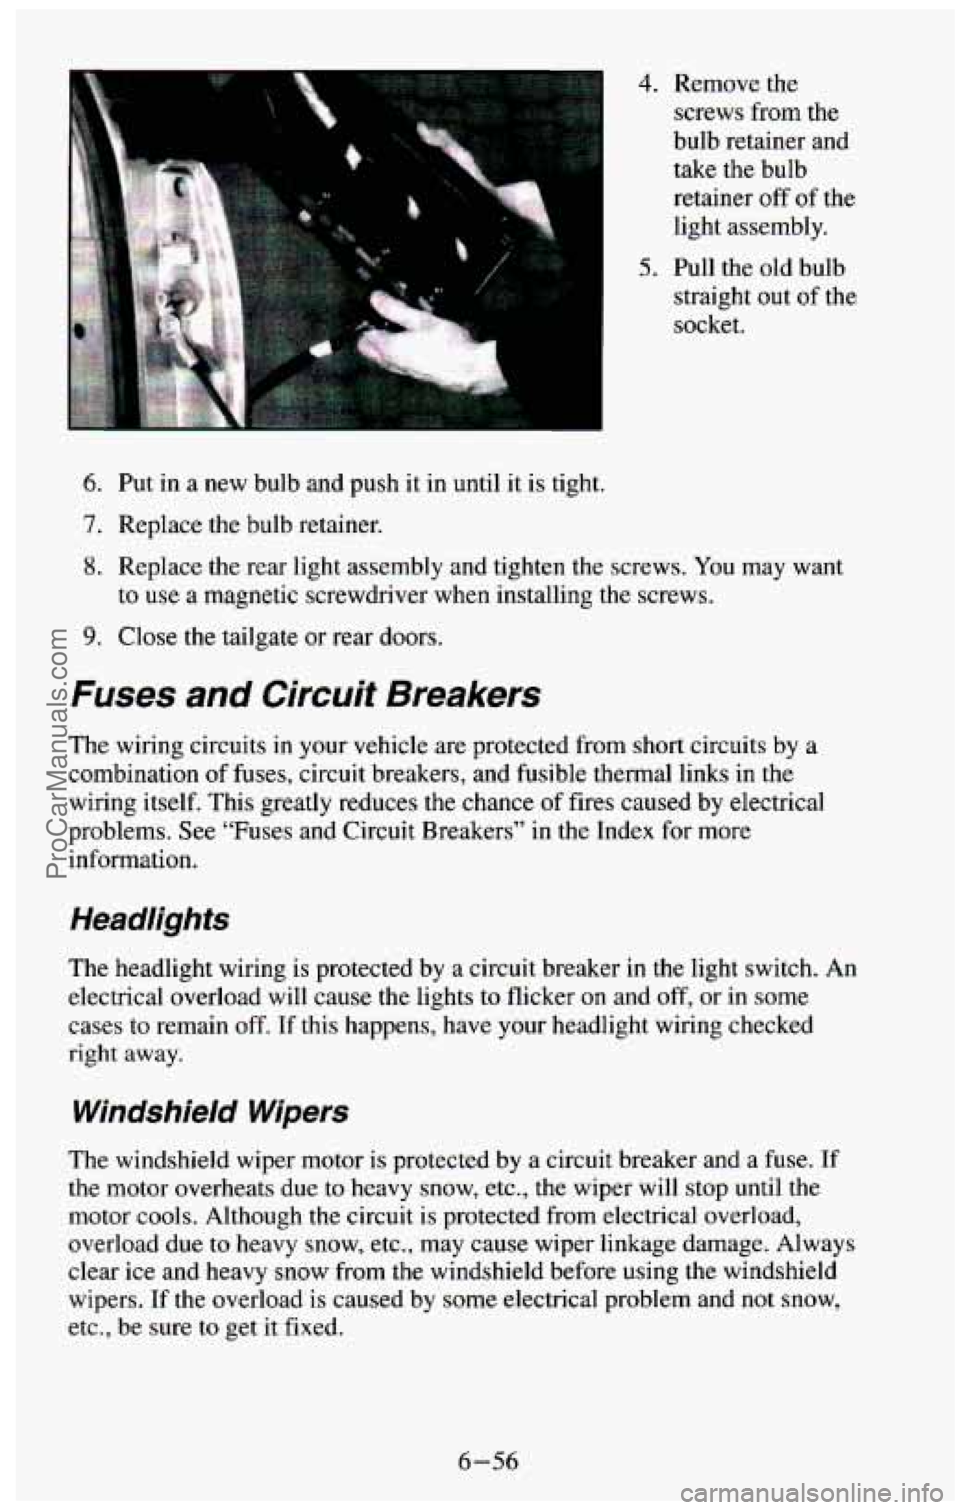
4. Remove the
screws from the
bulb retainer and
take the bulb
retainer
off of the
light assembly.
5. Pull the old bulb
straight out
of the
socket.
6. Put in a new bulb and push it in until it is tight.
7. Replace the bulb retainer.
8. Replace the rear light assembly and tighten the screws. You may want
to use
a magnetic screwdriver when installing the screws.
9. Close the tailgate or rear doors.
Fuses and Circuit Breakers
The wiring circuits in your vehicle are protected from short circuits by a
combination
of fuses, circuit breakers, and fusible thermal links in the
wiring itself. This greatly reduces the chance of fires caused by electrical
problems. See “Fuses and Circuit Breakers” in the Index for more
information.
The headlight wiring is protected by
a circuit breaker in the light switch. An
electrical overload
will cause the lights to flicker on and off, or in some
cases to remain off.
If this happens, have your headlight wiring checked
right away.
Windshield Wipers
The windshield wiper motor is protected by a circuit breaker and a fuse. If
the motor overheats due to heavy snow, etc., the wiper will stop until the
motor cools. Although
the circuit is protected from electrical overload,
overload due to heavy snow, etc., may cause wiper linkage damage. Always
clear ice and heavy snow from the windshield before using the windshield
wipers.
If the overload is caused by some electrical problem and not snow,
etc., be sure to get it fixed.
6-56
ProCarManuals.com
Page 330 of 385

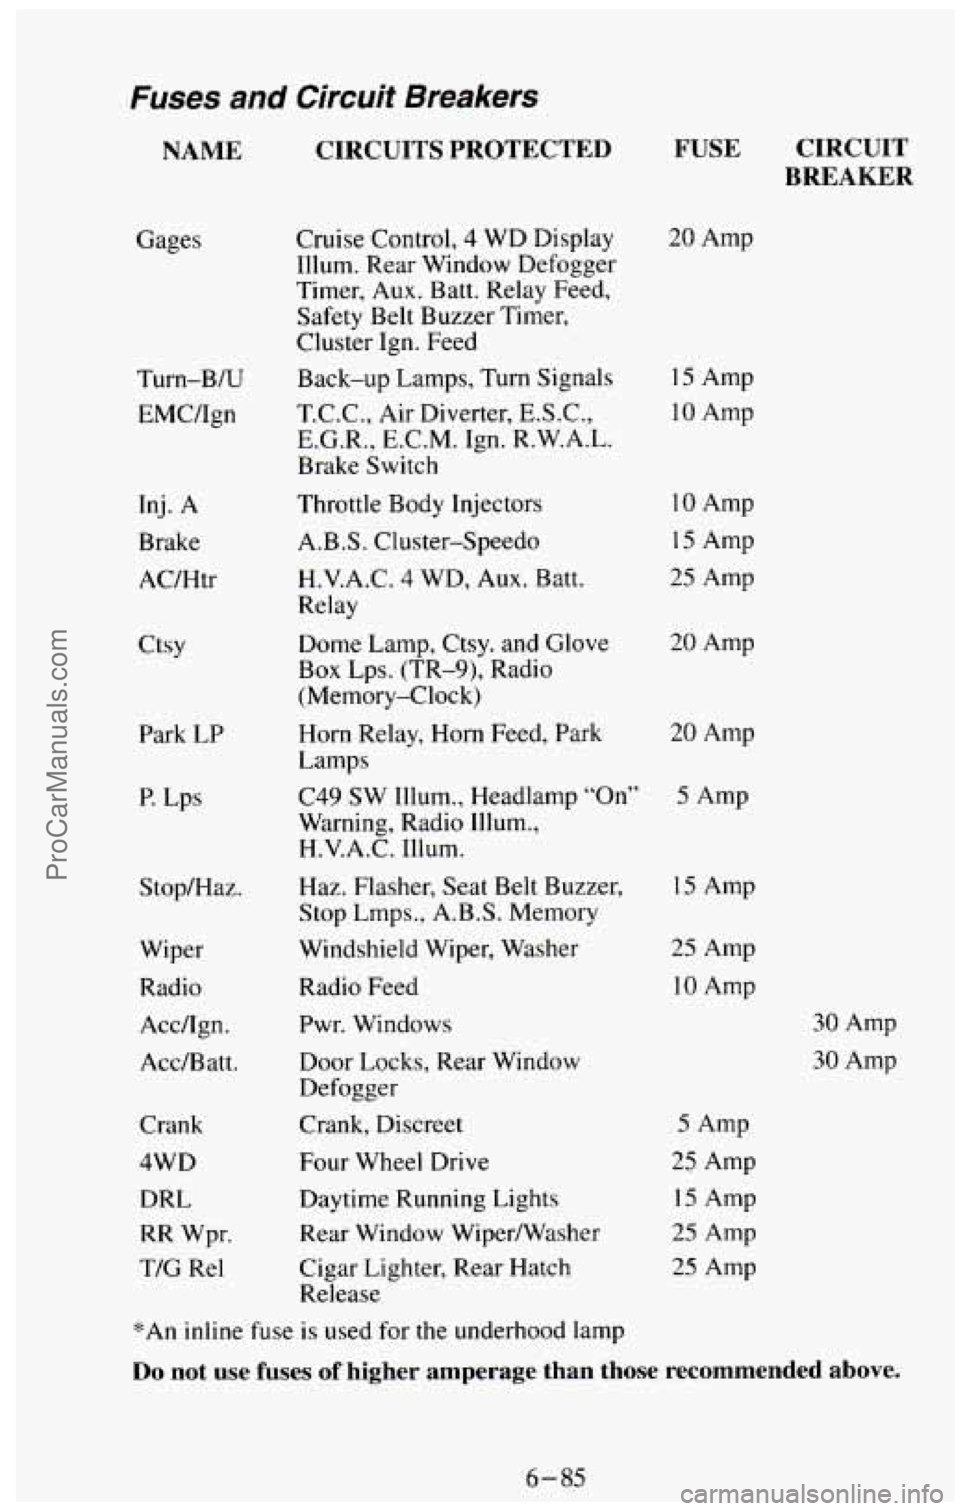
Fuses and Circuit Breakers
NAME CIRCUITS PROTECTED
Gages Turn-B/U
EMC/Ign
Inj. A
Brake
AC/Htr
Ctsy Park
LP
P. Lps
Stop/Haz.
Wiper
Radio Acc/Ign.
Acc/Batt.
Crank
4WD DRL
RR Wpr.
TIC Re1 Cruise Control,
4 WD Display
Illum. Rear Window Defogger
Timer, Aux. Batt. Relay Feed,
Safety Belt Buzzer Timer,
Cluster Ign. Feed
Back-up Lamps, Turn Signals
T.C.C., Air Diverter, E.S.C.,
E.G.R., E.C.M. Ign. R.W.A.L.
Brake Switch
Throttle Body Injectors
A.B.S. Cluster-Speed0
H.V.A.C.
4 WD, Aux. Batt.
Relay
Dome Lamp, Ctsy. and Glove
Box Lps. (TR-9), Radio
(Memory-Clock)
FUSE CIRCUIT
BREAKER
20 Amp
15 Amp
10 Amp
10 Amp
15 Amp
25 Amp
20 Amp
Horn Relay,
Horn Feed, Park 20 Amp
Lamps
C49 SW Illum., Headlamp
“On” 5 Amp
Warning, Radio Illum.,
H.V.A.C.
Illum.
Haz. Flasher, Seat Belt Buzzer,
Stop
Lmps., A.B.S. Memory
Windshield Wiper, Washer
Radio Feed Pwr. Windows
Door Locks, Rear Window
Defogger
Crank, Discreet
Four Wheel Drive
Daytime Running Lights
Rear Window Wipermasher
Cigar Lighter, Rear Hatch
Release
15 Amp
25 Amp
10 Amp
5 Amp
25 Amp
15 Amp
25 Amp
25 Amp
30 Amp
30 Amp
*An inline fuse is used for the underhood lamp
Do not use fuses of higher amperage than those recommended above.
6-85
ProCarManuals.com
Page 332 of 385
LAMP OR BULB
INSTRUMENT
P ANEL
Transmission Indicator (PRNDL)
Daytime Running Lights Indicator?'
Charging System Indicator Lamp
Instrument Cluster Illumination -Gage
Cluster
Instrument Cluster Illumination
-Tachometer Cluster
Headlamp Beam Indicator
Directional Signal Indicator
Brake Warning Indicator
Safety Belt Warning
Check Gages Indicator Malfunction Indicator ("Service Engine
Soon") Lamp
Upshift Indicator
Glow Plugs Lamp*:"
Low Coolant Lamp**
Water
in Fuel Lamp**
Service Throttle
Soon Lamp**
'k*Diesel only
'fCanadian Vehicles only
TRADE NO.
161 74
74
194
194 74
74
74
74
74 74
74
74 74
74
74
6
6-87
ProCarManuals.com