1994 CHEVROLET S10 manual radio set
[x] Cancel search: manual radio setPage 75 of 340
Downloaded from www.Manualslib.com manuals search engine Electronic Transfer Case
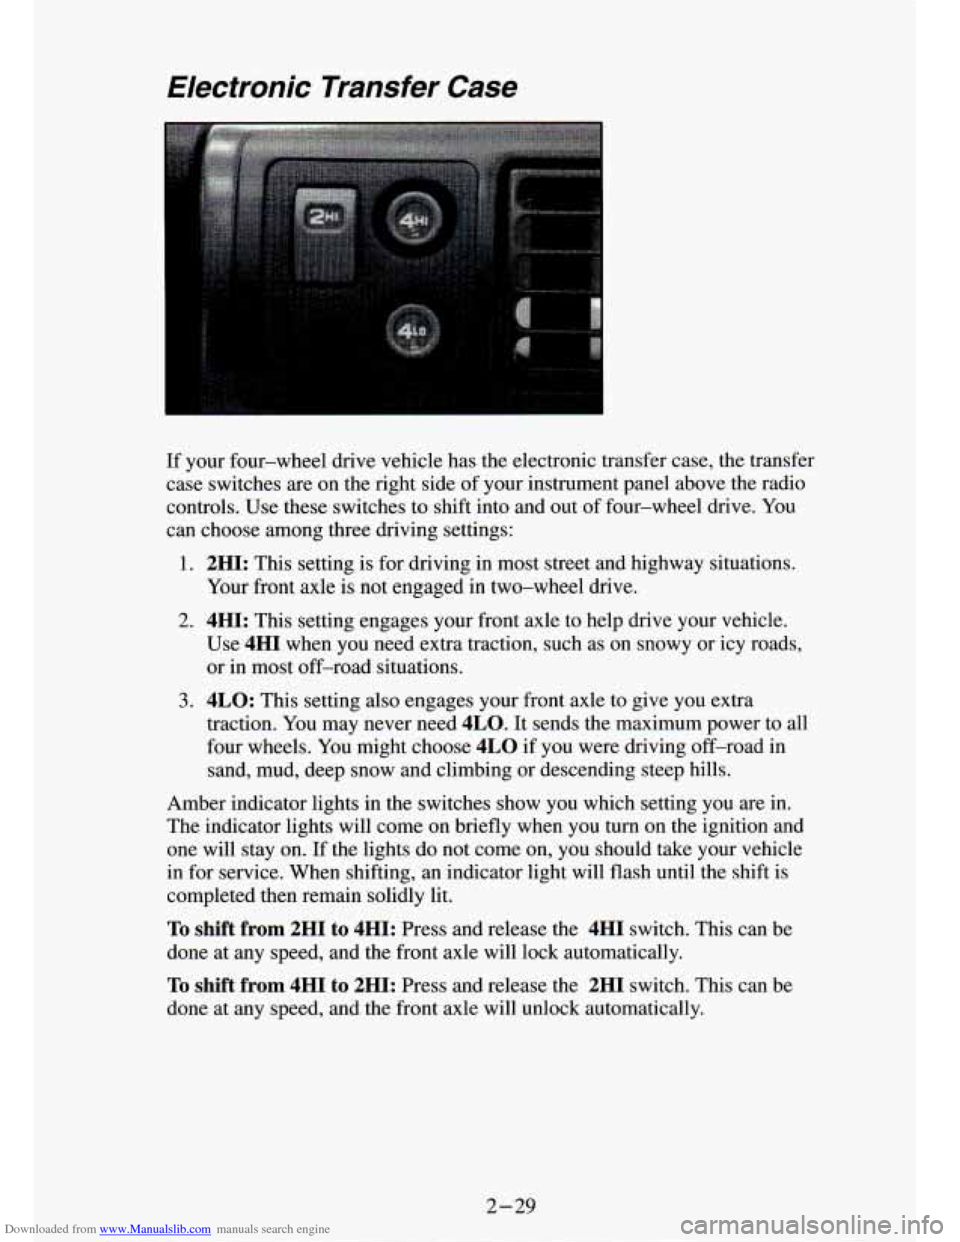
If your four-wheel drive vehicle has the electronic transfer case, the transfer
case switches are on the right side of your instrument panel above the radio
controls. Use these switches to shift into and out of four-wheel drive. You
can choose among three driving settings:
1. 2HI: This setting is for driving in most street and highway situations.
Your front axle is not engaged
in two-wheel drive.
2. 4HI: This setting engages your front axle to help drive your vehicle.
Use
4HI when you need extra traction, such as on snowy or icy roads, \
or in most off-road situations.
3. 4LO: This setting also engages your front axle to give you extra
traction. You may never need
4LO. It sends the maximum power to all
four wheels. You might choose
4LO if you were driving off-road in
sand, mud, deep snow and climbing or descending steep hills.
Amber indicator lights in the switches show you which setting \
you are in.
The indicator lights will come on briefly when you
turn on the ignition and
one
will stay on. If the lights do not come on, you should take your vehicle
in for service. When shifting, an indicator light will flash until the shift is
completed then remain solidly lit.
To shift from 2HI to 4HI: Press and release the 4HI switch. This can be
done at any speed, and the front axle will lock automatically.
To shift from 4HI to 2HI: Press and release the 2HI switch. This can be
done at any speed, and the front axle will unlock
; omaticallv.
2-29
Page 115 of 340
Downloaded from www.Manualslib.com manuals search engine Comfort Controls & Audio Systems
Section
I .
In this part you’ll find out how to operate the comfort co\
ntrol systems and audio systems offered with your vehicle
. Be sure to read about the particular
system supplied with your vehicle
.
For explanation of vehicle symbols. refer to “Vehicle Symbols” in the
Introduction
.
Comfort Controls
Flow-Through Ventilation System
........................... 3-2
Heater Controls
.......................................... 3-3
Heater/Air Conditioning Controls
........................... 3-4
Engine Coolant Heater (Engine Block Heater)
.................... 3-5
Audiosystems
............................................. 3-5
FMStereo
.............................................. 3-6
AM
................................................... 3-6
AM Stereo
.................. ... -* ........ I ............ 3-6
How to Operate Your
E I R@ AM Radio ....................... 3-7
How to Operate Your ETR@ AM-FM Stereo Audio System
...... 3-8
How to Operate Your ETR@ AM-FM Stereo Audio Cassette
System
............................................. 3-10
How to Operate Your ETR@ AM-FM Stereo Audio Cassette System
With Equalizer
....................................... 3-13
Care
of Your Cassette Tape Player .......................... 3-16
How to Operate Your
ETR@ AM-FM Stereo Audio Compact Disc
(CD)Systern
........................................ 3-17
Care of Compact Disc
.................................... 3-22
Fixed Mast Antenna
..................................... 3-22
3-1
Page 120 of 340
Downloaded from www.Manualslib.com manuals search engine To help avoid hemng loss or aamL_,z
Adjust the volume control to the lowest setting.
0 Increase volume slowly until you hear comfortably and clearly.
FM Stereo
FM stereo will give you the best sound. But FM signals will reach only
about
10 to 40 miles (16 to 65 km). And, tall buildings or hills can interfere
with FM signals, causing the sound to come and go.
AM
The range for most AM stations is greater than for FM, especially at night.
The longer range, however, can cause stations to interfere with eac\
h other.
AM can pick up noise from things like storms and power lines. Tr\
y reducing
the treble to reduce this noise if you ever get
it.
AM Stereo
This means the Delco’ system can receive C-QUAM’ stereo broadcasts.
Many AM stations around the country use C-QUAM@ to produce ste\
reo, though some
do not. (C-QUAM@ is a registered trademark of Motorola,
kc.) If your DelcoB system can get C-QUAM@, your “STEREO’ light will
come on when you’re receiving it.
NOTICE:
Before you add any sound equipment to your ~ehicle - like a
tape player,
CB radio, mobile telephone or two-way radio - be
sure you can add
what you want. If you can, it’s very important
to do
it properly. Added sound equipment may interfere with the
operation of your vehicle’s engine, Delco@ radio or other
systems, and even damage them. And, your vehicle’s systems
may interfere with the operation of sound equipment that has
been added improperly.
So, before adding sound equipment, check with your dealer and
be sure to check Federal rules covering mobile radio and
telephone units.
3-6
1
Page 121 of 340
Downloaded from www.Manualslib.com manuals search engine How To Operate Your ETP AM Radio
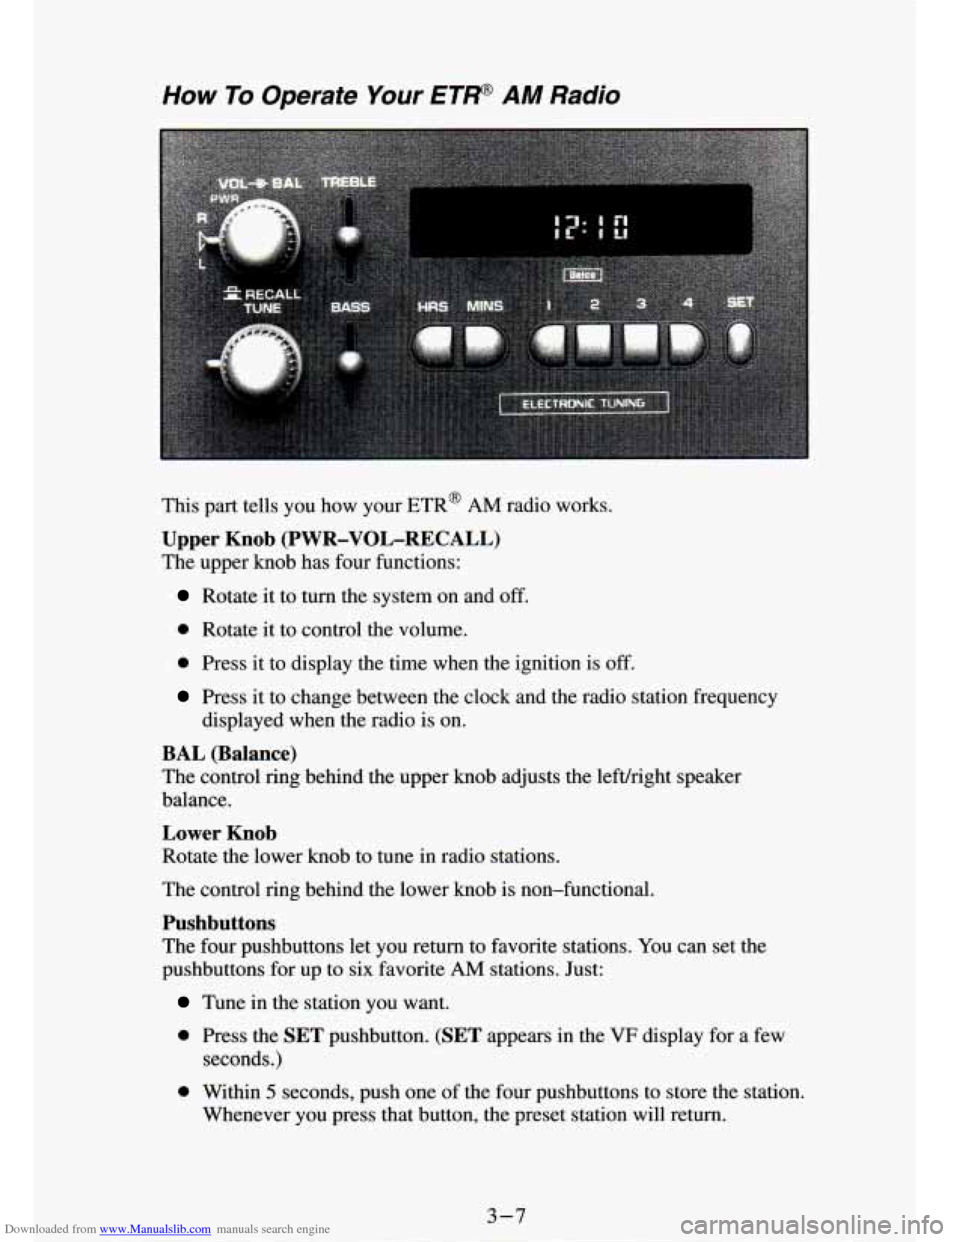
This part tells you how your ETR@ AM radio works.
Upper Knob (PWR-VOL-RECALL)
The upper knob has four functions:
Rotate it to turn the system on and off.
0 Rotate it to control the volume.
0 Press it to display the time when the ignition is off.
Press it to change between the clock and the radio station frequency
displayed when the radio is on.
BAL (Balance)
The contrQl rimz behind the upper knob adjusts the lefvright speaker
balance.
Lower Knob
Rotate the lower knob to tune in radio srauons.
The control ring behind the lower knob is non-functional.
Pushbuttons
The four pushbuttons let you return to favorite stations. You can set the
pushbuttons for up to six favorite
AM stations. Just:
Tune in the station you want.
0 Press the SET pushbutton. (SET appears in the VF display for a few
seconds.)
0 Within 5 seconds, push one of the four pushbuttons to store the station,
Whenever you press that button, the preset station will return.\
3-7
Page 123 of 340
Downloaded from www.Manualslib.com manuals search engine This part tells you how your ETR@ AM-FM stereo audio system works:
Upper Knob (PWR-VOL-RECALL)
The upper knob has these four functions:
Rotate it to turn the system on and off.
Rotate it to control the volume.
Press it to display the time when the ignition is off.
0 Press it to change between the clock and the radio station fr\
equency
displayed when~the radio is on.
BAL (Balance)
The control ring behind the upper knob adjusts the leftlright me: :r
balance.
Lower Knob
The lower knob has two functions:
*
Rotate it to tune in radio stations.
0 Press it to change between the AM and FM bands.
FADE
The control ring behind the lower knob adjusts the frontlrear speaker
balance.
SEEK
Press the SEEK button to cause the receiver to SEEK the next higher
station and stop.
SCAN
When you press SCAN, the radio will go to the next station and pause and
will keep scanning until you press
SCAN again. SCAN appears in the VF
display.
Pushbuttons
The four pushbuttons let you return to favorite stations.
YOU can set the pushbuttons for up to eight favorite stations
(4 AM and
4 FM). Just:
Tune in the desired station.
Press the SET pushbutton. (SET appears in the VF display for a few
seconds.)
0 Within 5 seconds, push one of the four pushbuttons to store the station.
Whenever you press that button, the preset station will return.\
NOTE:
Up to two additional stations may be preset on each band by pressing two
adjoining buttons at
the same time. (The station will return when the same
two buttons are pressed again.)
Page 124 of 340
Downloaded from www.Manualslib.com manuals search engine 1
3
Clock
To set the clock, just:
Press the SET pushbutton.
Within 5 seconds, press and hold SEEK until the correct minute
appears
on the display.
0 Press and hold SCAN until the correct hour appears on the display.
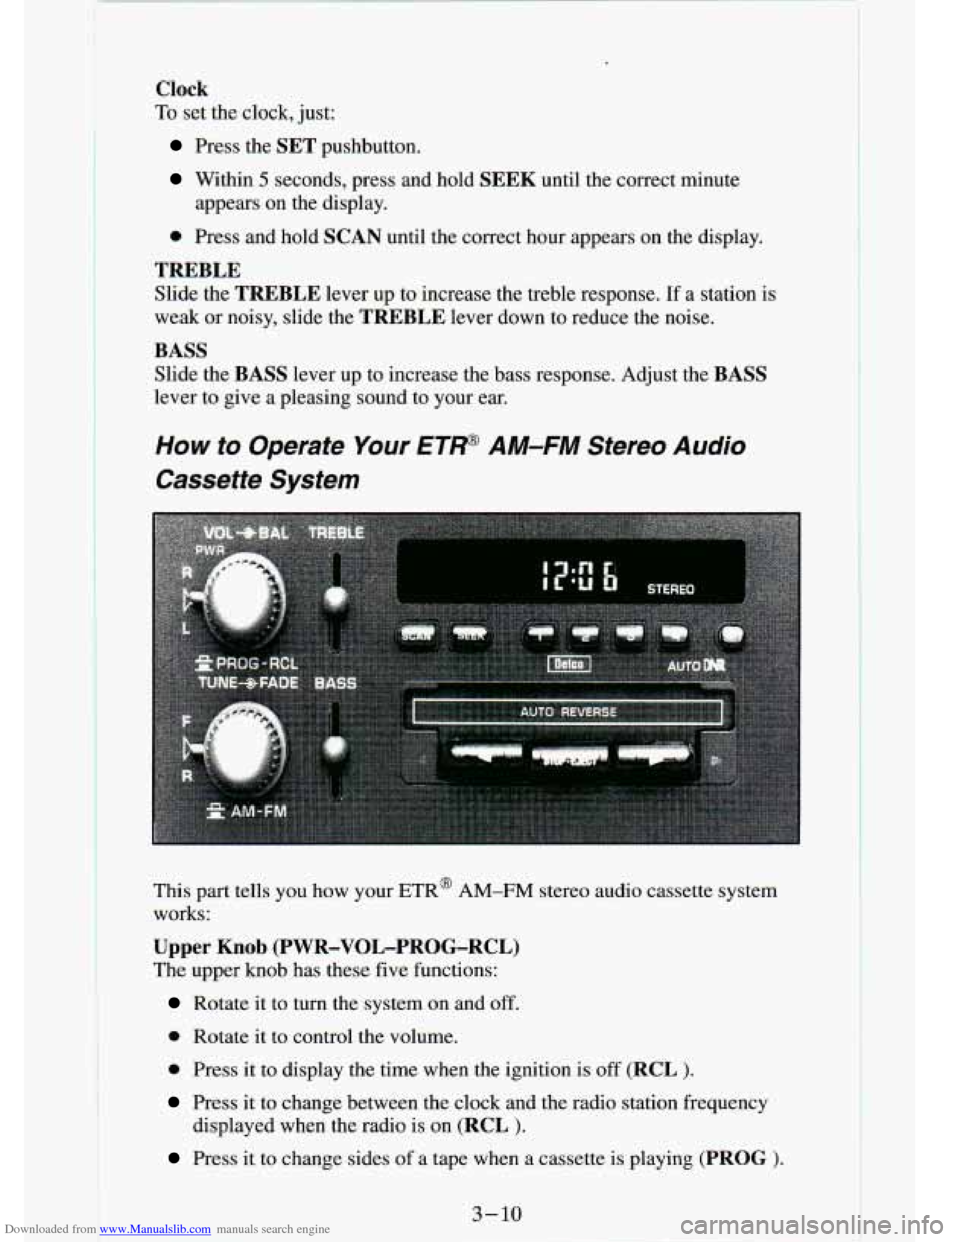
TREBLE
Slide the TREBLE lever up to increase the treble response. If a station is
weak or noisy, slide the
TREBLE lever down to reduce the noise.
BASS
Slide the BASS lever up to increase the bass response. Adjust the BASS
lever to give a pleasing sound to your ear.
How to Operate Your ET' AM-FM Stereo Audio
Cassette System
This part tells you how your ETR@ AM-FM stereo audio cassette system
works:
Upper Knob (PWR-VOL-PROG-RCL)
The upper knob has these five functions:
Rotate it to turn the system on and off.
0 Rotate it to control the volume.
0 Press it to display the time when the ignition is off (RCL $.
Press it to change between the clock and the radio station fr\
equency
displayed when the radio is on
(RCL ).
Press it to change sides of a tape when a cassette is playing (PROG >.
3-16
Page 125 of 340
Downloaded from www.Manualslib.com manuals search engine BAL (Balance)
The control ring behind the upper knob adjusts the lefuright speaker
balance.
Lower Knob
The lower knob has two functions:
Rotate it to tune in radio stations.
Press it to change between the AM and FM bands.
FADE
The control ring behind the lower knob adjusts the fronurear spes
balance.
SEEK
Press the SEEK button to cause the receiver to SEEK the next higher
station and stop.
SCAN
When you press SCAN, the radio will go to the next station and pause, and
will keep scanning until you press SCAN again. SCAN appears in the VF
display.
Pushbuttons
The four pushbuttons let you return to favorite stations. You can set the
pushbuttons for up to eight favorite stations
(4 AM and 4 FM). Just:
Tune in the desired station.
0 Press the SET pushbutton. (SET appears in the VF display for
5 seconds.)
0 Within 5 seconds, push one of the four pushbuttons to store the station.
Whenever you press that button, the preset station will return.\
NOTE:
In addition to the four stations set as above, up to two additional stations
may be preset on each band by pressing two adjoining pushbuttons at the
same time.
Tune in the desired station.
0 Push the SET pushbutton. (SET appears in the VF display for
5 seconds.)
time. (The station will return when the same two buttons are pressed
again.
Within 5 seconds, press any two adjoining pushbuttons at the same
3 - 11
Page 126 of 340
Downloaded from www.Manualslib.com manuals search engine t
Clock
To set the clock, just:
Press the SET pushbutton.
Within 5 seconds, press and hold SEEK until the correct minute
Press and hold SCAN until the correct hour appears on the display.
appears on the display.
TREBLE
Slide
the TREBLE lever up to increase the treble response. If the station is
weak or noisy, slide the
TREBLE lever down to reduce the noise.
BASS
Slide the BASS lever up to increase the bass response. Adjust the BASS
lever to give a pleasing sound to your ear.
AUTO DNR @
This unit is equipped with an automatic Dynamic Noise Reduction system.
DNR@reduces background hiss on
AM and FM radio broadcasts, as well as
on cassette tapes.
DNR@
is a registered trademark of National Semiconductor Corporation.
To Play A Cassette
Your tape player is built to work best with tapes that are 30 to 45 minutes
long on each side. Tapes longer than that are
so thin they may not work well
in this player.
Once
the tape is playing, use the upper and lower knobs for volume,
balance, and fade just as you do for the radio. The arrows indicate which
side
of the tape is being played.
Fast Forward
Press the button with the arrow pointing in the same direction that the tape
is playing. The
arrow light next to the arrow button will be lit. To stop fast
forward, press the
STOP-E JECT button.
Reverse
Press the button with the arrow pointing in the opposite direction that the
tape is playing. The arrow light next to the arrow button will be lit\
. To stop
reverse, press the
STOP-E JECT button.
PROGRAM
To change sides of the tape, press the PWR-VOL-PROG-RCL knob.
STOP- EJECT
To stop playing a tape, fully press this button (the cassette will be partially \
ejected, and the radio will begin playing).
3-12