1994 CHEVROLET CORVETTE fuel
[x] Cancel search: fuelPage 207 of 274
Downloaded from www.Manualslib.com manuals search engine Service and Appearance Care
Inflation - Tire Pressure
The Tire-Loading Information label which is on the driver’s door shows the correct
inflation pressures for your tires, when they’re cold. “Cold” means your vehicle has
been sitting for at least three hours or driven no more than a mile.
For competitive driving or high-speed driving (over
150 mph or 240 krn/h), make
sure your tires are inflated to
35 psi (240 kPa). When you end this type of driving,
reduce the “cold” inflation pressures (if necessary) to those listed
on the
Tire-Loading Information label.
NOTICE:
Don’t let anyone tell you that underinflation or overinflation is all right. It’s not.
If your tires don’t have enough air (underinflation) you can get:
0 Too much flexing
0 Too much heat
0 Tire overloading
0 Bad wear
0 Bad handling
Bad fuel economy.
If your tires have too much air (overinflation), you can get:
Unusual wear
Bad handling
0 Rough ride
Needless damage from road hazards.
When to Check: Check your tires
mce
a month or more. Don’t forget
your compact spare tire. It should be at
50 psi (420 Wa).
How to Check: Use a good quality
pocket-type gauge to check tire
pressure. Simply looking at the tires
will not tell you the pressure,
=specially if you have radial tires
-
which may look properly inflated even
if they’re underinflated.
Lf your tires have valve caps, be sure to
put them back on. They help prevent
leaks by keeping out dirt and moisture.
Tire Rotation
I’he tires on your Corvette are
lirectional, asymmetrical, and are
different sizes front to rear. Due to this,
your tires should not be rotated. Each
tire and wheel should be used only in
the position it is in.
. . .206
Page 217 of 274
Downloaded from www.Manualslib.com manuals search engine Service and Appearance Care
Finish Damage
Any stone chips, fractures or deep
scratches
in the finish should be repaired
right away.
Minor chips and scratches can be repaired
with touch-up materials available from
your dealer or other service outlets.
Larger areas of finish damage can be
corrected
in your dealer’s body and
paint shop.
Underbody Maintenance
Chemicals used for ice and snow removal
and dust control can collect on the
underbody. If these are not removed,
accelerated corrosion (rust) can occur on
the underbody parts such as fuel lines,
frame, floor pan, and exhaust system even
though they have corrosion protection.
At least every spring, flush these
materials from
the underbody with plain
water. Clean any areas where mud and
other debris can collect. Dirt packed in
closed areas of the frame should be
loosened before being flushed. Your
dealer or an underbody vehicle washing
system can do this for you.
. . .216
Fiberglass Springs
I NOTICE:
Don’t use corrosive or acidic
cleaning agents, engine degreasers,
aluminum cleaning agents or other
harsh solvents to clean fiberglass
springs; they’ll damage the springs.
Chemical Paint Spotting
Some weather and atmospheric conditions
can create a chemical fallout. Airborne
pollutants can fall upon and attack
painted surfaces on your vehicle. This damage can take two
forms: blotchy,
ringlet-shaped discolorations, and small
irregular dark spots etched into the paint
surface.
Although no defect in the paint job causes
this, Chevrolet will repair, at no charge to
the owner,
the surfaces of new vehicles
damaged by this fallout condition within
12 months or 12,000 miles (20 000 km)
Df purchase, whichever comes first.
Page 221 of 274

Downloaded from www.Manualslib.com manuals search engine Service and Appearance Care
I EoA7 I
POWER WINDOW
lu
D
.
Instrument Panel Fuse Block
1 - A/C Module (5 Amp)
2 - Blank
3 - Windshield WiperNVasher Switch
4 - Radio Receiver Box (Ignition)
5 - Heated Mirrors (5 Amp.)
6 - Taillight, Daytime Running Lights
Module (15 Amp.)
Assembly
(30 Amp.)
(5 Amp.)
7 - Horn Relay
(15 Amp.)
*Export Horn
(20 Amp.)
8 - Hazard Flashers; Brake Switch
(20 Amp.)
9 - Crank-Air Bag (5 Amp.)
10 - Crank-Parmeutral Shitch
(Automatic); Clutch (Manual)
(5 Amp.)
11 - RH Illumination (5 Amp.)
12 - LH Illumination (5 Amp.)
13 - Console Illumination (5 Amp.)
14 - Fuel Pump 1 (10 Amp.)
15 - Fuel Pump 2 (LT5) (IO Amp.)
16 - Central Control Module; Daytime
Running Lights Module
(5 Amp.)
17 - Generator; Vacuum Pump (LT5);
Valet Mode (LT5); EGR Circuit
(LT5); Oxygen Sensors (LT5)
(10 Amp.)
and A/C Control Head; Heater and
A/C Programmer; Rear Defog
Relay
(10 Amp.)
19 - Utility Plug (15 Amp.)
20 - Heated Oxygen Sensors (LT1)
(15 Amp.)
21 - Fuel Pump Relay Coil #2 (LT5);
Selective Ride Control Module;
ABS Module; Transmission Clutch
Control Switch (Automatic);
Air Pump Relay; Diverter Valve;
Secondary Bypass Valve (LT5)
(10 Amp.)
22 - Injectors #1,4,6,7 (LT1); Primary
Injectors #1-8 (LT5); Ignition Coil
Module (LT5); Ignition Coil Plate
Connector (LT5) (10 Amp.)
18 - A/C Compressor Clutch; Heater
. . .220
Page 223 of 274
Downloaded from www.Manualslib.com manuals search engine Service and Appearance Care
. . .222
1 I INTERIOR LIGHTING
20A I
I RH HDLP 30A I I I
h 3 5 I SECONDARY COOLING FAN
40A I
6 I EXTERIOR LIGHTING
60A
I
7 piiiFiAAccsy
I
AIR PUMP
20A I
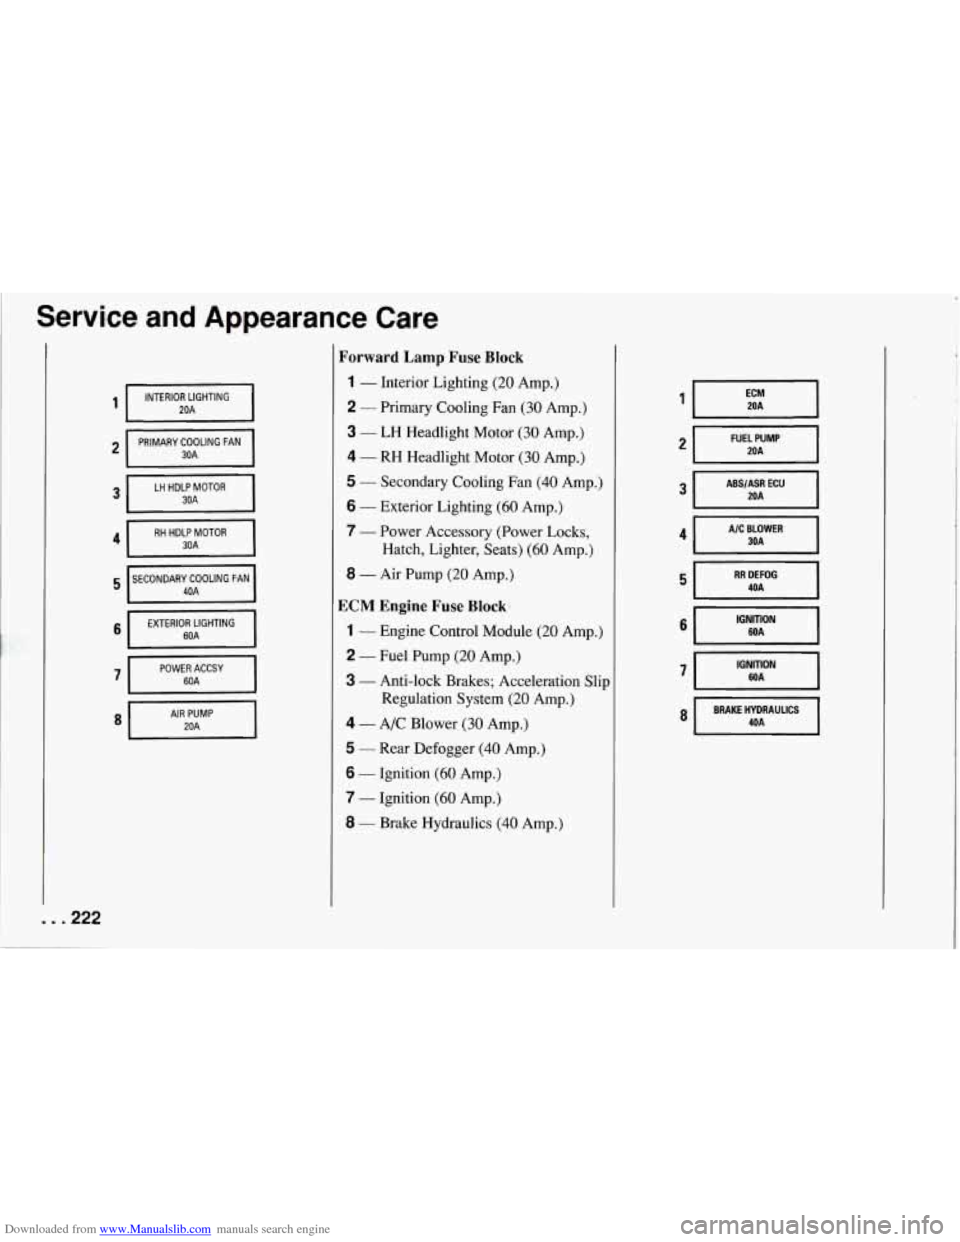
Forward Lamp Fuse Block
1 - Interior Lighting (20 Amp.)
2 - Primary Cooling Fan (30 Amp.)
3 - LH Headlight Motor (30 Amp.)
4 - RH Headlight Motor (30 Amp.)
5 - Secondary Cooling Fan (40 Amp.)
6 - Exterior Lighting (60 Amp.)
7
- Power Accessory (Power Locks, Hatch, Lighter, Seats)
(60 Amp.)
8 - Air Pump (20 Amp.)
ECM Engine Fuse Block.
1 - Engine Control Module (20 Amp.)
2 - Fuel Pump (20 Amp.)
3 - Anti-lock Brakes; Acceleration Slip
Regulation System
(20 Amp.)
4 - A/C Blower (30 Amp.)
5 - Rear Defogger (40 Amp.)
6 - Ignition (60 Amp.)
7 - Ignition (60 Amp.)
8 - Brake Hydraulics (40 Amp.)
FUEL PUMP
ABS/ASR ECU
A/C BLOWER
IGNITION WA I
8 I BRAKE HYDRAULICS 4OA I
Page 225 of 274
Downloaded from www.Manualslib.com manuals search engine Service and Appearance Care
Capacities and Specifications
Engine
Type ............................................................. V8
Fuel Delivery
....................... Sequential Multiport Fuel Injection (SFI)
Valve Arrangement VIN Engine Code
J ................................. Dual Overhead Cam
VIN Engine Code
P .................................... Overhead Valve
Piston Displacement ....................................... 350 CID (5.7L)
Bore
VIN Engine Code
J ..................................... 3.90" (99 mm)
VIN Engine Code P .................................. .4.00" (101.6 mm)
VIN Engine Code
J ..................................... 3.66" (93 mm)
VIN Engine Code
P .................................. .3.48" (88.39 mm)
VIN Engine Code
J ............................................ 11 .O: 1
VIN Engine Code
P ............................................ 10.5: 1
Firingorder .......................................... 1-843-6-5-7-2
Stroke
Compression Ratio
.. .224
Page 227 of 274
Downloaded from www.Manualslib.com manuals search engine l Service and Appearance Care
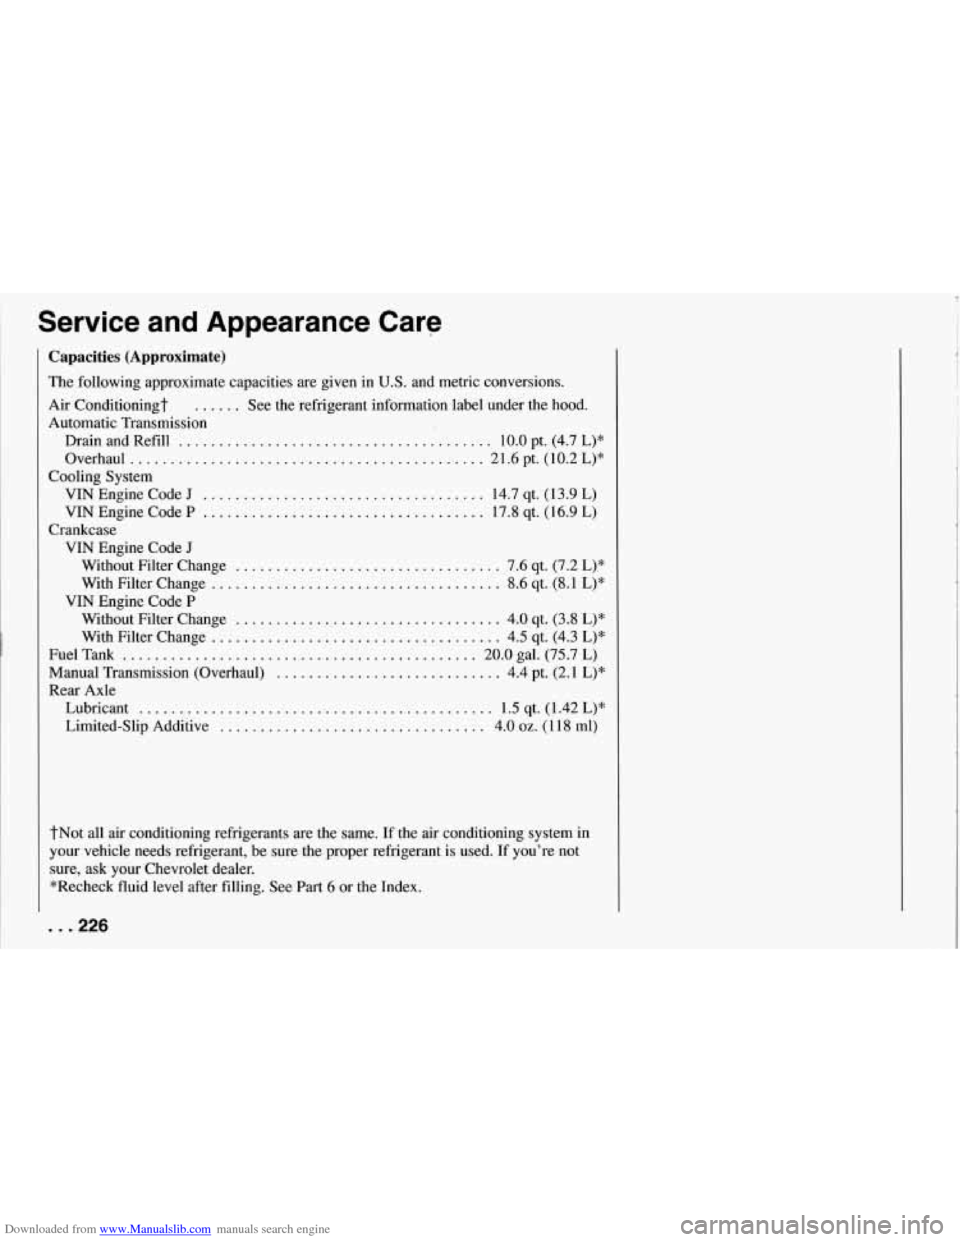
Capacities (Approximate)
The following approximate capacities are given in U.S. and metric conversions.
Air Conditioningt
...... See the refrigerant information label under the hood.
Automatic Transmission
Drain and Refill
....................................... 10.0 pt. (4.7 L)*
Overhaul
............................................ 21.6 pt. (10.2 L)*
VIN Engine Code J ................................... 14.7 qt. (1 3.9 L)
VIN Engine Code
P ................................... 17.8 qt. (16.9 L)
VIN Engine Code J
Cooling System
Crankcase Without Filter Change
................................. 7.6 qt. (7.2 L)*
With Filter Change
.................................... 8.6 qt. (8.1 L)*
Without Filter Change ................................. 4.0 qt. (3.8 L)*
With Filter Change .................................... 4.5 qt. (4.3 L)*
Fuel Tank ............................................ 20.0 gal. (75.7 L)
Manual Transmission (Overhaul)
............................ 4.4 pt. (2.1 L)*
Rear Axle
Lubricant
............................................ 1.5 qt. (1.42 L)*
Limited-Slip Additive
................................. 4.0 oz. (1 18 ml)
VIN Engine
Code
P
tNot all air conditioning refrigerants are the same. If the air conditioning system in
your vehicle needs refrigerant, be sure the proper refrigerant is used. If you’re not
sure, ask your Chevrolet dealer.
*Recheck fluid level after filling. See Part
6 or the Index.
.. .226
Page 230 of 274
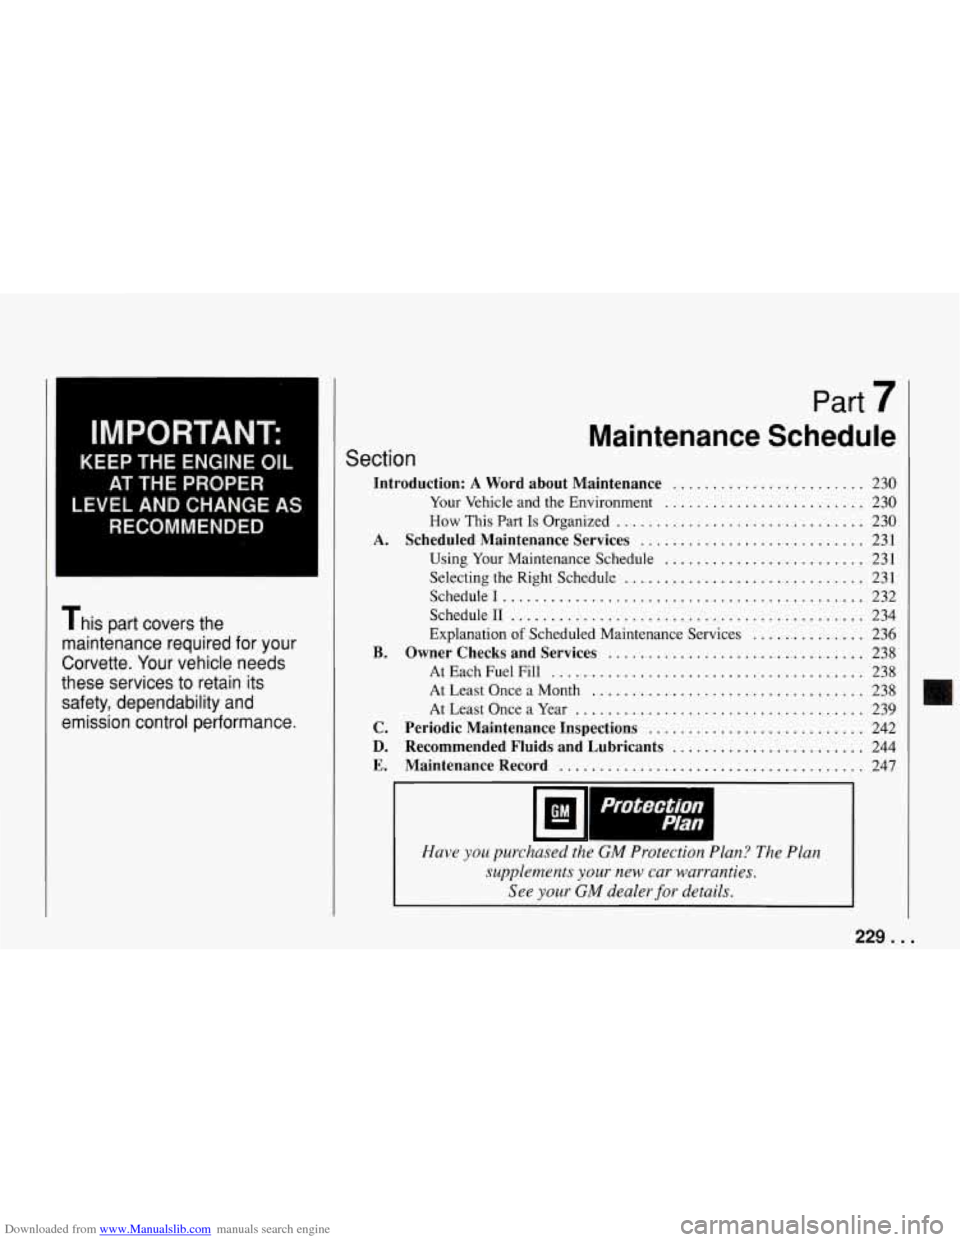
Downloaded from www.Manualslib.com manuals search engine IMPORTANT:
KEEP THE ENGINE OIL
AT THE PROPER
LEVEL AND CHANGE AS
RECOMMENDED
This part covers the
maintenance required for your
Corvette
. Your vehicle needs
these services to retain its
safety. dependability and
emission control performance
.
.
Maintenance Schedule
Section
Introduction: A Word about Maintenance ........................ 230
A .
B .
C .
D .
E .
Your Vehicle and the Environment ......................... 230
How This Part Is Organized ............................... 230
Scheduled Maintenance Services ............................ 231
Using Your Maintenance Schedule
......................... 231
Selecting the Right Schedule
.............................. 231
Schedule1
............................................. 232
Schedule11
............................................ 234
Explanation
of Scheduled Maintenance Services .............. 236
Owner Checks and Services ................................ 238
At Each Fuel
Fill ....................................... 238
AtLeastOnceaMonth
.................................. 238
At Least Once
a Year .................................... 239
Periodic Maintenance Inspections ........................... 242
Recommended Fluids and Lubricants ........................ 244
Maintenance Record ...................................... 247
I
Protection
Plan
Have you purchased the GM Protection Plan? The Plan
supplements your new car warranties
.
See your GM dealer for details .
229 ...
Page 231 of 274
Downloaded from www.Manualslib.com manuals search engine Maintenance Schedule
Introduction: A Word about Maintenance
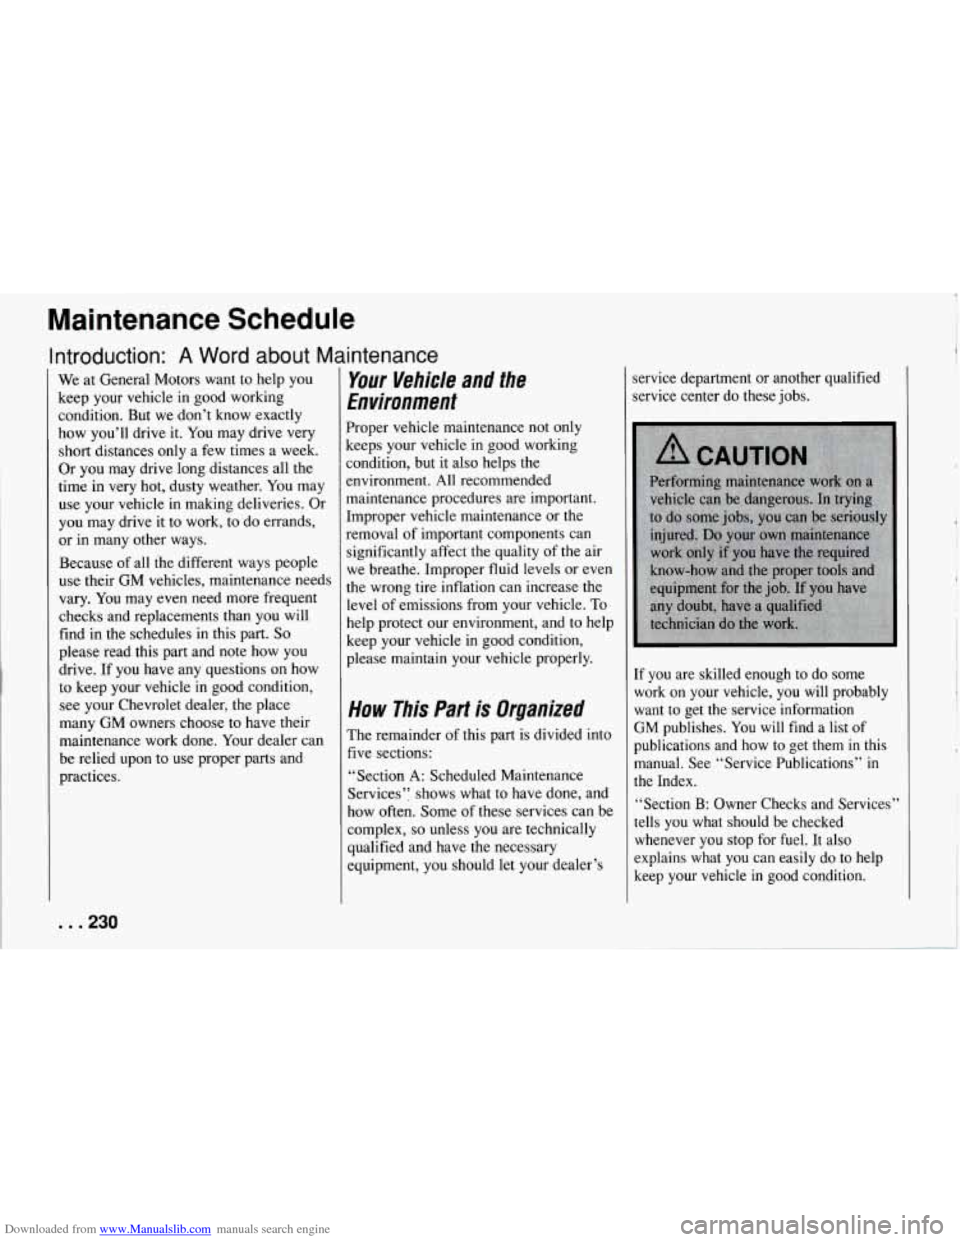
We at General Motors want to help you
keep your vehicle in good working
condition. But we don’t know exactly
how you’ll drive it. You may drive very
short distances only a few times a week.
Or you may drive long distances all the
time in very hot, dusty weather.
You may
use your vehicle in making deliveries. Or
you may drive it to work, to do errands,
or
in many other ways.
Because of all the different ways people
use their GM vehicles, maintenance needs
vary. You may even need more frequent
checks and replacements than you will
find in the schedules in this part.
So
please read this part and note how you
drive. If you have any questions on how
to keep your vehicle in good condition,
see your Chevrolet dealer, the place
many GM owners choose to have their
maintenance work done. Your dealer can
be relied upon to use proper parts and
practices.
Your Vehicle and I
Environment the
Proper vehicle maintenance not only
keeps your vehicle in good working
condition,
but it also helps the
environment. All recommended
maintenance procedures are important.
Improper vehicle maintenance or the
removal of important components can
significantly affect the quality of the air
we breathe. Improper fluid levels or even
the wrong tire inflation can increase the
level of emissions from your vehicle. To
help protect our environment, and to help
keep your vehicle in good condition,
please maintain your vehicle properly.
How This Part is Organized
The remainder of this part is divided into
five sections:
“Section
A: Scheduled Maintenance
Services’: shows what to have done, and
how often. Some of these services can be
complex,
so unless you are technically
qualified and have the necessary
equipment, you should let your dealer’s lified
service department or another
qua
service center do these jobs.
If you are skilled enough to do some
work on your vehicle, you will probably
want to get the service information
GM publishes. You will find a list of
publications and how to get them in this
manual. See “Service Publications”
in
the Index.
“Section B: Owner Checks and Services’’
tells you what should be checked whenever you stop for fuel. It also
explains what you can easily do to help
keep your vehicle in good condition.
1
. . .230