1994 CHEVROLET CORVETTE window
[x] Cancel search: windowPage 103 of 274
Downloaded from www.Manualslib.com manuals search engine Features and Controls
I
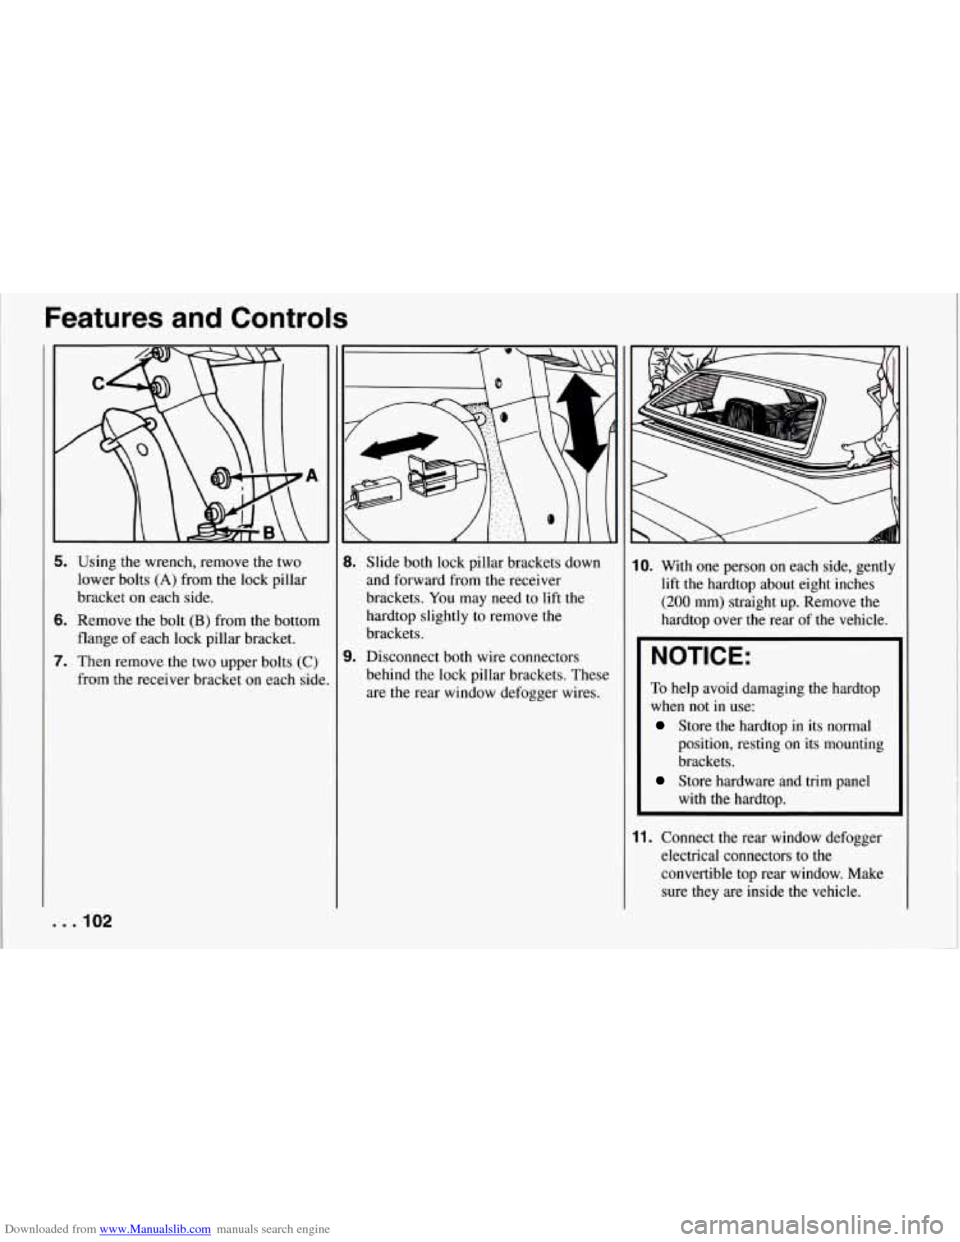
5. Using the wrench, remove the two
lower bolts (A) from the lock pillar
bracket on each side.
6. Remove the bolt (B) from the bottom
flange of each lock pillar bracket.
7. Then remove the two upper bolts (C)
from the receiver bracket on each side
. .I02
Slide both lock pillar brackets down
and forward from the receiver
brackets.
You may need to lift the
hardtop slightly to remove
the
brackets.
Disconnect both wire connectors
behind the lock pillar brackets. These
are the rear window defogger wires.
10. With one person on each side, gently
lift the hardtop about eight inches
(200 mm) straight up. Remove the
hardtop over the rear of the vehicle.
NOTICE:
To help avoid damaging the hardtop
when not
in use:
Store the hardtop in its normal
position, resting
on its mounting
brackets.
with the hardtop.
Store hardware and trim panel
11. Connect the rear window defogger
electrical connectors to the
convertible top rear window. Make
sure they are inside the vehicle.
Page 104 of 274
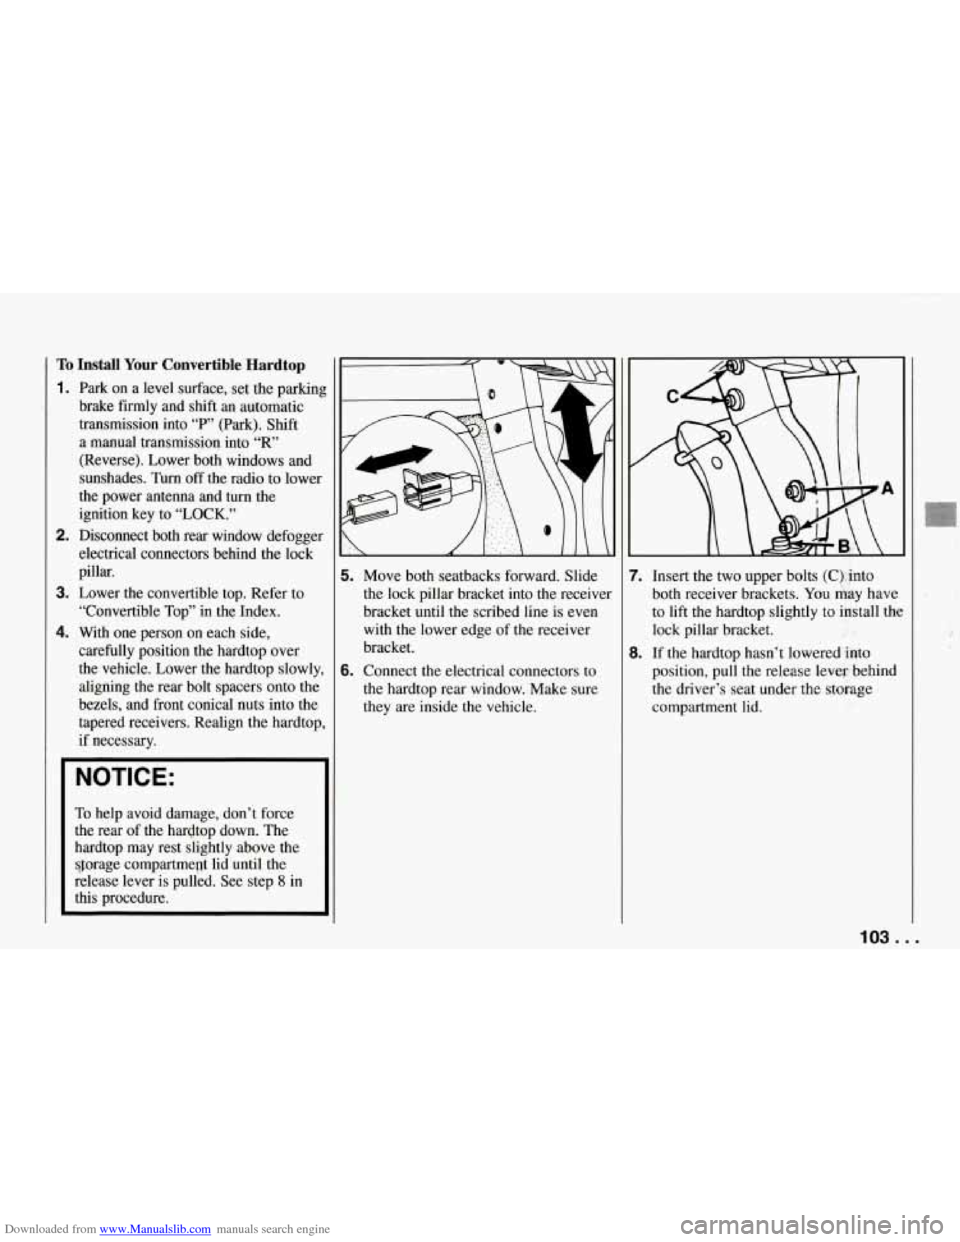
Downloaded from www.Manualslib.com manuals search engine TO Install Your Convertible Hardtop
1. Park on a level surface, set the parkinl
brake firmly and shift an automatic
transmission into
“F’” (Park). Shift
a manual transmission into
“R’
(Reverse). Lower both windows and
sunshades.
Turn off the radio to lower
the power antenna and turn the
ignition key to
“LOCK.”
electrical connectors behind the lock
pillar.
3. Lower the convertible top. Refer to
“Convertible Top” in the Index.
4. With one person on each side,
carefully position the hardtop over
the vehicle. Lower the hardtop slowly. aligning the rear bolt spacers onto the
bezels, and front conical nuts into the
2. Disconnect both rear window defogger
tapered receivers. Realign the hardtop
if necessary.
NOTICE:
To help avoid damage, don’t force
the rear of the hardtop down. The
hardtop may rest slightly above the
$forage compartment lid until the
release lever
is pulled. See step 8 in
this procedure.
\Q
i. Move both seatbacks forward. Slide
the lock pillar bracket into the receiver
bracket until
the scribed line is even
with the lower edge of the receiver
bracket.
i. Connect the electrical connectors to
the hardtop rear window. Make sure
they are inside the vehicle. 7.
Insert the two upper bolts
(C), into
both receiver brackets. You kay have
to lift the hardtop slightly to install the
lock pillar bracket.
8. If the hardtop hasn’t lowered into
position, pull the release lever- behind
the driver’s seat under the storage
compartment lid.
103 ...
Page 106 of 274

Downloaded from www.Manualslib.com manuals search engine In this part you’ll find out how to
operate the comfort control
systems and audio systems
offered with your Corvette
. Be
sure to read about the particular
system supplied with your
vehicle
.
Part 3
Comfort Controls & Audio
Systems
Comfort Controls ................................................ 106
Air Conditioner Controls ........................................ 106
Automatic Electronic Climate Control .............................. 108
Rear Window Defogger ......................................... 111
Treated Windshield ............................................ 111
Flow-Through Ventilation System ................................. 111
Audio Systems .................................................. 112
Setting the Clock .............................................. 113
Noise Reduction ............................................... 113
AM/FM Stereo with Cassette Tape Player ........................... 113
DelcoBose AM/FM Stereo with Cassette Tape and
Compact Disc Player
......................................... 115
Understanding Radio Reception .................................. 117
Care of Your Cassette Tape Player ................................. 117
Care of Your Compact Discs ..................................... 118
Power Antenna Mast Care ................................... 118
105 ..
Page 107 of 274
Downloaded from www.Manualslib.com manuals search engine Comfort Controls and Audio Systems
0 00
0 0 0 0 0 0 0 a
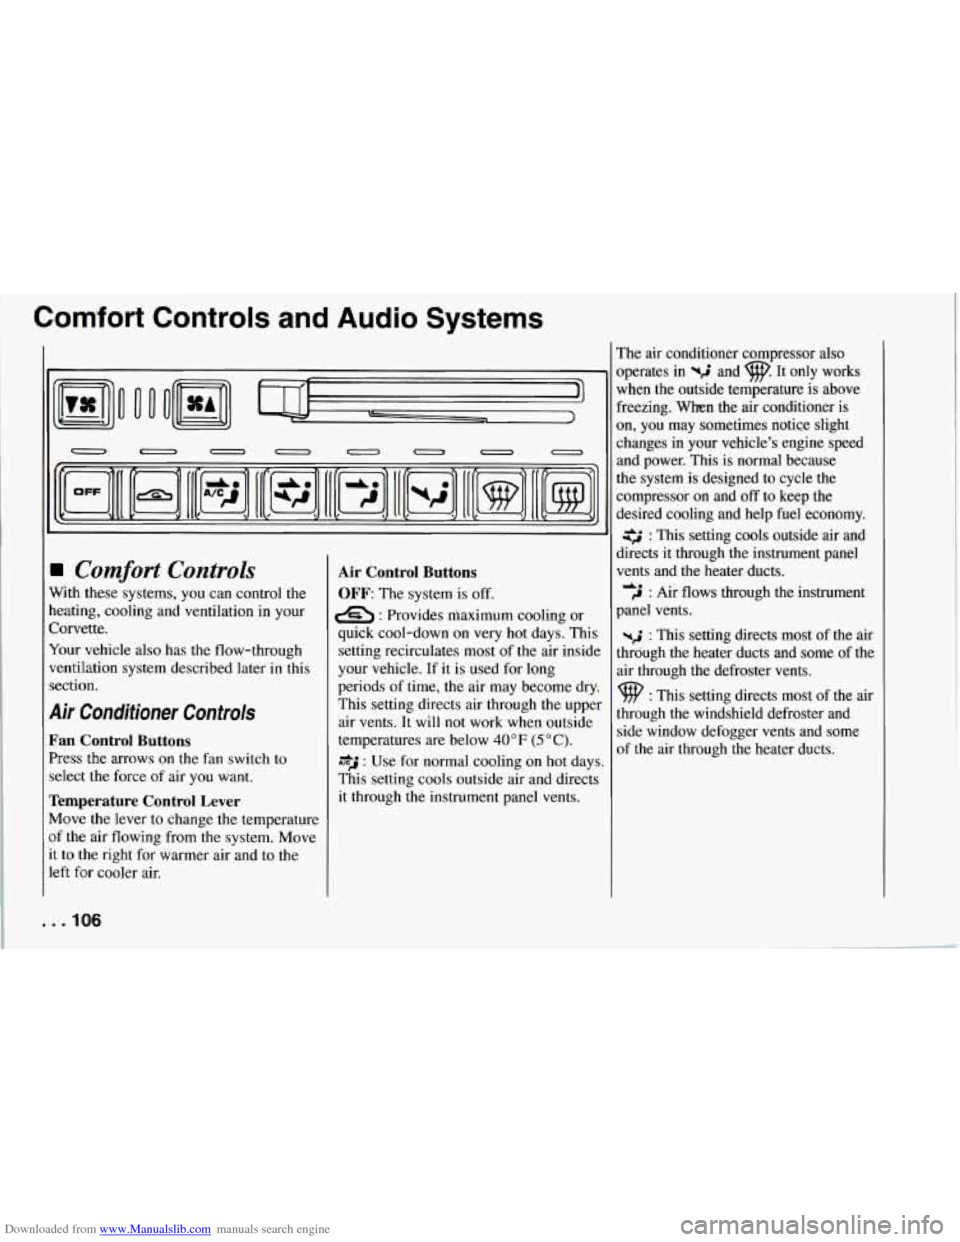
Comfort Controls
With these systems, you can control the
heating, cooling and ventilation in your
Corvette.
Your vehicle also has
the flow-through
ventilation system described later in this
section.
Air Conditioner Controls
Fan Control Buttons
Press the arrows on the fan switch to
select the force of air you want.
Temperature Control Lever
Move the lever to change the temperature
of the air flowing from
the system. Move
it to the right for warmer air and to the
left for cooler air.
Air Control Buttons
OFF: The system is off.
e : Provides maximum cooling or
quick cool-down on very hot days. This
setting recirculates most of the air inside
your vehicle. If it is used for long
periods of time,
the air may become dry.
This setting directs air through the upper
air vents. It will not work when outside
temperatures are below
40 OF (5 O C).
*J : Use for normal cooling on hot days.
This setting cools outside air and directs
it through the instrument panel vents. The air conditioner compressor also
operates in
%$ and w. It only works
when the outside temperature is above
freezing. When the air conditioner is
on, you may sometimes notice slight
changes
in your vehicle’s engine speed
and power. This is normal because
the system is designed to cycle the
compressor on and
off to keep the
desired cooling and help fuel economy.
: This setting cools outside air and
directs it through the instrument panel
vents and the heater ducts.
,J : Air flows through the instrument
panel vents.
-2 : This setting directs most of the air
through the heater ducts and some of the
air through the defroster vents.
9 : This setting directs most of the air
through the windshield defroster and
side window defogger vents and some
of the air through the heater ducts.
de
. . .IO6
Page 108 of 274
Downloaded from www.Manualslib.com manuals search engine Heating
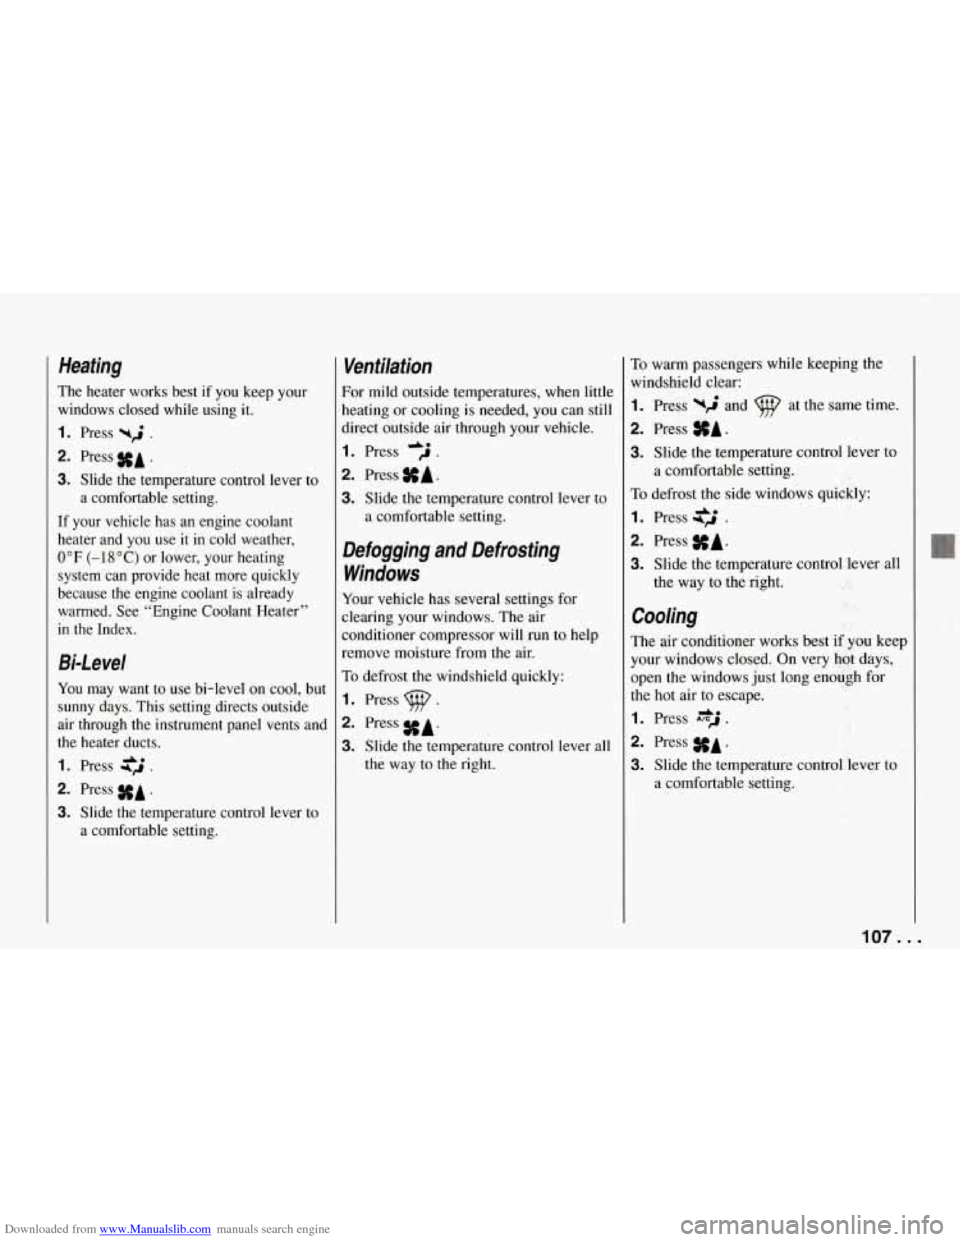
The heater works best if you keep your
windows closed while using it.
1. Press yri .
2. Press #A .
3. Slide the temperature control lever to
If your vehicle has an engine coolant
heater and you use it in cold weather,
0°F (-18°C) or lower, your heating
system can provide heat more quickly
because the engine coolant is already
warmed. See “Engine Coolant Heater”
in the Index. a comfortable setting.
Bi-Level
You may want
to use bi-level on cool, but
sunny days. This setting directs outside
air through the instrument panel vents and
the heater ducts.
1. Press $2 .
2. Press #A .
3. Slide the temperature control lever to
a comfortable setting.
Ventilation
For mild outside temperatures, when little
heating or cooling is needed, you can still
direct outside air through your vehicle.
I. Press .
2. Press SA.
3. Slide the temperature control lever to
a comfortable setting.
Defogging and Defrosting
Windows
Your vehicle has several settings for
Aearing your windows. The air
Zonditioner compressor will
run to help
remove moisture from the air.
To defrost the windshield quickly:
I. Press p .
2. Press SA.
3. Slide the temperature control lever all
the way to the right.
To warm passengers while keeping the
windshield clear:
1. Press wd and at the same time.
2. Press SA.
3. Slide the temperature control lever to
To defrost the side windows quickly:
I. Press .
2. Press SA.
3. Slide the temperature control lever all
a
comfortable setting.
the way to the right.
Cooling
The air conditioner works best if you keep
your windows closed. On very hot days,
,pen the windows just long enou,gh for
:he hot air to escape.
I. Press A*J .
2. Press SA.
3. Slide the temperature control lever to
a comfortable setting.
107. I
Page 109 of 274
Downloaded from www.Manualslib.com manuals search engine Comfort Controls and Audio Systems
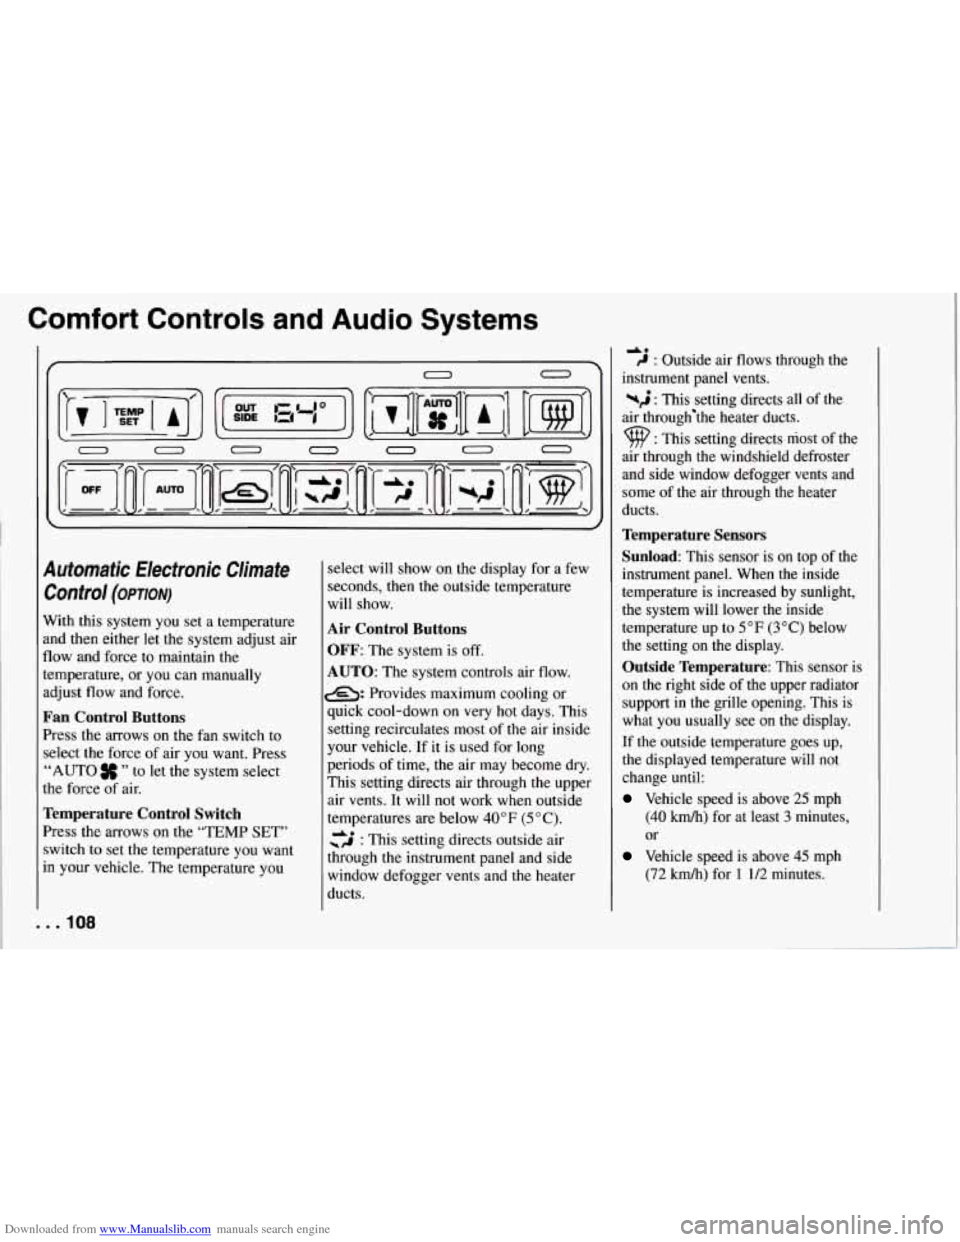
Automatic Electronic Climate Control
(OP~ON)
With this system you set a temperature
and then either let the system adjust air
flow and force to maintain
the
temperature, or you can manually
adjust flow and force.
Fan Control Buttons
Press the arrows on the fan switch to
select the force of air you want. Press
“AUTO
” to let the system select
the force of air.
Temperature Control Switch
Press the arrows on the “TEMP SET’’
switch to set the temperature you want
in your vehicle. The temperature you
. . .IO8
select will show on the display for a few
seconds, then the outside temperature
will show.
Air Control Buttons
OFF:
The system is off.
AUTO: The system controls air flow.
e: Provides maximum cooling or
quick cool-down on
very hot days. This
setting recirculates most of the air inside
your vehicle. If it is used for long
periods of time, the air may become dry.
This setting directs air through the upper
air vents. It will not work when outside
temperatures are below
40°F (5 “C).
cs : This setting directs outside air
through the instrument panel and side
window defogger vents and the heater
ducts.
40 C : Outside air flows through the
instrument panel vents.
%$ : This setting directs all of the
air through‘the heater ducts.
9 : This setting directs most of the
air through
the windshield defroster
and side window defogger vents and
some of the air through the heater
ducts.
Temperature Sensors
Sunload:
This sensor is on top of the
instrument panel. When the inside
temperature is increased by sunlight,
the system will lower the inside
temperature up to
5°F (3°C) below
the setting on the display.
Outside Temperature: This sensor is
on the right side of the upper radiator
support in the grille opening. This is
what you usually see on the display.
If the outside temperature goes up,
the displayed temperature will not
change until:
Vehicle speed is above 25 mph
(40 kmh) for at least 3 minutes,
or
Vehicle speed is above 45 mph
(72
km/h) for 1 1/2 minutes.
Page 110 of 274
Downloaded from www.Manualslib.com manuals search engine This delay helps prevent a false reading.
If vehicle speed remains above
25 mph
(40 kmh) or the temperature goes down,
the display is updated immediately.
If your vehicle has been
off for more than
three hours, the current outside
temperature will be stored
in the system
when you start the vehicle.
Inside Temperature: This sensor is in the
center air outlet on the passenger side.
If you block or cover either interior
sensor, the system will give a false
reading.
Automatic Control
The system will adjust to maintain the
temperature you set. It will select the best
fan speed and air flow setting to keep you
comfortable with the least amount of
noise.
1. Press the arrows on the “TEMP SET”
switch to set a comfortable
temperature.
2. Press “AUTO.”
The fan speed will adjust automatically unless you press
the arrows on the switch.
Manual Heating
The heater works best if you keep your
windows closed while using it.
1. Press the arrows on the “TEMP SET”
switch to set a comfortable
temperature.
2. Press uj .
3. Press the arrows on the fan speed
switch if you don’t like the automatic
setting. In “AUTO
# ” on cold days,
the fan will stay off until the coolant
warms up enough to heat your vehicle.
If your vehicle has an engine coolant
heater and you use it in cold weather,
0 OF (-1 8 O C) or lower, your heating
system can provide heat more quickly
because the engine coolant
is already
warmed. See “Engine Coolant Heater”
in the Index.
Manual Bi-Level
Bi-level can heat or cool outside air and
direct it in two directions.
1. Press the arrows on the “TEMP SET”
switch to set a comfortable
temperature.
2. Press 3 .
3. Press the arrows on the fan speed
switch if
you don’t like the automatic
setting.
Manual Ventilation
For mild outside temperatures, when little
heating or cooling is needed, you can still
direct outside
air through your vehicle.
1. Press the arrows on the “TEMP SET”
switch to set a comfortable
temperature. For ventilation, the system can’t cool the vehicle below
the outside temperature.
2. Press dJ .
3. Press the arrows on the fan speed
switch if you don’t like the automatic
setting.
Manual Cooling
The air conditioner works best if you keep
your windows closed. On very hat days,
open the windows just long enough for
the hot air to escape.
1. Press the arrows on the “TEMP SET”
switch to set a comfortable
temperature.
2. Press a. After cool-down, adjust
the air flow to another setting. The
compressor works in all settings
109 ...
Page 111 of 274
Downloaded from www.Manualslib.com manuals search engine Comfort Controls and Audio Systems
except ‘j and-; and at all
temperatures above freezing.
3. Press the arrows on the fan speed
switch if you don’t like the automatic
setting. In
“AUTO # ” on hot days,
the fan speed will be low at fist to
help get rid of the hot inside air..
When the air conditioner is on,
you may
notice slight changes
in your vehicle’s
engine speed and power. This is normal
because the system is designed to cycle
the compressor on and off to keep the
desired temperature and help fuel
economy.
Defogging and Defrosting
Windows
Your vehicle has several settings for
clearing your windows. The air
conditioner compressor will run to help
remove moisture from the air.
To defrost the windshield quickly:
1. Press the arrows on the “TEMP SET”
switch to set
a comfortable
temperature.
2. Press .
3. The fan will go to high speed. After
the windows are clear, you can lower
. . .I10
the speed using 7 or
“AUTO .”
To warm passengers while keeping the
windshield clear:
1. Press the arrows on the “TEMP SET”
switch
to set a comfortable
temperature.
2. Press -2 and at the same time.
3. Press the arrows on the fan speed
switch if you don’t like the automatic
setting.
To defrost
the side windows quickly:
1. Press the arrows on the “TEMP SET”
switch to set a‘comfortable
temperature.
2. Press c2 .
3. Press the arrows on the fan speed
switch if you don’t like the automatic
setting.
System Problems
If ,the light above a button flashes when
you turn on the ignition, your system may
have an electrical problem. The flashing
will continue for one minute, then stop.
The flashing light could also mean the
refrigerant level
is too low in your
system. The light will continue to flash, even
if refrigerant
is added, until the
system is reset. Have your system
checked and serviced
if needed.
To reset yoilr system:
1. Turn your ignition key to “Off’ or
2. Remove the courtesy lights and radio
fuses from the main fuse panel and
wait one minute. See “Fuses and
Circuit Breakers” in the Index.
3. Put the fuses back in and start your
The light shouldn’t come on and your
system should be working properly. If
you still have a problem, see your dealer.
“LOCK.”
vehicle.