1994 CHEVROLET CORVETTE lights
[x] Cancel search: lightsPage 68 of 274

Downloaded from www.Manualslib.com manuals search engine Ieadlights
?he headlight knob controls these lights:
b Headlights
1 Taillights
1 Parking lights
1 Sidemarker lights
hm the knob to $R to turn on your
leadlights and other operating lights.
rurn the knob to:OO:to turn on your
mking and other operating lights without
‘our headlights.
rurn the knob to “OFF’ to turn off the
ights.
(our digital display will dim at dusk to
emind you to turn on your headlights. To
read your odometer and fuel level with
the ignition
off, turn on your parking
lights.
Lights On Reminder
If you turn the ignition “Off” and leave
the lights on, you will hear a chime.
Brightness Control
The “DIMMER’ switch controls the
brightness of your instrument panel lights
when your headlights or parking lights are
on. Move the switch up or down to
brighten or dim the lights. If you turn the
switch all the way up, your courtesy,
reading, map and cargo area lights will
some on. Be sure to turn off the lights
when you leave your vehicle.
Headlight Doors
The headlight doors are designed to open
when you
turn the headlights on and close
when you turn the headlights and parking
lights
off. If you turn the headlights on,
then turn
the headlight switch back to the
parking lights setting, the headlight doors
will stay open.
You can open the doors manually using
the knob next to the headlight assembly.
Turn the knob counterclockwise until the
doors are open.
The headlight doors should be open when
driving in icy or snowy conditions to
prevent the doors from freezing closed
and when washing the vehicle to help
clean the headlights.
67. .
Page 69 of 274

Downloaded from www.Manualslib.com manuals search engine Features and Controls
Daytime Running Lights (Canada)
The Canadian Federal Government has
decided that “Daytime Running Lights”
(DE) are a useful feature, in that DIU
can make your vehicle more visible to
pedestrians and other drivers during
daylight hours. DIU are required on new
vehicles sold
in Canada.
Your
DRL, work with a light sensor on top
of the instrument panel. Don’t cover it up.
The front turn signal lights will come on
in daylight when:
0 The ignition is on
0 The headlight switch is off, and
0 The parking brake is released.
At dusk, the exterior lights will come on
automatically and the front turn signal
lights will go out. At dawn, the exterior
lights will go out and the front turn signal
lights will come on (if the headlight
switch is
off).
Of course, you may still turn on the
headlights any time
you need to.
To idle your vehicle with the DRL off, set
the parking brake while the ignition is
in
the “Off” or “LOCK” position. Then start
the vehicle. The DRL will stay
off until
you release the parking brake.
... 68
$.
Fog Lights
Use your fog lights for better vision in
Foggy or misty conditions. Your parking
lights or low beam headlights must be
on
or your fog lights won’t work.
To turn the fog lights on, push the button.
Push the button again to turn the fog
lights
off. A light above the button will
come on when the fog lights are on.
Interior Lights
Courtesy Lights
When any door is opened, the interior
lights will go on (unless it’s bright
outside). The lights will stay on for about
30 seconds or until you turn on the
ignition.
Front Map Lights
Your inside rearview mirror includes two
map lights. The lights will go on when a
door is opened. When the doors are
closed and the ignition is on, press the
switch to turn on the lights.
Page 72 of 274
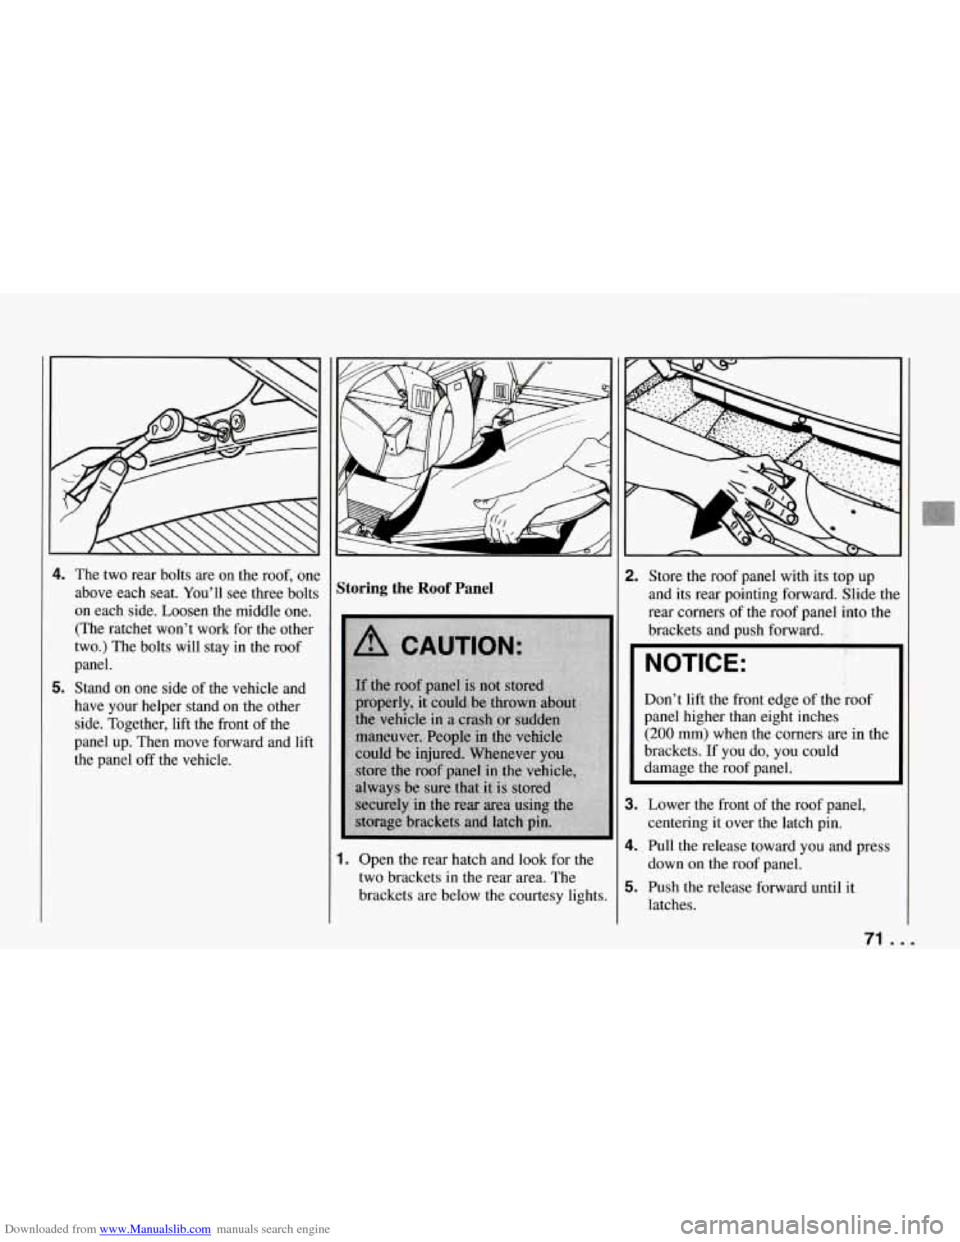
Downloaded from www.Manualslib.com manuals search engine 4. The two rear bolts are on the roof, one
above each seat. You’ll see three bolts
on each side. Loosen the middle one. (The ratchet won’t work for the other
two.) The bolts will stay in the roof
panel.
5. Stand on one side of the vehicle and
have your helper stand on the other
side. Together, lift the front of the
panel up. Then move forward and lift
the panel
off the vehicle.
Storing the Roof Panel
1. Open the rear hatch and look for the
two brackets in the rear area. The
brackets are below the courtesy lights.
2. Store the roof panel with its top up
and its rear pointing forward. Slide tht
rear corners of the roof panel into the
brackets and push forward.
NOTICE:
Don’t lift the front edge of the roof
panel higher than eight inches
(200 mm) when the corners are in the
brackets. If you do, you could
damage the roof panel.
3. Lower the front of the roof panel,
centering it over the latch pin.
4. Pull the release toward you and press
down on the roof panel.
5. Push the release forward until it
latches.
71 ...
Page 76 of 274
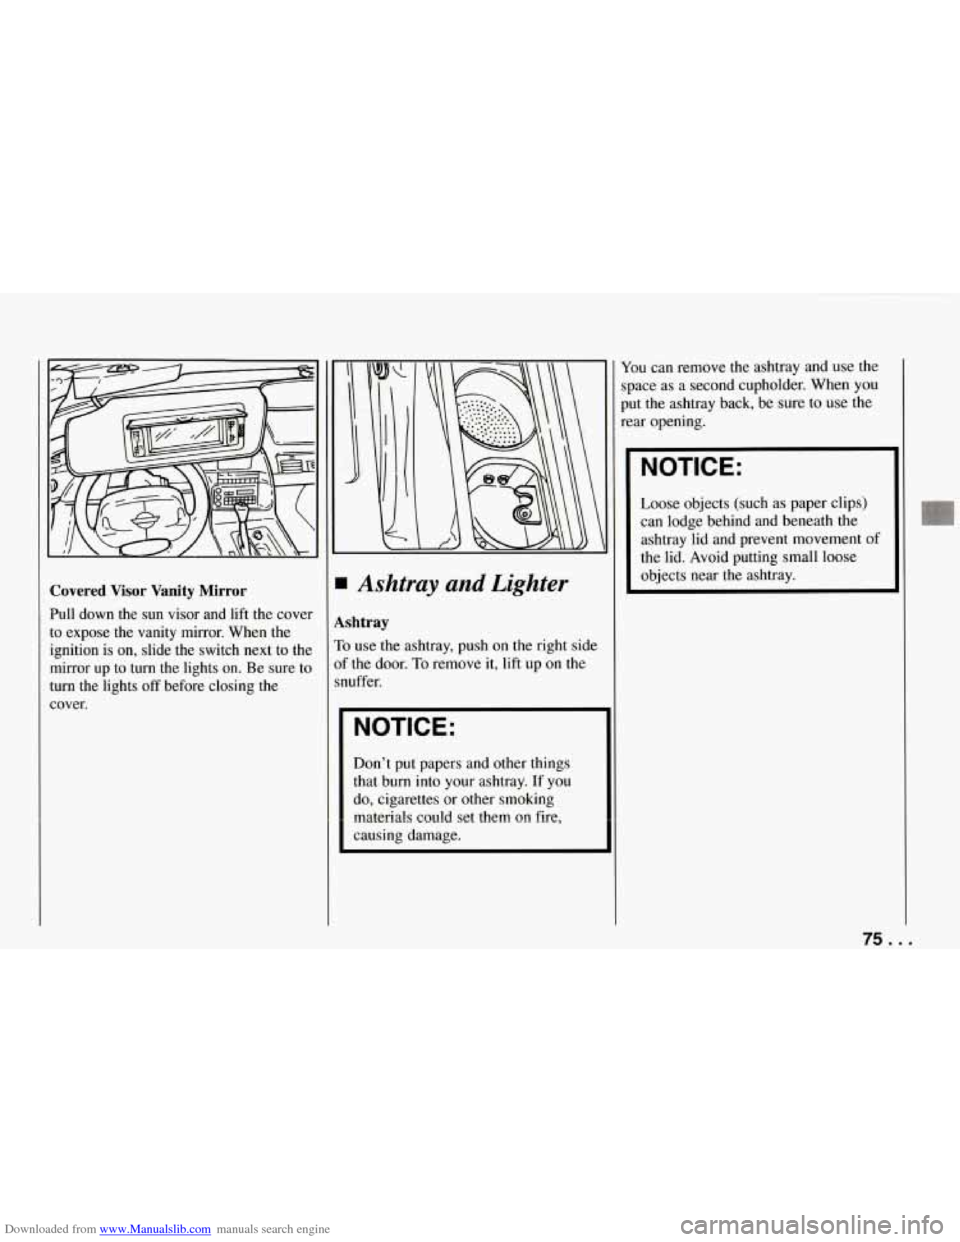
Downloaded from www.Manualslib.com manuals search engine Covered Visor Vanity Mirror
Pull down the sun visor and lift the cover
to expose the vanity mirror. When the
ignition is on, slide the switch next to the
mirror up
to turn the lights on. Be sure to
turn the lights
off before closing the
cover.
Ashtray and Lighter
shtray
t use the ashtray, push on the right side
the door.
To remove it, lift up on the
uffer.
NOTICE:
Don’t put papers and other things
that burn into your ashtray. If you
do, cigarettes or other smoking
materials
could set them on fire,
causing damage. You
can remove the ashtray and use the
space as a second cupholder. When you
put the ashtray back, be sure to use the
rear opening.
NOTICE:
Loose objects (such as paper clips)
can lodge behind and beneath the
ashtray lid and prevent movement of
the lid. Avoid putting small loose
objects near the ashtray.
75 ...
Page 83 of 274
Downloaded from www.Manualslib.com manuals search engine Features and Controls
Warning Lights, Gauges
and Indicators
This section describes the warning lights
and gauges that may be on your vehicle.
The pictures will help you locate them.
Warning lights and gauges can signal that
something is wrong before it becomes
serious enough to cause an expensive
repair or replacement. Paying attention
to your warning lights and gauges could
also save you or others from injury.
Warning lights go on when there may be
or
is a problem with one of your vehicle’s
functions.
As you will see in the details
on the
next few pages, some warning
lights come on briefly when you turn the
ignition key just to let you know they’re
working. If you are familiar with this
section, you should not be alarmed when
this happens.
Gauges can indicate when there may be
or is a problem with one of your vehicle’s
functions. Often gauges and warning
lights work together to
let you know
when there’s a problem with your vehicle.
... 82
When one of the warning lights comes on
and stays on when you are driving, or
when one of the gauges shows there may
be a problem, check the section that tells
you what to do about
it. Please follow the
manual’s advice. Waiting to
do repairs
can be costly
- and even dangerous. So
please get to know your warning lights
and gauges. They’re a big help.
Your vehicle also has a driver information
center that works along with the warning
lights and gauges. See “Driver Information Center’’
in the Index.
System Problems
If “SYS” flashes on the display near your
fuel gauge, there may be a problem with
your Corvette’s electrical system. If the
“SECURITY” light flashes at the same
time, there is a problem with your theft
deterrent system. Have your vehicle
checked by your dealer
if “SYS’ keeps
appearing.
Gauge Markings
The analog gauges provide a quick visual
reference to the actual measurement of
these gauges. However, you must keep in mind that the gauges aren’t linear. This means that the middle mark is not
a
temperature halfway between the top and
bottom temperatures on the gauge. For
example, the middle mark on the coolant
gauge represents 210°F,
not 180°F as you
might expect.
Page 84 of 274
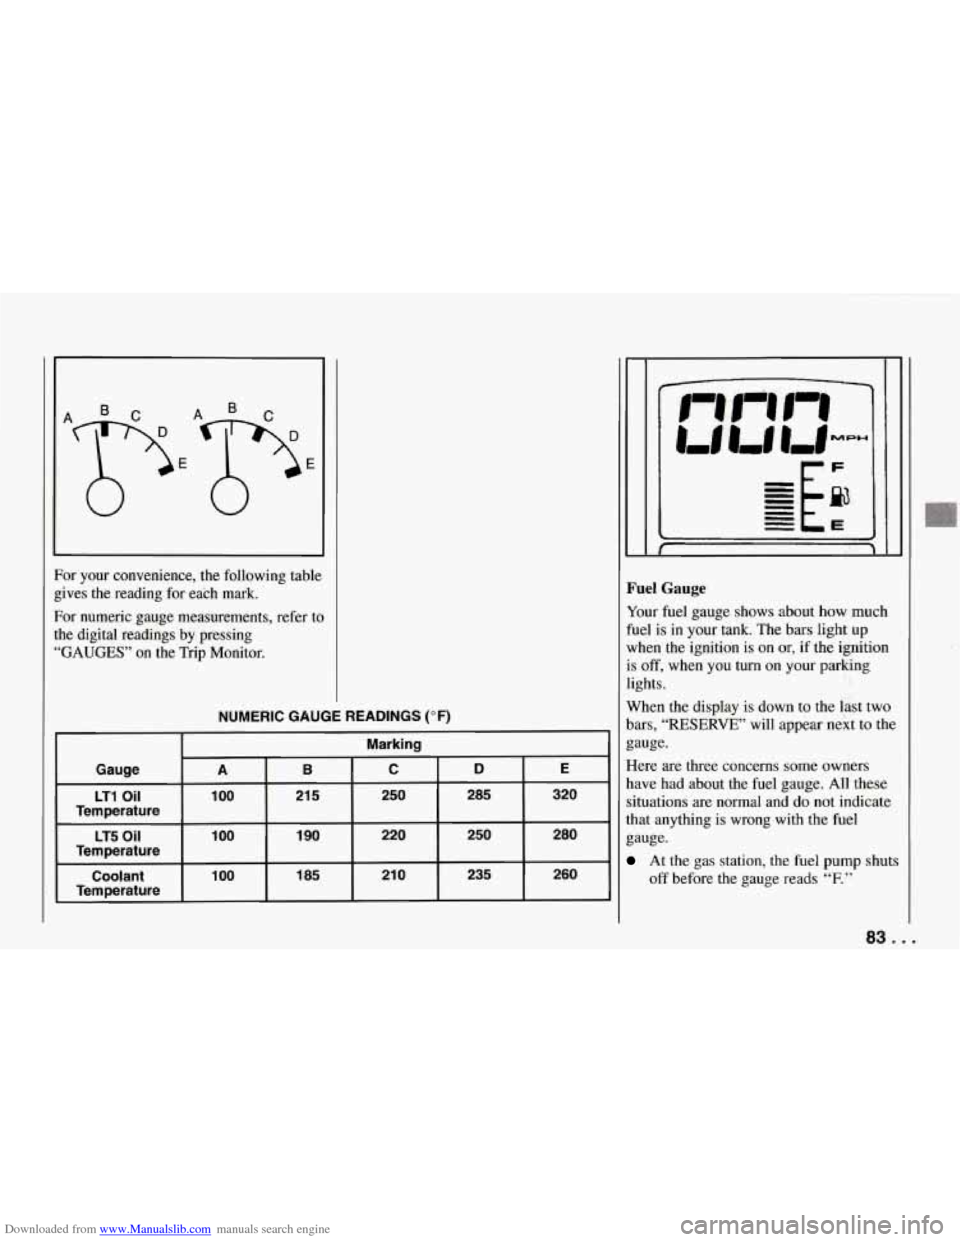
Downloaded from www.Manualslib.com manuals search engine For your convenience, the following table
gives the reading for each mark.
For numeric gauge measurements, refer to
the digital readings by pressing
“GAUGES” on the Trip Monitor.
NUMERIC GAUGE READINGS (OF)
Marking
Gauge
B C D E A
LT1 Oil 100
185 21
0 235 260 100 Coolant 1
90 220 250 280 1 00 LT5 Oil
21 5 250 285 320
Temperature
Temperature
Temperature
Fuel Gauge
Your fuel gauge shows about how much
fuel is in your tank. The bars light up
when the ignition is on or, if the ignition
is
off, when you turn on your parking
lights.
When the display
is down to the last two
bars,
“RESERVE” will appear next to the
gauge.
Here are three concerns some owners
have had about the fuel gauge. All these
situations are normal and do not indicate
that anything is wrong with the fuel
gauge.
At the gas station, the fuel pump shuts
off before the gauge reads
“F.”
83 ...
Page 111 of 274
Downloaded from www.Manualslib.com manuals search engine Comfort Controls and Audio Systems
except ‘j and-; and at all
temperatures above freezing.
3. Press the arrows on the fan speed
switch if you don’t like the automatic
setting. In
“AUTO # ” on hot days,
the fan speed will be low at fist to
help get rid of the hot inside air..
When the air conditioner is on,
you may
notice slight changes
in your vehicle’s
engine speed and power. This is normal
because the system is designed to cycle
the compressor on and off to keep the
desired temperature and help fuel
economy.
Defogging and Defrosting
Windows
Your vehicle has several settings for
clearing your windows. The air
conditioner compressor will run to help
remove moisture from the air.
To defrost the windshield quickly:
1. Press the arrows on the “TEMP SET”
switch to set
a comfortable
temperature.
2. Press .
3. The fan will go to high speed. After
the windows are clear, you can lower
. . .I10
the speed using 7 or
“AUTO .”
To warm passengers while keeping the
windshield clear:
1. Press the arrows on the “TEMP SET”
switch
to set a comfortable
temperature.
2. Press -2 and at the same time.
3. Press the arrows on the fan speed
switch if you don’t like the automatic
setting.
To defrost
the side windows quickly:
1. Press the arrows on the “TEMP SET”
switch to set a‘comfortable
temperature.
2. Press c2 .
3. Press the arrows on the fan speed
switch if you don’t like the automatic
setting.
System Problems
If ,the light above a button flashes when
you turn on the ignition, your system may
have an electrical problem. The flashing
will continue for one minute, then stop.
The flashing light could also mean the
refrigerant level
is too low in your
system. The light will continue to flash, even
if refrigerant
is added, until the
system is reset. Have your system
checked and serviced
if needed.
To reset yoilr system:
1. Turn your ignition key to “Off’ or
2. Remove the courtesy lights and radio
fuses from the main fuse panel and
wait one minute. See “Fuses and
Circuit Breakers” in the Index.
3. Put the fuses back in and start your
The light shouldn’t come on and your
system should be working properly. If
you still have a problem, see your dealer.
“LOCK.”
vehicle.
Page 131 of 274
Downloaded from www.Manualslib.com manuals search engine Your Driving and the Road
0
0
..
If other cars are lined up to pass a
slow vehicle, wait your turn. But take
care that someone isn’t trying to pass
you as you pull out to pass the slow
vehicle. Remember to glance over
your shoulder and check the blind
spot.
Check your mirrors, glance over your
shoulder, and start your left lane
change signal before moving out of
the right lane to pass. When you are
far enough ahead
of the passed vehicle
to see its front
in your inside mirror,
activate your right lane change signal
and move back into the right lane.
(Remember that your right outside
mirror is convex. The vehicle you just
passed may seem to be farther away
from you than it really is.)
Try not to pass more than one vehicle
at a time on two-lane roads.
Reconsider before passing the next vehicle.
Don’t overtake a slowly moving
vehicle too rapidly. Even though the
brake lights are not flashing, it may be
slowing down or starting
to turn.
If you’re being passed, make it easy
for the following driver to get ahead
of you. Perhaps you can ease a little
to the right.
,130
Loss of Control
Let’s review what driving experts say
about what happens when the three
control systems (brakes, steering and
acceleration) don’t have enough friction
where the tires meet the road to do what
the driver has asked.
In any emergency, don’t give up. Keep
trying to steer and constantly seek an
escape route or area of less danger.
Skidding
In a skid, a driver can lose control of the
vehicle. Defensive drivers avoid most
skids by taking reasonable care suited to
existing conditions, and by not
“overdriving” those conditions. But skids
are always possible.
The three types of skids correspond to
your Corvette’s three control systems.
In the braking skid your wheels aren’t
rolling. In the steering or cornering skid,
too much speed or steering in a curve
causes tires to slip and lose cornering
force. And in the acceleration skid too
much throttle causes the driving wheels
to spin.
A cornering skid
is best handled by
easing your foot
off the accelerator pedal. Remember: Any
ASR system helps avoid
only the acceleration skid. If your ASR
system is
off, then an acceleration skid is
also best handled by easing your foot off
the accelerator pedal.
If your vehicle starts to slide, ease your
foot
off the accelerator pedal and quickly
steer the way you want the vehicle to go.
If you start steering quickly enough, your
vehicle may straighten out. Always be
ready for a second skid if it occurs.
Of course, traction is reduced when water,
snow, ice, gravel, or other material is on
the road. For safety, you’ll want to slow
down and adjust your driving to these
conditions. It is important to slow down
on slippery surfaces because stopping
distance will be longer and vehicle
control more limited.