Page 214 of 348

Downloaded from www.Manualslib.com manuals search engine If No Steam Is Coming From Your Engine
If you get the overheat warning but see or hear no steam, the problem may
not be too serious. Sometimes the engine can get a little too hot when you:
Climb a long hill on a hot day.
Stop after high speed driving.
Idle for long periods in traffic.
Tow a trailer.
If
you get the overheat warning with no sign of steam, try this for a minute
or so:
1. If you have an air conditioner, turn it off.
2. Turn on your heater to full hot at the highest fan speed and open the
3. If you’re in a traffic jam, shift to “N” (Neutral).
window as
necessary.
If
you no longer have the overheat warning, you can drive. Just to be safe,
drive slower for about
ten minutes. If the warning doesn’t come back on,
you can drive normally.
If
the warning continues, pull over, stop, and park your vehicle right away.
If there’s still no sign of steam, push
the accelerator until the engine speed is
about twice as fast as normal idle speed. Bring the engine speed back to
normal idle speed after two
or three minutes. Now see if the warning stops.
But then, if you still have the warning, TURN OFF THE ENGINE AND
GET EVERYONE OUT OF THE VEHICLE until it cools down.
You may decide not to
lift the hood but to get service help right away.
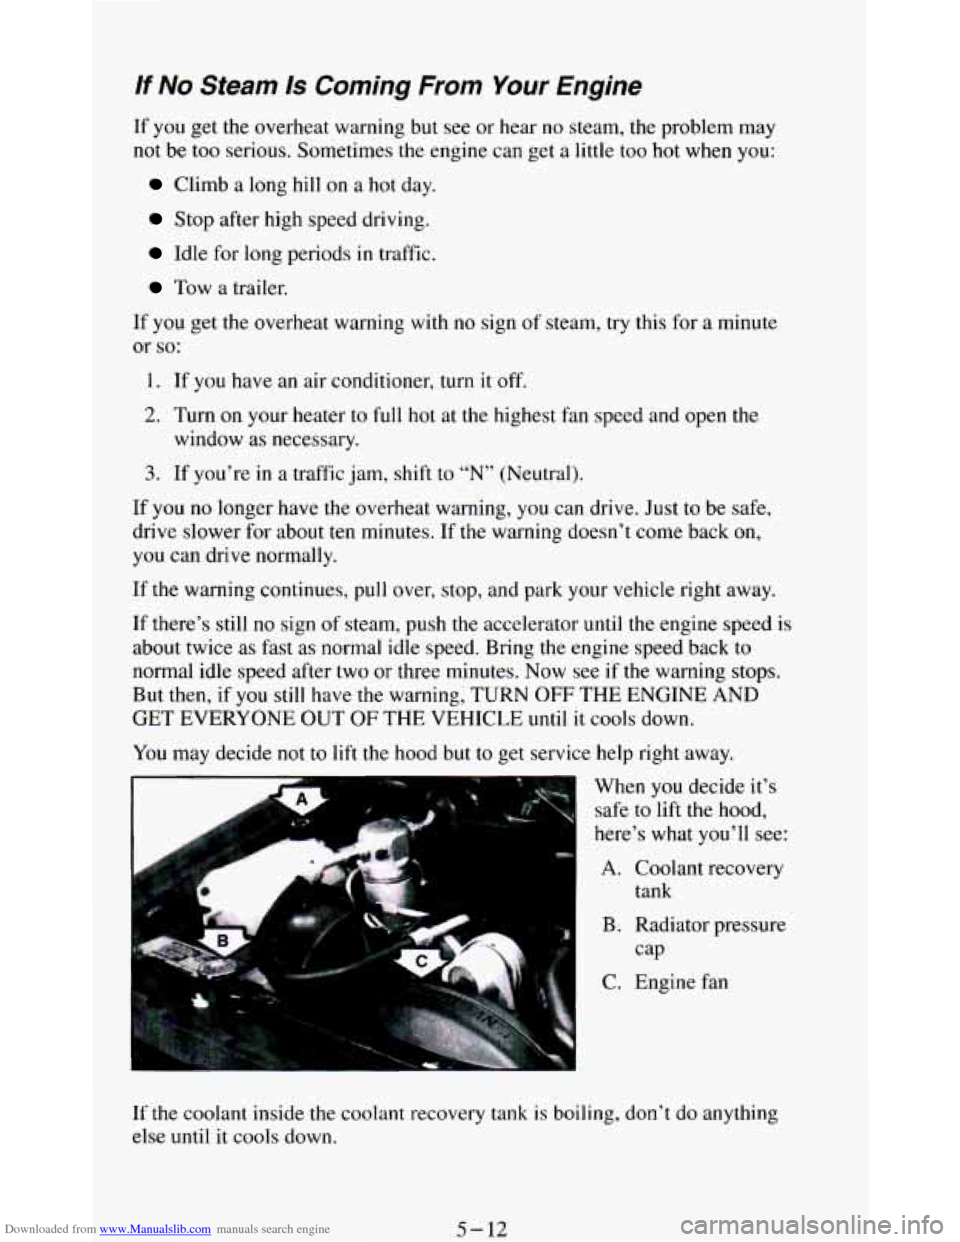
When
you decide it’s
safe to
lift the hood,
here’s what you’ll see:
A. Coolant recovery
B. Radiator pressure
C. Engine fan tank
cap
If the
coolant inside the coolant recovery tank is boiling, don’t do anything
else until
it cools down.
5-12
Page 215 of 348
Downloaded from www.Manualslib.com manuals search engine B'
The coolant level should be at or above the ADD mark. If it isn't, you may
have a leak
in the radiator hoses, heater hoses, radiator, water pump or
somewhere else
in the cooling system.
NOTICE:
Engine damage from running your engine without coolant isn't
covered by your warranty.
If there seems to be no leak, start the engine again. See if the fan speed
increases when idle speed is doubled
by pushing the accelerator pedal down.
If
it doesn't, your vehicle needs service. Turn off the engine.
How to Add Coolant to the Coolant Recovery Tank
If you haven't found a problem yet, but the coolant level isn't at or above
the
ADD mark, add a 50/50 mixture of clean water (preferably distilled)
and a proper antifreeze at the coolant recovery tank. (See "Engine Coolant"
in the Index for more information about the proper coolant mix.)
5-13
Page 216 of 348
Downloaded from www.Manualslib.com manuals search engine NOTICE:
In cold weather, water can freeze and crack the engine, radiator, \
heater core
and other parts. Use the recommended coolant.
When the coolant in the coolant recovery tank is at or above the the ADD
mark, start your vehicle.
If the overheat warning continues, there’s one more thing you can try. You
can add the proper coolant mix directly to the radiator but be sure the
cooling system is cool before you do it.
Page 217 of 348
Downloaded from www.Manualslib.com manuals search engine How to Add Coolant to the Radiator
1. You can remove the radiator pressure cap when the cooling system,
including the radiator pressure cap and upper radiator hose,
is no longer
hot. Turn
the pressure cap slowly to the left until it first stops. (Don't
press down while turning the pressure cap.)
If you hear a hiss, wait for that to stop. A hiss means there is still some
pressure left.
5-15
Page 218 of 348
Downloaded from www.Manualslib.com manuals search engine r
I-
2. Then keep turning the
pressure cap, but
now push down
as
you turn it.
Remove the
pressure cap.
3. Fill the radiator
with the proper
mix, up to the
base
of the filler
neck.
4. Then fill the
coolant recovery
tank to
the ADD
mark.
5-16
Page 219 of 348
Downloaded from www.Manualslib.com manuals search engine 5. Put the cap back
on the coolant
recovery tank,
but leave the
radiator pressure
cap
off'.
6. Start the engine
and let it run until
you can feel the
upper radiator
hose getting hot.
Watch out for the
engine fan.
7. By this time the coolant level inside the filler neck may be lower. If the
level
is lower, add more of the proper mix through the filler neck until
the
level reaches the base of the filler neck.
8. Then replace the
pressure cap. At
any time during
this procedure if
coolant begins to
flow out of the
filler neck,
reinstall the
pressure cap. Be
sure the arrows
on pressure cap
line
up like this.
5-17
Page 237 of 348

Downloaded from www.Manualslib.com manuals search engine Service & Appearance Care
Section
Here you will find information about the care of your vehicle . This part
begins with service and fuel information. and then
it shows how to check
important fluid and lubricant levels
. There is also technical information
about your vehicle. and a section devoted to
its appearance care .
Service ................................................... 6-2
Fuel
..................................................... 6-3
Checking Things Under the Hood
.............................. 6-6
Engineoil
.............................................. 6-8
Aircleaner
............................................ 6-14
Automatic Transmission Fluid
............................. 6-15
Manual Transmission Fluid
............................... 6-18
Hydraulic Clutch ........................................ 6-20
RearAxle
............................................. 6-20
Transfer Case
.......................................... 6-21
FrontAxle
............................................. 6-22
Enginecoolant
......................................... 6-23
Power Steering Fluid
.................................... 6-26
Windshield Washer Fluid
................................. 6-28
Brake Master Cylinder
................................... 6-29
Replacing Brake System Parts
................................ 6-30
Battery
.................................................. 6-31
Vehiclestorage
......................................... 6-31
Bulb Replacement
......................................... 6-32
Other Maintenance Items
.................................... 6-35
Loading Your Vehicle
...................................... 6-39
Tires .................................................... 6-42
Appearance Care
.......................................... 6-49
Vehicle Identification Number (VIN)
.......................... 6-58
Service Parts Identification Label
............................. 6-60
Fuses and Circuit Breakers
.................................. 6-60
Capacities and Specifications Charts
........................... 6-62
6-1
Page 249 of 348

Downloaded from www.Manualslib.com manuals search engine When to Change Engine Oil
See if any one of these is true for you:
Most trips are less than 4 miles (6 km).
It’s below freezing outside and most trips are less than 10 miles (I 6 km).
0 The engine is at low speed most of the time (as in door-to-door
delivery, or
in stop-and-go traffic).
You tow a trailer often.
0 Most trips are through dusty places.
0 The vehicle is frequently operated off-road.
If any one of these is true for your vehicle, then you need to change your oil
andfilter every 3,000 miles (5 000 km) or 3 months - whichever comes
first.
If none
of them is true, change the oil every 7,500 miles (12 500 km) or
12 months - whichever comes first. Change the filter at the first oil change
and at every other oil change after that.
Four-wheel Drive Remote Oil Filter
If your vehicle has four-wheel drive, you will have a remote oil filter
located under the hood. It is mounted to the front left inner fender, behind
the headlights.
Engine Coolant Heater (Engine Block Heater)
An engine coolant heater can be a big help if you have to park outside in
very cold weather, 0°F (-18°C) or colder. If your vehicle has this option,
see “Engine Coolant Heater
” in the Index.
What to Do with Used Oil
Did you know that used engine oil contains certain elements that may be
unhealthy for your skin and could even cause cancer? Don’t let used oil stay
on your skin for very long. Clean your skin
and nails with soap and water,
or
a good hand cleaner. Wash or properly throw away clothing or rags
containing used engine oil. (See
the manufacturer’s warnings about the use
and disposal of oil products.)
Used oil can be
a real threat to the environment. If you change your own oil,
be sure to drain all free-flowing oil from
the filter before disposal. Don’t
ever dispose of oil
by putting it in the trash, pouring it on the ground, into
sewers, or into streams or bodies of water. Instead, recycle
it by taking it to
a place that collects used oil. If you have a problem properly disposing of
your used oil, ask your dealer,
a service station or a local recycling center
for help.
6-13