Page 1151 of 1254
HEADLAMP
-
Daytime Light System -
Operation
After starting the engine with
lhe lighting
switch in the "OFF"
position, the headlamp low
beam and clearance,
tail, license
and instrumenl illumination
lamps automatically turn on. Light-
ing switch operations
other than the
above are the same
as
conventional light systems.
Engine Wjth engine stopped
Wrth engine running
Lighting switch OFF
1ST
2ND OFF 1ST
2ND
B c
Bc B
c B
c Bc B
c
Headlamp High
beam XX
o XX
o o Xo XX
o XX
oo X
o
LOW Deam XXX
Xx XX
o Xo
oo XX X
Xo X
Clearance and tail lamp X
XX
oo oo
o oo
ooo o
o ooo
License and instrument
illumination lamp X
X
Xo o
o oo
oo oo
oo o
oo o
O: Lamp "ON"
X: Lamp "OFF"
El: Added
functions
Schematic
] GNI TI ON SWI ICIl
ON o. START J
GN] T] ON SW] ICI
SIART BATTERY
a 7 9
5 tt
I
)? 3
OAYIIIlE L] GII
CON IROL
UN]T L]GNTING
SW] TCH
HEAO.
Rf. H]
GH AEAM
] NDI CAIOR
ALIERNAIOR LO2
0 ensine
mode s
Exccpt LDz0 eng ine
node s
MEL675A
EL4O
Page 1153 of 1254
HEADLAMP
-
Dimdip lamp
System -
Operation
When ignition
switch is
in
the "ON" position
with the lighting
switch in the "1ST"
oosition. the headlamo low
beam comes on
dimly to
function as a clearance lamp. Lighting switch opera-
tions other than the above are the same as conventional fioht
svstems.
lgnition switch OFF or ACC ON
Lighting switch OFF
1ST
2ND
OFF 1ST
2ND
B c B Bc Bc B(.
Bc
Headlamp High
beam XXo Xxo Xo XX XX
o X
Low beam X
X XX
X X
Xo XX XX XXX x
o X
Dimp-dip
(Low b€am) X
x XXX XXXX Xx X xXXX
Clearance and tail lamo
Xx X
o o XX X
oo o
License and instrument
illumination lamp X
Xx
o oXX X o o
o
O: Lamo "ON"
X: Lamo "OFF"
Cl Added
functions
Schematic
I GNJ I]
ON SWJ ICH
0N o. START AAITERY
5 O] I1'O]
P
LJGHT 9
CON IROL UNI I
?
it
]? L]GIlT]NG
SWJ TCH
To c
€a.ance, ta i I
I iccnse
amps
HI GH 8EAI1
J NO]
CAIOR
MEL6/78
EL42
Page 1174 of 1254

EXTERIOR
LAMP
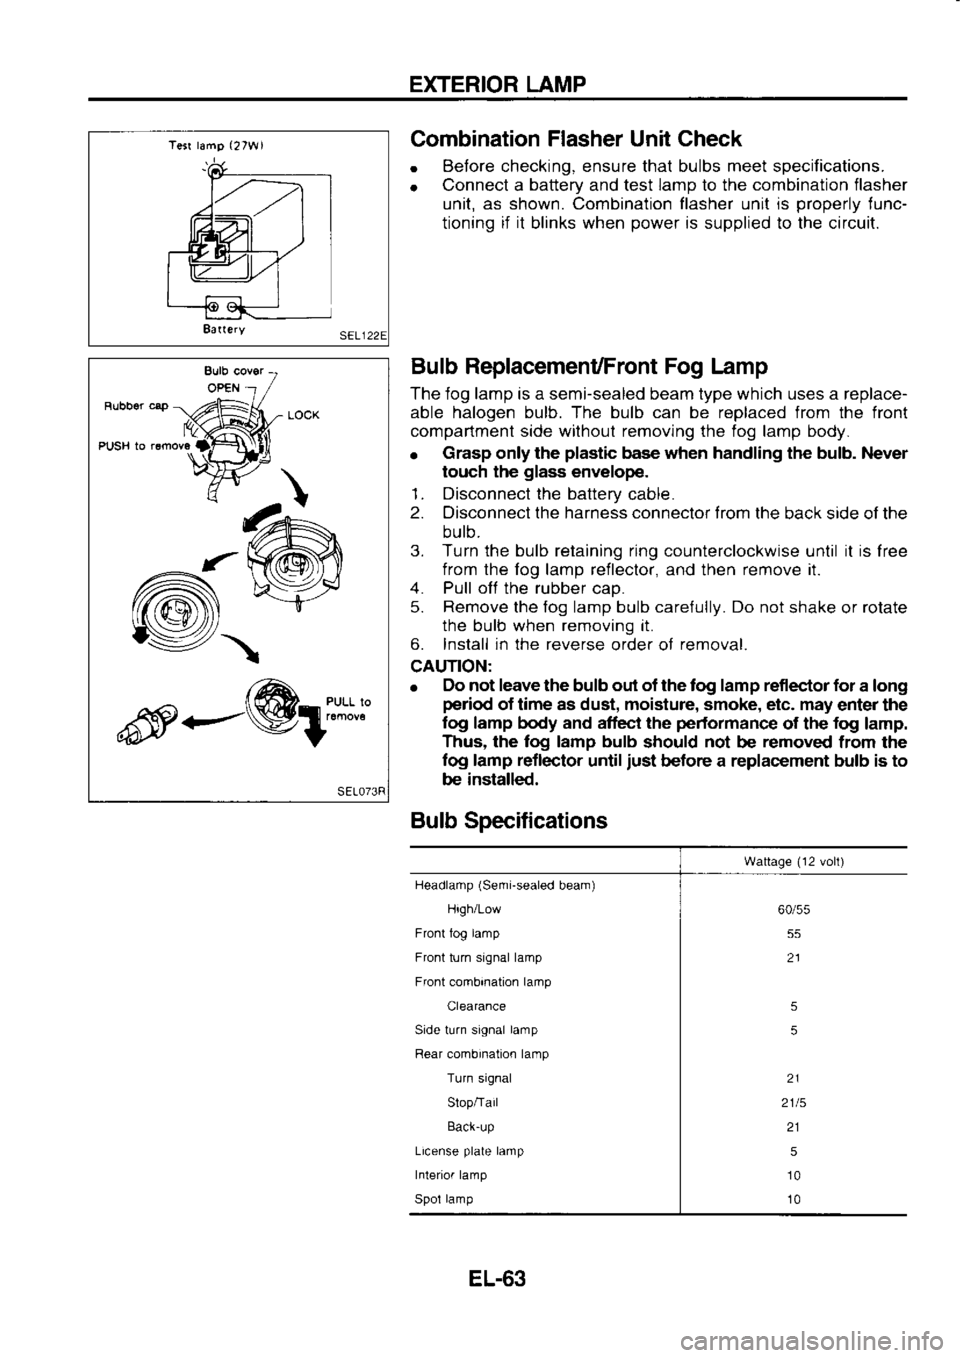
Tesr lamg (27W1
8a(ery Combination
Flasher
Unit Check
. Before
checking, ensure that bulbs meet specifications.
o Connect
a battery
and test lamp
to the combination
flasher
unit, as shown. Combination flasher unit is properly
lunc-
tioning if it
blinks when power
is supplied to the circuit.
Bulb ReplacemenUFront Fog Lamp
The iog lamp is a semi-sealed beam type which uses a replace-
able halogen bulb. The bulb can be replaced from the front
compartment side withoul removing the fog lamp body.
o Grasp
only the plastic
base when handling the bulb. Never
touch the glass
envelope.
1. Disconnect the battery
cable.
2. Disconnect the harness connector trom
the back side of the
bulb.
3. Turn the bulb retaining ring
counterclockwise until it
is
free
from the fog lamp reileclor,
and then remove
it.
4. Pull off
the rubber
cao.
5. Remove
the fog lamp bulb care{ully. Do not
shake or rolate
the bulb when removing it.
6. Install in the reverse
order of removal.
CAUTION:
e Elo
not leave the bulb out of the tog lamp reflector for
a long
period of time as dust, moisture, smoke, etc. may
enter the
log lamp body and affect the performance
of the fog
lamp.
Thus, the log lamp bulb
should not
be removed
from the
fog lamp reflector
until just
before a replacement bulb is to
be installed.
Bulb Specifications
Wattage (12
volt)
Headlamp (Semi-sealed
beam)
High/Low
Front tog lamp
Front turn signal lamp
Front combination lamp
Clearance
Side turn signal lamp
Rear combination lamp
Turn signal
Slop/Tail
Back-up
License plate
lamp
Interior lamp
Spol lamp 60/55
55
21
5
5
21
2115 215
10
10
-/\
<---@1:"*:l'l
EL-63