1993 CHEVROLET LUMINA bulb
[x] Cancel search: bulbPage 72 of 324

Downloaded from www.Manualslib.com manuals search engine Features & Controls
Turn Si'llHeadlight
Beam kver
The lever on the left side of the steering
column includes your:
Turn Signal and Lane Change
Headlight High-Low Beam
Windshield Wipers
Windshield Washer
Cruise Control (Option)
Indicator
Turn Signal and Lane Change
Indicator
The turn signal has two upward (for
Right) and
two downward (for Left)
positions. These positions allow you to
signal a turn or a lane change.
To Signal a Turn:
Move the lever all the way up or down.
When the turn is finished, the lever will
return automatically.
I
A green arrow on the instrument panel
will flash in the direction of the turn or
lane change.
To signal a lane change, just raise or
lower the lever until the green arrow
starts to flash. Hold it there until you
complete your lane change. The lever
will return by itself when you release it.
As you signal a turn or a lane change, if
the arrows don't flash but just stay
on, a
signal bulb may be burned out and
other drivers won't see your turn signal.
If a bulb is burned out, replace it to help
avoid an accident.
If the green arrows
don't go
on at all when you signal a
turn, check the fuse (see the
Index
under Fuses G. Circuit Breakers) and
for burned-out bulbs.
Page 162 of 324

Downloaded from www.Manualslib.com manuals search engine Your Driving and the Road
Driving with a Trailer (CONT.)
Making Turns
When you’re turning with a trailer, make wider turns than normal. Do this
so your trailer won’t strike soft
shoulders, curbs, road signs, trees, or
other objects. Avoid jerky or sudden
maneuvers. Signal well in advance.
Turn Signals When Towing a Trailer
When you tow a trailer, your vehicle has
to have a different turn signal flasher
and extra wiring. The green arrows on
your instrument panel will flash
whenever you signal a turn or lane
change. Properly hooked up, the trailer
lights will also flash, telling other
drivers you’re about to turn, change
lanes or stop.
I60
When towing a trailer, the green arrows
on your instrument panel will flash for
turns even if the bulbs on the trailer are
burned out. Thus, you may think
drivers behind you are seeing your
signal when they are not. It’s important
to check occasionally to be sure the
trailer bulbs are still working.
Your vehicle has bulb warning .lights.
When you plug trailer lights into your
vehicle’s lighting system, its bulb
warning lights may not let you know if
one
of your lights goes out. So, when
you have trailer lights plugged in, be
sure to check your vehicle and trailer
lights from time to time to be sure
they’re all working. Once you disconnect the trailer lights, the bulb
warning lights again can tell you if one
of your vehicle lights
is out.
Driving On Grades
Reduce speed and shift to a lower gear
before you start down a long or steep
downgrade. If you don’t shift down,
you
might have to use your brakes so much
that they would get hot and no longer
work well.
On a long uphill grade, shift down and
reduce your speed to around
45 mph
(70 Wh) to reduce the possibility of
engine and transaxle overheating.
If you are towing a trailer and you have
an automatic transaxle with Overdrive,
it’s best to drive in
D instead of (or,
as you need to, a lower gear). This will
minimize heat build-up and extend the
life of your transaxle.
Page 193 of 324

Downloaded from www.Manualslib.com manuals search engine H ere you will find information
about the care of your Chevrolet
.
This part begins with service and
fuel information. and then it shows how to check important fluid and
lubricant levels
. There is also
technical information about your
vehicle. and a section devoted to its
appearance care
.
part 6
Service & Appearance Care
Service ........................................................................\
............................................. 192
Fuel
........................................................................\
.................................................. 193
Hood Release ........................................................................\
................................... 196
Engine Oil ........................................................................\
....................................... 201
Air Cleaner ........................................................................\
...................................... 205
Transaxle Fluid
........................................................................\
................................ 206
Engine Coolant
........................................................................\
................................ 211
Power Steering Fluid
........................................................................\
....................... 214
Windshield Washer Fluid
........................................................................\
................ 215
Brakes
........................................................................\
.............................................. 216
Battery
........................................................................\
............................................. 218
Bulb Replacement
........................................................................\
............................ 218
Windshield Wiper Blade Replacement
.................................................................... 224
Loading Your Vehicle
........................................................................\
...................... 224
Tires
........................................................................\
................................................. 225
Appearance Care
........................................................................\
............................. 232
Vehicle Identification Number (VIN)
.................................................................... 239
Add-on Electrical Equipment
........................................................................\
........ 240
Fuses
& Circuit Breakers ........................................................................\
............... 241
Capacities and Specifications 247
Fluids
& Lubricants ........................................................................\
........................ 249
Replacement Bulbs
........................................................................\
......................... 251
Normal Maintenance Replacement Parts
.............................................................. 254
.. ........................................................................\
..........
Page 220 of 324

Downloaded from www.Manualslib.com manuals search engine Service & Appearance Care
I
Battery
Every new Chevrolet has a Delco
Freedom@ battery. You never have to
add water to one of these. When it’s
time for a new battery, we recommend a
Delco Freedom@ battery. Get one that
has the catalog number shown on the
original battery’s label.
Jump Starting
For jump starting instructions, see the
Index under Jump Starting.
Vehicle Storage
If you’re not going to drive your vehicle
for
25 days or more, take off the black,
negative
(-) cable from the battery. This
will help keep your battery from
running down.
x Batteries have acid that can
L burn you and gas that can
explode. You can be badly hurt if
you aren’t careful. See the Index
under Jump Starting for tips on
working around
a battery without
getting hurt.
Contact your dealer to prepare your
vehicle for longer storage periods.
Bulb Rephcement
In this section you’ll find directions for
changing the light bulbs in some of the
lights on your Chevrolet.
Be sure to read the directions before
you begin to replace or adjust any
lights.
See the
Index under Replacement
Bulbs to find the type of bulb you need
to use.
Page 221 of 324

Downloaded from www.Manualslib.com manuals search engine Halogen Bulbs I Headlight Bulb Replacement
Halogen bulbs have
pressurized
gas inside and
can burst if you drop or scratch the
bulb.
You or others could be
injured. Take special care when
handling and disposing
of halogen
bulbs.
Bulbs to check the type-of bulb to use.
To Replace a Bulb:
1. Open the hood. Open the protective
panel above the headlights.
2. Reach behind the headlights and turn
the socket counterclockwise until it
pops loose
from the housing.
3. Pull the socket and bulb free.
Page 222 of 324

Downloaded from www.Manualslib.com manuals search engine Service & Appearance Care
HwdDghf Bulb Replacement
(COW..)
4. Lift the lacking tab on the electrical
connector
and pd it from the socket.
5. plug a new bulb ayld socket into the
electxical cannectur, Be sure the
lacking tab
snaps securely onto the
socket.
6. Replace the socket in the headlight
housing.
7. Turn it clockwise to lo& it in place.
8. Close the protective panel,
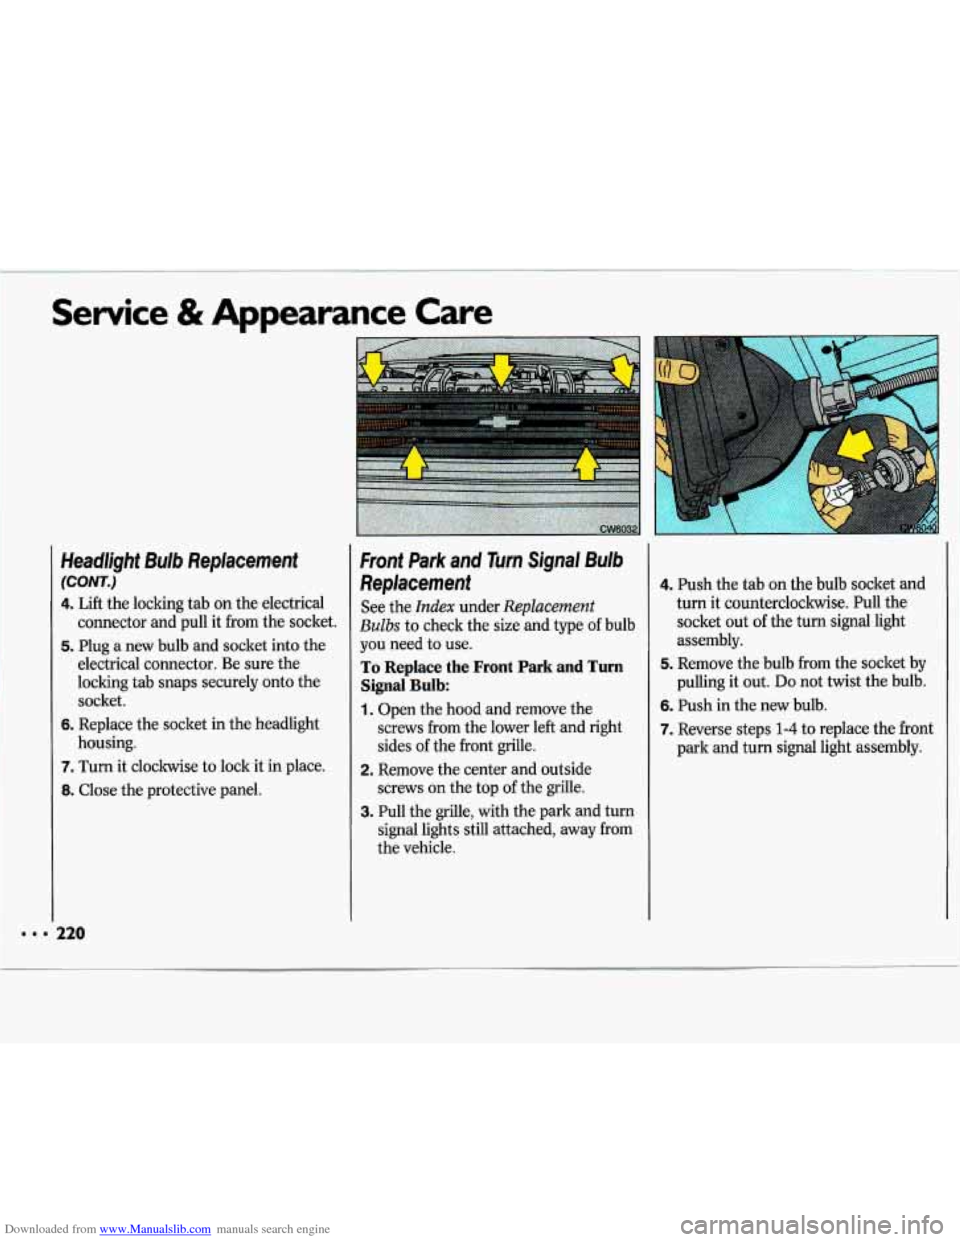
4. Push the tab on the bulb socket and I
turn it c=own.t~do;ckwise. 9ull the
assembly.
5. Remove the bulb from the socket by
palling
it out. De not twist the bulb.
6. Push in the new bulb.
7. Reverse steps 1-4 to replace the front
park and turn signal light assembly.
socket out of the tw [email protected]
I
Page 223 of 324

Downloaded from www.Manualslib.com manuals search engine Front Side Marker Bulb
Replacement
See the Index under Replacement
Bulbs to check the type of bulb to use.
To Replace a Bulb:
1. Open the hood. Open the panel
2. Unscrew the bolt behind the front
above
the headlights.
side marker
light assembly.
3. Turn the socket counterclockwise
until
it stops. Then pull the socket
and bulb from the side marker light
assembly.
4. Pull the bulb out of the socket. Do
not twist the bulb.
5. Plug the new bulb in the socket.
6. Replace the bulb and socket in the
7. Replace the assembly in the vehicle.
side marker light assembly.
Replace the bolt.
Center High-Mounted Stoplight
Bulb Repkcememt
See the Index under Replacement
BuZbs to check the type of bulb to use.
If you would like to clean the inside
surface
of the rear window or need to
replace a bulb, you can remove the
stoplight housing by following these
steps:
1. Remove the screws and pull the cover
down.
Page 224 of 324

Downloaded from www.Manualslib.com manuals search engine Service & Appearance Care
Center High-Mounted Stoplight
Bulb Replacement
(CONT.)
2. Lift the locking tabs at the top and
bottom and pull the bulb and socket
out of the center high-mounted
stoplight assembly.
3. Pull the bulb from the socket.
4. Push the new bulb into the socket.
5. Replace the bulb and socket in the
assembly. Make sure the locking tabs
snap in place.
6. Replace the cover and screws.
TailStop/Turn Signal Bulb
Replacement
See the Index under Replacement
Bulbs to check the type of bulb to use.
To Replace a Bulb:
1. Open the trunk. Remove the
convenience net
if you have one.
Remove the carpet fasteners by
twisting them a little as you pull them
away from the carpet.
the vehicle.
2. Pull the carpet away from the rear of
3. Unscrew the three wing nuts and pull
the light assembly
from the vehicle.