1993 CHEVROLET DYNASTY tires
[x] Cancel search: tiresPage 225 of 2438

ABS EQUIPPED VEHICLE PERFORMANCE
Anti-Lock Brakes provide the driver with some
steering control during hard braking. However there
are conditions where the system does not provide any
benefit. In particular, hydroplaning is still possible
when the tires ride on a film of water. Hydroplaning
results in the vehicle tires leaving the road surface
rendering the vehicle almost uncontrollable. In addi-
tion, extreme steering maneuvers at high speed or
high speed cornering beyond limits of tire adhesion
to the road surface may cause vehicle skidding. So,
the ABS system is termed Anti-Lock instead of Anti-
Skid. One of the significant benefits of the ABS system is
that of maintaining steering control during hard
braking or during braking on slippery surfaces. It is
therefore possible to steer the vehicle while braking
on almost any road surface.
ABS SYSTEM SELF-DIAGNOSTICS
The ABS system has been designed with Self Diag-
nostic Capability. There are two self checks the sys-
tems performs every time the vehicle is started.
First, when the key is turned on the system performs
an electrical check called Start-Up Cycle. During this
check, the Red Brake Warning Lamp and the Amber
Anti-Lock Warning Lamp are illuminated. Then
turned off at the end of the test, after about 1 to 2
seconds. When the vehicle reaches a speed of about 3
to 4 miles per hour. The system performs a func-
tional check called Drive-Off. During Drive-Off. hy-
draulic valves are activated briefly to test their
function. Drive-Off can be detected as a series of
rapid clicks upon driving off the first time the car is
started. If the brake pedal is applied during Drive-
Off, the test is by-passed. Both of these conditions
are a normal part of the system self test. Most fault
conditions will set a ABS Fault Code in the (CAB),
which can be retrieved to aid in fault diagnosis. De-
tails can be found in Diagnosis Section.
ABS WARNING SYSTEMS OPERATION
The ABS system uses two methods for notifying
the driver of a system malfunction. These include the
standard Red Brake Warning Lamp and an Amber
Anti-Lock Warning Lamp, both located in the instru-
ment cluster. The purpose of these two lamps are dis-
cussed in detail below.
RED BRAKE WARNING LAMP
The Red Brake Warning Lamp, located in the in-
strument cluster, will Turn On to warn the driver of
brake system conditions that may result in reduced
braking ability. The lamp is also turned on when the
parking brake is not fully released. Conditions which
may cause the Red Brake Warning Lamp to Turn On
include: ²
Parking brake not fully released. If the parking
brake is applied or not fully released. The switch on the
parking brake pedal assembly will ground the Red
Brake Warning Lamp circuit and cause the lamp to
turn on. On vehicles equipped with mechanical instru-
ment clusters, the Amber Anti-Lock Lamp will turn on
if the vehicle is driven above 3 miles per hour with the
Parking Brake applied.
² Low brake fluid. The fluid level sensor in the hy-
draulic assembly reservoir will ground the Red Brake
Warning Lamp circuit if low brake fluid level is de-
tected. In addition, ABS will be deactivated above 3
miles per hour and the Amber Anti-Lock Warning
Lamp will be illuminated. If the vehicle is equipped
with EVIC, a low fluid condition will also cause the
Low Brake Fluid message to appear.
² Low Accumulator Pressure. In the event of low
accumulator pressure, the dual function pressure
switch in the hydraulic assembly will signal the (CAB)
to ground the Red Brake Warning Lamp circuit. This
will cause the Red Brake Warning Lamp to turn on.
Low accumulator pressure also results in the activa-
tion of the Yellow Anti-Lock Warning Lamp. Low accu-
mulator pressure may result in loss of power assist.
² Modulator Or (CAB) Faults. The modulator assem-
bly or (CAB) may turn on the Yellow Anti-Lock Warn-
ing Lamp, if certain faults are detected in either the
modulator assembly or the (CAB).
² Bulb check. As a bulb check, the Red Brake Warning
Lamp will illuminate whenever the ignition switch is
placed in the crank position. Illumination of the red Brake Warning Lamp
may indicate reduced braking ability. A vehicle
that has the Red Brake Warning Lamp ON should
not be driven except to do diagnostic procedures
described in Section 2 of this manual. Most con-
ditions that turn on the Red Brake Warning
Lamp will also turn on the Amber Anti-Lock
Warning Lamp, consequently disabling the Anti-
Lock function.
ANTI-LOCK WARNING LAMP
The Anti-Lock Warning Lamp is located in the in-
strument cluster and is Amber in color. The Amber
Anti-Lock Warning Lamp is illuminated when the
(CAB) detects a condition that results in a shutdown of
Anti-Lock function. The Amber Anti-Lock Warning
Lamp is normally on until the (CAB) completes its self
tests and turns the lamp off. For example, if the (CAB)
is disconnected, the lamp is on. Display of the Amber Anti-Lock Warning Lamp
without the Red Brake Warning Lamp indicates
only that Anti-Lock function has been disabled.
Power assisted normal braking is unaffected.
Ä ANTI-LOCK 10 BRAKE SYSTEM 5 - 75
Page 230 of 2438

stant velocity joint housings. The rear Tone Wheels
are serviced as an assembly with the rear disc brake
rotor hub. Correct Anti-Lock System operation is dependent
on wheel speed signals from the wheel speed sensors.
The vehicles' wheels and tires must all be the same
size and type to generate accurate signals. In addi-
tion, the tires must be inflated to the recommended
pressures for optimum system operation. Variations
in wheel and tire size or significant variations in in-
flation pressure can produce inaccurate wheel speed
signals.
CONTROLLER ANTI-LOCK BRAKE (CAB)
The Anti-Lock Brake Controller is a small micro-
processor based device that monitors the brake sys- tem and controls the system while it functions in
Anti-Lock Mode. The CAB is located under the bat-
tery tray and is mounted to the left frame rail (Fig.
7) and uses a 60-way system connector. The power
source for the CAB is through the ignition switch to
pin 60 of the controller. With the ignition in the
RUN or ON position. IF THE (ABS) CONTROL-
LER NEEDS TO BE REPLACED BE SURE THE
CORRECT CONTROLLER IS USED. THE CON-
TROLLER ANTI-LOCK BRAKE (CAB) IS NOT
ON THE CCD BUS
Fig. 5 Rear Wheel Speed Sensor
Fig. 4 Front Wheel Speed Sensor
Fig. 6 Rear Tone Wheel
Fig. 7 Location Controller Anti-Lock Brake (CAB)
5 - 80 ANTI-LOCK 10 BRAKE SYSTEM Ä
Page 265 of 2438

CONTROLLER ANTI-LOCK BRAKE (CAB)
The (CAB) (Fig. 5) is a small control computer
which receives wheel speed information, controls An-
ti-Lock operation and monitors system operation.
ANTI-LOCK BRAKES OPERATION AND
PERFORMANCE
This Anti-Lock Braking System represents the cur-
rent state-of-the-art in vehicle braking systems and
offers the driver increased safety and control during
braking. This is accomplished by a sophisticated sys-
tem of electrical and hydraulic components. As a re-
sult, there are a few performance characteristics that
may at first seem different but should be considered
normal. These characteristics are discussed below.
More technical details are discussed further in this
section.
PEDAL FEEL
Since the Bendix Anti-Lock 6 Braking System uses
the conventional Booster/Master Cylinder. The brake
pedal feel during normal braking is the same as con-
ventional Non ABS equipped cars. When Anti-Lock is activated during hard braking
due to a wheel lockup tendency. Brake pedal effort
will increase do to the master cylinder pressure be-
ing isolated from the brake system. Some brake
pedal movement and associated noises may be felt
and herd by the driver. This is normal of a Anti-Lock
Braking System due to pressurized fluid being trans-
ferred to and from the wheel brakes.
ANTI-LOCK BRAKE SYSTEM OPERATION
During Anti-Lock Braking, brake pressures are
modulated by cycling electric solenoid valves. The cy-
cling of these valves can be faintly heard as a series
of popping or ticking noises. In addition, the cycling
may be felt as a pulsation in the brake pedal, al-
though no pedal movement will be noticed. If Anti-
Lock Operation occurs during hard braking, some pulsation may be felt in the vehicle body due to fore
and aft movement of the suspension as brake pres-
sures are modulated.
Although ABS operation is available at virtually
all vehicle speeds. It will automatically turn off at
speeds below 3 to 5 mph. Wheel lockup may be per-
ceived at the very end of an anti lock stop and is con-
sidered normal.
TIRE NOISE & MARKS
Although the ABS system prevents complete wheel
lock-up, some wheel slip is desired in order to
achieve optimum braking performance. During brake
pressure modulation, as brake pressure is increased,
wheel slip is allowed to reach up to 30%. This means
that the wheel rolling velocity is 30% less than that
of a free rolling wheel at a given vehicle speed. This
slip may result in some tire chirping, depending on
the road surface. This sound should not be inter-
preted as total wheel lock-up. Complete wheel lock up normally leaves black tire
marks on dry pavement. The Anti-Lock Braking Sys-
tem will not leave dark black tire marks since the
wheel never reaches a locked condition. Tire marks
may however be noticeable as light patched marks.
VEHICLE PERFORMANCE
Anti-Lock Brakes provide the driver with some
steering control during hard braking, however there
are conditions where the system does not provide any
benefit. In particular, hydroplaning is still possible
when the tires ride on a film of water. This results in
the vehicles tires leaving the road surface rendering
the vehicle virtually uncontrollable. In addition, ex-
treme steering maneuvers at high speed or high
speed cornering beyond the limits of tire adhesion to
the road surface may cause vehicle skidding, inde-
pendent of vehicle braking. For this reason, the ABS
system is termed Anti-Lock instead of Anti-Skid.
SYSTEM SELF-DIAGNOSTICS
The Bendix Anti-Lock 6 Brake System has been
designed with the following self diagnostics capabil-
ity. The self diagnostic ABS startup cycle begins when
the ignition switch is in the on position. An electrical
check is completed on the ABS components such as
Wheel Speed Sensor Continuity and System and
other Relay continuity. During this check the Amber
Anti-Lock Light is on for approximately 1-2 seconds. Further Functional testing is accomplished once
the vehicle is set in motion. (1) The solenoid valves and the pump/motor are ac-
tivated briefly to verify function. (2) The voltage output from the wheel speed sen-
sors is verified to be within the correct operating
range.
Fig. 5 Controller Anti-Lock Brake (CAB)
Ä ANTI-LOCK 6 BRAKE SYSTEM 5 - 115
Page 268 of 2438

PROPORTIONING VALVES
Two Proportioning Valves (Fig. 3) are used in the
system, one for each rear brake hydraulic circuit.
The Proportioning Valves function the same as in a
standard brake system. The Proportioning Valves are
located on the bottom of the hydraulic assembly (Fig.
1). They are the same screw in type as the ones used
on the Bendix Anti-Lock 10 and Bosh Anti-Lock
Brake systems.
WHEEL SPEED SENSORS
One Wheel Speed Sensor (WSS), is located at each
wheel (Fig. 4 and 5), and sends a small (AC) signal
to the control module (CAB). This signal is generated
by magnetic induction. The magnetic induction is
created, when a toothed sensor ring Tone Wheel (Fig.
6) passes a stationary magnetic Wheel Speed Sensor.
The (CAB) converts the (AC) signal generated at
each wheel into a digital signal. If a wheel locking
tendency is detected, the (CAB) will then modulate
hydraulic pressure to prevent the wheel(s) from lock-
ing. The front Wheel Speed Sensor is attached to a boss
in the steering knuckle (Fig. 4). The tone wheel is
part of the outboard constant velocity joint. The rear
Wheel Speed Sensor is mounted to the caliper adap-
tor (Fig. 5) and the rear tone wheel is an integral
part of the rear wheel hub (Fig. 6). The speed sensor
air gap is NOT adjustable. The four Wheel Speed Sensors are serviced individ-
ually. The front Tone Wheels are serviced as an as-
sembly with the outboard constant velocity joint. The
rear Tone Wheels are serviced as an assembly with
the rear brake hub. Correct Anti-Lock system operation is dependent
on the vehicle's wheel speed signals, that are gener-
ated by the Wheel Speed Sensors. The vehicle's
wheels and tires must all be the same size and type
to generate accurate signals. In addition, the tires
must be inflated to the recommended pressures for
optimum system operation. Variations in wheel and
tire size or significant variations in inflation pres-
sure can produce inaccurate wheel speed signals.
Fig. 3 Proportioning Valve Identification
Fig. 4 Front Wheel Speed Sensor
Fig. 5 Rear Wheel Speed Sensor
5 - 118 ANTI-LOCK 6 BRAKE SYSTEM Ä
Page 301 of 2438

ANTILOCK BRAKES OPERATION AND
PERFORMANCE
The Bendix Antilock 4 Brake System represents
the current state-of-the-art in vehicle brake systems
and offers the driver increased safety and control
during braking. This is accomplished by a sophisti-
cated system of electrical and hydraulic components.
As a result, there are a few performance characteris-
tics that may at first seem different but should be
considered normal. These characteristics are dis-
cussed below. More technical details are discussed
further in this section.
PEDAL FEEL
Since the Bendix Antilock 4 Brake System uses the
vehicle's conventional brake system power booster
and master cylinder. The brake pedal feel during
normal braking is the same as on a conventional
Non ABS equipped vehicle. When the Antilock system becomes activated dur-
ing hard braking due to a wheel lockup tendency.
The brake pedal effort will increase do to the master
cylinder pressure being isolated from the brake sys-
tem. Some brake pedal movement and associated
noises may be felt and heard by the driver. This is
normal operation of the Bendix Antilock 4 Brake
System due to pressurized brake fluid being trans-
ferred to and from the wheel brakes.
ANTILOCK BRAKE SYSTEM OPERATION
During Antilock Brake system operation, brake
pressures are modulated by cycling electric solenoid
valves. The cycling of these valves can be heard as a
series of popping or ticking noises. In addition, the
cycling may be felt as a pulsation in the brake pedal.
If Antilock operation occurs during a hard applica-
tion of the brakes, some pulsation may be felt in the
vehicle body due to fore and aft movement of vehicle
suspension components. Although ABS operation is available at virtually
all vehicle speeds, it will automatically turn off at
speeds below 3 to 5 mph. Wheel lockup may be per-
ceived at the very end of an anti lock stop and is con-
sidered normal.
TIRE NOISE & MARKS
Although the ABS system prevents complete wheel
lock-up, some wheel slip is desired in order to
achieve optimum vehicle braking performance. During brake fluid pressure modulation, as the
brake fluid pressure is increased, wheel slip is al-
lowed to reach up to 30%. This means that wheel
rolling speed is 30% less than that of a free rolling
wheel at a given vehicle speed. This slip may result
in some tire chirping, depending on the road surface.
This sound should not be interpreted as total wheel
lock-up. Complete wheel lock up normally leaves black tire
marks on dry pavement. The Antilock Brake System
will not leave dark black tire marks since the wheel
never reaches a locked condition. Tire marks may
however be noticeable as light patched marks.
VEHICLE PERFORMANCE
Antilock Brakes provide the driver with some
steering control during hard braking, however there
are conditions where the system does not provide any
benefit. In particular, hydroplaning is still possible
when the tires ride on a film of water. This results in
the vehicles tires leaving the road surface rendering
the vehicle virtually uncontrollable. In addition, ex-
treme steering maneuvers at high speed or high
speed cornering beyond the limits of tire adhesion to
the road surface may cause vehicle skidding, inde-
pendent of vehicle braking. For this reason, the ABS
system is termed Antilock instead of Anti-Skid.
SYSTEM SELF-DIAGNOSTICS
The Bendix Antilock 4 Brake System has been de-
signed with the following self diagnostic capabilities. The self diagnostic ABS startup cycle begins when
the ignition switch is turned to the on position. At
this time an electrical check is completed on the ABS
components such as Wheel Speed Sensor Continuity
and System and other Relay continuity. During this
check the Amber Antilock Light is on for approxi-
mately 1-2 seconds. Further Antilock Brake System functional testing
is accomplished once the vehicle is set in motion,
known as drive-off. (1) The solenoid valves and the pump/motor are ac-
tivated briefly to verify function.
Fig. 5 Controller Antilock Brake CAB
Ä ANTILOCK 4 BRAKE SYSTEM 5 - 15
Page 304 of 2438

WHEEL SPEED SENSORS
One Wheel Speed Sensor (WSS), is located at each
wheel (Fig. 5 and 6), and sends a small AC signal to the
control module CAB. This signal is generated by mag-
netic induction. The magnetic induction is created,
when a toothed sensor ring (Tone Wheel) (Fig. 7) passes
a stationary magnetic Wheel Speed Sensor. The CAB
converts the AC signal generated at each wheel into a
digital signal. If a wheel locking tendency is detected,
the CAB will then modulate hydraulic pressure to pre-
vent the wheel or wheels from locking.
The front Wheel Speed Sensor is attached to a boss
in the steering knuckle (Fig. 5). The tone wheel is
part of the outboard constant velocity joint (Fig. 5). The rear Wheel Speed Sensor is mounted to the cal-
iper adapter (Fig. 6) and the rear tone wheel is an
integral part of the rear wheel hub (Fig. 7). The
speed sensor air gap is NOT adjustable.
The four Wheel Speed Sensors are serviced individ-
ually. The front Tone Wheels are serviced as an as-
sembly with the outboard constant velocity joint. The
rear Tone Wheels are serviced as an assembly with
the rear brake hub. Correct Antilock system operation is dependent on
the vehicle's wheel speed signals, that are generated
by the Wheel Speed Sensors. The vehicle's wheels
and tires must all be the same size and type to gen-
erate accurate signals. In addition, the tires must be
inflated to the recommended pressures for optimum
system operation. Variations in wheel and tire size
or significant variations in inflation pressure can
produce inaccurate wheel speed signals.
CONTROLLER ANTILOCK BRAKE CAB
The Antilock Brake Controller is a small micropro-
cessor based device which monitors the brake system
and controls the system while it functions in the An-
tilock mode. The CAB is mounted on the top of the
right front frame rail and uses a 60-way system con-
nector (Fig. 8). The power source for the CAB is
through the ignition switch in the Run or On posi-
tion. THE CONTROLLER ANTILOCK BRAKE
CAB IS NOT ON THE CCD BUS The primary functions of the CAB are:
(1) Detect wheel locking tendencies.
(2) Control fluid modulation to the brakes while in
Antilock mode. (3) Monitor the system for proper operation.
Fig. 5 Front Wheel Speed Sensor
Fig. 6 Rear Wheel Speed Sensor
Fig. 7 Rear Tone Wheel (Typical)
5 - 18 ANTILOCK 4 BRAKE SYSTEM Ä
Page 1928 of 2438
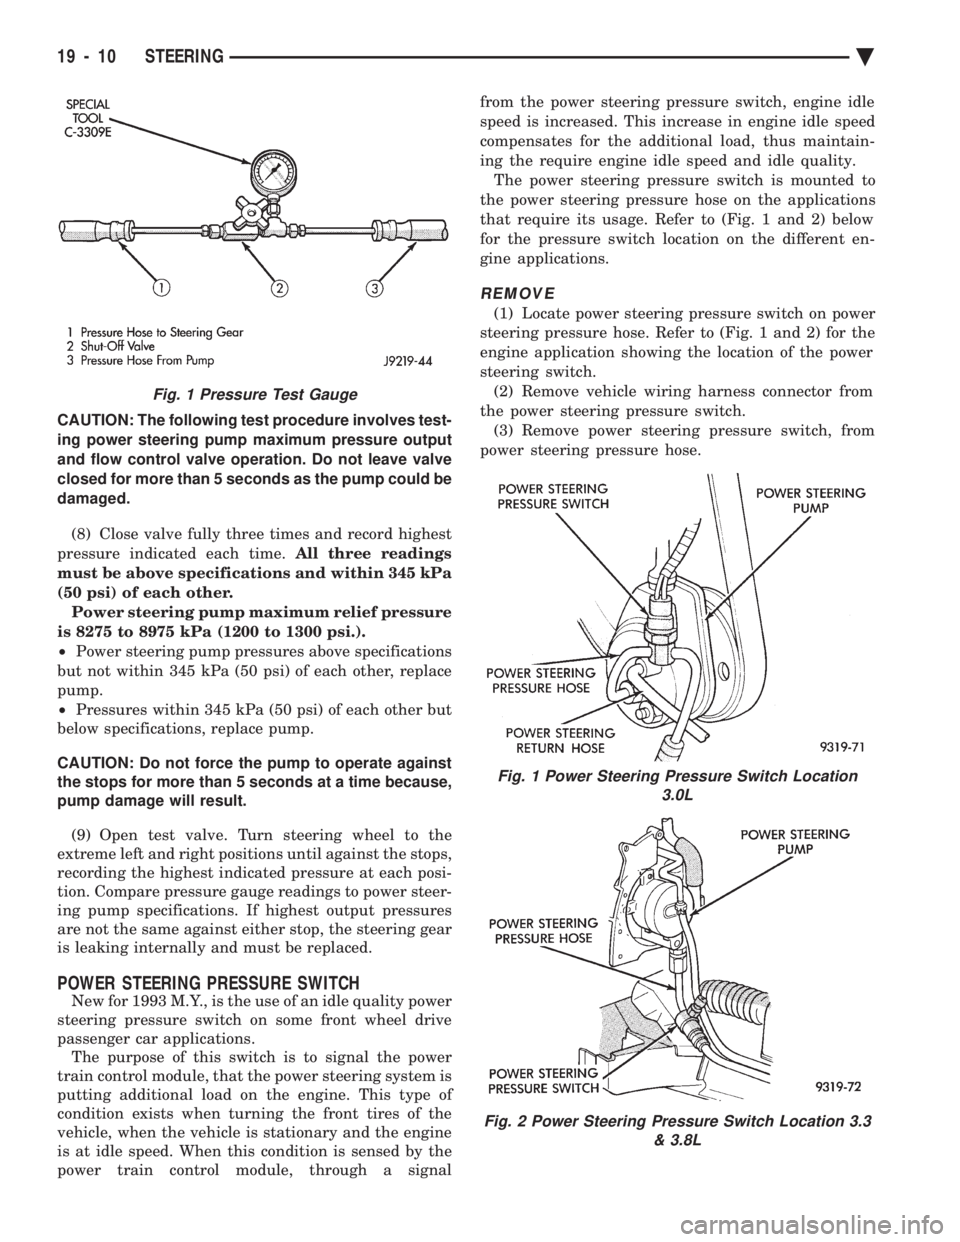
CAUTION: The following test procedure involves test-
ing power steering pump maximum pressure output
and flow control valve operation. Do not leave valve
closed for more than 5 seconds as the pump could be
damaged.
(8) Close valve fully three times and record highest
pressure indicated each time. All three readings
must be above specifications and within 345 kPa
(50 psi) of each other. Power steering pump maximum relief pressure
is 8275 to 8975 kPa (1200 to 1300 psi.).
² Power steering pump pressures above specifications
but not within 345 kPa (50 psi) of each other, replace
pump.
² Pressures within 345 kPa (50 psi) of each other but
below specifications, replace pump.
CAUTION: Do not force the pump to operate against
the stops for more than 5 seconds at a time because,
pump damage will result.
(9) Open test valve. Turn steering wheel to the
extreme left and right positions until against the stops,
recording the highest indicated pressure at each posi-
tion. Compare pressure gauge readings to power steer-
ing pump specifications. If highest output pressures
are not the same against either stop, the steering gear
is leaking internally and must be replaced.
POWER STEERING PRESSURE SWITCH
New for 1993 M.Y., is the use of an idle quality power
steering pressure switch on some front wheel drive
passenger car applications. The purpose of this switch is to signal the power
train control module, that the power steering system is
putting additional load on the engine. This type of
condition exists when turning the front tires of the
vehicle, when the vehicle is stationary and the engine
is at idle speed. When this condition is sensed by the
power train control module, through a signal from the power steering pressure switch, engine idle
speed is increased. This increase in engine idle speed
compensates for the additional load, thus maintain-
ing the require engine idle speed and idle quality.
The power steering pressure switch is mounted to
the power steering pressure hose on the applications
that require its usage. Refer to (Fig. 1 and 2) below
for the pressure switch location on the different en-
gine applications.
REMOVE
(1) Locate power steering pressure switch on power
steering pressure hose. Refer to (Fig. 1 and 2) for the
engine application showing the location of the power
steering switch. (2) Remove vehicle wiring harness connector from
the power steering pressure switch. (3) Remove power steering pressure switch, from
power steering pressure hose.
Fig. 1 Power Steering Pressure Switch Location 3.0L
Fig. 2 Power Steering Pressure Switch Location 3.3 & 3.8L
Fig. 1 Pressure Test Gauge
19 - 10 STEERING Ä
Page 2149 of 2438
WHEELSÐTIRES
CONTENTS
page page
SPECIFICATIONS ........................ 8
TIRE SERVICE PROCEDURES .............. 1 WHEELS SERVICE PROCEDURES
........... 6
TIRE SERVICE PROCEDURES INDEX
page page
Cleaning of Tires .......................... 1
General Information ........................ 1
Pressure Gauges ......................... 2
Radial-Ply Tires ........................... 1
Repairing Leaks .......................... 3
Rotation ................................ 3 Spare TireÐCompact
...................... 1
Tire Inflation Pressures ..................... 2
Tire Noise or Vibration ..................... 3
Tire Wear Patterns ........................ 3
Tread Wear Indicators ...................... 3
GENERAL INFORMATION
Throughout this group, references may be made to a
particular vehicle by letter or number designation. A
chart showing the breakdown of these designations is
included in the Introduction Section. Tires are designed for the vehicle and provide the
best overall performance for normal operation. The
ride and handling characteristics match the vehicle's
requirements. With proper care they will give excellent
reliability traction, skid resistance and tread life. They
have load carrying capacity, when properly inflated, to
operate at loads up to the specified Maximum Vehicle
Capacity. Driving habits have more effect on tire life than any
other factor. Careful drivers will obtain, in most cases,
much greater mileage than severe or careless drivers. A
few of the driving habits which will shorten the life of
any tire are:
² Rapid acceleration and deceleration
² Severe application of brakes
² High-speed driving
² Taking turns at excessive speeds
² Striking curbs and other obstacles
Radial ply tires can be more susceptible to irregular
tread wear. It is very important to follow the tire
rotation interval shown in the section on Tire
Rotation to achieve a greater tread life potential.
RADIAL-PLY TIRES
Radial-ply tires improve handling, tread life, and
ride quality and decrease rolling resistance. Radial-ply tires must always be used in sets of four
and under no circumstances should they be used on
the front only. However, they may be mixed with temporary spare tires when necessary,
but reduced speeds are recommended. Radial-ply tires have the same load carrying capac-
ity as other types of tires of the same size. They also
use the same recommended inflation pressures.
SPARE TIREÐCOMPACT
The compact spare tire is designed for emergency
use only. The original tire should be repaired and re-
installed at the first opportunity. Refer to Owner's
Manual for complete details.
TIRE CHAINS
Tire snow chains may be used on certainmodels.
Refer to Owner's Manual for more information.
CLEANING OF TIRES
Remove protective coating on tires before delivery
of vehicle, otherwise it could cause deterioration of
tires. Remove protective coating by applying warm wa-
ter, letting it soak one minute, and then scrubbing
the coating away with a soft bristle brush. Steam cleaning may also be used for cleaning.
DO NOT use gasoline or wire brush for cleaning.
DO NOT use mineral oil or an oil-based solvent.
Ä WHEELSÐTIRES 22 - 1