Page 191 of 308
Downloaded from www.Manualslib.com manuals search engine Ll X5076
Rust or dirt on the wheel, or
on the parts to which it is
fastened, can make the wheel nuts
become loose after a time. The wheel
could come off and cause an
accident. When
you change a
wheel, remove any rust
or dirt from
the places where the wheel attaches
to the vehicle. In an emergency,
you can use a cloth
or a paper towel
to do this; but be sure to use a scraper
or wire brush later, if you need to,
to get all the rust or dirt off.
1 1. Remove any rust or dirt from the
wheel bolts, mounting surfaces or
spare wheel.
mounting surface.
1 2. Place the spare on the wheel
~ CAUTION
13. Replace the wheel nuts with the
rounded end of the nuts toward the
wheel. Tighten each nut by hand
until
the wheel is held against the
hub.
A
Never use oil or grease on
studs or nuts. If
you do, the
nuts might come loose. Your wheel
could fall off, causing a serious
accident.
I89
Page 195 of 308

Downloaded from www.Manualslib.com manuals search engine If you let your tires spin at
- high speed, they can explode
and you or others could be injured.
And, the transaxle or other parts of
the vehicle can overheat. That could
cause an engine compartment fire
or other damage. When you’re
stuck, spin
the wheels as little as
possible. Don’t spin the wheels
above
35 mph (56 h/h) as shown
on
the speedometer. Spinning
your wheels can destroy
parts
of your vehicle as well as the
tires.
If you spin the wheels too
fast while shifting your transa:
back and forth, you can destroy
your transaxle.
-
Rocking Your Vehicle to Get it Out:
First, turn your steering wheel left and
right. That will clear the area around
your front wheels. Then shift back and
forth between
R (Reverse) and a
forward gear, or with a manual
transaxle, between
1 (First) or 2 (Second)
gear and
R (Reverse), spinning the
wheels as little as possible. Release
the
accelerator pedal while you shift, and
press lightly on the accelerator pedal
when the transaxle is in gear. If that
doesn’t get you out after a few tries,
you
may need to be towed out.
If
you do need to be towed out, see the
Index under Towing Your Chevrolet.
I93
Page 207 of 308
Downloaded from www.Manualslib.com manuals search engine Engine Oil
It’s a good idea to check your engine oil
level every time
you get fuel. In order to
get an accurate reading, the
oil must be
warm and the vehicle must be on level
ground.
Turn off the engine and give the oil a
few minutes to drain back into the oil
pan. If you don’t, the oil dipstick might
not show
the actual level.
To Check Engine Oil:
Pull out the dipstick and clean it with a
paper towel or cloth, then push
it back
in all the way. Remove
it again, keeping
the tip lower.
2.2L L4: Checking Engine Oil
3.1L V6: Checking Engine Oil
205 I..
Page 214 of 308
Downloaded from www.Manualslib.com manuals search engine Service & Appearance Care
Automatic Transaxle Fluid (CONT.)
To Check the Fluid Level:
Park your vehicle on a level place.
Place the shift lever in P (Park) with
With your foot on the brake pedal,
the
parking brake applied.
move the shift lever through each gear
range, pausing for about three seconds
in each range. Then, position the shift
lever in
P (Park).
Then, Without Shutting Off the
Engine,
Follow These Steps:
1. Pull out the dipstick and wipe it with
a clean rag or paper towel.
2. Push it back in all the way, wait three
seconds and then pull it back out
again.
3. Check both sides of the dipstick, and
read the lower level. The fluid level
must be in the cross-hatched area.
4. If the fluid level is where it should
be, push the dipstick back in all the
way.
2.2L L4: Checking Automatic
Transaxle Fluid
3.1L V6: Checking Automatic
Transaxle Fluid
Page 216 of 308
Downloaded from www.Manualslib.com manuals search engine Service & Appearance Care
Manual Transax/e Fluid (CONT.)
How to Check: Because this operation
can be a little difficult, you may choose
to have this done at a Chevrolet
dealership Service Department.
If you do it yourself, be sure to follow
all the instructions here, or you could
get a false reading on the dipstick.
Too much or too little fluid can
damage your transaxle.
Too much
can mean that some
of the fluid
could come out and fall on hot
engine parts, starting a fire. Be
sure to get an accurate reading if
you check your transaxle fluid. The manual transaxle dipstick is located
on the driver’s side near the
rear
of the
transaxle case.
Check the fluid level only
when your
engine is off, the vehicle is parked on a
level place and the transaxle is cool
enough for you to rest your fingers
on
the transaxle case.
Then, Follow These Steps:
1. Pull out the dipstick and clean it with
a rag or paper towel.
Page 233 of 308

Downloaded from www.Manualslib.com manuals search engine Tire hspection and Rotation I
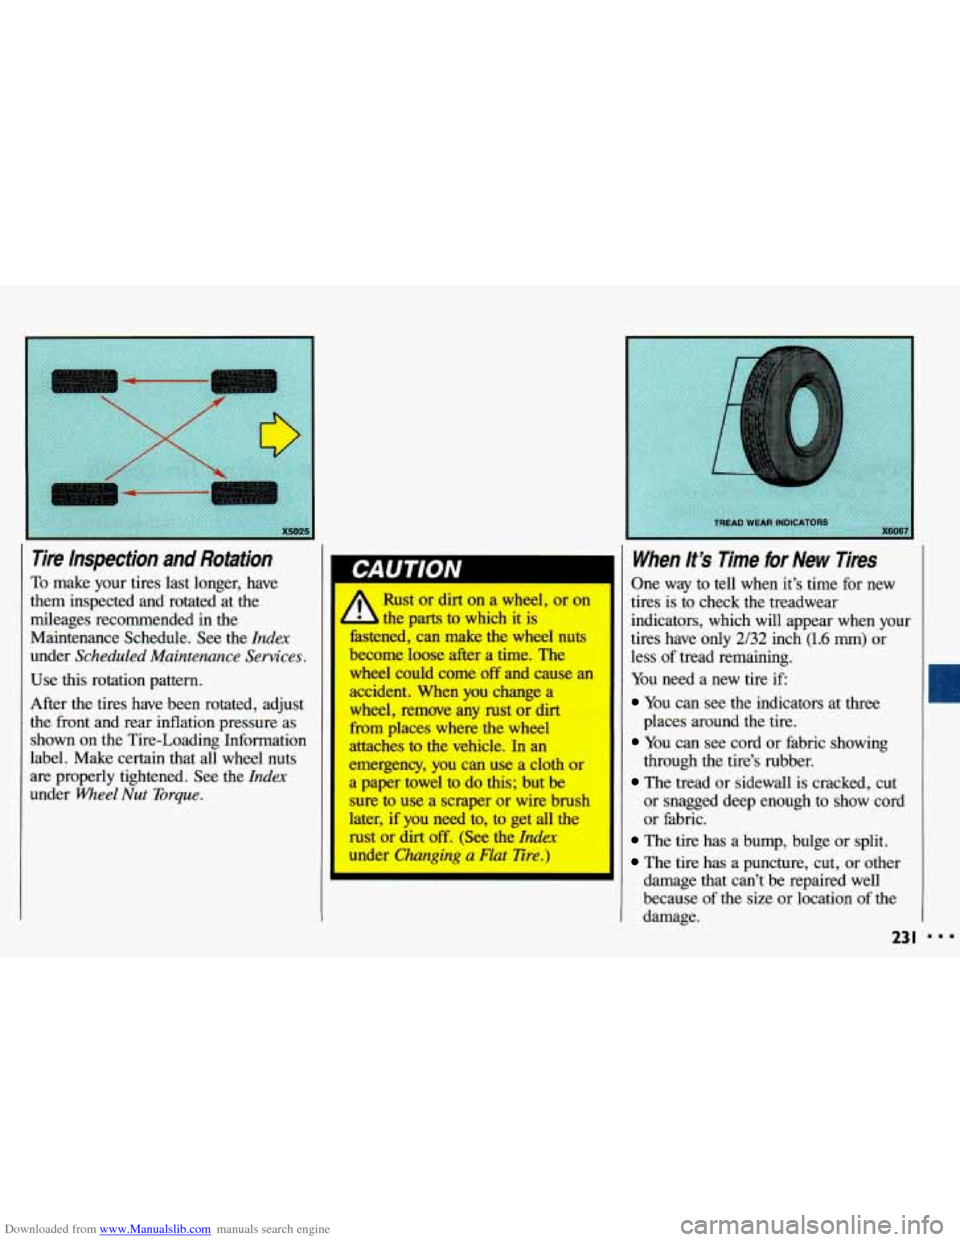
Use this rotation pattern.
After the tires have been rotated, adjust
the front and rear inflation pressure as
shown on the Tire-Loading Information
label. Make certain that all wheel nuts
are properly tightened. See the Index
under Wheel Nut Torque.
To make your tires last longer, have
them inspected and rotated at the
mileages recommended in the
Maintenance Schedule. See the
Index
under Scheduled Maintenance Services.
u I I’ -
Rust or dirt on a wheel, or on
; parts to which it is
fastened, can make the wheel nuts
become loose after a time. The
wheel could come off and cause an
accident. When you change a
wheel, remove any rust or dirt
from
places where the wheel
attaches to the vehicle. In an
emergency, you can use a cloth or
a paper towel to do this; but be
sure to use a scraper or wire brush
later, if you need to, to get all the
rust or dirt
off. (See the Index
under Changing a Flat Tire.)
When lt’s Time for New Tires
One way to tell when it’s time for new
tires
is to check the treadwear
indicators, which will appear when your
tires have
only 2/32 inch (1.6 mm) or
less of tread remaining.
You need a new tire if
You can see the indicators at three
You can see cord or fabric showing
The tread or sidewall is cracked, cut
places around the tire.
through the tire’s rubber.
or
snagged deep enough to show cord
or fabric.
The tire has a bump, bulge or split.
The tire has a puncture, cut, or other
damage that can’t be repaired well
because
of the size or location of the
damage.
23 I
Page 240 of 308

Downloaded from www.Manualslib.com manuals search engine Service & Appearance Care
Using &am-Type Cleaner on
Fabric
Vacuum and brush the area to remove
any loose dirt.
Always clean a whole trim panel or
section. Mask surrounding trim along
stitch or welt lines.
Mix Multi-Purpose Powdered Cleaner
following the directions on the
container label.
Use suds only and apply with a clean
Don’t saturate the material.
Don’t rub it roughly.
As soon as you’ve cleaned the section,
sponge.
use a sponge to remove the suds.
Rinse the section with a clean, wet
sponge.
Wipe off what’s left with a slightly
damp paper towel or cloth.
Then dry it immediately with an air
hose,
a hair dryer or a heat lamp.
I
Be careful with a hair dryer or heat
lamp. You
could scorch the fabric. I
Wipe with a clean cloth.
Using Solvent-Type Cleaner on
Fabric
First, see if you have to use solvent-type
cleaner at all. Some spots and stains will
clean
off better with just water and mild
soap.
If you need to use it, then:
Gently scrape excess soil from the
trim material with a clean, dull knife
or scraper. Use very little cleaner,
light pressure and clean cloths (preferably cheesecloth). Cleaning
should start at the outside of the stain,
“feathering” toward the center. Keep
changing to a clean section
of the
cloth.
When you clean a stain from fabric,
immediately dry the area with an air
hose, hair dryer, or heat lamp to help
prevent a cleaning ring. (See the
previous
NOTICE.)
Page 244 of 308

Downloaded from www.Manualslib.com manuals search engine ...
Service & Appearance Care
Cleaning the Outside of Your
Chevrolet (CONT)
Washing Your Vehicle
The best way to preserve your vehicle’s
finish is to keep it clean by washing it
often with lukewarm or cold water.
Don’t wash your vehicle in the direct
rays of the sun. Don’t use strong soaps
or chemical detergents. Use liquid hand,
dish
or car washing (non-detergent)
soaps. Don’t use cleaning agents that
contain acid or abrasives. All cleaning
agents should be flushed promptly and not allowed to dry on the surface, or
they could stain.
Dry the finish with a
soft, clean chamois or a 100% cotton
towel to avoid surface scratches and water spotting.
High pressure vehicle washes may cause
water
to enter your vehicle.
242
Textured-Surface Bumper Covers
(VL and RS MODELS)
Cleaning with a brush, a soft terry cloth
or a commercial car wash is
recommended for normal dirt. Never
use a wire brush or abrasives.
Avoid applying wax
or polish to the
textured-surface bumper covers. To
remove wax, a commercially available
wax solvent should be used. Tar and Oil
Remover (GM Part
No. 1050172) is also
recommended. It’s also recommended
for cleaning difficult soils like road tar
and oil. Also recommended are solvent-
type fabric cleaners such as GM Part
No. 1050244.
To clean white bumper covers, first use
Tar and Oil Remover. If the dark areas
are still visible, whiten with White
Sidewall Tire Cleaner, such as GM Part
No. 1050174.
Finish Care of Textured-Surface
Bumper Covers
To touch up any small spots after
regular washing, use a solvent-type
fabric cleaner such as GM Part No.
1050244 and a clean, dry cloth.
To help maintain bumper covers, after
washing use a cleaner/protectant like
GM/Armor AllTM Part No. 1052919.