1993 CHEVROLET CAVALIER set clock
[x] Cancel search: set clockPage 54 of 308
Downloaded from www.Manualslib.com manuals search engine Features & Controls
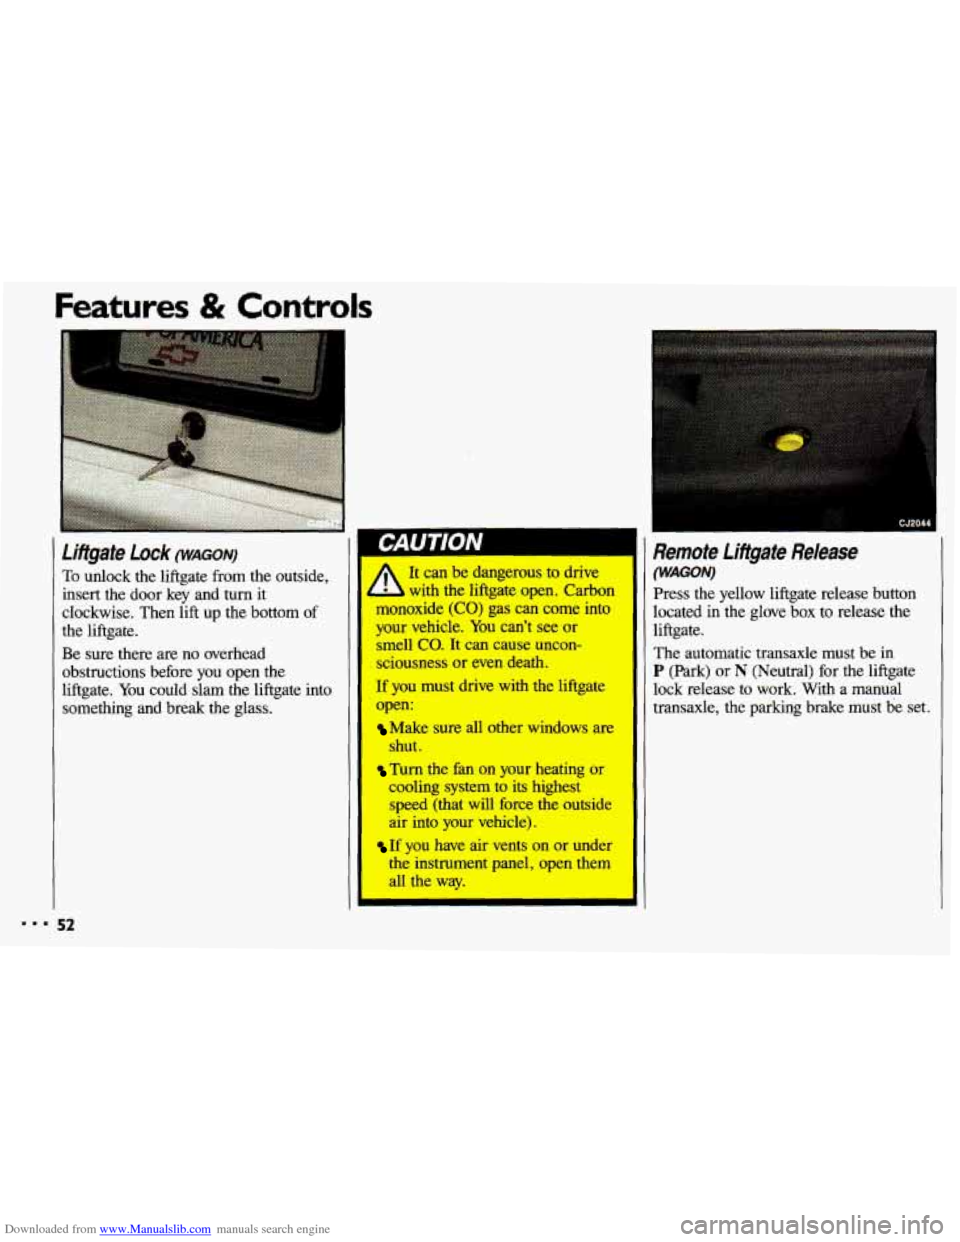
To &dock the liftgate from the outside,
insert the door key and turn it
clockwise. Then
lift up the bottom of
the liftgate.
Be sure there are no overhead
obstructions before you open the
liftgate. You could slam the liftgate into
something and break the glass.
I CJ2044
Remote Lifigate Release
(WAGON) It can be dangerous to drive
L with the liftgate open. Carbon
monoxide
(CO) gas can come into
your vehicle.
You can’t see or I smell co. It can cause uncon-
sciousness or even death.
If you must drive with the liftgate lock release to work. With a manual
open: transaxle, the parking brake must be set.
I
The automatic transaxle must be in
P (Park) or N (Neutral) for the liftgate
Make sure all other windows are
shut.
Turn the fan on your heating or
cooling system to its highest
speed (that will force the outside
air into your vehicle).
If you have air vents on or under
the instrument panel, open them
all the way. Press the
yellow liftgate release button
located in the glove box to release the
liftgate.
Page 107 of 308
Downloaded from www.Manualslib.com manuals search engine Part 3
In this part you’ll find out how to
operate the comfort control systems
and audio systems offered with your
Chevrolet
. Be sure to read about the
particular system supplied with your
vehicle
.
Comfort Controls &
Audio Systems
Climate Control System ............................................ 106
Air Conditioning System ........................................... 107
Rear Window Defogger
............................................ 109
Setting the Clock .................................................. 111
AM/FM Stereo Radio
.............................................. 112
AM/FM Stereo Radio with Cassette Tape Player ......................... 113
AM/FM Stereo
Radio with Compact Disc Player ......................... 116
Understanding Radio Reception
...................................... 121
Care
of Your Cassette Tape Player .................................... 121
Care
of Your Compact Discs ........................................ 122
Fixed Mast Antenna
............................................... 122
I05
Page 113 of 308
Downloaded from www.Manualslib.com manuals search engine I Audio Systems
The following pages describe the audio systems available for your Chevrolet, and
how to get the best performance from them. Please read about the system in your
vehicle.
IOU. equip:
I A Hearing damage from loud noise is almost undetectable until it is too
late. Your hearing can adapt to higher volumes
of sound. Sound that
seems normal can be loud and harmful to your hearing. Take precautions by
I
hearing adapts to it.
To help avoid hearing loss or damage:
1. Adjust the volume control to the lowest setting.
I adjusting the volume control on your radio to a safe sound level before your
[ I 2. Increase volume slowly until you hear comfortably and clearly.
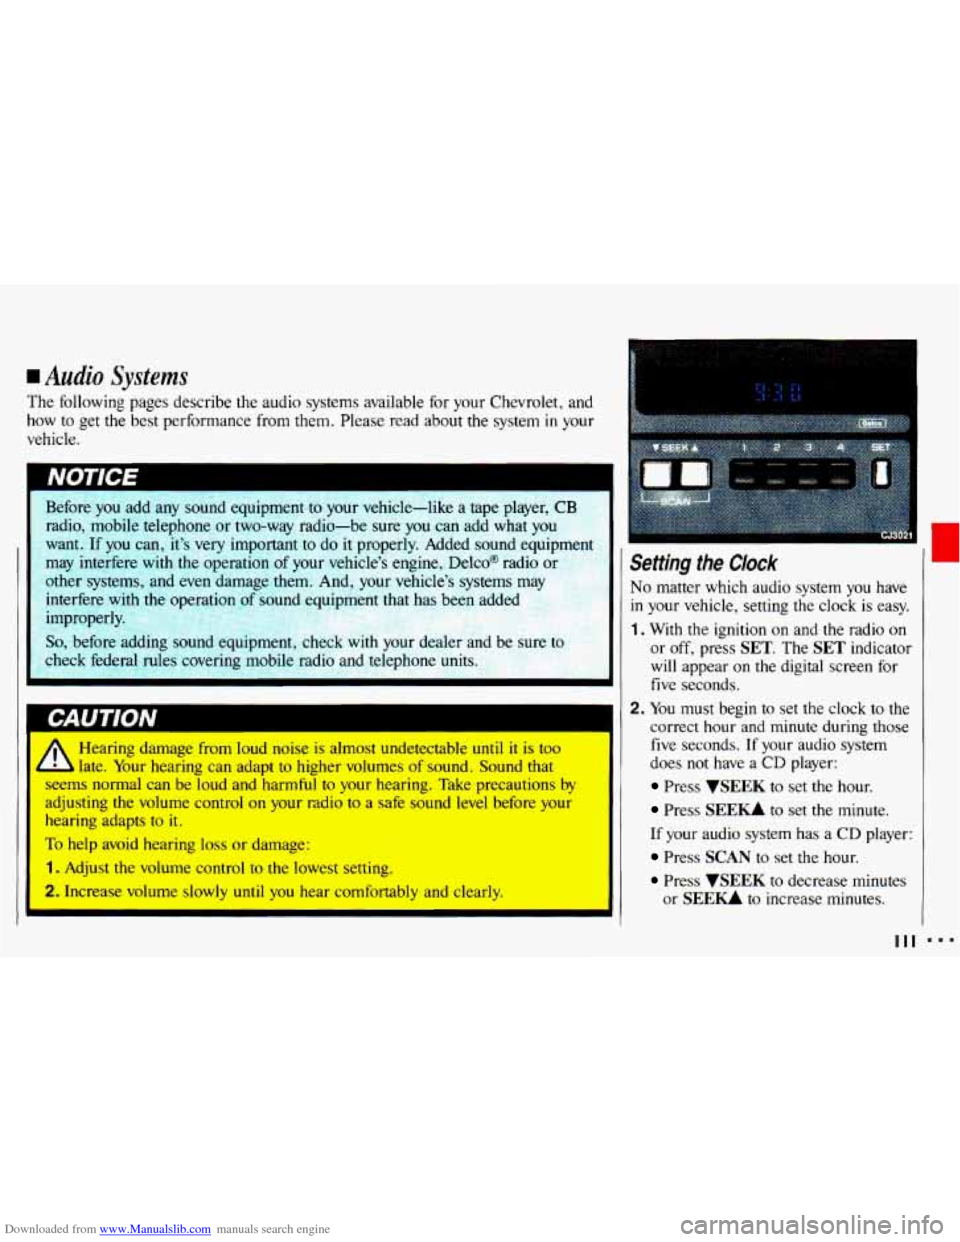
Setting the Clock
No matter which audio system you have
in your vehicle, setting the clock is easy.
1. With the ignition on and the radio on
or off, press SET. The SET indicator
will appear on the digital screen for
five seconds.
2. You must begin to set the clock to the
correct hour and minute during those
five seconds. If your audio system
does
not have a CD player:
Press VSEEK to set the hour.
Press SEE- to set the minute.
If your audio system has a CD player:
Press SCAN to set the hour.
Press WEEK to decrease minutes
or
SEE- to increase minutes.
I
111
Page 115 of 308
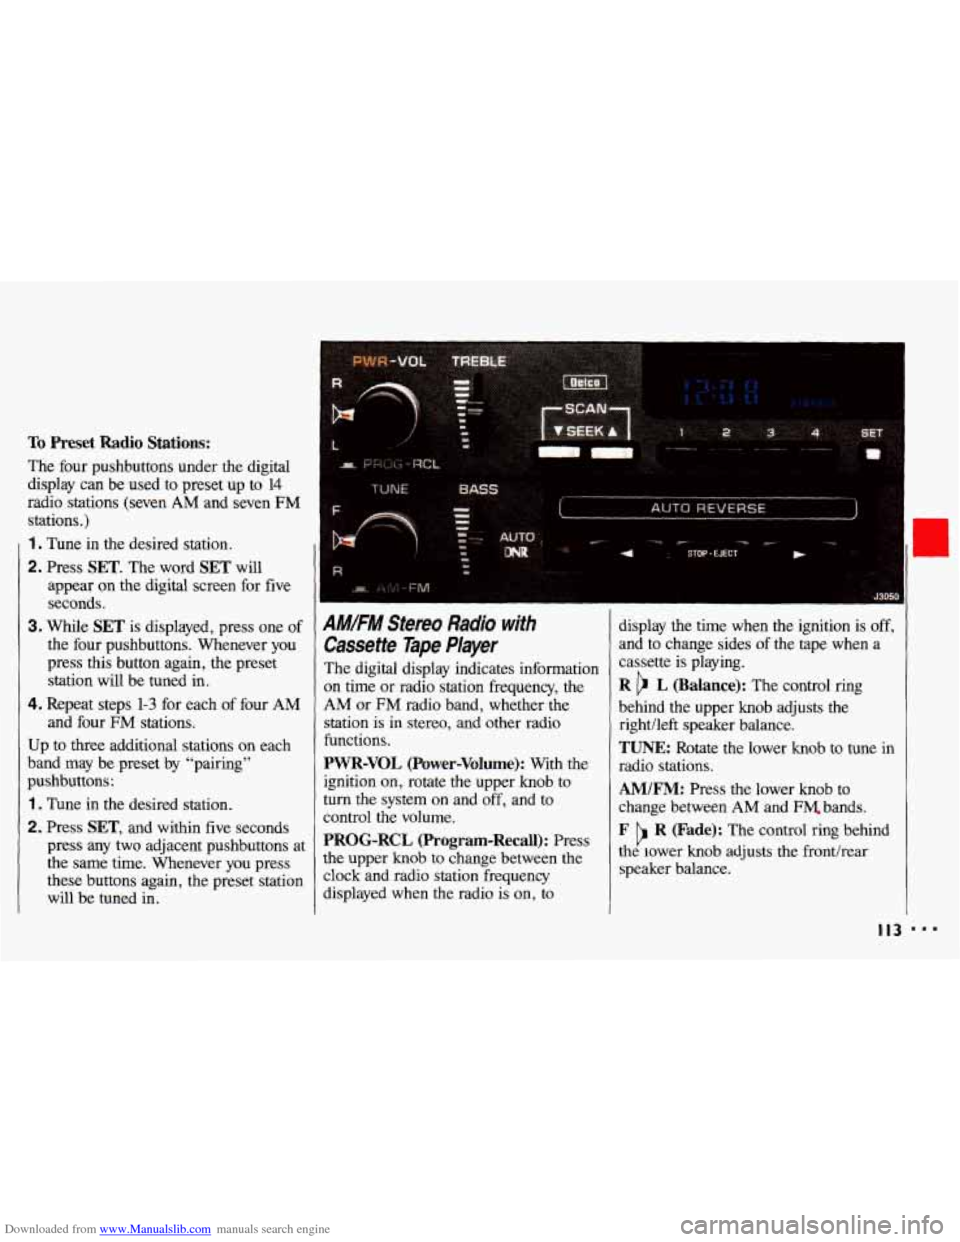
Downloaded from www.Manualslib.com manuals search engine To Preset Radio Stations:
The four pushbuttons under the digital
display can be
used to preset up to 14
radio stations (seven AM and seven FM
stations.)
1 . Tune in the desired station.
2. Press SET. The word SET will
appear on the digital screen for five
seconds,
3. While SET is displayed, press one of
the four pushbuttons. Whenever you
press this button again, the preset
station will be tuned in.
4. Repeat steps 1-3 for each of four AM
and four FM stations.
Up
to three additional stations on each
band may be preset by “pairing”
pushbuttons:
1 . Tune in the desired station.
2. Press SET, and within five seconds
press any
two adjacent pushbuttons at
the same time. Whenever you press
these buttons again, the preset station
will be tuned in.
AMIFM Stereo Radio with
Cassette Tape Player
The digital display indicates information
on time or radio station frequency, the
AM or FM radio band, whether the
station
is in stereo, and other radio
functions.
PWR-VOL (Power-Volume): With the display
the time when the ignition is off,
and
to change sides of the tape when a
cassette
is playing.
R b L (Balance): The control ring
behind the upper knob adjusts the
rightlleft speaker balance.
TUNE: Rotate the lower knob to tune in
radio stations.
ignition on, rotate the upper knob to
turn the system on and off, and to
control the volume.
PROG-RCL (Program-Recall): Press
the upper knob to change between the
clock and radio station freauencv
AM/FM: Press the lower knob to
change between
AM and FM. bands.
F R (Fade): The control ring behind
the lower knob adjusts the fronthear
speaker balance. b
displayed when the radio is’ on, io
I I3 ...
Page 118 of 308
Downloaded from www.Manualslib.com manuals search engine AM/FM Stereo Radio with
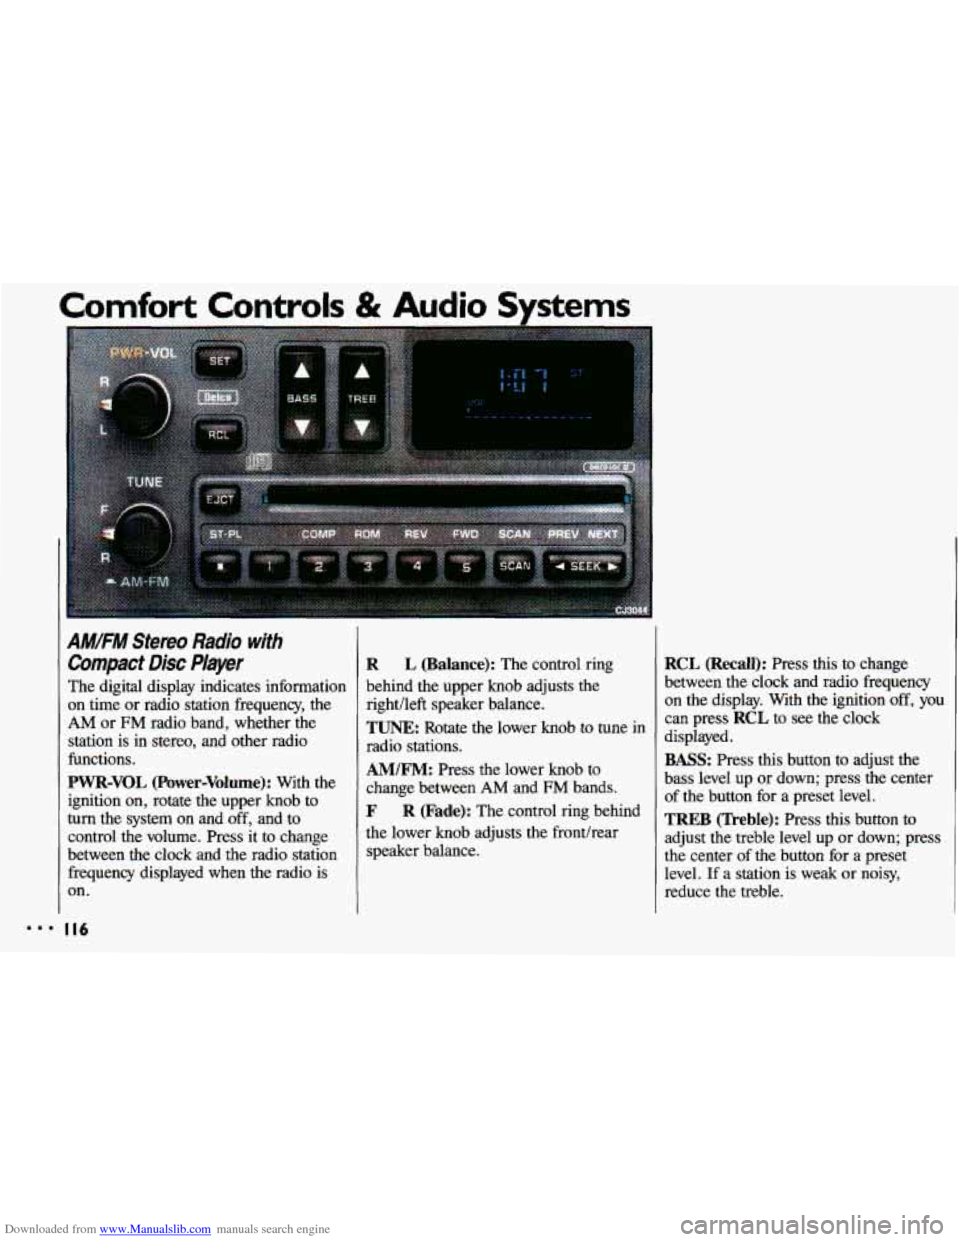
Compact Disc Player
The digital display indicates information
on time or radio station frequency, the
AM or FM radio band, whether the
station is in stereo, and other radio
functions.
PWR-VOL (Power-Volume): With the
ignition on, rotate the upper knob to
turn the system on and off, and to
control the volume. Press it to change
between the clock and the radio station frequency displayed
when the radio is
on.
R L (Balance): The control ring
behind the upper knob adjusts the
right/left speaker balance.
TUNE: Rotate the lower knob to tune in
radio stations.
AM/FM: Press the lower knob to
change between
AM and FM bands.
F R (Fade): The control ring behind
the lower knob adjusts the fronthear
speaker balance.
RCL (Recall): Press this to change
between the clock and radio frequency
on the display. With the ignition
off, you
can press RCL to see the clock
displayed.
BASS: Press this button to adjust the
bass level up or down; press the center
of the button for a preset level.
TREB (Treble): Press this button to
adjust the treble level
up or down; press
the center of the button for a preset
level.
If a station is weak or noisy,
reduce the treble.
Page 297 of 308
Downloaded from www.Manualslib.com manuals search engine Index
Adding Brake Fluid
............ .222. 252
Electrical Equipment
.......... 247
Engine Coolant
...... .217. 250. 252
Engine Oil
......... .206. 250. 252
Hydraulic Clutch Fluid
.... .2l5. 252
Power Steering Fluid
. .220. 251. 252
Transaxle Fluid Autornatic
........ .213. 250. 252
Manual
.......... .2l5. 250. 252
Windshield Washer Fluid
....... 220
Air Cleaner Filter
......... .209. 256
Air Conditioner
................ 107
Alcohol. Driving Under the Influence of
.................. 129
Alcohol in Gasoline
............. 198
Aluminum Wheels
Cleaning
.................... 243
Removing
................... 186
Antenna
...................... 122
Antifreeze
............ .216. 250. 252
Anti-Lock Brake System
......... 134
Warning Light
................ 101
Appearance Care
............... 236
Ashtrays and Lighter
............. 87
Audio Systems .................. 111
AM/FM Stereo Radio
.......... 112
AM/FM Stereo Radio with
Cassette Player
.............. 113
AM/FM Stereo Radio with Compact
Disc Player
................. 116
Care
of Audio Systems ......... 121
Radio Reception. Understanding
. . 121
Setting the Clock
.............. 111
Automatic Door Locks
........... 50
Automatic Lap-Shoulder Belt
(see
Safety Belts)
Automatic Transaxle
Adding Fluid
........ .213, 250, 252
Brake-Transaxle Shift Interlock
... 61
Checking Fluid
............... 211
Shifting
...................... 60
Starting the Engine ............. 56
Battery ...................... 223
Jump Starting
................ 164
Battery Warning
........... .167. 223
Battery Warning Light
........... 100 Blizzard. Caught
In a
............ 159
Block Heater. Engine
........ .59. 208
Blowout. Tire
.................. 184
Brake Adjustment
.................. 137
Fluid
.................. .221. 252
Master Cylinder
.............. 221
Parking
...................... 66
Pedal Travel
................. 136
Rear
....................... -136
Warning Light ................ 100
Wear Indicators-Front Brakes ... 135
Brake System Warning Light
...... 100
Brake-Transaxle Shift
Interlock
..................... 61
Brakes. Anti-Lock
.............. 134
Braking
....................... 132
Braking In Emergencies
.......... 137
Braking Technique
.............. 132
Break-In. New Vehicle
Normal Driving ............... 54
Buckling Up (see
Safety Belts)
Bulb Replacement
Headlight
.............. .224. 253
Taillight
............... .225. 253
295
Page 298 of 308
Downloaded from www.Manualslib.com manuals search engine Capacities & Specifications ...... 250
Carbon Monoxide in
Cassette Tape Player
Center Console Ashtray
........... 87
Center Passenger Position
......... 32
Chains. Tire
.............. .192. 236
Exhaust
.............. .70.
71. 159
(see
Audio Systems)
Changing a Flat Tire ............ 184
Charging System Warning Light
... -100
“Check Engine” Light
........... 102
“Check Gages” Light
............ 103
Checking Brake Fluid
.................. 221
Engine
Oil Level ............. 205
Hydraulic Clutch
.............. 215
Safety Belt Systems
............ 45
Transaxle Fluid
Automatic
................. 211
Manual
................... 213
Chemical Paint Spotting
......... 245
Child Restraints
................. 35
Children and Safety Belts
..... .33. 43
196
Engine Coolant ............... 217
Power Steering Fluid
........... 219
Checking Things Under the
Hood ... 201 Cigarette Lighter
................ 87
Circuit Breakers
8z Fuses ........ 247
Cleaner. Air
............. .209. 256
Cleaning Aluminum Wheels
............ 243
Antenna
.................... 122
Bumpers
.................... 242
Cassette Player
............... 121
Compact Discs
............... 122
Fabric
...................... 238
Glass
....................... 241
Inside of Your Chevrolet
....... 237
Instrument Panel
............. 240
Leather and Vinyl
............ 240
Outside
of Your Chevrolet ...... 241
Safety Belts
................. 240
ScotchgardTMFabric Protection
. . 239
Special Problems
............. 239
Textured-Surhce Bumper Coven
. . 242
Underbody Maintenance
....... 245
Warnings
.. .236. 237. 238. 240. 243
Waxing
..................... 243
Weatherstrips
................ 244
White Sidewall Tires
.......... 243
Windshield
.................. 241
City
Driving
.................. 149 Clock.
Setting the
............... 111
Clutch. Hydraulic
Adding Fluid
........... .215. 252
Checking Fluid
.............. -215
Air Conditioning System
....... 107
Climate Control System
........ 106
Ventilation
................... 110
Compact Disc Player
(see
Audio Systems)
Compact Spare Tire ............. 191
Control of a Vehicle
............. 131
Convenience Net
................ 54
Convex Outside Mirror ........... 85
Coolant ....................... 216
Checking
& Adding .. .217. 250. 252
Low Coolant Warning Light ..... 97
Proper Mixture to Use
......... 216
Safety Warnings About
... .174. 176. 177. 1781 179. 217. 218. 219
Temperature Gage
............. 97
Cruise Control .................. 74
Cup Holder
.................... 87
Curves. Driving on
............. 138
Customer Assistance Information
... 281
Comfort Controls
Page 303 of 308
Downloaded from www.Manualslib.com manuals search engine Rocking Your Vehicle ............ 193
Stuck. If You Are ............. 192
Roof Luggage Carrier ............. 91
Rotation. Tire .................. 231
S afety Belts .................... 17
Adults ....................... 22
Automatic Lap-Shoulder Belt ..... 23
Care ....................... 240
Center Passenger Position ....... 32
Checking .................... 45
Children
................. .33. 43
Child Restraints ............... 35
Child Restraints-How to Install Them
................ 35
Child Restraints. Where to Put
................ 35
Cleaning .................... 240
Driver Position ............... 23
Extender ..................... 44
How to Wear ................. 22
Passenger Belts ................ 27
Pregnancy, Use During .......... 27
Questions & Answers .. .21. 25. 44. 45
Rear Safety Belts .............. 28
Replacement .............. : .. 45
Right Front. Adult Passenger .... 27
Smaller Children
and Babies
................. 34
TopStrap .................... 36
Torn ........................ 45
Twisted ..................... 26
Vehicles First Sold in Canada .... 23
Warning Light ............ .18. 22
Why You Should Wear
Safety Belts
................. 18
Scheduled Maintenance Services
. . 262
Seat Belts (see Safety Belts)
Seat Controls
Safety Defects. Reporting
........ 286
Easy-Entry ................... 15
Manual Front
Seat ............. 12
Manual Reclining Seatback ...... 12
Seat. Split Fold-Down Rear ...... 15
Seats. Split Folding.
Rear Wagon
................. 16
Seatback Latches .............. 14
Service Parts Identification
Label
...................... 246
Service Publications ............ 288
Service Publications Order Form . . 291
Service Station Information ...... 304
Manual 4-Way Adjustable ....... 14
Setting the Clock ............... 111
Setting the Trip Odometer
........ 95
Shift Light ................ .65. 101
Shifting Into P (Park) ............ 67
Shifting Out of P (Park) .......... 69
Shifting the Transaxle
Automatic Transaxle
........... 60
Manual Transaxle ............. 64
Signaling Turns ............ .73, 127
Signs. Road ................... 124
Skidding
...................... 142
Snow or Ice. Driving On ......... 158
Snowstorm. If You’re
Caught in
a .................. 159
Sound Equipment. Adding ........ 111
Sound Systems (see Audio Systems)
Spare Tire. Compact ............ 191
Specifications
& Capacities ...... 250
Speed Control (see Cruise Control)
Speedometer & Odometer ......... 94
Trip Odometer ................ 95
Stains. Removing ............... 239
Starting Your Engine ............. 56
Automatic Transaxle ........... 57
Manual Transaxle ............. 57
is Dead (see Jump Starting)
Starting Your Vehicle if the Battery
30 I