1993 CADILLAC ELDORADO ignition
[x] Cancel search: ignitionPage 171 of 398

Downloaded from www.Manualslib.com manuals search engine FWD (Forward)
Push the FWD button to move forward rapidly to another part of the
tape. The radio will play during fast forward. To stop the tape push the
same button and the tape will start to play again.
REV (Reverse)
Push the REV button to move the tape rapidly backward. To stop the
tape, push the same button lightly or any of the other buttons. The radio
will play during this reve.rse function.
To go from one side of the tape to the other, push in the upper knob on
your radio.
To remove the tape, push EJCT. The tape can be ejected when
the ignition is turned
off.
NEXT
Push the NEXT button up to jump quickly to the next selection. If the
selection is at the end
of the tape, the tapc will reverse directions and
begin playing at
a normal speed.
PREV
Push the PREV button up to quickly go to the beginning of the last
selcction.
If the player has played less than 10 seconds into the current selection:
depressing the PREV button
will cause the player to find the beginning of
the previous selection and resume play from that point. If the player is
more than
10 seconds into the current selection, pressing PREV button
will cause the player to find the beginning of the current selection and
resume play from that point.
If PREV is issued while the first selection on
the tape is being played, the player will return to the beginning of that
side of the tape.
S TIPL (Stop-Play)
Press ST/PL to switch back to the radio without ejecting the tape. Press it
a second time to start playing it again.
157
Page 174 of 398

Downloaded from www.Manualslib.com manuals search engine Comp (Compression)
Pressing COMP makes soft and loud passages more nearly equal in
volume. For example, playing classical or jazz music with very quiet and
very loud passages
in the same tune. The COMP display will light as long
as COMP is on.
Setting The Clock
Turn the ignition on. Then:
To Set the Hour:
0 Press SET, and within 5 seconds,
0 Press and hold SEEK. When the clock gets to the correct hour, let go.
To Set the Minutes:
Press SET, and within 5 seconds,
Press and hold SCAN. When the clock gets to the correct minute, let
Your clock
is set.
go*
Care of Your Cassette Tape Player
A tape player that is not cleaned regularly can cause reduced sound
quality, ruined cassettes, or a damaged mechanism. Cassette tapes should
be stored
in their cases away from contaminants, direct sunlight, and
extreme heat. If they aren’t, they may not operate properly or cause
failure of the tape player.
Your tape player should be cleaned regularly each month or after every
15 hours of use. If you notice a reduction in sound quality, try a known
good cassette to see
if the tape or the tape player is at fault. If this other
cassette has
no improvement in sound quality, clean the tape player.
Clean your tape player with a wiping-action, non-abrasive cleaning
cassette, and follow the directions provided with it.
Cassettes are subject to wear and the sound quality may degrade over
time. Always make sure that the cassette tape is
in good condition before
you have your tape player serviced.
160
Page 175 of 398

Downloaded from www.Manualslib.com manuals search engine Care of Your Compact Discs
Handle discs carefully. Store them in their original cases or other
protective
cases and away from direct sunlight and dust. If the surface of
a disc is soiled, dampen a clean, soft cloth in a mild, neutral detergent
solution and clean it, wiping from the center to the edge.
L
.
Be sure never to touch the signal surface when handling discs. Pick up
discs by grasping the outer edges or the edge of the hole and the outer
edge.
Power Antenna Mast Care
Your power antenna will look its best and work well if it's cleaned from
time to time.
To Clean the Antenna Mast:
1. Turn on the ignition and radio to raise the antenna to full mast
2. Dampen a clean cloth with mineral spirits or equivalent solvent.
3. Wipe cloth over the mast sections, removing any dirt.
4. Wipe dry with clean cloth before retracting.
5. Make the antenna go up and down by turning the radio or ignition on
6. Then repeat if necessary.
extension.
and
off.
161
Page 216 of 398

Downloaded from www.Manualslib.com manuals search engine If you drive regularly in steep country, or if you’re planning to visit there,
here are some tips that can
make your trips safer and more enjoyable.
0 Keep your vehicle in good shape. Check all fluid levels and also the
brakes, tires, cooling system and transaxle. These parts can work hard
on mountain roads.
Know how to go down hills. The most important thing to know is this:
let your engine do some
of the slowing down. Don’t make your brakes
do it all. Shift to a lower gear when you go down a steep or long hill.
That way, you
will slow down without excessive use of your brakes.
<
A CAUTION: .r S<*.
If you don’t shift down, your brakes could get so hot that they ’+--*
wouldn’t work well. You would then have poor braking or even
none going down
a hill. You could crash. Shift down to let your
engine assist your brakes on
a stef downhil’ lope.
- - i. .*$
Coasting downhill in “N” (Neutral) or with the ignition off is
dangerous. Your brakes will have to do all the work of slowing
down. They could get
so hot that they wouldn’t work well. You
could crash. Always have your engine running and your vehicle
in gear when you
go downhill.
0 Know how to go uphill. You may want to shift down to a lower gear.
The lower gears help cool your engine and transaxle, and you can
climb the hill better.
Stay in your own lane when driving on two-lane roads in hills or
mountains. Don’t swing wide or cut across the center
of the road.
Drive at speeds that let you stay
in your own lane. That way, you won’t
be surprised by a vehicle coming toward
you in the same lane.
202
Page 236 of 398

Downloaded from www.Manualslib.com manuals search engine 2. Get the vehicles close enough so the jumper cables can reach, but be
sure the vehicles aren’t touching each other.
If they are, it could cause
a ground connection
you don’t want. You wouldn’t be able to start
your Cadillac, and the bad grounding could damage the electrical
systems.
-
A CAUTION:
You could be injured if the vehicles roll. Set the parking brake
firmly on each vehicle. Put an automatic transaxle in
“P”
‘”ark).
-
3. Turn off the ignition on both vehicles. Turn off all lights that aren’t
needed, and radios. This
will avoid sparks and help save both
batteries. And it could save your radio!
4. Open the hoods and locate the batteries.
A CAUTION:
An electric fan can start up even when the engine is not running
and can injure you. Keep hands, clothing and tools away from
any underhood elc ric fan.
Find the positive
(+) and negative (-) terminals on each battery.
222
Page 243 of 398

Downloaded from www.Manualslib.com manuals search engine r
I
I
r- 1-
i-
i-
1
A CAUTION:
To help avoid injury to you or others:
0
0
0
0
0
0
Never let passengers ride in a vehicle that is being towed.
Never tow faster than safe or posted speeds.
Never tow with damaged parts not fully secured.
Never get under your vehicle after it has been lifted by the
tow truck.
Always use separate safety chains on each side when towing a
vehicle.
Never use
“J” hooks. Use T-hooks instead.
When your vehicle is being towed, have the ignition key off. The steering
wheel should be clamped in
a straight-ahead position, with a clamping
device designed for towing service.
Do not use the vehicle’s steering
column lock for this. The transaxle should be in Neutral and the parking
-
F brake released.
Don’t have your vehicle towed on the front wheels, unless you must.
If
the vehicle must be towed on the front wheels, don’t go more than 55
mph (88 km/h) or farther than 500 miles (804 lun) or your transaxle will
be damaged.
If these limits must be exceeded, then the front wheels have
to. be supported on a dolly.
c
m
IC
229
Page 313 of 398

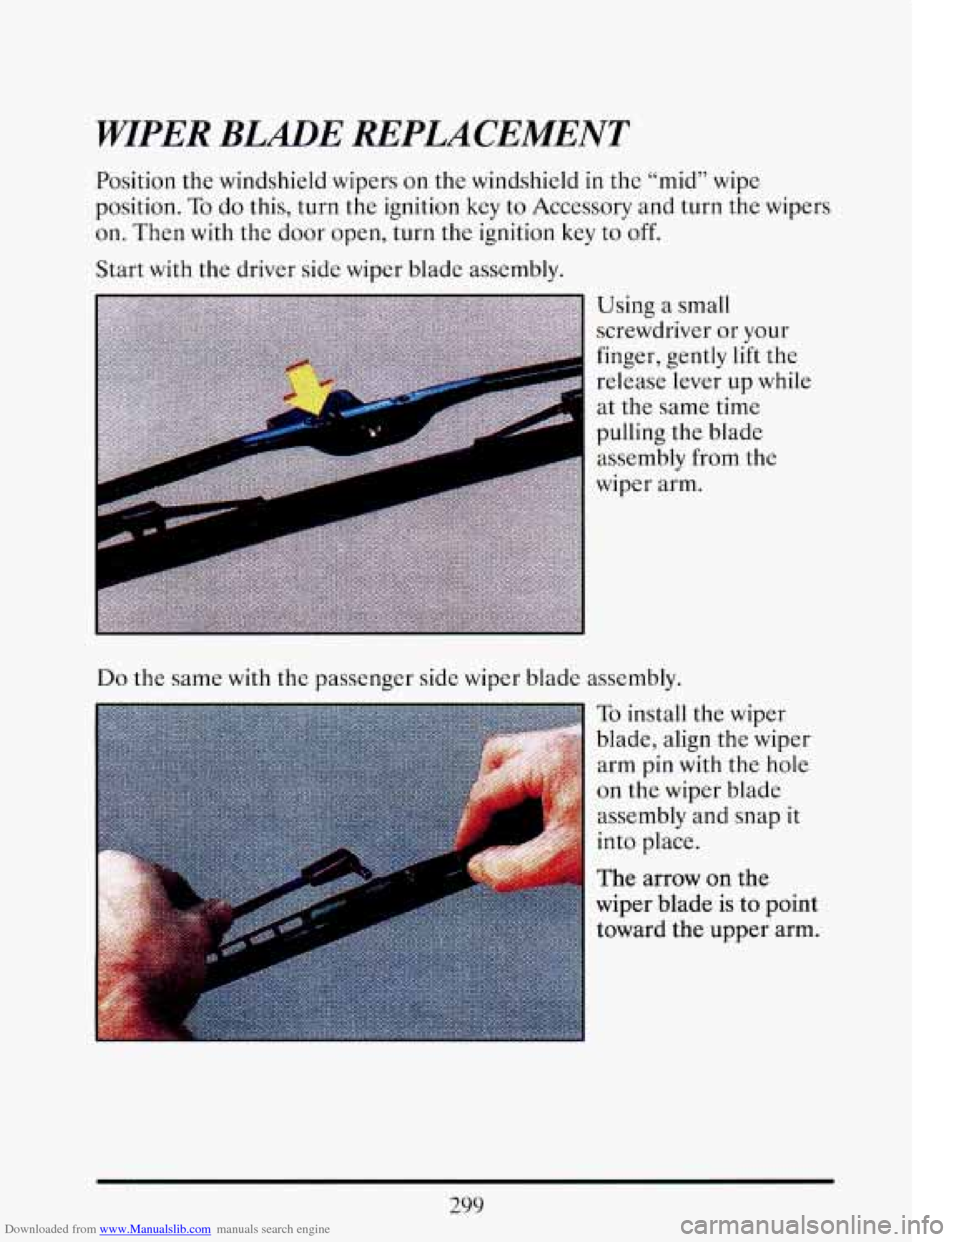
Downloaded from www.Manualslib.com manuals search engine WIPER BLADE REPLACEMENT
Position the windshield wipers on the windshield in the “mid” wipe
position.
To do this, turn the ignition key to Accessory and turn the wipers
on. Then with the door open, turn the ignition
key to off.
Start with the driver side wiper blade assembly.
I
Using a small
screwdriver
or your
finger, gently lift the
release lever up while
at the same time
pulling
the blade
assembly from the
wiper arm.
Do the same with the passenger side wiper blade assembly.
To install the wiper
blade, align the wiper
arm pin with the hole
on the wiper blade
assembly and snap it
into place.
The arrow on the
wiper blade
is to point
toward the upper arm.
299
Page 343 of 398

Downloaded from www.Manualslib.com manuals search engine 1nrVc-I
SENSE
I I
BIII mc 1 m DRL
SUSPENSION RTD (BAT)
L HDLP LO
R HDLP LO L HDLP HI R HDLP HI
-1
COOL FAN TRANS/ECS
FUSE CENTER IDENTIFICATION I
ENGINE COMPARTMENT FUSE BLOCK
COIL 20A - 4.9L DISTRIBUTOR - 4.6L IGNITION CONTROL MODULE SIR 20A - DIAGNOSTIC ENERGY RESERVE MODULE
- ARMING SENSOR
- POWERTRAIN CONTROL MODULE (PCM) (DERM) SIR (AIR BAG)
PCM (IGN) 10A - PASSKeyB DECODER MODULE
INJ 10A
INJ 10A
IGN 10A
- FUEL INJECTORS 1,4,6,7
- FUEL INJECTORS 2,3,5,8
- A/C COMPRESSOR - ELECTROCHROMIC MIRROR - INSTRUMENT PANEL CLUSTER - DIAGNOSTIC ENERGY RESERVE MODULE
- KEYLESS ENTRY MODULE - CORNERING LIGHTS - CHIME MODULE - TWILIGHT SENTINEVDRL MODULE - BACKUP LIGHTS - BRAKE TRANSMISSION SHIFT INTERLOCK (DERM)
SIR (AIR BAG)
FUEL 20A
- FUELPUMP - POWERTRAIN CONTROL MODULE
PCM (BAT) 10A
A/C 1OA
HTD
W/S 10A
STOP LP 20A
TURN/HAZ 20A
- POWERTRAIN CONTROL MODULE (PCM)
- A/C COMPRESSOR
- HEATED WINDSHIELD
- STOP LIGHTS
- HAZARD LIGHTS - TURN SIGNAL LIGHTS DRL
1OA (CANADA)
DRL 1OA (CANADA)
SUSPENSION 10A
- DAYTIME RUNNING LIGHTS
- DAYTIME RUNNING LIGHTS
- ROAD SENSING SUSPENSION
- SPEED SENSITIVE SUSPENSION (4.9L)
- ROAD SENSING SUSPENSION (NORTHSTAR)
RTD (BAT) 20A
L HDLP LO 1 OA (EXPORT)
R HDLP LO 1OA (EXPORT)
L HDLP HI 10A (EXPORT)
R HDLP HI (EXPORT)
IGN
3 10A
- LEFT HEADLAMP LOW BEAM
- RT HEADLAMP LOW BEAM
- LEFT HEADLAMP HIGH BEAM
- RIGHT HEADLAMP HIGH BEAM
- HEATED WINDSHIELD - HEATER AND A/C PROGRAMMER - ELECT. LEVEL CONTROL (ELC) - DEFOGGER RELAY “D”
- CRUISE CONTROL - POWERTRAIN CONTROL MODULE
- COOLING FANS - POWERTRAIN CONTROL MODULE (4.6L) - FRONT AND REAR HEATED OXYGEN
COOLING
FAN 10A
SENSOR (4.6L)
TRANS/ECS
1 OA
SOLENOID - EXHAUST GAS RECIRCULATION (EGR)
- POWERTRAIN CONTROL MODULE (PCM) - AUTOMATIC TRANSAXLE - EVAPORATIVE EMISSION CONTROL
SOLENOID
- OVERSPEED ALERT MODULE (EXPORT) - POWER STEERING PRESSURE SWITCH
329