1992 VOLKSWAGEN TRANSPORTER wheel bolts
[x] Cancel search: wheel boltsPage 115 of 164

Downloaded from www.Manualslib.com manuals search engine
GENERAL
MAINTENANCE
•
Knowing
the
tyre
lettering and its
meaning
makes
the
selection
of the correct
tyres
easier.
Radial
ply tyres
have
the
fol
lowing
lettering on the
sidewall:
e.g.:
195 / 70 R 15 97 S reinforced
195 =
Tyre
width in mm
70 = Height/width ratio in %
R
=
Radial
construction
code
letter
=
Radial
15 =
Wheel
diameter in
inches
97 =
Carrying
capability
code
S
=
Speed
code
letter
rein =
Reinforced
version
The manufacturing date is
also
to be
seen
on the tyre wall
(possibly
only on inner
side
of
wheel):
DOT
... 120 ...
means
that the tyre was
pro
duced
in the 12th
week
of 1990.
Attention
Tyres
which are more than 6 years old should only be used in
an emergency and then
with
a particularly careful style of driv
ing.
If you wish to fit your car
with
non
standard wheels or tyres please note:
Attention
•
For technical reasons it is not normally possible to use wheels
from other vehicles - in certain
circumstances
not even wheels
from the same vehicle model!
•
Wheels and wheel bolts are matched to one another.
On
changing to a different type
of wheel (e.g. alloy wheels or
wheels
with
winter
tyres) the cor rect bolt
with
the proper length
and conical shape must be
used.
The security of the wheels and
the functioning of the brake
sys
tem depend on this!
•
Using types of wheel and or
tyres which have not been ap
proved
by us for your vehicle
model can be detrimental tc thi
safety of the vehicle. It can also
affect the vehicle under the
Con
struction and Use regulations.
•
If wheel
trim
discs
are
subse
quently installed it is essential to
ensure
that
the air flow remains
adequate to cool the brakes.
Volkswagen
dealers
have
a :ne
~e:e;5;~
information
about the
poss
;e :
~
of
wheels,
tyres and
wheel
trims.
www.vwT4camper.info - a useful website for owners and enthusiasts of VW T4 Transporter Campervans
Page 116 of 164

Downloaded from www.Manualslib.com manuals search engine
GENERAL
MAINTENANCE
Winter
tyres
In winter conditions winter tyres will dis
tinctly improve the vehicle's handling. This
applies
in particular to vehicles that are
equipped
with wide tyres.
Because
of their
construction (width, rubber mixture, tread
formation etc.) these tyres provide
less
trac
tion on ice and snow.
When
fitting
winter tyres note the follow
ing:
• Only radial ply winter tyres may be fitted.
The
factory recommended tyre
sizes
are
givenonpagel
46.
• To obtain the best possible handling
characteristics,
winter tyres must be
fitted
on all four wheels. • Winter tyres are no longer fully effective
when the tread has worn down to a depth
of 4 mm.
• All-weather tyres can also be used in
stead
of winter tyres.
• If you have a
flat
tyre the remarks on
using
the spare wheel on page 112 should
be
noted.
• Do not leave winter tyres
fitted
for an un
necessary
long period because when the
roads
are free of snow and ice the handling
with summer tyres is better.
For
environmental
reasons
summer
tyres
should
be
fitted
again
as soon as possible
because
normally
they
are
quieter
in
running,
tyre
wear
is
reduced
and the
fuel
consumption is
lower.
Snow chains
Snow chains may only be
fitted
on
the
front
wheels.
Snow
chains must not be
fitted
on 215/65 F
16
tyres. When
necessary
the vehicle mus:
be
equipped with smaller tyres - see
Wheels,page146.
Only
use thin chains which do not stanc
clear
more than 15 mm (including ten-
sioner).
When
using snow chains wheel
trim
plates
and
trim
rings must be taken off. For safet
reasons
the wheel bolts must then be f ittec
with caps which are available from
Volks
wagen
dealers.
When
driving over roads which are free of
snowyou
must remove the
chains.
On such
roads
they are detrimental to vehicle handl
ing,
damage the tyres and wear out quickly.
In Germany, the maximum permissible
speed
with snow chains is 50 km/h.
114
www.vwT4camper.info - a useful website for owners and enthusiasts of VW T4 Transporter Campervans
Page 122 of 164

Downloaded from www.Manualslib.com manuals search engine
DO-IT-YOURSELF
Changing
wheels
Park
the vehicle as far as possible away
from the
traffic
flow, if necessary switch on emergency warning lights and place the
warning triangle in position - note legal re
quirements.
• All vehicles occupants should leave the vehicle and move to a safe area (e.g. behind
the barrier).
• Apply handbrake firmly. If the car is on a
slope,
block one of the wheels on the oppo
site side
with
a stone or some similar object.
• Take the tools out of the vehicle.
• Take spare wheel out of carrier at rear of vehicle - see previous page.
JB70
- 121J
•
Push
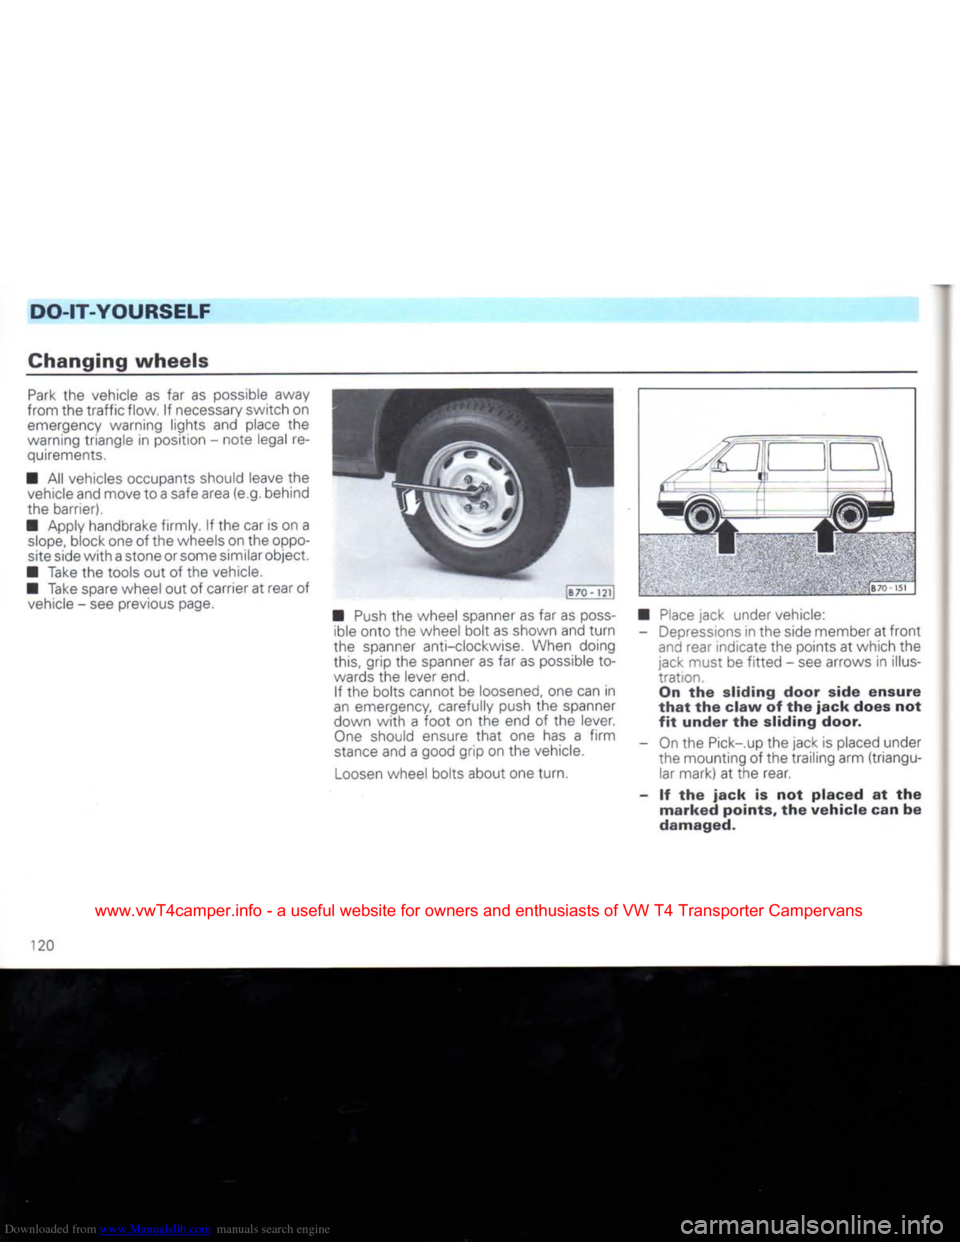
the wheel spanner as far as
poss
ible onto the wheel bolt as shown and
turn
the spanner anti-clockwise. When doing this, grip the spanner as far as possible to
wards the lever end.
If the bolts cannot be loosened, one can in
an emergency, carefully push the spanner
down
with
a
foot
on the end of the lever.
One
should ensure
that
one has a
firm
stance
and a good grip on the vehicle.
Loosen
wheel bolts about one turn. 8"" 1 •>!
•
Place
jack under vehicle: - Depressions in the side member at
front
and rear indicate the points at which the
jack must be
fitted
- see arrows in illus
tration. On the sliding door side
ensure
that
the
claw
of the
jack
does not
fit
under
the sliding door.
- On the Pick-.up the jack is placed under the mounting of the trailing arm (triangular mark) at the rear.
- If the
jack
is not
placed
at the
marked
points, the
vehicle
can be
damaged.
120
www.vwT4camper.info - a useful website for owners and enthusiasts of VW T4 Transporter Campervans
Page 123 of 164

Downloaded from www.Manualslib.com manuals search engine
DO-IT-YOURSELF
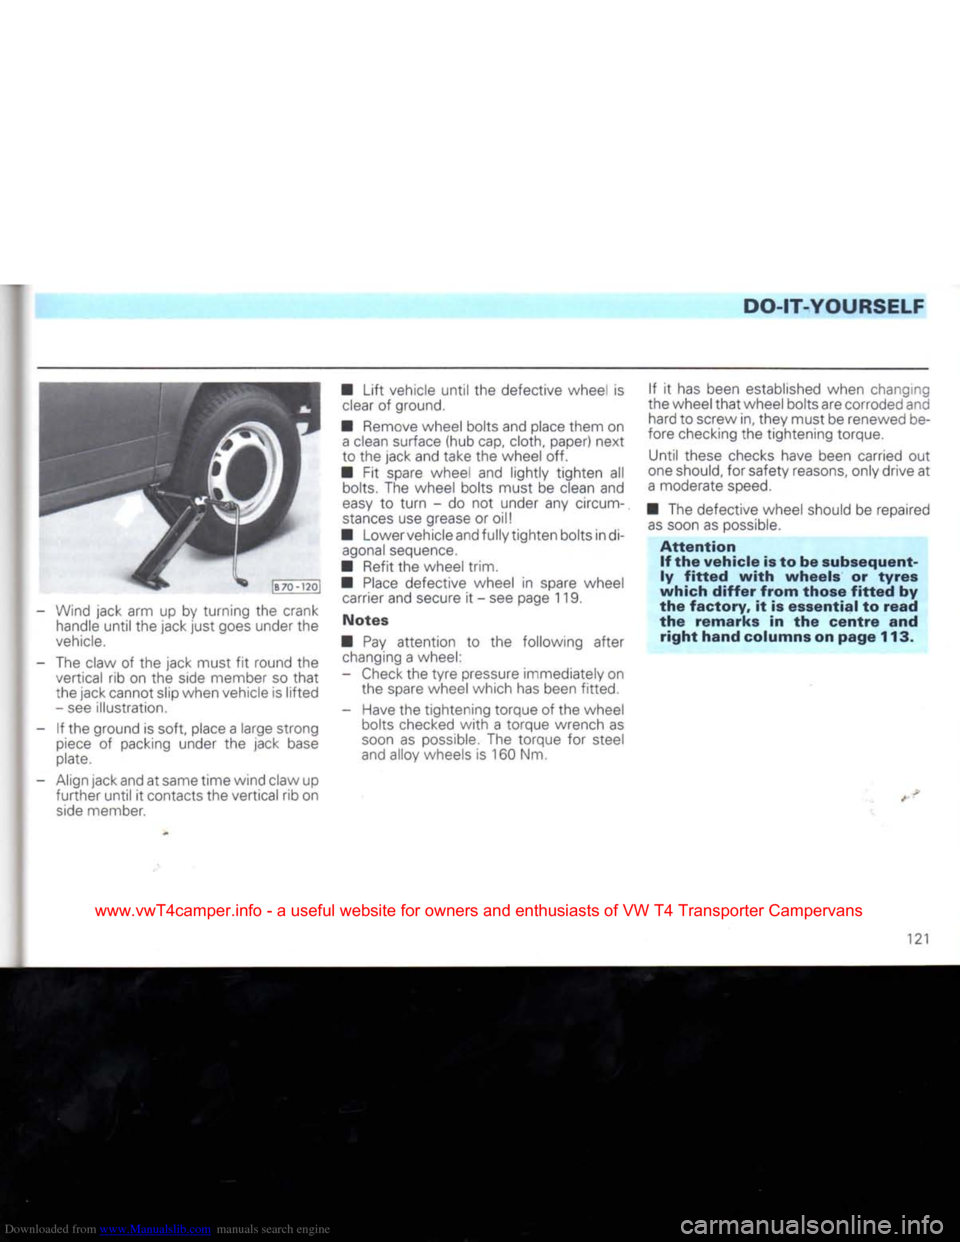
- Wind jack arm up by turning the crank handle
until
the jack
just
goes under the
vehicle.
- The claw of the jack must fit round the vertical rib on the side member so
that
the jack cannot slip when vehicle is
lifted
- see illustration.
- If the ground is soft, place a large strong
piece
of packing under the jack base
plate.
- Align jack and at same time wind claw up
further
until
it contacts the vertical rib on
side
member. •
Lift
vehicle
until
the defective wheel is
clear
of ground.
• Remove wheel bolts and place them on
a
clean surface (hub cap, cloth, paper) next
to the jack and take the wheel off.
• Fit spare wheel and lightly tighten all bolts. The wheel bolts must be clean and
easy
to
turn
- do not under any circum
stances
use grease or oil!
• Lowervehicleand fully tighten bolts indi- agonal sequence.
• Refit the wheel trim.
•
Place
defective wheel in spare wheel carrier and secure it - see page 119.
Notes
• Pay attention to the following after changing a wheel:
- Check the
tyre
pressure immediately on the spare wheel which has been fitted.
- Have the tightening torque of the wheel bolts checked
with
a torque wrench as
soon
as possible. The torque for steel
and alloy wheels is 160 Nm. If it has been established when changing
the wheel
that
wheel bolts are corroded and hard to screw in, they must be renewed be
fore checking the tightening torque.
Until these checks have been carried out
one should, for safety reasons, only drive at
a
moderate
speed.
• The defective wheel should be repaired
as
soon as possible.
Attention
If the
vehicle
is to be
subsequent
ly
fitted
with
wheels
or
tyres
which
differ
from
those
fitted
by
the
factory,
it is
essential
to
read
the
remarks
in the
centre
and
right
hand
columns on
page
113.
121
www.vwT4camper.info - a useful website for owners and enthusiasts of VW T4 Transporter Campervans