Page 85 of 225

Audio System (Si, SR)
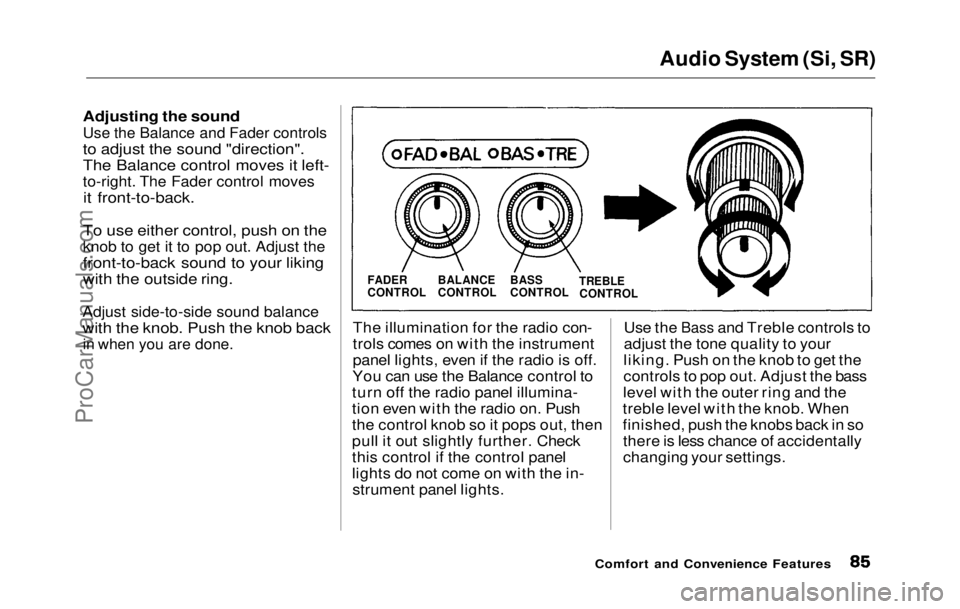
Adjusting the soundUse the Balance and Fader controls
to adjust the sound "direction".
The Balance control moves it left-
to-right. The Fader control moves
it front-to-back.
To use either control, push on the
knob to get it to pop out. Adjust the
front-to-back sound to your liking
with the outside ring.
Adjust side-to-side sound balance
with the knob. Push the knob back
in when you are done.
The illuminatio n
for the radio con-
trols comes on with the instrument
panel lights, even if the radio is off.
You can use the Balance control to
turn off the radio panel illumina-
tion even with the radio on. Push
the control knob so it pops out, then
pull it out slightly further. Check
this control if the control panel
lights do not come on with the in- strument panel lights. Use the
Bass and Treble controls to
adjust th e
tone quality to your
liking. Push on the knob to get the
controls to pop out. Adjust the bass
level with the outer ring and the
treble level with the knob. When
finished, push the knobs back in so there is less chance of accidentally
changing your settings.
Comfort and Convenience Features
FADER
CONTROL
BALANCE
CONTROL
BASS
CONTROL
TREBLE
CONTROLProCarManuals.comMain Menu Table of Contents s t
Page 89 of 225

Audio System (Si, SR)
The AUTO SELECT function allows you to find stations easily
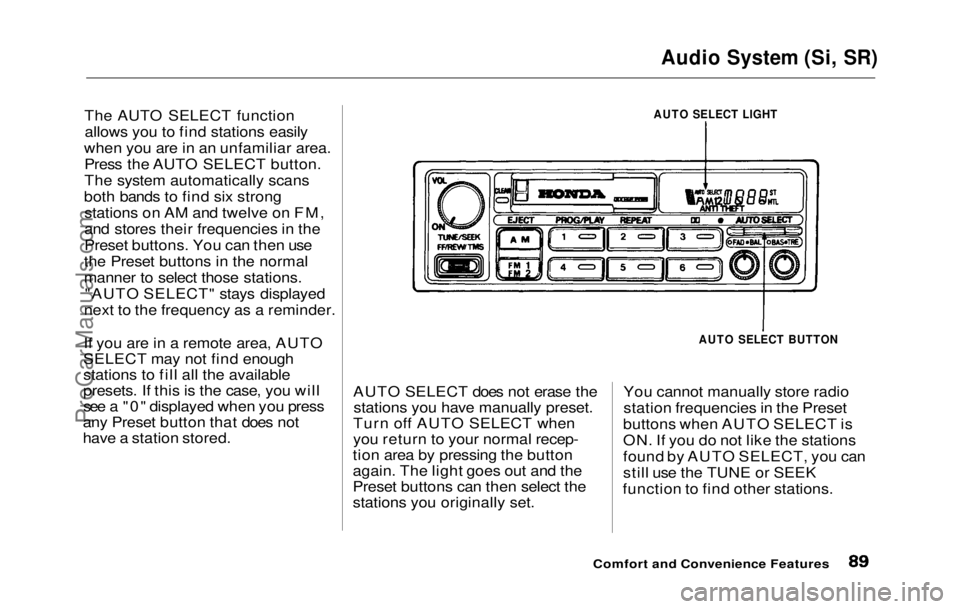
when you are in an unfamiliar area. Press the AUTO SELECT button.
The system automatically scans
both bands to find six strong stations on AM and twelve on FM,
and stores their frequencies in the
Preset buttons. You can then use
the Preset buttons in the normal
manner to select those stations. "AUTO SELECT" stays displayed
next to the frequency as a reminder.
If you are in a remote area, AUTO
SELECT may not find enough
stations to fill all the available
presets. If this is the case, you will
see a "0" displayed when you press
any Preset button that does not
have a station stored. AUTO SELECT does not erase the
stations you have manually preset.
Turn off AUTO SELECT when
you return to your normal recep-
tion area by pressing the button
again. The light goes out and the
Preset buttons can then select the
stations you originally set. You cannot manually store radio
station frequencies in the Preset
buttons when AUTO SELECT is
ON. If you do not like the stations
found by AUTO SELECT, you can
still use the TUNE or SEEK
function to find other stations.
Comfort and Convenience Features
AUTO SELECT LIGHT
AUTO SELECT BUTTONProCarManuals.comMain Menu Table of Contents s t
Page 91 of 225

Audio System (Si, SR)
Operating the Cassette Player
Turn the
system ON. Insert the
cassette into the slot with the tape
opening to the right. Push the cassette in most of the way. The
drive will pull it in the rest of the
way and begin to play. The or will light to show you
which side of the cassette is playing.
The indicates the side you
inserted facing upward is now
playing. To play the other side of
the tape, press the PROG/PLAY
button.
The system also has an Auto-
reverse feature. It will automati-
cally reverse direction when it
reaches the end of the cassette. If the cassette is a metal tape
(chromium-dioxide or CrO2), you
will see "MTL" displayed. The
system automatically adjusts for
the special frequency character-
istics of metal tape.
Dolby noise reduction turns on
when you insert a cassette. If the tape was not recorded with Dolby
"B" noise reduction, turn it off by
pressing the button.
To remove the cassette from the
drive, press the EJECT button. The
system automatically ejects the
cassette whenever you turn off the
system or the ignition switch.
Comfort and Convenience Features
ON/OFF/VOL KNOB
CASSETTE SLOT
TAPE DIRECTION
INDICATOR METAL
INDICATOR
EJECT
BUTTON PROG/PLAY
BUTTON DOLBY BUTTONProCarManuals.comMain Menu Table of Contents s t
Page 92 of 225

Audio System (Si, SR)
Cassette Search Functions
Once a cassette is playing, you can
use the FF, REW, TMS, or REPEAT function to look for
desired songs or passages.
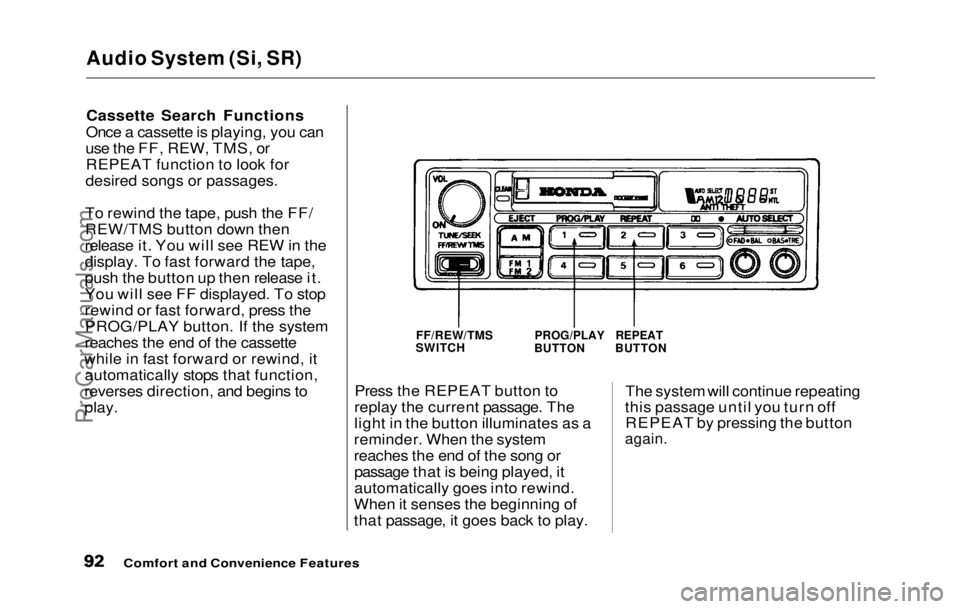
To rewind the tape, push the FF/
REW/TMS button down then
release it. You will see REW in the
display. To fast forward the tape,
push the button up then release it.
You will see FF displayed. To stop
rewind or fast forward, press the PROG/PLAY button. If the system
reaches the end of the cassette
while in fast forward or rewind, it automatically stops that function,
reverses direction, and begins to
play. Press the REPEAT button to
replay the current passage. The
light in the button illuminates as a
reminder. When the system
reaches the end of the song or passage that is being played, it
automatically goes into rewind.
When it senses the beginning of
that passage, it goes back to play. The system will continue repeating
this passage until you turn off REPEAT by pressing the button
again.
Comfort and Convenience Features
FF/REW/TMS
SWITCH
PROG/PLAY
BUTTON
REPEAT
BUTTONProCarManuals.comMain Menu Table of Contents s t
Page 94 of 225

Caring for the Cassette Player
The cassette drive picks up dirt
and oxides whenever you play a
tape. This builds up over time and
causes the sound quality to degrade.
To prevent this, you should clean
the cassette drive after every 30
hours of use. Your dealer has a cleaning kit available for this
purpose.
To remind you, a small red light
labelled CLEAN comes on every 30
hours of tape use. If you are
already regularly cleaning the tape
drive at least every 30 hours,
simply push the CLEAN light for
five seconds to turn it off.
If you do not clean the cassette
drive regularly, it may eventually
become impossible to remove the deposits with a normal cleaning kit.
The cassette player automatically ejects cassettes that do not play
normally. If it ejects a cassette
before it begins to play, it is
probably defective and should not
be inserted again. You may have a cassette suddenly stop playing,
reverse directions once or twice
and then eject. This is normally an
indication the tape is wound
unevenly. It should play normally after being manually rewound. Use 100-minute or shorter cas-
settes. Cassettes longer than 100
minutes use thinner tape that may
break or jam the drive.
Look at a cassette before you insert
it. If the tape is loose, tighten it by
turning one of the hubs with a pencil or your finger.
If the label is peeling off, do not put
it in the player. It may cause the
cassette to jam in the drive mecha-
nism when you try to eject it.
Do not leave cassettes sitting
where they are exposed to high heat or humidity, such as on top of
the dashboard or in the player. If a
cassette is exposed to extreme heat
or cold, let it reach a moderate
temperature before putting it in the
player.
Comfort and Convenience Features
S model
Si and SR models
CLEAN LIGHTProCarManuals.comMain Menu Table of Contents s t
Page 97 of 225

Break-in Period, Gasoline
Break-in Period
Help assure your car's future
reliability and performance by
paying extra attention to how you
drive during the first 1,000 km (600
miles).
During thi
s period:
Avoid full-throttle starts and
rapid acceleration.
If you need to add oil, use the
engine oil recommended in this
owner's manual.
Avoid hard braking. New brakes need to be broken-in by moderate
use for the first 300 km (200
miles).
You should follow these same re-
commendations with an overhauled
or exchanged engine, or when the
brakes are relined. Gasoline
Your Honda is designed to operate
most effectively on unleaded
gasoline.
Using gasoline containing lead will
damage your car's emission
controls. Thi s
contributes to air
pollution and can void certain parts
of your warranty.
(S model)
Use an unleaded gasoline with a
pump octane number of 86 or
higher.
Use of a lower octane gasoline can
cause a persistent, heavy metallic
rapping noise that can lead to
engine damage.
(All other models)
Use a
premium unleaded gasoline
with a pump octane number of
91
or higher .
I
f you are unable to find premium
unleaded, you may substitute an
unleaded regular gasoline. The engine will compensate for the
lower octane, but you may notice a
slight decrease in power as a result.
Oxygenated Fuels
Some conventional gasolines are
being blended with alcohol or an
ether compound to increase the
gasoline's octane. These gasolines
are collectively referred to as
oxygenated fuels. Some areas of
the United States and Canada use
oxygenated fuels to help meet clean
air standards.
If you use an oxygenated fuel, be
sure it meets the minimum octane
rating requirement as recom-
mended.
Before DrivingProCarManuals.comMain Menu Table of Contents s t
Page 100 of 225
Service Station Procedures
Opening the Hood
1. Shift to Park or Neutral and set
the parking brake. Pull the hood
release handle, located under the
left lower corner of
the dash-
board. The hood will pop up slightly.
2. Standing
in front of the car, put
your fingers under the front edge
of the hood to the right of center.
Slide your hand to the left until
you feel the hood latch handle.
Push this handle to the left until
it releases the hood. Lift the hood.
3. Pul l
the support rod out of its clip
and insert the end into the hole
on the left side of the hood.
To close the hood, lift it up slightly
to remove the support rod from the hole. Put the support rod back into
its holding clip. Lower the hood to
about a foot above the fender, then
let it drop.
Before Driving
HOOD RELEASE HANDLE
LATCH
CONTINUED
CLIP
SUPPORT RODProCarManuals.comMain Menu Table of Contents s t
Page 107 of 225
Preparing to Drive
You should do the following checks and adjustments every day before
you drive your car.
1. Make sure all windows, mirrors, and outside lights are clean and
unobstructed. Remove frost,
snow, or ice.
2. Check that the hood and trunk are fully closed.
3. Check that any items you may be carrying with you inside are
stored properly or fastened down
securely. 4. Check the adjustment of the seat
(see page 51 ).
5. Check the adjustment of the
inside and outside mirrors (see
page 59 ).
6. Chec k
the adjustment of the
steering wheel (see page 43 ).
7. Make sure the doors are securely
closed and locked.
8. Fasten your seat belt. Check that your passengers have fastened
their seat belts (see page 7 ). 9. Turn the ignition ON (II). Check
the indicator lights in the instru-
ment panel.
10.Start th
e
engine.
11.Check the gauges and indicator
lights in the instrument panel
(see page 31 ).
Driving
ProCarManuals.comMain Menu Table of Contents s t