1992 HONDA PRELUDE service
[x] Cancel search: servicePage 134 of 225

Engine Oil
Recommended Oil
Oil is a major contributor to your
engine's performance and longevity.
Always use a premium-grade deter-
gent oil. You can determine an oil's
SAE viscosity and Service Classifi-
cation from the API Service label
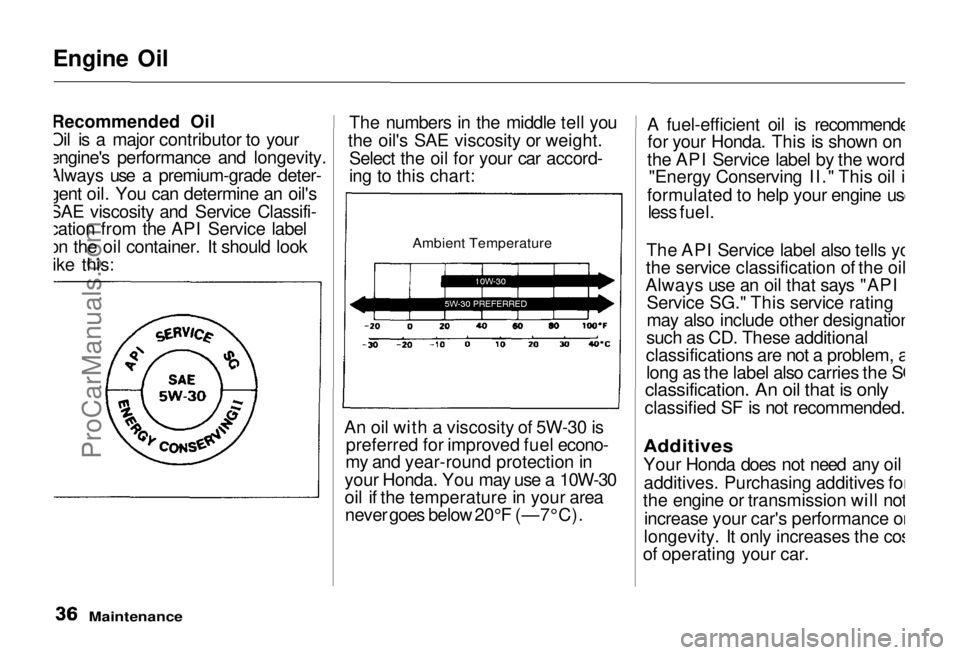
on the oil container. It should look
like this: The numbers in the middle tell you
the oil's SAE viscosity or weight. Select the oil for your car accord-
ing to this chart:
Ambient Temperature
An oil with a viscosity of 5W-30 is preferred for improved fuel econo-
my and year-round protection in
your Honda. You may use a 10W-30
oil if the temperature in your area never goes below 20°F (—7°C). A fuel-efficient oil is recommended
for your Honda. This is shown on
the API Service label by the words "Energy Conserving II." This oil is
formulated to help your engine use less fuel.
The API Service label also tells you
the service classification of the oil.
Always use an oil that says "API
Service SG." This service rating
may also include other designations,
such as CD. These additional
classifications are not a problem, as long as the label also carries the SG
classification. An oil that is only
classified SF is not recommended.
Additives
Your Honda does not need any oil additives. Purchasing additives for
the engine or transmission will not
increase your car's performance or
longevity. It only increases the cost
of operating your car.
MaintenanceProCarManuals.comMain Menu Table of Contents s t
Page 135 of 225

Engine Oil
Oil and Filter Changes
Always change the oil and filter according to the time and mileage
recommendations on the mainte-
nance schedule. The oil and filter collect contaminants that can dam-
age your engine if they are not
removed regularly. Changing the oil and filter requires
special tools and access from
underneath the car. The car should
be raised on a service station-type
hydraulic lift for this service. Unless you have the knowledge
and proper equipment, you should
have this maintenance done by a
skilled mechanic. 1. Run the engine until it reaches
normal operating temperature,
then shut it off. 2. Open the hood and remove the oil
filler cap. Remove the oil drain
bolt from the bottom of the
engine. Drain the oil into an
appropriate container.
3. Remove the oil filter and let the remaining oil drain. A special
wrench (available from your Honda dealer) is required to
remove the filter.
Maintenance
CONTINUED
The oil, engine components
and the exhaust system are
hot and can burn you.
Use caution and wear protec-
tive clothing while working in
the engine compartment.
Repeated, prolonged exposure
to used motor oil may cause
skin cancer.
Wash your hands thoroughly
with strong soap as soon as possible after handling used oil. OIL FILTER
OIL DRAIN BOLTProCarManuals.comMain Menu Table of Contents s t
Page 147 of 225

Air Filter
The air filter element should be
replaced every 2 years or 48,000 km
(30,000 miles), whichever comes
first. Under severe driving condi-
tions, it should also be cleaned every 12 months or 24,000 km
(15,000 miles), whichever comes
first.
Cleaning (Severe Conditions)
Clean the air cleaner element by
blowing compressed air through it in the opposite direction to normal
air flow. If you do not have access
to compressed air (such as a gas station), ask your Honda dealer to
do this service.
Follow the replacement procedure
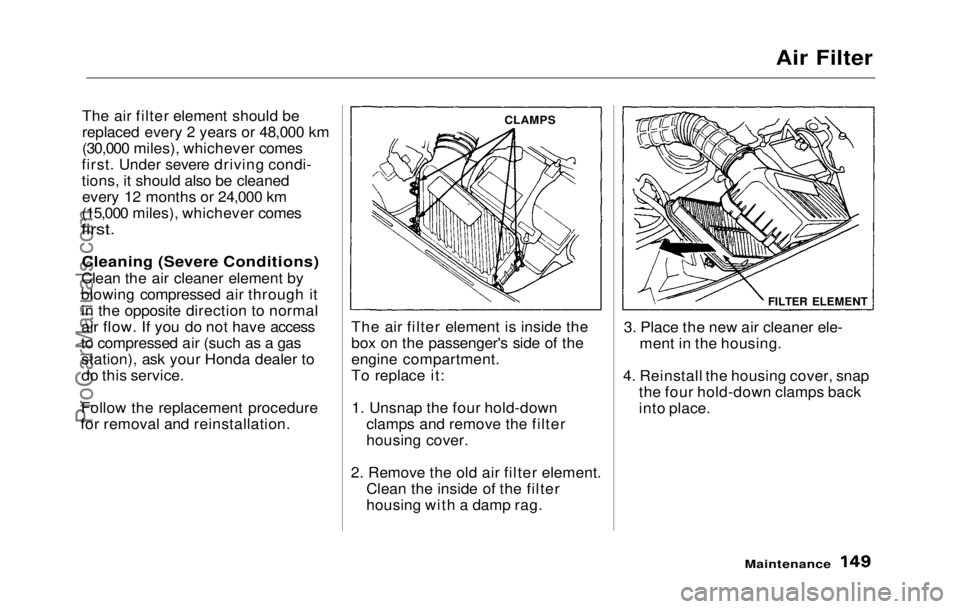
for removal and reinstallation. The air filter element is inside the
box on the passenger's side of the
engine compartment.
To replace it:
1. Unsnap the four hold-down clamps and remove the filter
housing cover.
2. Remove the old air filter element. Clean the inside of the filter
housing with a damp rag. 3. Place the new air cleaner ele-
ment in the housing.
4. Reinstall the housing cover, snap the four hold-down clamps back
into place.
Maintenance
FILTER ELEMENT
CLAMPSProCarManuals.comMain Menu Table of Contents s t
Page 155 of 225

Air Conditioner
Optional for S model
Your car's air conditioner is a
sealed system. Any major mainte-
nance, such as recharging, should
be done by a qualified technician. There are a couple of things you
can do to make sure the air condi-
tioner works efficiently. Periodically check the engine's
radiator and air conditioning
condenser for leaves, insects, and
dirt stuck to the front surface.
These block the air flow and
reduce cooling efficiency. Use a light spray from a hose or a soft
brush to remove them.
The condenser and radiator fins
bend easily. Only use a low- pressure spray or soft-bristle brush
to clean them.
Run the air conditioner at least
once a week during the cold
weather months. Run it for at least ten minutes while you are driving
at a steady speed with the engine at
normal operating temperature.
This circulates the lubricating oil contained in the refrigerant. If the air conditioner does not get
as cold as before, it is probably
because some of the refrigerant has
leaked from the system. Have your dealer check the system for leaks
and recharge the system with
Refrigerant 12 (R-12).
Charging quantity: 750 — 800 g (26.5 — 28.3 oz)
Whenever you have the air condi-
tioning system serviced, make sure
the service facility uses a refrige-
rant recycling system. This system captures the refrigerant for reuse.
Releasing refrigerant into the at-
mosphere can damage the environ-
ment.
Maintenance
AIR CONDITIONING
CONDENSER
NOTICE
NOTICEProCarManuals.comMain Menu Table of Contents s t
Page 159 of 225

Tires
Replacing Tires
The tires that came with your Honda were selected to match the
performance capabilities of the car
and provide the best combination of
handling, ride comfort, and long life.
You should replace them with
radial tires of the same size, load
range, and speed rating. Mixing
radial and bias-ply or bias-belted tires on your car can reduce its
braking ability, traction, and
steering accuracy.
It is best to replace all four tires at
the same time. If that is not possi-
ble or necessary, then replace the two front tires or the two rear tires
as a pair. Replacing just one tire
can seriously affect your car's han-
dling.
If you ever need to replace a wheel,
make sure you use the same wheel
that originally came on your Honda.
Replacement wheels are available
at your Honda dealer. Wheels and Tires
Wheel:
(US: S, Canada: S)
14 x 5.5 JJ
(US: Si, Si 4WS, Canada: SR, SR 4WS)
15
x
6.5 JJ
Tire:
(US: S, Canada: S)
185/70R14 87H
(US: Si, Si 4WS, Canada: SR, SR 4WS)
205/55R15 87V
DOT Tire Quality Grading
(US Cars)
The tires on your car meet all U.S.
Federal Safety Requirements. All
tires are also graded for treadwear,
traction, and temperature perform-
ance according to Department of
Transportation (DOT) standards.
The following explains these
gradings.
Treadwear
The treadwear grade is a compara-
tive rating based on the wear rate
of the tire when tested under con-
trolled conditions on a specified
government test course. For exam-
ple, a tire graded 150 would wear
one and one half (1-1/2) times as
well on the government course as a
tire graded 100. The relative per-
formance of tires depends upon the
actual conditions of their use, how-
ever, and may depart significantly
from the norm due to variations in
driving habits, service practices
and differences in road character-
istics and climate.
CONTINUED
MaintenanceProCarManuals.comMain Menu Table of Contents s t
Page 185 of 225

Changing a Flat Tire
15.Tighten the
wheel nuts securely
in the same crisscross pattern.
Have the wheel nut torque check-
ed at the nearest automotive
service facility.
Tighten the wheel nuts to:
110 N .
m (1
1 kg-m, 80 Ib-ft)
16.Remove the wheel cover or
center cap.
Place the flat tire face down in
the trunk well.
17.Remove the
spacer cone from
the wing bolt, turn it over, and
put it back on the bolt.
18.Secure th e
flat tire by screwing
the wing bolt back into its hole.
19.Store th
e
jack in its holder with
the end bracket facing to the
rear. Turn the jack'
s end bracket
to lock it in place. Replace the
cover. Store the tool kit.
20.Store th e
wheel cover or center
cap in the trunk.
Taking Car
e
of the Unexpected
WING BOLT
SPACERCONEProCarManuals.comMain Menu Table of Contents s t
Page 192 of 225

Charging System Indication
The charging system light should
go out after the engine starts. If it
comes on brightly with the engine
running, the alternator is no longer
charging the battery. Immediately turn off all electrical
accessories: radio, heater, A/C, rear
defogger, cruise control, etc. Try
not to use other electrically-
operated controls such as the
power windows. Keep the engine
running and take extra care not to
stall it. Starting the engine will discharge the battery rapidly. By eliminating as much of the
electrical load as possible, you can
drive several miles before the
battery is too discharged to keep
the engine running. Drive to a
service station or garage where you
can get technical assistance.
Taking Care of the Unexpected
CHARGING SYSTEM LIGHTProCarManuals.comMain Menu Table of Contents s t
Page 198 of 225

Towing
If your car needs to be towed, call a
professional towing service or, if
you belong to one, an organization
that provides roadside assistance.
Never tow your car behind another car with just a rope or chain. It is
very dangerous.
Emergency Towing
There are three popular methods of
towing a car:
Flat-bed Equipment — The
operator loads your car on the back
of a truck. This is the best way
of transporting your Honda.
Wheel Lift Equipment — The tow
truck uses two pivoting arms that
go under the tires (front or rear)
and lift them off the ground. The
other two wheels remain on the
ground.
Sling-type Equipment — The tow
truck uses metal cables with hooks
on th
e
ends. These hooks go around
parts of the frame or suspension
and the cables lift that end of the
car off the ground. Your car's sus-
pension and body can be seriously
damaged if this method
of towing
is attempted.
If your Honda cannot be trans-
ported by flat-bed, it should be
towed with the front wheels off the
ground. If due to damage, your car
must be towed with the front
wheels on the ground, do the
following:
5-Speed Transmission
Release the parking brake.
Shift the transmission to Neutral.
Automatic Transmission
Release the parking brake.
Start the engine.
Shift to D4, then to N.
Turn off the engine. Improper towing preparation will
damage the transmission. Follow
the above procedure exactly. If you
cannot shift the transmission or
start the engine (automatic trans-
mission), your car must be trans-
ported on a flat-bed. It is best to tow the car no far-
ther than 80 km (50 miles), and
keep the speed below 35 mph (55
km/h).
Trying to lift or tow your car by
the bumpers will cause serious
damage. The bumpers are not
designed to support the car's
weight.
Taking Care
of the Unexpected NOTICE
NOTICEProCarManuals.comMain Menu Table of Contents s t