1992 HONDA PRELUDE service
[x] Cancel search: servicePage 2 of 225

Introduction
Congratulations ! Your selection of a 1992 Honda Prelude was a wise investment. It will give you years of driving
pleasure.
To enhance the enjoyment of your new car, take time to study this manual. In it, you will learn about your car's
many conveniences and useful features. Following the service interval and maintenance recommendations will
help keep your driving trouble-free while preserving your investment.
Keep this owner's manual in your car so you can refer to it at any time. Please make sure the manual stays with
the car if you sell it. The next owner will find it just as helpful.
Several other booklets in the glove box explain the warranties that protect your Honda. We suggest you read
them carefully so you understand the coverages and the responsibilities of ownership.
When your car needs scheduled maintenance, keep in mind that your Honda dealer's service staff is specially-
trained in the service and maintenance of the many systems unique to your Honda. Your Honda dealer is
dedicated to your satisfaction and will be pleased to answer any questions and concerns.
Best wishes and happy motoring.
American Honda Motor Co., Inc. Honda Canada Inc.
31SS0604ProCarManuals.comMain Menu s t
Page 4 of 225

Driver and Passenger Safety
This section gives you important
information about occupant protection. It shows how to use seat
belts properly. It explains the Supplemental Restraint System.
And it gives useful information about how to protect infants and
children in your car. Your Occupant Protection
System........................................ 4
The Seat Belt System
and How It Works.................... 5
Why Wear Seat Belts................... 5 Important Safety Reminders..... 5
Seat Belt System Components... 6
Lap/Shoulder Belt........................ 6
Wearing Seat Belts Properly...... 6
Wearing a Lap/Shoulder
Belt ............................................. 7
Advice for Pregnant Women..... 8 Seat Belt Maintenance................ 9
Supplemental Restraint System.. 10 Important Safety Reminder..... 11
How the Driver's Airbag
Works........................................ 12
How the Passenger's Airbag
Works........................................ 13
How the SRS Indicator Light
Works ...................................... 14
System Service.......................... .
14
System Service Precautions..... 15
Additional Safety Information .... 16 Seat-back Position..................... 16
Door Locks.................................. 16 Storing Cargo Safely ................
17
Driving wit
h
Pets....................... 17
Child Safety..................................... 18
Where Should Children Sit?..... 18
Important Safety Reminders... 19
General Guidelines
for Restraining Children Under 18 kg (40 Ibs)............... 19
Restraining an Infant Who Weighs Less Than 9 kg (20 Ibs)......... 20
Restraining a Child Who Weighs Between
9 and 18 kg (20 and 40 Ibs).... 20
Using Child Restraints with Tethers............................
21
Using a
Seat Belt
Locking Clip............................ 22
Restraining a Child Who Weigh
s
Over 1 8
kg (40 Ibs)..................
23
Storing a
Chil
d Seat...................
23
Alcohol and Drugs..........................
24
Carbon Monoxid
e
Hazard ............
25
Reporting Safet
y
Defects
(US Cars)......................................
26
Safety Labels .................................
27
Driver an d
Passenger SafetyProCarManuals.comMain Menu s t
Page 15 of 225

Supplemental Restraint System
The passenger's airbag is stored
near the top of the dashboard,
under a lid marked SRS. Do not
place any objects on top of this lid. If the airbag inflates, those objects
can be propelled inside the car and possibly hurt someone.
How the SRS
Indicator Light Works
The purpose of the SRS light on
your instrument panel is to alert
you of a potential problem with
your supplemental restraint system.
Have the system checked if:
The light does not come on when
you turn the ignition ON (II). The light stays on after the
engine starts.
The light comes on or flashes
while you are driving.
System Service
Your supplemental restraint
system is virtually maintenance-
free. There are no parts you can
safely service.
You must have the system serviced
by an authorized Honda dealer in the following situations: If your airbag ever inflates. The
bag must be replaced. Do not try
to remove or discard the airbag
by yourself. This must be done by a Honda dealer.
If the SRS indicator light alerts
you of a problem. Have the
supplemental restraint system
checked as soon as possible.
Otherwise, your airbag might not
inflate when you need it. When the car is ten years old, get
the system inspected. The
production date is on the driver's
door jamb for your convenience.
Driver and Passenger Safety
SRS
ProCarManuals.comMain Menu Table of Contents s t
Page 16 of 225

Supplemental Restraint System
System Service Precautions
Do not modify your steering wheel
or any other part of the supple-
mental restraint system. Modifica-
tions could make the system inef-
fective.
Do not tamper with the system
components or wiring. This could cause the airbag to inflate inadver-
tently, possibly injuring someone
very seriously.
Tell anyone who works on your car
that you have a supplemental
restraint system. Failure to follow
the procedures and precautions in
the official Honda service manualcould result in personal injury or
damage to the system.
Scrapping an entire car that has an
uninflated airbag can be dangerous.
Get assistance from a Honda dealer
if your car must be scrapped.
If you sell your car, please be sure
to tell the new owner that the car
has a supplemental restraint sys-
tem. Alert them to the information
and precautions in this part of the
owner's manual.
Driver and Passenger SafetyProCarManuals.comMain Menu Table of Contents s t
Page 25 of 225

Alcohol and Drugs
Driving a car requires your full at-
tention and alertness. Traffic condi-
tions change rapidly. You must be able to react just as rapidly. Alcohol
or drugs directly affect your alert-
ness and ability to react. Even pre-
scription and non-prescription medi-
cines can have this effect.
There are laws that deal with drunken driving. These laws define
how much alcohol it takes in your system to be legally "drunk." How-
ever, your judgment and reaction
time get worse with every drink —
even the first one. The safest thing you can do is
never drink and drive. This can be
done if you plan ahead. If you know you are going to be drinking, make
plans to ride with a friend who will
not be drinking.
What if you find that you've been
drinking and cannot get a ride from
a friend? Find alternative transpor-
tation. Call a taxi. Take a bus.
Many communities have transporta-
tion services devoted to shuttling people who have been drinking.If yo
u
have no choice but to drive,
stop drinking and give yourself lots
of time to sober up. Time is the only thing that can make you sober.
Things like coffee or a cold shower
don't speed up the process.
If you see friends trying to get
behind the wheel after drinking,
stop them. Drive them yourself or
arrange other transportation. If you
think you are interfering, remem-
ber that your interference will keep
them from sharing the road with
you.
Driver and Passenger SafetyProCarManuals.comMain Menu Table of Contents s t
Page 34 of 225

Indicator Lights
Supplemental
Restraint System
Indicator
Only on cars equipped with SRS
The SRS light normally comes on
for a few seconds when you turn
the ignition ON (II). If it doesn't, or it stays on after the engine starts,
something is wrong with the
Supplemental Restraint System. It
may also flash on and off to indi-
cate a problem.
If you see any of these indications,
the airbag may not work when
needed in an accident. Take the car
to your dealer promptly for diag-
nosis and service.
Anti-lock Brake
System (ABS)
Indicator
Only on cars equipped with ABS (see
page 117)
This light normally comes on whenyou turn the ignition ON (II) and
goes off after the engine starts. If it
comes on a
t any other time, there is
a problem in the ABS. If this
happens, stop the car in a safe place
and tur n
off the engine. Reset the
system by restarting the engine.
Watch the ABS light. If it does not
go off, or comes back on again
while driving, take the car to your
dealer to have it checked. With the
light on, your car still has normal
braking ability but no anti-lock.
Check Engine
Light
This light comes on for a few
seconds when you turn the ignition
switch ON (II). If it comes on at any
other time, it indicates one of the
engine's emission control systems
may have a problem. Turn to page
167 fo r
information about what to
do.
Brake Lam
p
Indicator
This light normally comes on for a
few seconds when you turn the
ignition switc h
ON (II). If this light
comes on at any other time, it
indicates a brake light does not
work.
A burned out brake light is a
hazard when drivers behind you
cannot tell you are braking. Have
your brake lights repaired right
away.
Instruments an d
Controls
SRS ABS US
Canada
BRAKE LAMP
ProCarManuals.comMain Menu Table of Contents s t
Page 96 of 225

Before Driving
Before you begin driving your
Honda, you should know what gaso-
line to use, and that your car is full
of oil and other important fluids.
You also need to know how to pro-
perly stow luggage or packages.
This section will help you. If you plan to add any accessories to your
car, please read the informatio n in
this section
first.
Break-in Period .............................. 98
Gasoline........................................... 98
Oxygenated Fuels...................... 98
Driving in Foreign Countries... 99
Service Station Procedures........ 100 Filling the Gas Tank ............... 100
Opening the Hood....................
101
Fuel Economy
.............................. 104
Vehicle Condition..................... 104
Driving Habits.......................... 104
Accessories................................... 105
Loading Cargo.............................. 106
Before DrivingProCarManuals.comMain Menu s t
Page 99 of 225

Service Station Procedures
Filling the Gas Tank
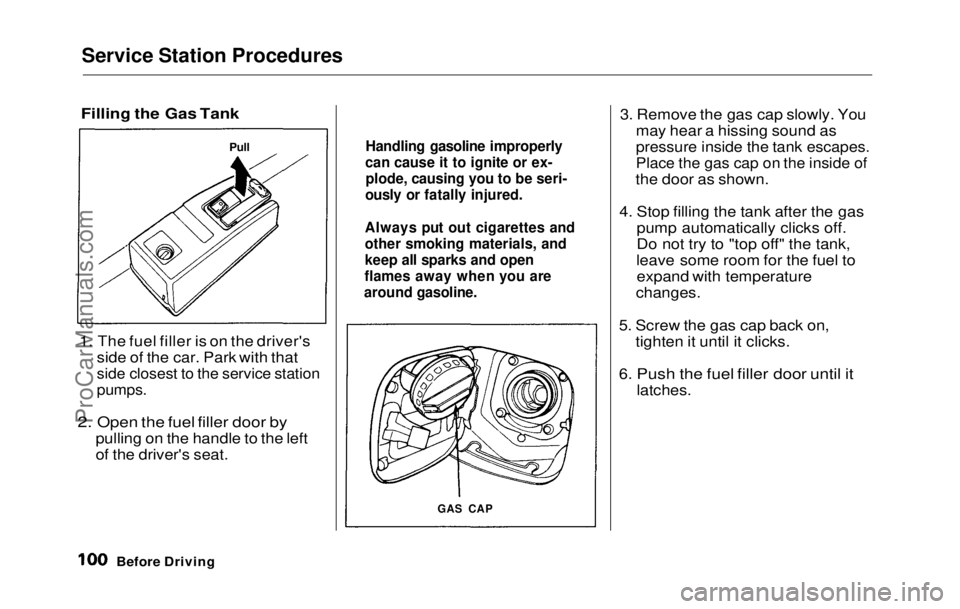
1. The fuel filler is on the driver's
side of the car. Park with that
side closest to the service station
pumps.
2. Open the fuel filler door by
pulling on the handle to the left
of the driver's seat.
3. Remove
the gas cap slowly. You
may hear a hissing sound as
pressure inside the tank escapes.
Place the gas cap on the inside of
the door as shown.
4. Stop
filling the tank after the gas
pump automatically clicks off.
Do not try to "top off" the tank,
leave some room for the fuel to expand with temperature
changes.
5. Screw
the gas cap back on,
tighten it until it clicks.
6. Push the fuel filler door until it
latches.
Before Drivin
g
Handlin
g gasoline improperly
can cause it to ignite or ex- plode, causing you to be seri-
ously or fatally injured.
Always put out cigarettes and
other smoking materials, and
keep all sparks and open
flames away when you are
around gasoline.
GAS CAP
PullProCarManuals.comMain Menu Table of Contents s t