1992 HONDA PRELUDE transmission
[x] Cancel search: transmissionPage 1 of 225

1992 Prelude Online Reference Owner's Manual
Use these links (and links throughout this manual) to navigate through\
this reference.
For a printed owner's manual, click on authorized manuals or go to www.h\
elminc.com.
Contents
Owner's Identification Form
Introduction ........................................................................\
................................................................. i
A Few Words About Safet y........................................................................\
.........................................ii
Driver and Passenger Safety ........................................................................\
......................................3
Proper use and care of your vehicle's seat belts, and Supplemental Restr\
aint System.
Instruments and Controls........................................................................\
.........................................29
Instrument panel indicator and gauge, and how to use dashboard and steering colu\
mn controls.
Comfort and Convenience Features ........................................................................\
...................... 67
How to operate the climate control system, the audio system, and other c\
onvenience features.
Before Driving........................................................................\
.......................................................... 97
What gasoline to use, how to break-in your new vehicle, and how to load luggage and other cargo.
Driving ........................................................................\
......................................................................107
The proper way to start the engine, shift the transmission, and park, pl\
us towing a trailer.
Maintenance........................................................................\
.............................................................127
The Maintenance Schedule shows you when you need to take your vehicle to the dealer.
Appearance Care........................................................................\
......................................................175
Tips on cleaning and protecting your vehicle. Things to look for if your\
vehicle ever needs body repairs.
Taking Care of the Unexpected........................................................................\
..............................183
This section covers several problems motorists sometimes experience, and how to handle them.
Technical Information........................................................................\
.............................................203
ID numbers, dimensions, capacities, and technical information.
Warranty and Customer Relations (U.S. and Canada)................................................................215
A summary of the warranties covering your new Acura, and how to contact \
us.
Authorized Manuals (U.S. only)........................................................................\
..............................221
How to order manuals and other technical literature.
Index ........................................................................\
........................ ......................................................
I
Gas Station Information
A summary of information you need when you pull up to the gas pump.
ProCarManuals.com
Page 36 of 225

Indicator Lights
"Daytime Running
Lights" Indicator
Canadian models only
This indicator lights when you turn
the ignition to ON (II) with the
headlight switch off and the
parking brake set. It should go off
if you turn on the headlights or
release the parking brake. If it comes on at any other time, it
means there is a problem with the
DRL. There may also be a problem
with the high beam headlights.
Shift Lever Position
Indicator
(Automatic Transmission only)
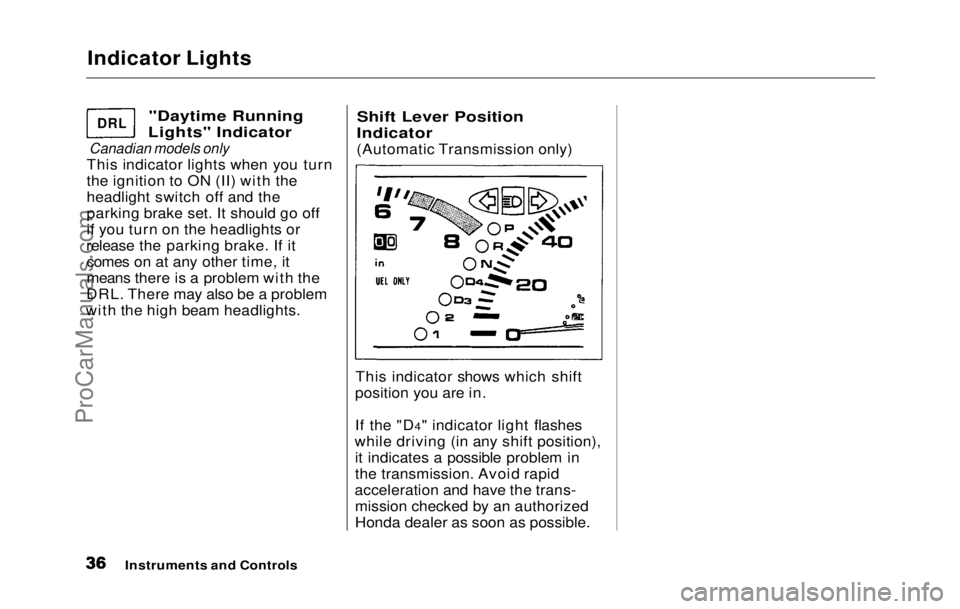
This indicator shows which shift
position you are in.
If the "D4" indicator light flashes
while driving (in any shift position), it indicates a possible problem in
the transmission. Avoid rapid
acceleration and have the trans- mission checked by an authorized
Honda dealer as soon as possible.
Instruments and Controls
DRL
ProCarManuals.comMain Menu Table of Contents s t
Page 48 of 225

Keys and Locks
Ignition Switch
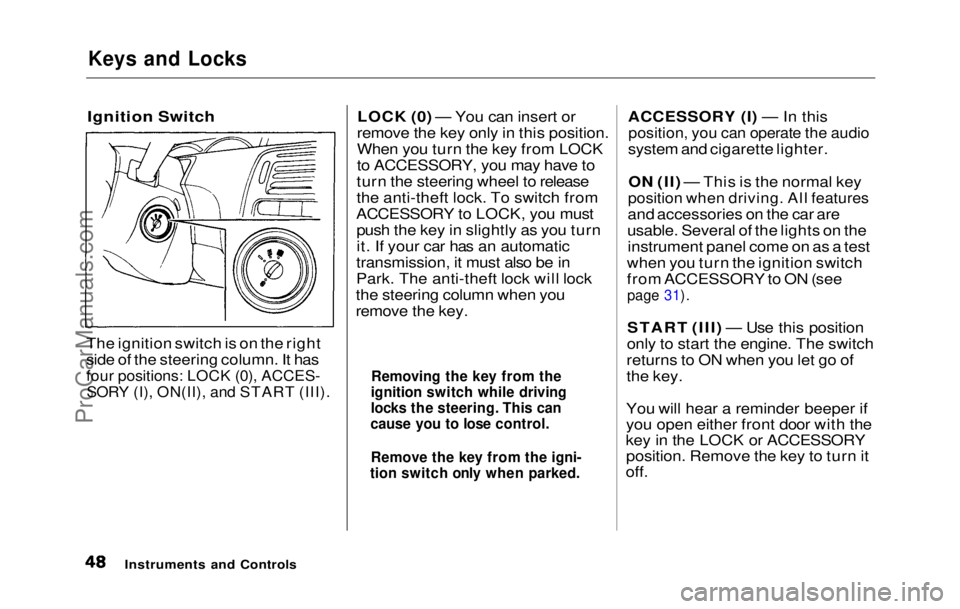
The ignition switch is on the right
side of the steering column. It has
four positions: LOCK (0), ACCES-
SORY (I), ON(II), and START (III).
LOCK (0) — You can insert or
remove the key only in this position.
When you turn the key from LOCK
to ACCESSORY, you may have to
turn the steering wheel to release
the anti-theft lock. To switch from
ACCESSORY to LOCK, you must push the key in slightly as you turn
it. If your car has an automatic
transmission, it must also be in
Park. The anti-theft lock will lock
the steering column when you
remove the key. ACCESSORY (I) — In this
position, you can operate the audio
system and cigarette lighter.
ON (II) — This is the normal key
position when driving. All features
and accessories on the car are
usable. Several of the lights on the instrument panel come on as a test
when you turn the ignition switch
from ACCESSORY to ON (see
page 31).
START (III) — Use this position
only to start the engine. The switch
returns to ON when you let go of
the key.
You will hear a reminder beeper if
you open either front door with the
key in the LOCK or ACCESSORY position. Remove the key to turn it
off.
Instruments and Controls
Removing the key from the
ignition switch while driving
locks the steering. This can
cause you to lose control.
Remove the key from the igni-
tion switch only when parked.ProCarManuals.comMain Menu Table of Contents s t
Page 106 of 225

Driving
This section gives you tips on
starting the engine under various conditions, and how to operate the
5-speed and automatic transmis-
sions. It also includes important information on your car's braking
system and facts you need if you
are planning to tow a trailer. Preparing to Drive ....................... 108
Starting the Engine...................... 109
5-speed Transmission............. 109
Automatic Transmission........ 109 Starting in Cold Weather at High Altitude.................... 110
5-speed Manua l
Transmission...
111
Recommended Shif
t
Points....
111
Maximum Speeds....................
.
112
Automatic Transmission...........
.
112
Shift Leve
r
Positions...............
112
Maximum Speeds....................
.
115
Shift Loc
k
Release...................
115
The Brakin
g
System....................
116
Brake Wea
r
Indicators............
116
Brake Syste
m
Design..............
116
Anti-lock Brakes.....................
.
117
Four Whee
l
Steering....................
118
Driving i
n
Bad Weather..............
119
Towing a
Traile
r ..........................
121
Driving
ProCarManuals.comMain Menu s t
Page 108 of 225

Starting the Engine
5-Speed Transmission 1. Apply the parking brake.
2. In cold weather, turn off all electrical accessories to reduce
the drain on the battery.
3. Push the clutch pedal down all the way. START (III) does not
function unless the clutch pedal
is depressed.
4. Without touching the accelerator pedal, turn the ignition key to the
START (III) position. If the
engine does not start right away,
do not hold the key in START
(III) for more than 15 seconds at
a time. Pause for at least 10
seconds before trying again. 5. If the engine does not start
within 15 seconds, or starts butstalls right away, repeat step 4
with the accelerator pedal pressed half-way down. If theengine starts, release pressure on
the accelerator pedal so the
engine does not race.
6. If the
engine still does not start,
press the accelerator pedal all the
way down and hold it there while
starting i n
order to clear flooding.
As before, keep the ignition key in the START (III) position for
no more than 15 seconds. Return
to step 5 if the engine does not
start. If it starts, lift your foot off
the accelerator pedal so the
engine does not race.
Automatic Transmissio
n
1
. Apply the parking brake.
2. In cold weather, turn off all electrical accessories to reduce
the drain on the battery.
3. Make sure the shift lever is in Park. Press on the brake pedal.
4. Without touching the accelerator pedal, turn the ignition key to the
START (III) position. If the
engine does not start right away,
do not hold the key in START
(III) for more than 15 seconds at
a time. Pause for at least 10
seconds before trying again.
CONTINUED
DrivingProCarManuals.comMain Menu Table of Contents s t
Page 110 of 225

5-speed Manual Transmission
The manual
transmission is syn-
chronized in all forward gears for smooth operation. It has a lockout
so you cannot shift directly from
Fifth to Reverse. When shifting up
or down, make sure you push the
clutch pedal down all the way, shift
to the next gear, and let the pedal
up gradually. When you are not shifting, do not rest your foot on
the clutch pedal. This can cause
your clutch to wear out faster. Come to a full stop before you shift
into reverse. You can damage the
transmission by trying to shift into
reverse with the car moving.
Depress the clutch pedal and pause
for a few seconds before putting it in reverse, or shift into one of the
forward gears for a moment. This
stops the gears so they won't
"grind".
You can get extra braking from the
engine when slowing down by
shifting to a lower gear. This extra
braking can help you maintain a safe speed and prevent your brakes
from overheating while going down a steep hill. Before downshifting,
make sure engine speed will not go
into the red zone in the lower gear.
Refer to the Maximum Speeds
chart.
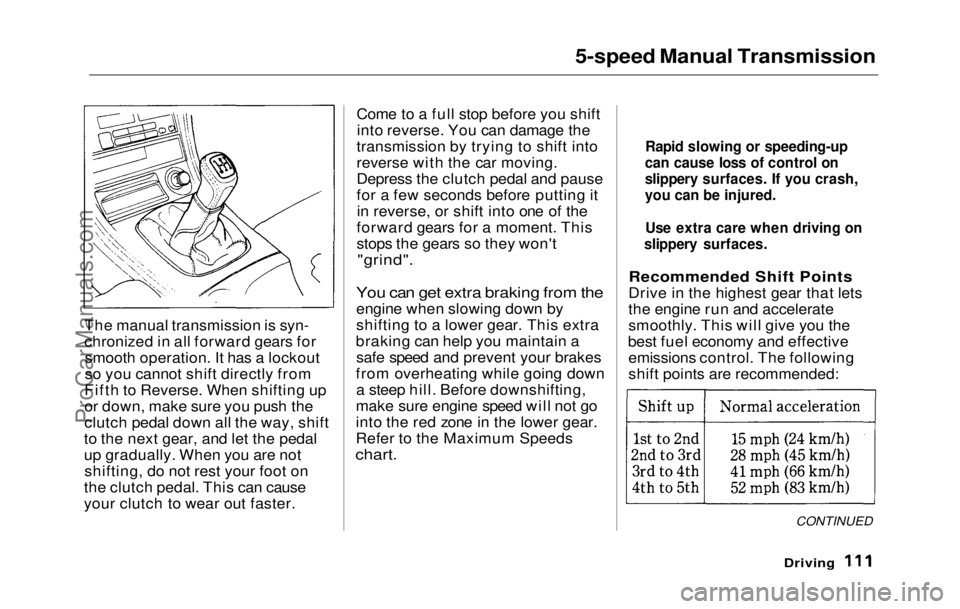
Recommended Shift Points
Drive in the highest gear that lets
the engine run and accelerate
smoothly. This will give you the
best fuel economy and effective emissions control. The following
shift points are recommended:
CONTINUED
Driving
Rapid slowing or speeding-up
can cause loss of control on
slippery surfaces. If you crash,
you can be injured.
Use extra care when driving on
slippery surfaces.ProCarManuals.comMain Menu Table of Contents s t
Page 111 of 225

5-speed Manual Transmission, Automatic Transmission
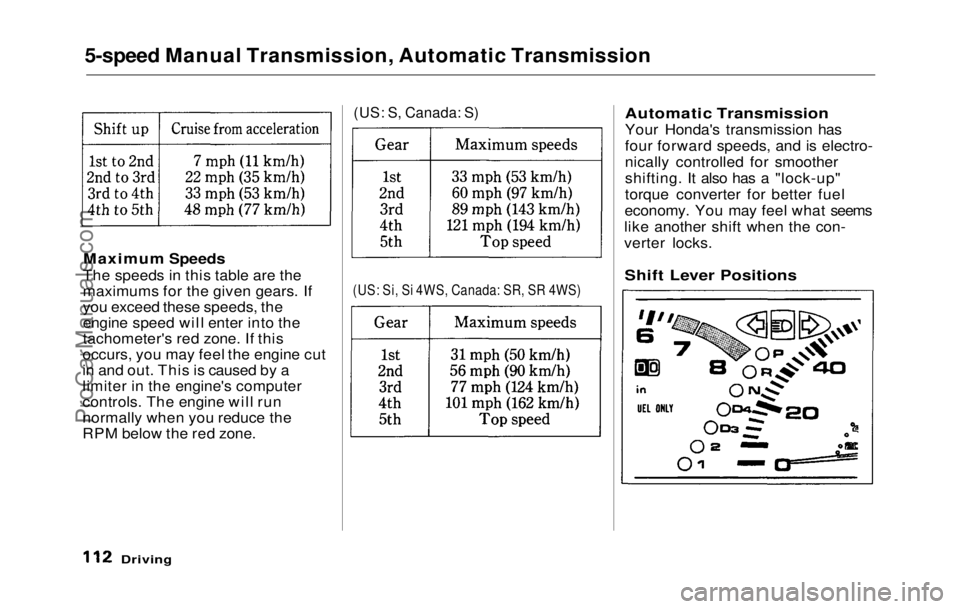
Maximum Speeds
The speeds in this table are the
maximums for the given gears. If
you exceed these speeds, the
engine speed will enter into the
tachometer's red zone. If this
occurs, you may feel the engine cut
in and out. This is caused by a
limiter in the engine's computer
controls. The engine will run
normally when you reduce the
RPM below the red zone.
(US: S, Canada: S)
(US: Si, Si 4WS, Canada: SR, SR 4WS)
Automatic Transmission
Your Honda's transmission has
four forward speeds, and is electro-
nically controlled for smoother
shifting. It also has a "lock-up"
torque converter for better fuel
economy. You may feel what seems
like another shift when the con-
verter locks.
Driving
Shift Lever PositionsProCarManuals.comMain Menu Table of Contents s t
Page 112 of 225

Automatic Transmission
This display is on the instrument panel. It shows you the position of
the shift lever. It also indicates a
possible problem in the transmis-
sion if the "D4" indicator light
flashes.
The shift lever has seven positions. It must be in Park or Neutral to
start the engine. When you are
stopped in D4, D3, 2, 1 or R, press
firmly on the brake pedal and keep
your foot off the accelerator pedal. Park (P) — This position mechani-
cally locks the transmission. Use
Park whenever you are turning off
or starting the engine. To shift out
of Park, you must press on the
brake pedal and have your foot off
the accelerator pedal. Press the
release button on the side of the shift lever to move it. You must also press the release
button to shift into Park. To avoid
transmission damage, come to a
complete stop before shifting into
Park. The shift lever must be in
Park before you can remove the
key from the ignition switch.
If you have done all of the above
and still cannot move the lever out
of Park, see Shift Lock Release on
page 115.
Driving
SHIFT
LEVER
CONTINUEDProCarManuals.comMain Menu Table of Contents s t