Page 1025 of 1146
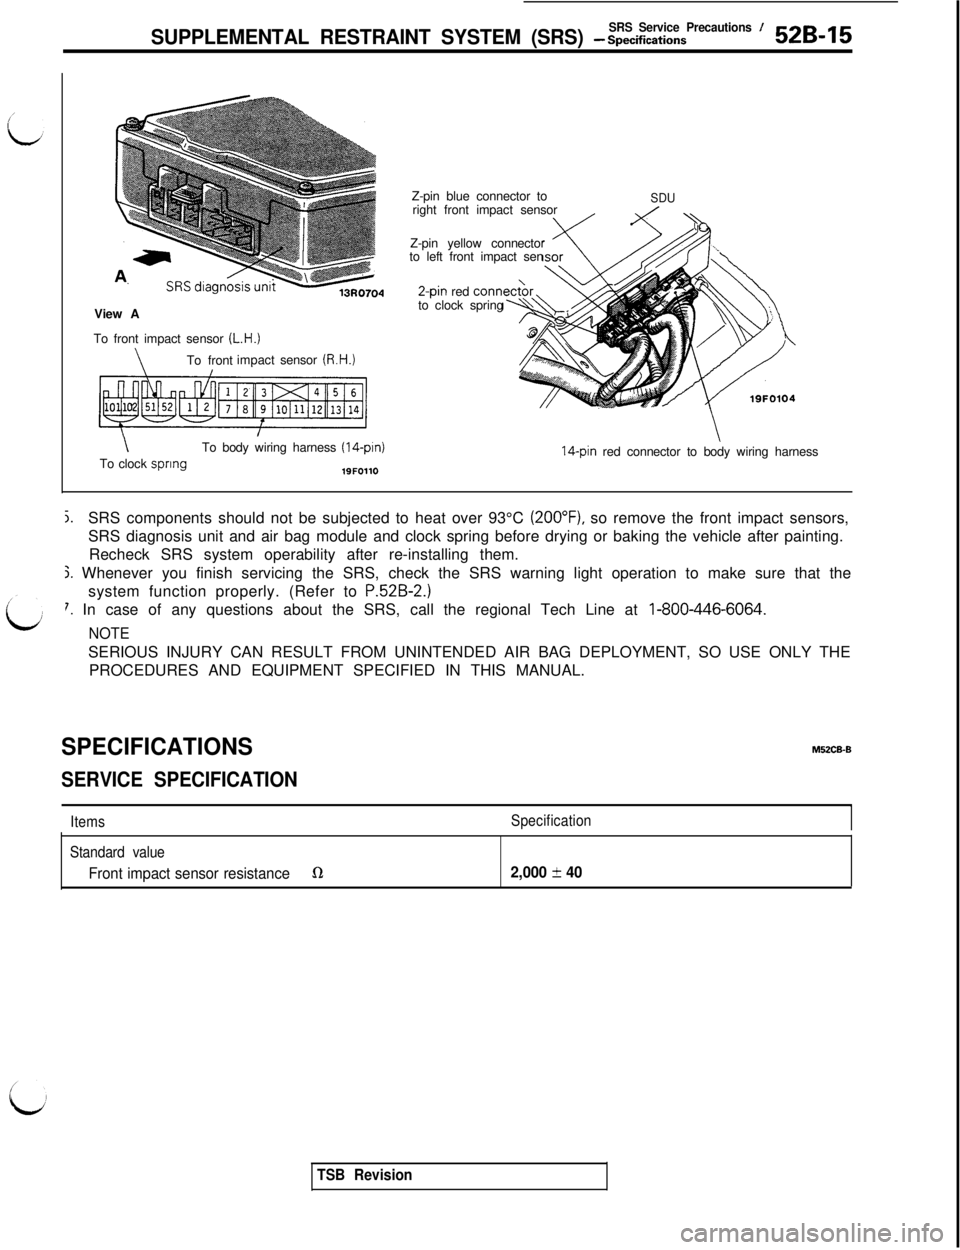
SRS ServicePrecautions /SUPPLEMENTAL RESTRAINT SYSTEM (SRS) - Spectiications52B-15View A
To front impact sensor
(L.H.)
\To frontimpactsensor (R.H.)
\To body wiring harness (14-pin)To clock spring19FOllOZ-pin blue connector to
right front impact sensor
Z-pin yellow connector
to left front impact sen2-pin red corm
to clock spring
SDU
14-pin red connector to body wiring harness
j.SRS components should not be subjected to heat over 93°C (2OO”F), so remove the front impact sensors,
SRS diagnosis unit and air bag module and clock spring before drying or baking the vehicle after painting.
Recheck SRS system operability after re-installing them.
j. Whenever you finish servicing the SRS, check the SRS warning light operation to make sure that the
system function properly. (Refer to
P.52B-2.)
7. In case of any questions about the SRS, call the regional Tech Line at I-800-446-6064.
NOTESERIOUS INJURY CAN RESULT FROM UNINTENDED AIR BAG DEPLOYMENT, SO USE ONLY THE
PROCEDURES AND EQUIPMENT SPECIFIED IN THIS MANUAL.
SPECIFICATIONSMUCB-B
SERVICE SPECIFICATION
ItemsSpecification
Standard value
Front impact sensor resistanceQ2,000 f 40
TSB Revision
Page 1027 of 1146
SUPPLEMENTAL RESfRAlNT SYSTEM (SRS) - Troub!eshooting 52B-17TROUBLESHOOTING
M52ECAA
idSRS DIAGNOSTIC PROCEDURES
- INITIAL STEPS’FOLLOW THESE STEPS WHEN BEGINNING ANY SRS SERVICE:
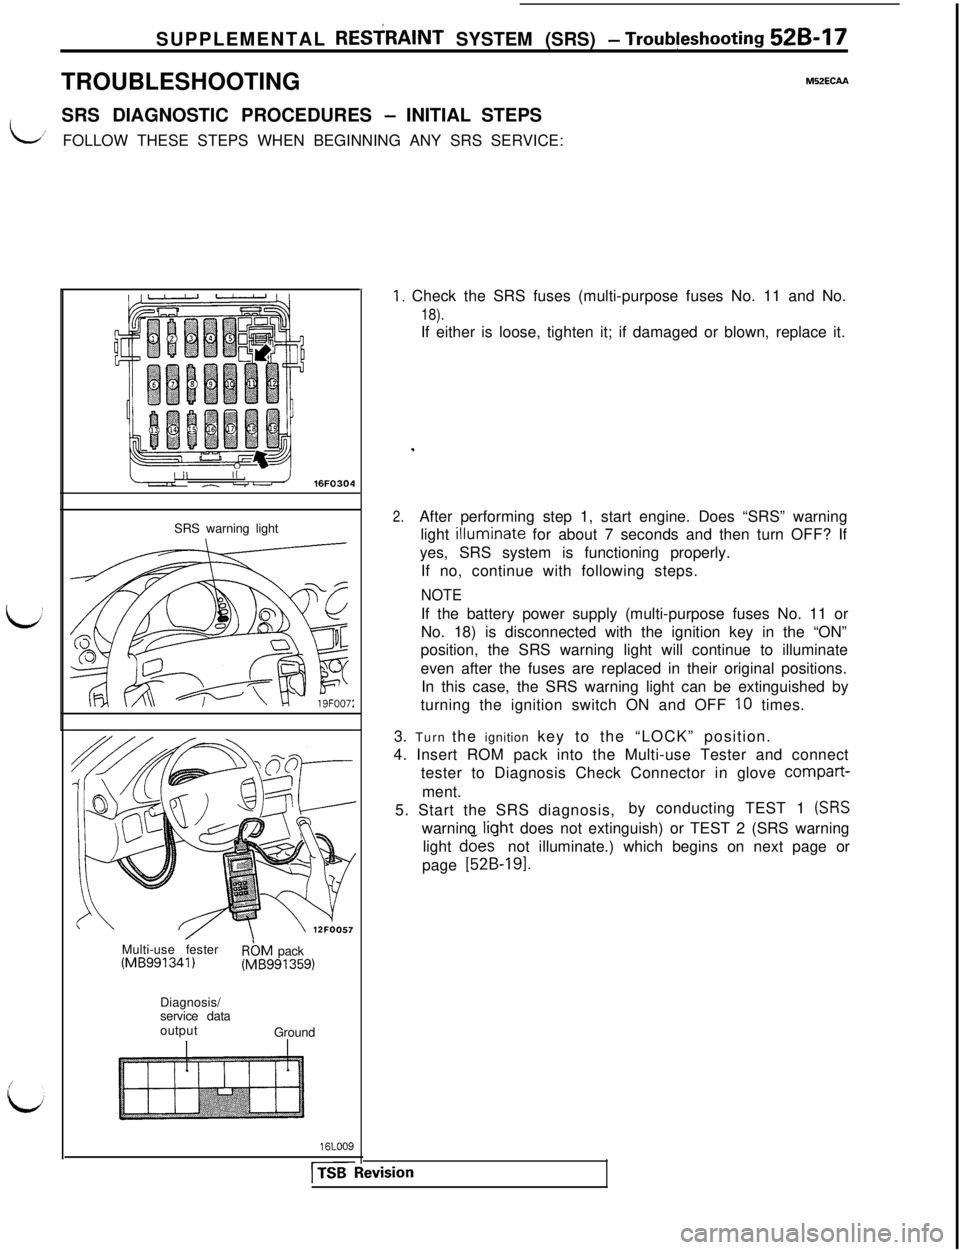
/II/ ,- -u’ 16FO304
SRS warning light
Multi-use fester
(MB991341)RbM pack(MB991359)
Diagnosis/
service data
output
Ground
16LOO9
[TSB
1. Check the SRS fuses (multi-purpose fuses No. 11 and No.
18).If either is loose, tighten it; if damaged or blown, replace it.
.
2.After performing step 1, start engine. Does “SRS” warning
light
illumi.nate for about 7 seconds and then turn OFF? If
yes, SRS system is functioning properly.
If no, continue with following steps.
NOTEIf the battery power supply (multi-purpose fuses No. 11 or
No. 18) is disconnected with the ignition key in the “ON”
position, the SRS warning light will continue to illuminate
even after the fuses are replaced in their original positions.
In this case, the SRS warning light can be extinguished by
turning the ignition switch ON and OFF
10 times.
3. Turn the ignition key to the “LOCK” position.
4. Insert ROM pack into the Multi-use Tester and connect
tester to Diagnosis Check Connector in glove compart-
ment.
5. Start the SRS diagnosis,by conducting TEST 1
(SRSwarninq liqht does not extinguish) or TEST 2 (SRS warning
light does- not illuminate.) which begins on next page or
page
[52B-191.
ivision
Page 1028 of 1146
52B-18 SUPPLEMENTAL RESTRAINT SYSTEM (SRS) - Troubleshooting
DIAGNOSTIC SEQUENCE
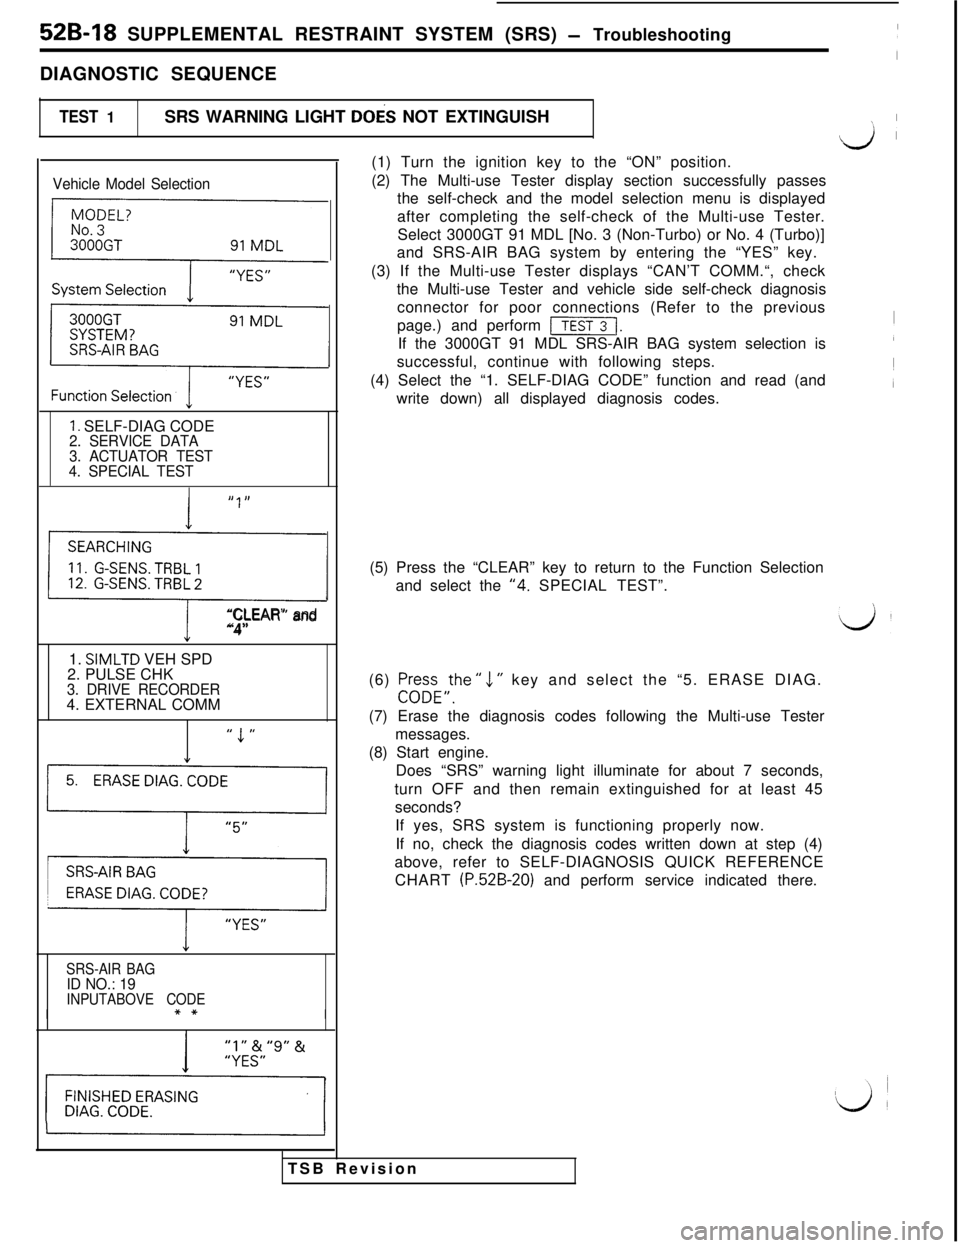
TEST 1SRS WARNING LIGHT DOES NOT EXTINGUISH
\1 I
Vehicle Model Selection
{
F
1. SELF-DIAG CODE2. SERVICE DATA
3. ACTUATOR TEST
4. SPECIAL TEST
,, I,
0
“CLEAR” and“4”1.
SIMLTD VEH SPD
2. PULSE CHK
3. DRIVE RECORDER4. EXTERNAL COMM
” 1 ”
1’1
y,,
SRS-AIR BAGID NO.: 19INPUTABOVE CODE
I(1) Turn the ignition key to the “ON” position.
(2) The Multi-use Tester display section successfully passes
the self-check and the model selection menu is displayed
after completing the self-check of the Multi-use Tester.
Select 3000GT 91 MDL [No. 3 (Non-Turbo) or No. 4 (Turbo)]
and SRS-AIR BAG system by entering the “YES” key.
(3) If the Multi-use Tester displays “CAN’T COMM.“, check
the Multi-use Tester and vehicle side self-check diagnosis
TSB Revisionconnector for poor connections (Refer to the previous
page.) and perform
[I.If the 3000GT 91 MDL SRS-AIR BAG system selection is
successful, continue with following steps.
(4) Select the “1. SELF-DIAG CODE” function and read (and
write down) all displayed diagnosis codes.
(5) Press the “CLEAR” key to return to the Function Selection
and select the
“4. SPECIAL TEST”.
(6) Pr+FE,the ”
1 ” key and select the “5. ERASE DIAG.
(7) Erase the diagnosis codes following the Multi-use Tester
messages.
(8) Start engine.
Does “SRS” warning light illuminate for about 7 seconds,
turn OFF and then remain extinguished for at least 45
seconds?
If yes, SRS system is functioning properly now.
If no, check the diagnosis codes written down at step (4)
above, refer to SELF-DIAGNOSIS QUICK REFERENCE
CHART
(P.52B-20) and perform service indicated there.
Page 1029 of 1146
SUPPLEMENTAL RESTRAINT SYSTEM (SRS) - Troubleshooting 52B-19
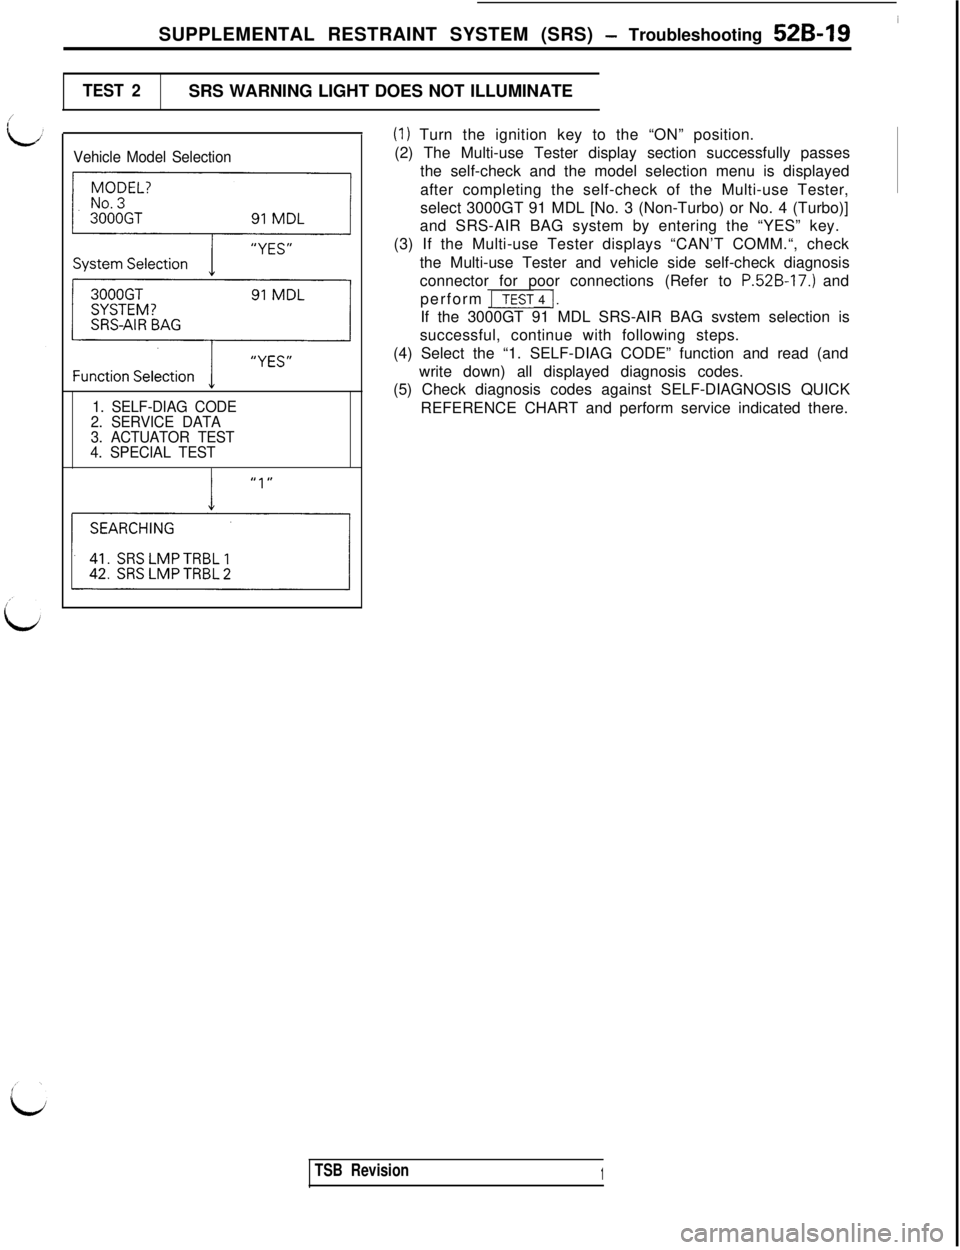
TEST 2SRS WARNING LIGHT DOES NOT ILLUMINATE
Vehicle Model Selection
-
pc-y-y
1. SELF-DIAG CODE
2. SERVICE DATA
3. ACTUATOR TEST
4. SPECIAL TEST
(1) Turn the ignition key to the “ON” position.
(2) The Multi-use Tester display section successfully passes
the self-check and the model selection menu is displayed
after completing the self-check of the Multi-use Tester,
select 3000GT 91 MDL [No. 3 (Non-Turbo) or No. 4 (Turbo)]
and SRS-AIR BAG system by entering the “YES” key.
(3) If the Multi-use Tester displays “CAN’T COMM.“, check
the Multi-use Tester and vehicle side self-check diagnosis
connector for poor connections (Refer to
P.52B-17.) and
perform
ITEST 4 1.If the 3000GT 91 MDL SRS-AIR BAG svstem selection is
successful, continue with following steps.
(4) Select the “1. SELF-DIAG CODE” function and read (and
write down) all displayed diagnosis codes.
(5) Check diagnosis codes against SELF-DIAGNOSIS QUICK
REFERENCE CHART and perform service indicated there.
TSB Revision1
Page 1030 of 1146
![MITSUBISHI 3000GT 1991 Service Manual 52B-20 SUPPLEMENTAL RESTRAINT SYSTEM (SRS) - Troubleshooting
SELF-DIAGNOSIS QUICK REFERENCE CHART
Fault
No.
-
11
32
Diagnosis code name
[Failure mode]
(NORMAL)
G-SENS. TRBL
1[Short circuit]
G-SENS. T MITSUBISHI 3000GT 1991 Service Manual 52B-20 SUPPLEMENTAL RESTRAINT SYSTEM (SRS) - Troubleshooting
SELF-DIAGNOSIS QUICK REFERENCE CHART
Fault
No.
-
11
32
Diagnosis code name
[Failure mode]
(NORMAL)
G-SENS. TRBL
1[Short circuit]
G-SENS. T](/manual-img/19/57085/w960_57085-1029.png)
52B-20 SUPPLEMENTAL RESTRAINT SYSTEM (SRS) - Troubleshooting
SELF-DIAGNOSIS QUICK REFERENCE CHART
Fault
No.
-
11
32
Diagnosis code name
[Failure mode]
(NORMAL)
G-SENS. TRBL
1[Short circuit]
G-SENS. TRBL 2[One open-circuit]
G-SENS. TRBL 3[Two open-circuit]
SQUIB TRBL 1[Short circuit]
SQUIB TRBL 2
[Open-circuit]
CONDENS. VO. HI
CONDENS. VO. LO
CRANKING TRBL
CONN. UNLOCKED
Explanation
Normal. The SRS is in goodorder.
The circuits for the front impact sensor are shortedto each other.
Right or left impact sensor cirucit is open or the
wire from the sensor to the SDU is open-circuit.
Right and left impact sensor circuits are open or thewires from the sensors to the SDU areopen-circuit.
The circuits for the air bag module (squib) are
shorted to each other or the circuit isgrounded.
The air bag module Isquib) circuit is open or the wire
from the air bag to the SDU (clock spring) is open-circuit.
The capacitor (integrated in the
SDU) terminal voltage
is higher than the specified value for 5 seconds.
The capacitor (integrated in the
SDU) terminal voltage
is lower than the specified value for 5 seconds.
The circuit for the cranking signal is shorted to
some power supply circuits.
It takes at least 45 seconds that the SDU detects
this fault.
The lock switch (short bar) of the SDU double lockconnector isopen.Service
Perform TEST 5
Perform TEST 6(I) Turn the ignition key
to the “LOCK” posi-
tion, disconnect the
negative battery
cable and tape the
terminal.
(2) After waiting atleast 30 seconds,
replace the SDU.
(Refer to P.52B-59.)
Perform TEST 7
Perform TEST 8NOTE
- IMPORTANT
(1) After repairing the SRS, reconnect the battery cable, erase the diagnosis code memory from theMulti-use Tester and check the SRS warning light operation to verify the system functions
properly. (Refer to TEST 1.)
(2) SDU
= SRS Diagnosis Unit
1 TSB Revision
Page 1031 of 1146
![MITSUBISHI 3000GT 1991 Service Manual SUPPLEMENTAL RESTRAINT SYSTEM (SRS) - Troubleshooting 52B-21
/
id
FaultDiagnosis code nameNo.[Failure mode]Explanation
Service
41
IG VOLT LOW 1The multi-purpose fuse (No. 18) is blown or the wirefrom MITSUBISHI 3000GT 1991 Service Manual SUPPLEMENTAL RESTRAINT SYSTEM (SRS) - Troubleshooting 52B-21
/
id
FaultDiagnosis code nameNo.[Failure mode]Explanation
Service
41
IG VOLT LOW 1The multi-purpose fuse (No. 18) is blown or the wirefrom](/manual-img/19/57085/w960_57085-1030.png)
SUPPLEMENTAL RESTRAINT SYSTEM (SRS) - Troubleshooting 52B-21
/
id
FaultDiagnosis code nameNo.[Failure mode]Explanation
Service
41
IG VOLT LOW 1The multi-purpose fuse (No. 18) is blown or the wirefrom the fuse to the SDU is open-circuit or itsresistance value is increased.
It takes at least 5 seconds that the SDU detects
this fault.
Perform TEST 9
42
IG VOLT LOW 2The multi-purpose fuse (No. 11) is blown or the wirefrom the fuse to the SDU is open-circuit or itsresistance value is increased.
It takes at least 5 seconds that the SDU detects
this fault.
Perform TEST 10
SRS LMP TRBL 1
i
The SRS warning light circuits are open or the wireWhen SRS warning lightOpen circuit orfrom the light to the SDU is grounded.does not extinguish:43ground shortIIt takes at least 5 seconds with the light OFF thatPerform TEST 11the SDU detects this fault.When SRS warning light
does not illuminate:
Perform TEST 12
SRS LMP TRBL 2The SRS warning light drive transistor (integrated
(1) Turn the ignition key
44SRS warning light
[I
in the SDU) is open-circuit.to the “LOCK” posi-
drive transistortion, disconnet the
is open-circuitnegative battery
cable and tape the
SRS DIAG. UNITThe EEP ROM or A/D converter (integrated in the SDU)terminal.is defective.(2) After waiting at
45least 30 seconds,
replace the SDU.
(Refer to P.52B-59.)
/NOTE -IMPORTANT
b(1) After repairing the SRS, reconnect the battery cable, erase the diagnosis code memory from theMulti-use Tester and check the SRS warning light operation to verify the system functions
properly. (Refer to TEST 1.)
(2) SDU
= SRS Diagnosis Unit
1 TSB Revision
Page 1064 of 1146
52B-54 SUPPLEMENTAL RESTRAINT SYSTEM (SRS) - ZZ%K%~g~~~s
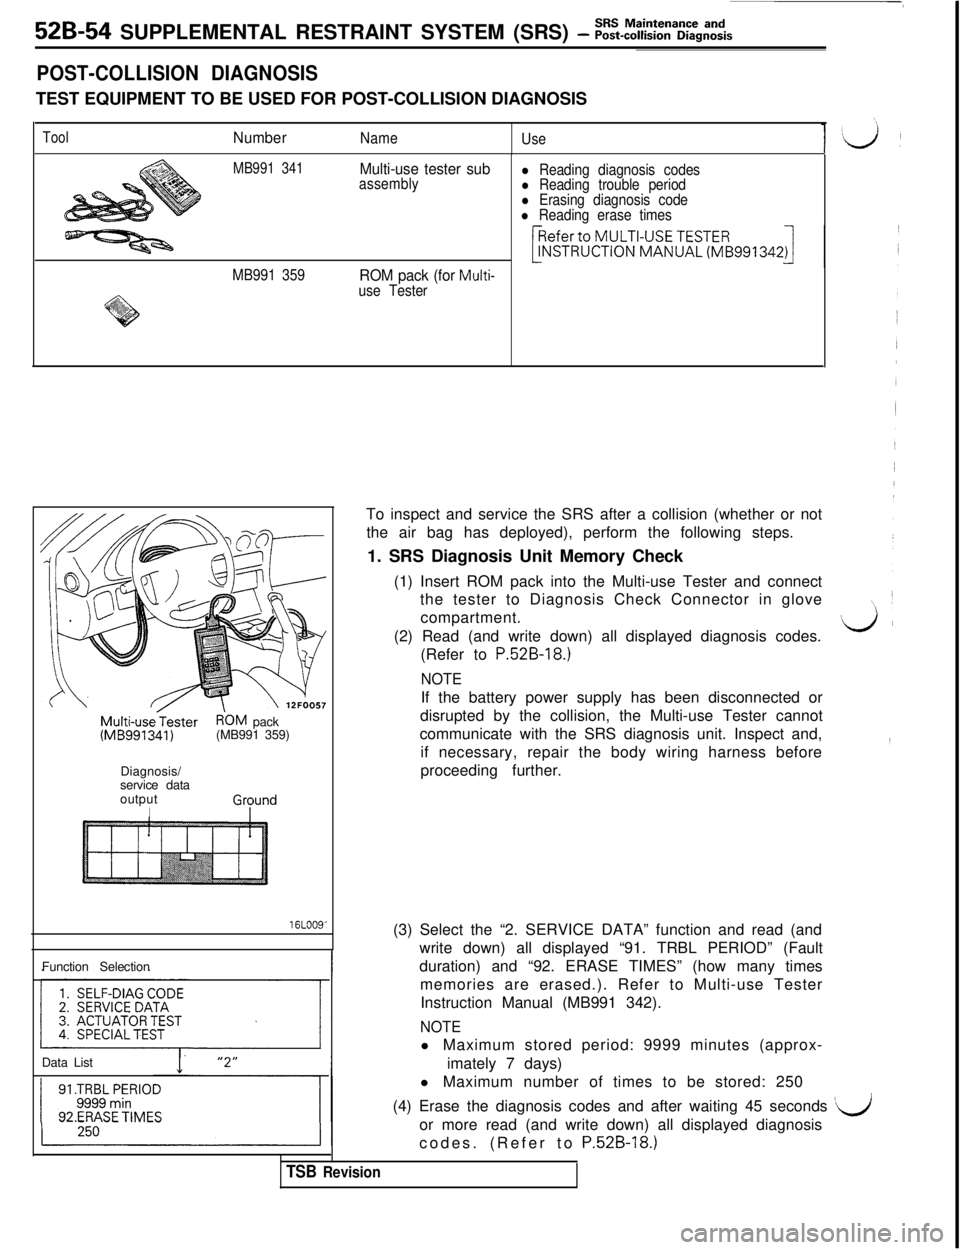
POST-COLLISION DIAGNOSISTEST EQUIPMENT TO BE USED FOR POST-COLLISION DIAGNOSIS
ToolNumberName
Use
MB991 341Multi-use tester subassemblyl Reading diagnosis codesl Reading trouble periodl Erasing diagnosis codel Reading erase times
MB991 359
ROM pack (for Multi-
use Tester
Multi-usejesterR'OM pack(MB991341)(MB991 359)
Diagnosis/
service data
output
I
16LOO9'Function Selection
Data ListTo inspect and service the SRS after a collision (whether or not
the air bag has deployed), perform the following steps.
1. SRS Diagnosis Unit Memory Check
(1) Insert ROM pack into the Multi-use Tester and connect
the tester to Diagnosis Check Connector in glove
compartment.
‘I i(2) Read (and write down) all displayed diagnosis codes.J’(Refer to
P.52B-18.)
NOTEIf the battery power supply has been disconnected or
disrupted by the collision, the Multi-use Tester cannot
communicate with the SRS diagnosis unit. Inspect and,
if necessary, repair the body wiring harness before
proceeding further.
(3) Select the “2. SERVICE DATA” function and read (and
write down) all displayed “91. TRBL PERIOD” (Fault
duration) and “92. ERASE TIMES” (how many times
memories are erased.). Refer to Multi-use Tester
Instruction Manual (MB991 342).
NOTEl Maximum stored period: 9999 minutes (approx-
imately 7 days)
l Maximum number of times to be stored: 250
(4) Erase the diagnosis codes and after waiting 45 seconds
‘dor more read (and write down) all displayed diagnosis
codes. (Refer to P.528-18.)
TSB Revision
Page 1066 of 1146
52B-56SUPPLEMENTAL RESTRAINT SYSTEM (SRS) - front lwtact sensors
INDIVIDUAL COMPONENT SERVICEIf the SRS components are to be removed or replaced as a result of maintenance, troubleshooting, etc.,
follow each procedure
(P.52B-56 - P.52B-68).L++(
Caution
1.SW components should not be subjected to heat over 93°C (2OO”F), so remove the front impactsensors, SRS diagnosis unit and air bag module and clock spring before drying or baking the
vehicle after painting. Recheck SRS system operability after re-installing them.
2.If the SRS components are removed for the purpose of check, sheet metal repair, painting, etc.,they should be stored in a clean, dry place until they are reinstalled.
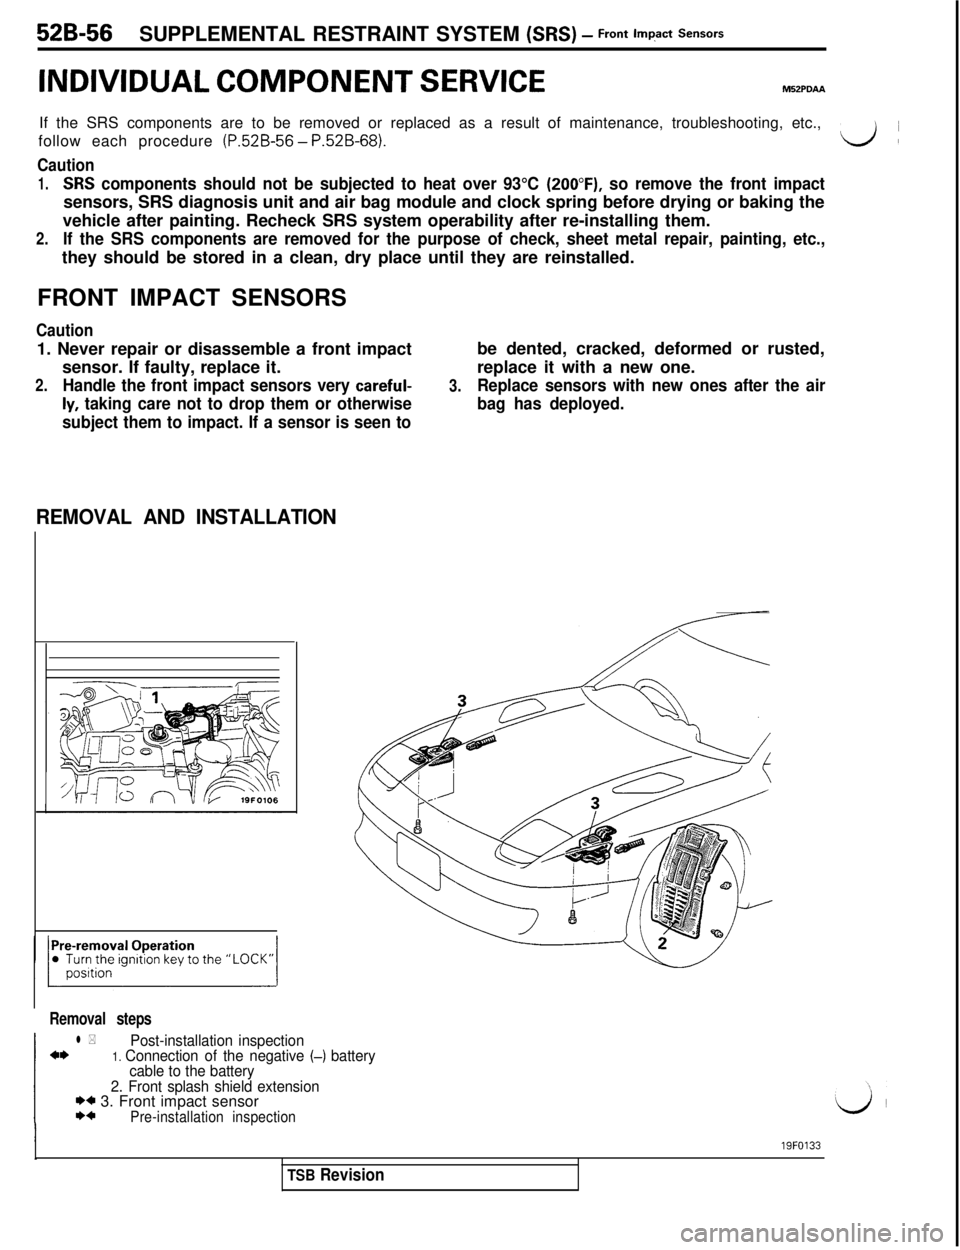
FRONT IMPACT SENSORS
Caution1. Never repair or disassemble a front impact
sensor. If faulty, replace it.
2.Handle the front impact sensors very careful-
ly, taking care not to drop them or otherwise
subject them to impact. If a sensor is seen tobe dented, cracked, deformed or rusted,
replace it with a new one.
3.Replace sensors with new ones after the air
bag has deployed.
REMOVAL AND INSTALLATION
Removal steps
l *Post-installation inspectiona*1. Connection of the negative (-) battery
cable to the battery
2. Front splash shield extension
I)* 3. Front impact sensorI)*Pre-installation inspection
I19FO133
TSB Revision