Page 1283 of 4087
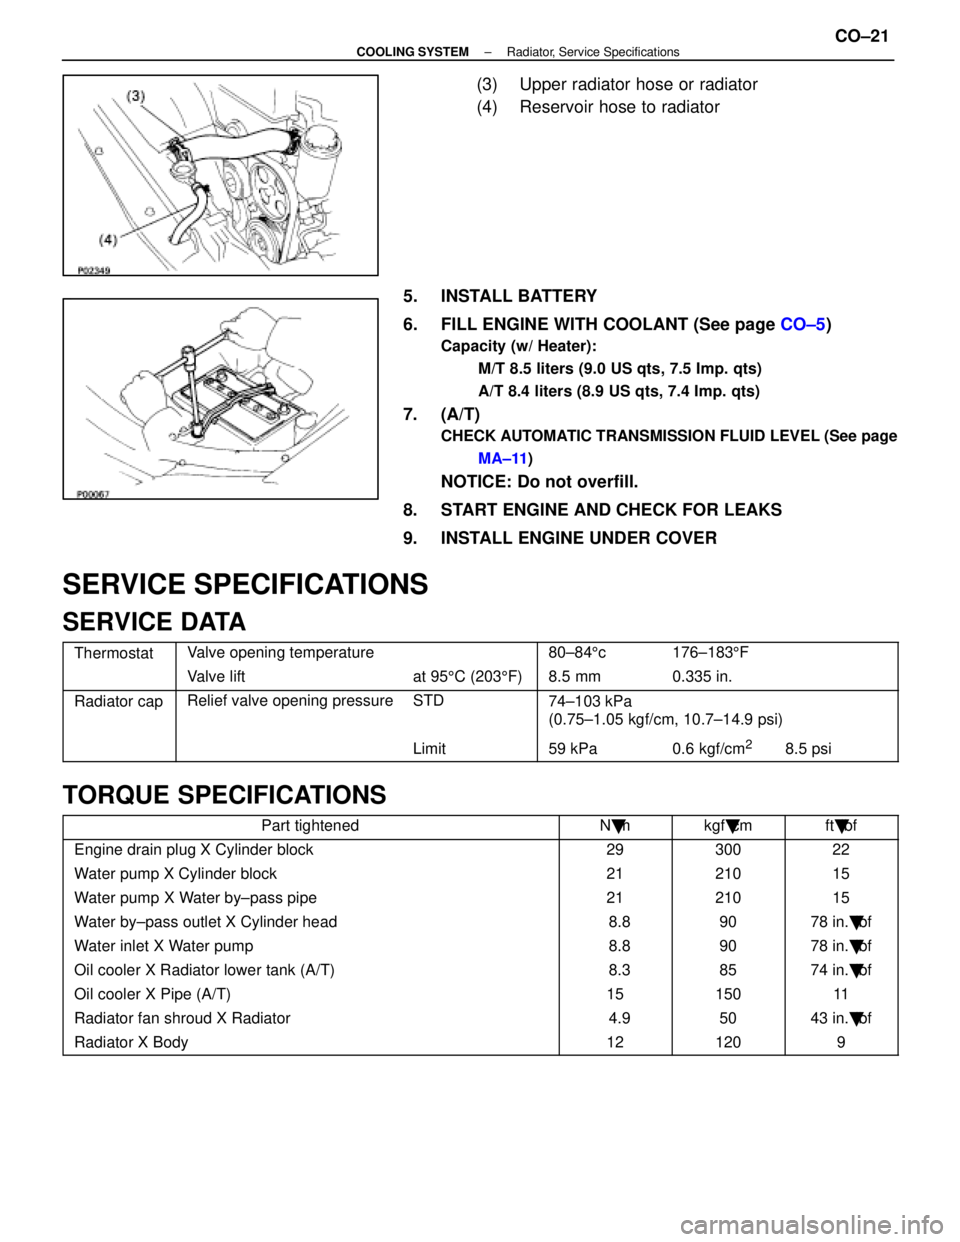
(3) Upper radiator hose or radiator
(4) Reservoir hose to radiator
5. INSTALL BATTERY
6. FILL ENGINE WITH COOLANT (See page CO±5)
Capacity (w/ Heater):
M/T 8.5 liters (9.0 US qts, 7.5 Imp. qts)
A/T 8.4 liters (8.9 US qts, 7.4 Imp. qts)
7. (A/T)
CHECK AUTOMATIC TRANSMISSION FLUID LEVEL (See pageMA±11 )
NOTICE: Do not overfill.
8. START ENGINE AND CHECK FOR LEAKS
9. INSTALL ENGINE UNDER COVER
SERVICE SPECIFICATIONS
SERVICE DATA
ThermostatValve opening temperature80±84 5c176±183 5F
Valve liftat 95 5C (203 5F) 8.5 mm0.335 in.
Radiator capRelief valve opening pressureSTD74±103 kPa
(0 75 1 05 k f/ 10 7 14 9 i)(0.75±1.05 kgf/cm, 10.7±14.9 psi)
Limit59 kPa0.6 kgf/cm28.5 psi
TORQUE SPECIFICATIONS
Part tightenedN �mkgf �cmft �lbf
Engine drain plug X Cylinder block2930022
Water pump X Cylinder block2121015
Water pump X Water by±pass pipe2121015
Water by±pass outlet X Cylinder head 8.89078 in. �lbf
Water inlet X Water pump 8.89078 in. �lbf
Oil cooler X Radiator lower tank (A/T) 8.38574 in. �lbf
Oil cooler X Pipe (A/T)1515011
Radiator fan shroud X Radiator 4.95043 in. �lbf
Radiator X Body121209
±
COOLING SYSTEM Radiator, Service SpecificationsCO±21
WhereEverybodyKnowsYourName
Page 1642 of 4087
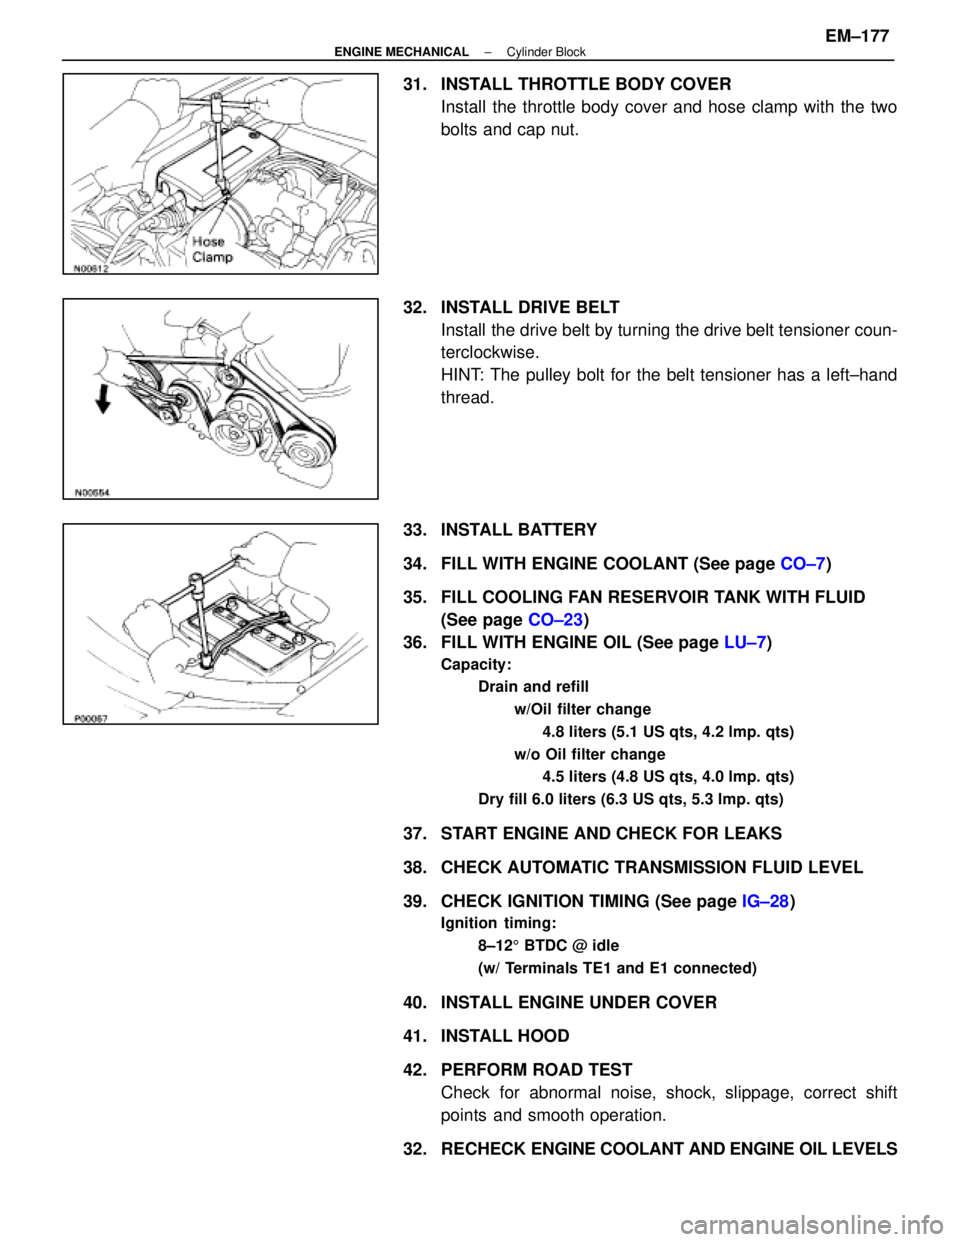
31. INSTALL THROTTLE BODY COVERInstall the throttle body cover and hose clamp with the two
bolts and cap nut.
32. INSTALL DRIVE BELT Install the drive belt by turning the drive belt tensioner coun-
terclockwise.
HINT: The pulley bolt for the belt tensioner has a left±hand
thread.
33. INSTALL BATTERY
34. FILL WITH ENGINE COOLANT (See page CO±7)
35. FILL COOLING FAN RESERVOIR TANK WITH FLUID (See page CO±23)
36. FILL WITH ENGINE OIL (See page LU±7)
Capacity:
Drain and refill
w/Oil filter change4.8 liters (5.1 US qts, 4.2 lmp. qts)
w/o Oil filter change 4.5 liters (4.8 US qts, 4.0 lmp. qts)
Dry fill 6.0 liters (6.3 US qts, 5.3 lmp. qts)
37. START ENGINE AND CHECK FOR LEAKS
38. CHECK AUTOMATIC TRANSMISSION FLUID LEVEL
39. CHECK IGNITION TIMING (See page IG±28)
Ignition timing:
8±125 BTDC @ idle
(w/ Terminals TE1 and E1 connected)
40. INSTALL ENGINE UNDER COVER
41. INSTALL HOOD
42. PERFORM ROAD TEST Check for abnormal noise, shock, slippage, correct shift
points and smooth operation.
32. RECHECK ENGINE COOLANT AND ENGINE OIL LEVELS
±
ENGINE MECHANICAL Cylinder BlockEM±177
WhereEverybodyKnowsYourName
Page 1700 of 4087
14. INSTALL NO. 2 AND NO. 3 TIMING BELT COVERS(a) Install the gasket on the timing belt cover.
(b) Using a 5 mm hexagon wrench, install the belt coverswith the nine bolts.
(c) Install the oil filler cap.
15. INSTALL RADIATOR AND WATER PUMP PULLEY (See steps 15, 16, 19 and 24 on pages EM±110 to 112)
16. FILL ENGINE WITH COOLANT (See page CO±5)
Capacity (w/ Heater):
M/T 8.5 liters (9.0 US qts, 7.5 Imp. qts)
A/T 8.4 liters (8.9 US qts, 7.4 Imp. qts)
17. (A/T)CHECK AUTOMATIC TRANSMISSION FLUID LEVEL
(See page MA±11)
NOTICE: Do not overfill.
18. START ENGINE AND CHECK FOR LEAKS
19. CHECK IGNITION TIMING (See page IG±14)
Ignition timing:
105 BTDC @ idle
(w/ Terminals TE1 and E1 connected)
20. PERFORM ROAD TEST Check for abnormal noise, shock, slippage, correct shift
points and smooth operation.
21. RECHECK ENGINE COOLANT LEVEL
±
ENGINE MECHANICAL Timing BeltEM±33
WhereEverybodyKnowsYourName
Page 1758 of 4087
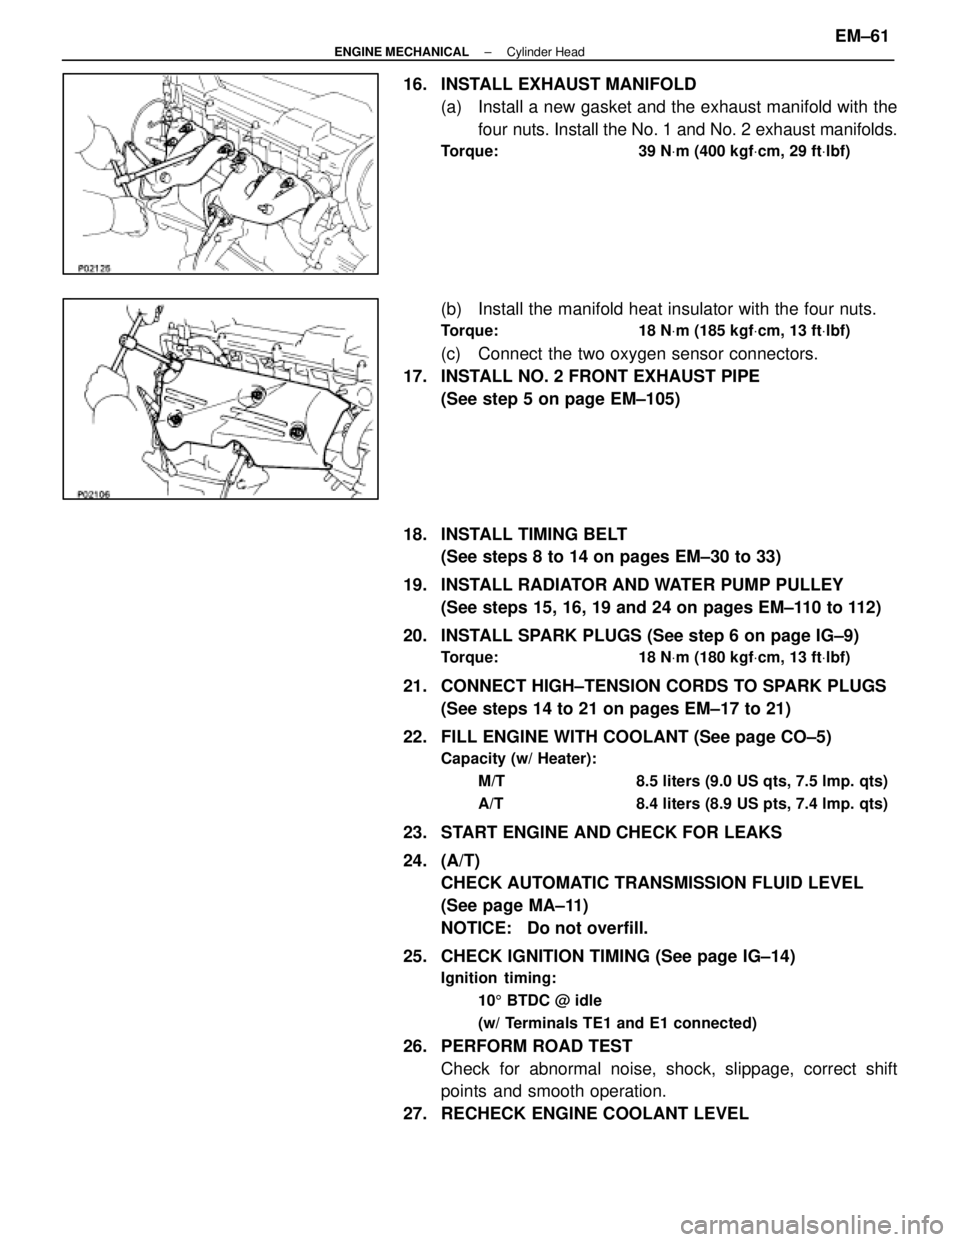
16. INSTALL EXHAUST MANIFOLD(a) Install a new gasket and the exhaust manifold with thefour nuts. Install the No. 1 and No. 2 exhaust manifolds.
Torque: 39 N Vm (400 kgf Vcm, 29 ft Vlbf)
(b) Install the manifold heat insulator with the four nuts.
Torque: 18 N Vm (185 kgf Vcm, 13 ft Vlbf)
(c) Connect the two oxygen sensor connectors.
17. INSTALL NO. 2 FRONT EXHAUST PIPE (See step 5 on page EM±105)
18. INSTALL TIMING BELT (See steps 8 to 14 on pages EM±30 to 33)
19. INSTALL RADIATOR AND WATER PUMP PULLEY (See steps 15, 16, 19 and 24 on pages EM±110 to 112)
20. INSTALL SPARK PLUGS (See step 6 on page IG±9)
Torque: 18 N Vm (180 kgf Vcm, 13 ft Vlbf)
21. CONNECT HIGH±TENSION CORDS TO SPARK PLUGS
(See steps 14 to 21 on pages EM±17 to 21)
22. FILL ENGINE WITH COOLANT (See page CO±5)
Capacity (w/ Heater): M/T 8.5 liters (9.0 US qts, 7.5 lmp. qts)
A/T 8.4 liters (8.9 US pts, 7.4 lmp. qts)
23. START ENGINE AND CHECK FOR LEAKS
24. (A/T)CHECK AUTOMATIC TRANSMISSION FLUID LEVEL
(See page MA±11)
NOTICE: Do not overfill.
25. CHECK IGNITION TIMING (See page IG±14)
Ignition timing: 105 BTDC @ idle
(w/ Terminals TE1 and E1 connected)
26. PERFORM ROAD TEST Check for abnormal noise, shock, slippage, correct shift
points and smooth operation.
27. RECHECK ENGINE COOLANT LEVEL
±
ENGINE MECHANICAL Cylinder HeadEM±61
WhereEverybodyKnowsYourName
Page 1867 of 4087
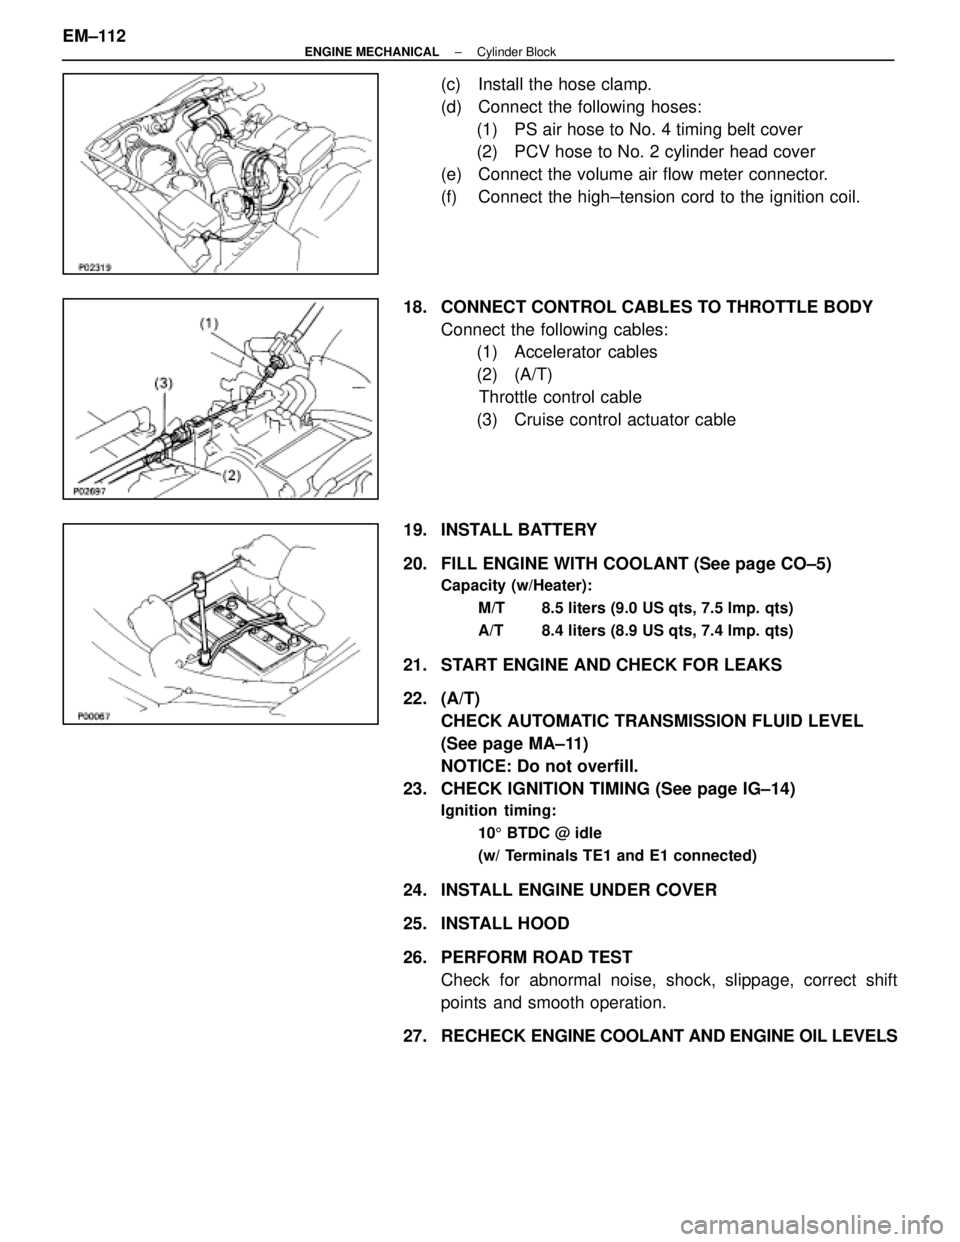
(c) Install the hose clamp.
(d) Connect the following hoses:(1) PS air hose to No. 4 timing belt cover
(2) PCV hose to No. 2 cylinder head cover
(e) Connect the volume air flow meter connector.
(f) Connect the high±tension cord to the ignition coil.
18. CONNECT CONTROL CABLES TO THROTTLE BODY Connect the following cables:(1) Accelerator cables
(2) (A/T)
Throttle control cable
(3) Cruise control actuator cable
19. INSTALL BATTERY
20. FILL ENGINE WITH COOLANT (See page CO±5)
Capacity (w/Heater): M/T 8.5 liters (9.0 US qts, 7.5 lmp. qts)
A/T 8.4 liters (8.9 US qts, 7.4 lmp. qts)
21. START ENGINE AND CHECK FOR LEAKS
22. (A/T)CHECK AUTOMATIC TRANSMISSION FLUID LEVEL
(See page MA±11)
NOTICE: Do not overfill.
23. CHECK IGNITION TIMING (See page IG±14)
Ignition timing:
105 BTDC @ idle
(w/ Terminals TE1 and E1 connected)
24. INSTALL ENGINE UNDER COVER
25. INSTALL HOOD
26. PERFORM ROAD TEST Check for abnormal noise, shock, slippage, correct shift
points and smooth operation.
27. RECHECK ENGINE COOLANT AND ENGINE OIL LEVELS
EM±112
±
ENGINE MECHANICAL Cylinder Block
WhereEverybodyKnowsYourName
Page 2156 of 4087
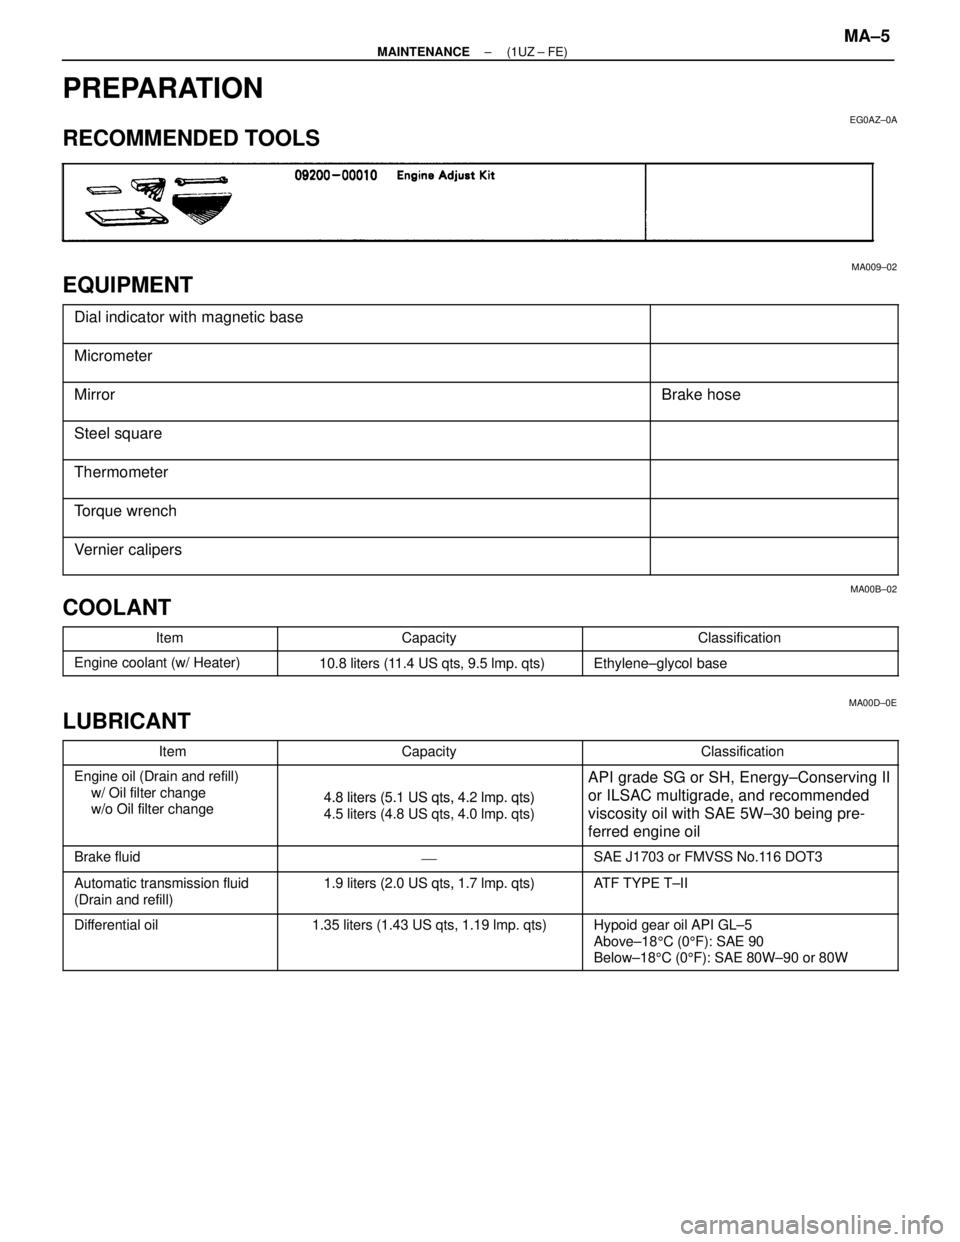
PREPARATION
EG0AZ±0A
RECOMMENDED TOOLS
MA009±02
EQUIPMENT
������������������\
������� �
������������������\
������
������������������\
�������Dial indicator with magnetic base������������ �
�����������
������������
������������������\
������� ������������������\
�������Micrometer
������������������\
������� �
������������������\
������
������������������\
�������MirrorBrake hose
������������������\
������� �
������������������\
������
������������������\
�������
Steel square
������������������\
������� ������������������\
�������Thermometer
������������������\
������� �
������������������\
������
������������������\
�������Torque wrench
������������������\
������� ������������������\
�������Vernier calipers
MA00B±02
COOLANT���������� �
���������Item
�������������� �
�������������Capacity
�������������� �
�������������Classification���������� �
���������
����������Engine coolant (w/ Heater)10.8 liters (11.4 US qts, 9.5 lmp. qts)Ethylene±glycol base
MA00D±0E
LUBRICANT
���������� ����������Item�������������� ��������������Capacity�������������� ��������������Classification���������� �
���������
����������Engine oil (Drain and refill)
w/ Oil filter change
/ Oil filt h
�������������� �
�������������
��������������4.8 liters (5.1 US qts, 4.2 lmp. qts)
�������������� �
�������������
��������������API grade SG or SH, Energy±Conserving II
or ILSAC multigrade, and recommended
���������� �
���������
����������
g
w/o Oil filter change�������������� �
�������������
��������������
4.8 liters (5.1 US qts, 4.2 lm. qts)
4.5 liters (4.8 US qts, 4.0 lmp. qts)�������������� �
�������������
��������������
or ILSAC multigrade, and recommended
viscosity oil with SAE 5W±30 being pre-
ferred engine oil
���������� ����������Brake fluid�������������� ���������������������������� ��������������SAE J1703 or FMVSS No.116 DOT3
���������� ����������Automatic transmission fluid�������������� ��������������1.9 liters (2.0 US qts, 1.7 lmp. qts)�������������� ��������������ATF TYPE T±II
����������
Automatic transmission fluid
(Drain and refill)��������������
1.9 liters (2.0 US qts, 1.7 lm . qts)
��������������
AT F TYPE TII
���������� �
���������
�
���������
����������
Differential oil�������������� �
�������������
�
�������������
��������������
1.35 liters (1.43 US qts, 1.19 lmp. qts)�������������� �
�������������
�
�������������
��������������
Hypoid gear oil API GL±5
Above±18
5C (0 5F): SAE 90
Below±18 5C (0 5F): SAE 80W±90 or 80W
±
MAINTENANCE (1UZ ± FE)MA±5
WhereEverybodyKnowsYourName
Page 2166 of 4087

20. INSPECT BALL JOINTS AND DUST COVERS
(a) Inspect the ball joints for excessive looseness.wJack up the front of the vehicle and support it with
stands.
w Make sure the front wheels are in a straight±ahead
position, and depress the brake pedal.
w Jack up the lower suspension arm until there is about
half a load on the front coil spring.
w Move the front wheel up and down and check that the
ball joint has no excessive play.
Maximum lower ball joint vertical play.
0.3 mm (0.012 in.)
If the play is greater than maximum, replace the ball joint.
(b) Visually check the dust covers for damage
21. C H E C K A U TO M AT I C T RANSMISSION AND
DIFFERENTIAL OIL (FLUID)
A. Inspect automatic transmission fluid
(a) Visually check the differential for fluid and leakage.
If leakage is found, check for the cause and repair.
(b) Check the fluid level with the engine idling and shift lever at ªPº.
If the level is low, add fluid.
Transmission fluid:
See item 22 (A)
B. Inspect differential oil
(a) Visually check the transmission for oil and leakage.If leakage is found, check for the cause and repair.
(b) Remove the filler plug, and feel inside the hole with your finger. Check that the oil comes to within 5 mm (0.20 in) of the
bottom edge of the filler hole.
If the level is low, add oil until it begins to run out of the filler
hole.
±
MAINTENANCE (1UZ ± FE)MA±15
WhereEverybodyKnowsYourName
Page 2167 of 4087

Differential oil:See item 22 (B)
(c) Reinstall the filler plug securely.
22. R E P L A C E A U TO M AT I C T RANSMISSION AND
DIFFERENTIAL OIL (FLUID)
A. Replace automatic transmission fluid
(a) Remove the drain plug, and drain the fluid.
(b) Clean the drain plug.
(c) Reinstall the drain plug securely.
(d) With the engine ªOFFº, add new fluid through the dipstick
tube.
Fluid type:
ATF Type T±II or equivalent
Drain and refill capacity: 1.9 liters (2.0 US qts. 1.7 lmp. qts)
(e) Start the engine and shift the selector into all positions fromªPº through ªLº, and then shift into ªPº position.
(f) With the engine idling, check the fluid level. Add fluid up the ªCOOLº level on the dipstick.
(g) Check that the fluid level is in the ªHOTº range at the normal
operating temperature (70 ± 80 � C (158 ± 176 � F)) and add
as necessary.
NOTICE: Do not overfill.
B. Replace differential oil
(a) Remove the filler and drain plugs, and drain the oil.
(b) Clean the drain plug.
(c) Reinstall the drain plug securely.
(d) Add new oil until it begins to run out of the filler hole.
Differential oil: Oil grade
API GL±5
MA±16
±
MAINTENANCE (1UZ ± FE)
WhereEverybodyKnowsYourName