Page 2428 of 4087
Injectors
ON±VEHICLE INSPECTION
INSPECT INJECTOR RESISTANCE(a) Remove the engine wire covers and throttle body.(See steps 1 to 8 and 13 on pages FI±27 to 30)
(b) Disconnect the injector connectors.
(c) Using an ohmmeter, measure the resistance between the terminals.
Resistance: 13.4±14.2 �
If the resistance is not as specified, replace the injector.
(d) Reconnect the injector connectors.
(e) Reinstall the throttle body and engine wire covers.
(See steps 5 and 10 to 18 on pages FI±38 to 41)
FI±48
± Fuel System (Injectors)EFI SYSTEM
WhereEverybodyKnowsYourName
Page 2430 of 4087

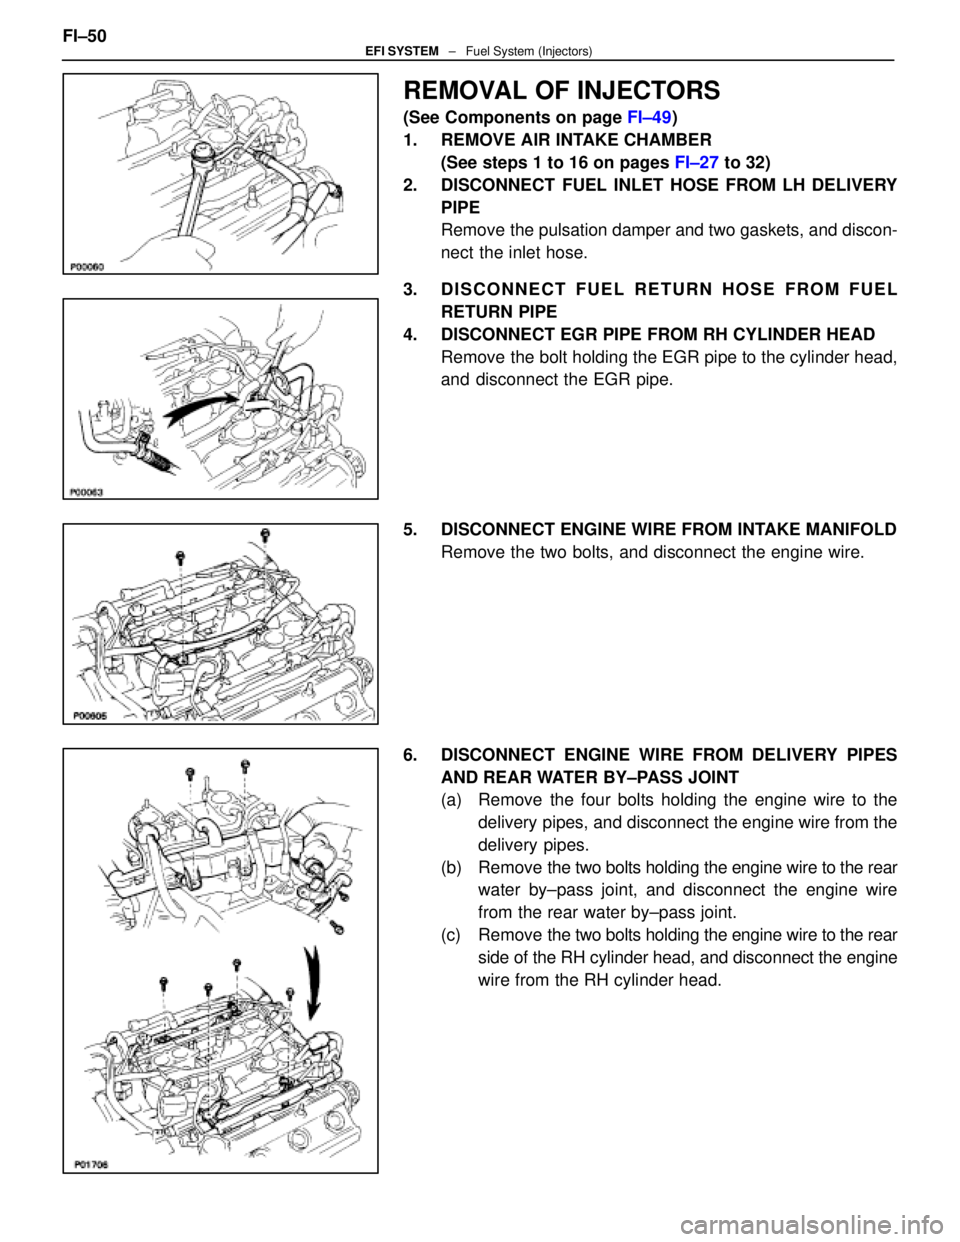
REMOVAL OF INJECTORS
(See Components on page FI±49)
1. REMOVE AIR INTAKE CHAMBER (See steps 1 to 16 on pages FI±27 to 32)
2. DISCONNECT FUEL INLET HOSE FROM LH DELIVERY PIPE
Remove the pulsation damper and two gaskets, and discon-
nect the inlet hose.
3. DISCONNECT FUEL RETURN HOSE FROM FUEL RETURN PIPE
4. DISCONNECT EGR PIPE FROM RH CYLINDER HEAD Remove the bolt holding the EGR pipe to the cylinder head,
and disconnect the EGR pipe.
5. DISCONNECT ENGINE WIRE FROM INTAKE MANIFOLD Remove the two bolts, and disconnect the engine wire.
6. DISCONNECT ENGINE WIRE FROM DELIVERY PIPES AND REAR WATER BY±PASS JOINT
(a) Remove the four bolts holding the engine wire to thedelivery pipes, and disconnect the engine wire from the
delivery pipes.
(b) Remove the two bolts holding the engine wire to the rear
water by±pass joint, and disconnect the engine wire
from the rear water by±pass joint.
(c) Remove the two bolts holding the engine wire to the rear
side of the RH cylinder head, and disconnect the engine
wire from the RH cylinder head.
FI±50
EFI SYSTEM
± Fuel System (Injectors)
WhereEverybodyKnowsYourName
Page 2431 of 4087
(d) Disconnect the two engine wire connectors from theconnector bracket on the front side of the LH delivery
pipe.
(e) Disconnect the eight injector connector.
7. REMOVE FUEL RETURN PIPE (a) Remove the bolt holding the return pipe to the LHcylinder head.
(b) Remove the union bolt and two gaskets and return pipe.
8. REMOVE DELIVERY PIPES AND INJECTORS (a) Remove the four nuts holding the delivery pipe to theintake manifold.
(b) Remove the connector bracket, the two delivery pipes and eight injector assembly, four spacers and eight
insulators.
NOTICE: Be careful not to drop the injectors, when re-
moving the delivery pipe.
(c) Pull out the eight injectors from the delivery pipes.
(d) Remove the O±ring and grommet from each injector. FI±51
EFI SYSTEM
± Fuel System (Injectors)
WhereEverybodyKnowsYourName
Page 2433 of 4087

(g) Install the grommet and a new O±ring to the injector.
(h) Connect SST (hose) to the injector with SST (union),and hold the injector and union with SST (clamp).
SST 09268±41045
(i) Put the injector into the graduated cylinder.
HINT: Install a suitable vinyl hose onto the injector to prevent
gasoline from splashing out.
(j) Using SST, connect terminals +B and FP of the check (ºDIAGNOSISº) connector.
SST 09843±18020
(k) Reconnect the cable to negative (±) terminal of battery.
(l) Turn the ignition switch ON.
NOTICE: Do not start the engine.
(m) Connect SST (wire) to the injector and battery for 15 seconds, and measure the injection volume with a
graduated cylinder. Test each injector two or three
times.
SST 09842±30070
Volume: 55±70 cc (3.4±4.3 cu in.) per 15 sec.
Difference between each injector:
10 cc (0.6 cu in.) or less
If the injection volume is not as specified, replace the injector.
2. INSPECT LEAKAGE (a) In the condition above, disconnect the test probes ofSST (wire) from the battery and check the fuel leakage
from the injector.
SST 09842±30070
Fuel drop: One drop or less per minute
(b) Disconnect the battery negative (±) cable.
(c) Remove SST.
SST 09268±41045 and 09843±18020
(d) Reconnect the fuel inlet hose to the fuel tube.
SST 09631±22020
Torque: 30 N Vm (310 kgf Vcm, 22 ft Vlbf)
HINT: Use a torque wrench with a fulerum length of 30 cm
(11.81 in.). FI±53
EFI SYSTEM
± Fuel System (Injectors)
WhereEverybodyKnowsYourName
Page 2436 of 4087
4. INSTALL ENGINE WIRE TO DELIVERY PIPES, REARWATER BY±PASS JOINT AND RH CYLINDER HEAD
(a) Connect the eight injector connectors.
(b) C onnect the two engine wire connectors to the
connector bracket on the LH delivery pipe.
(c) Install the engine wire to the RH cylinder head with the two bolts.
(d) Install the engine wire to the rear water by±pass joint
with the two bolts.
(e) Install the engine wire to the delivery pipes with the four bolts.
5. INSTALL ENGINE WIRE TO INTAKE MANIFOLD Install the engine wire with the two bolts.
6. TEMPORARILY INSTALL EGR PIPE TO RH CYLINDER HEAD
Temporarily Install the EGR pipe with the bolt.
FI±56
EFI SYSTEM
± Fuel System (Injectors)
WhereEverybodyKnowsYourName
Page 2439 of 4087
REMOVAL OF FUEL PRESSURE
PULSATION DAMPER
(See Component on page FI±58)
1. DISCONNECT CABLE FROM NEGATIVE TERMINAL OF BATTERY
CAUTION: Work must be started after approx. 20 se-
conds or longer from the time the ignition switch is
turned to the ºLOCKº position and the negative (±) termi-
nal cable is disconnected from the battery.
2. REMOVE UPPER HIGH±TENSION CORD COVER (a) Remove the two mounting bolts.
(b) Disconnect the front side claw groove of the cord coverfrom the claw of the lower cover, and remove the cord
cover.
3. REMOVE LH ENGINE WIRE COVER Remove the two bolts and engine wire cover.
4. REMOVE FUEL PRESSURE PULSATION DAMPER (a) Remove the pulsation damper and upper gasket.
(b) Disconnect the fuel inlet hose from the delivery pipe,and remove the lower gasket. FI±59
EFI SYSTEM
± Fuel System (Fuel Pressure Pulsation Damper)
WhereEverybodyKnowsYourName
Page 2440 of 4087

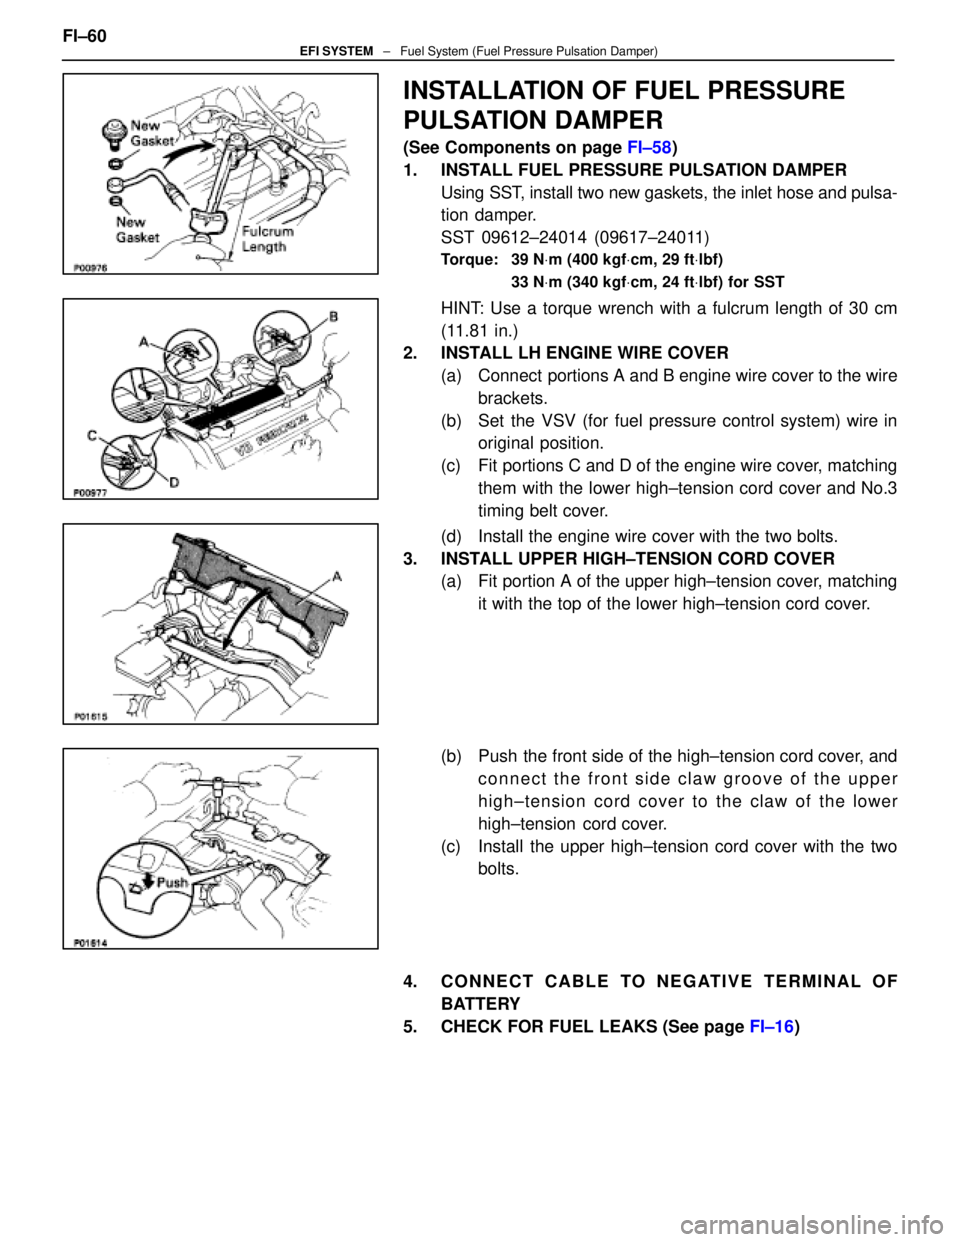
INSTALLATION OF FUEL PRESSURE
PULSATION DAMPER
(See Components on page FI±58)
1. INSTALL FUEL PRESSURE PULSATION DAMPER Using SST, install two new gaskets, the inlet hose and pulsa-
tion damper.
SST 09612±24014 (09617±24011)
Torque: 39 N Vm (400 kgf Vcm, 29 ft Vlbf)
33 N Vm (340 kgf Vcm, 24 ft Vlbf) for SST
HINT: Use a torque wrench with a fulcrum length of 30 cm
(11.81 in.)
2. INSTALL LH ENGINE WIRE COVER
(a) Connect portions A and B engine wire cover to the wirebrackets.
(b) Set the VSV (for fuel pressure control system) wire in original position.
(c) Fit portions C and D of the engine wire cover, matching them with the lower high±tension cord cover and No.3
timing belt cover.
(d) Install the engine wire cover with the two bolts.
3. INSTALL UPPER HIGH±TENSION CORD COVER (a) Fit portion A of the upper high±tension cover, matching
it with the top of the lower high±tension cord cover.
(b) Push the front side of the high±tension cord cover, and connect the front side claw groove of the upper
high±tension cord cover to the claw of the lower
high±tension cord cover.
(c) Install the upper high±tension cord cover with the two bolts.
4. CONNECT CABLE TO NEGATIVE TERMINAL OF BATTERY
5. CHECK FOR FUEL LEAKS (See page FI±16)
FI±60
EFI SYSTEM
± Fuel System (Fuel Pressure Pulsation Damper)
WhereEverybodyKnowsYourName
Page 2447 of 4087
ON±VEHICLE INSPECTION
1. INSPECT THROTTLE BODY(a) Remove the throttle body cover.w Remove the mounting cap nut.
w Loosen the two bolts, and remove the throttle body
cover.
(b) Check that the throttle linkage moves smoothly.
(c) Check the vacuum at each port. w Start the engine.
w Check the vacuum with your finger.
Port nameAt idlingAt 3,000 rpm
PNo vacuumVacuum
*ENo vacuumVacuum
*RNo vacuumVacuum
* Exc. USA Spec.
(d) Reinstall the throttle body cover.
3. INSPECT AND ADJUST DASH POT (DP)
A. Warm up engine Allow the engine to warm up to normal operating tempera-
ture.
B. Check idle speed
Idle speed: 700 + 50 rpm
C. Remove cap, filter and separator from DP FI±67
EFI SYSTEM
± Air Induction System (Throttle Body)
WhereEverybodyKnowsYourName