1991 HONDA CIVIC check engine
[x] Cancel search: check enginePage 29 of 136

Speedometer
The speed is indicated in miles per hour (outside scale) and kilometers per hour (inside).
Odometer
The numbers on the odometer indicate miles.
The odometer registers total distance traveled, and serves as your guide for determining when periodic maintenance is due. Federal lawmakes it illegal to alter the odometer of any motor vehicle with the
intent to change the number of miles indicated.
Trip Meter The numbers on the trip meter indicate miles.
The trip meter can be returned to zero by pushing in the reset button. Use it for checking fuel consumption or distance traveled
per trip.
Tachometer (Si Hatchback and LX/EX Sedan) The tachometer indicates engine speed in revolutions per minute.
The beginning of the RED ZONE indicates the maximum allowableengine R.P.M. Do not run the engine with the tachometer indicator
needle in the RED ZONE.
Fuel Gauge
FUEL TANK CAPACITY: 45 (11.9 US gal ,9.9 Imp gal)
As a convenience, the gauge continues to show the same fuel level
as when the ignition was last on. After refueling, the gauge will
slowly change to the new fuel level when the ignition is switched on.
When the needle first indicates E (empty), you have a usable
reserve left in the tank of about:
4 (1.1 US gal, 0.9 Imp gal)
Coolant Temperature Gauge
CAUTION:
The needle should stay within the white range. If the needle reaches the red line at "H" (Hot), pull safely off the road, stop theengine and check the coolant level in the reserve tank on the
driver's side of the radiator under the hood.
Do not remove the radiator cap when the engine is hot. The
coolant is under pressure and may blow out and scald you.
GaugesProCarManuals.comMain Menu s t
Page 31 of 136
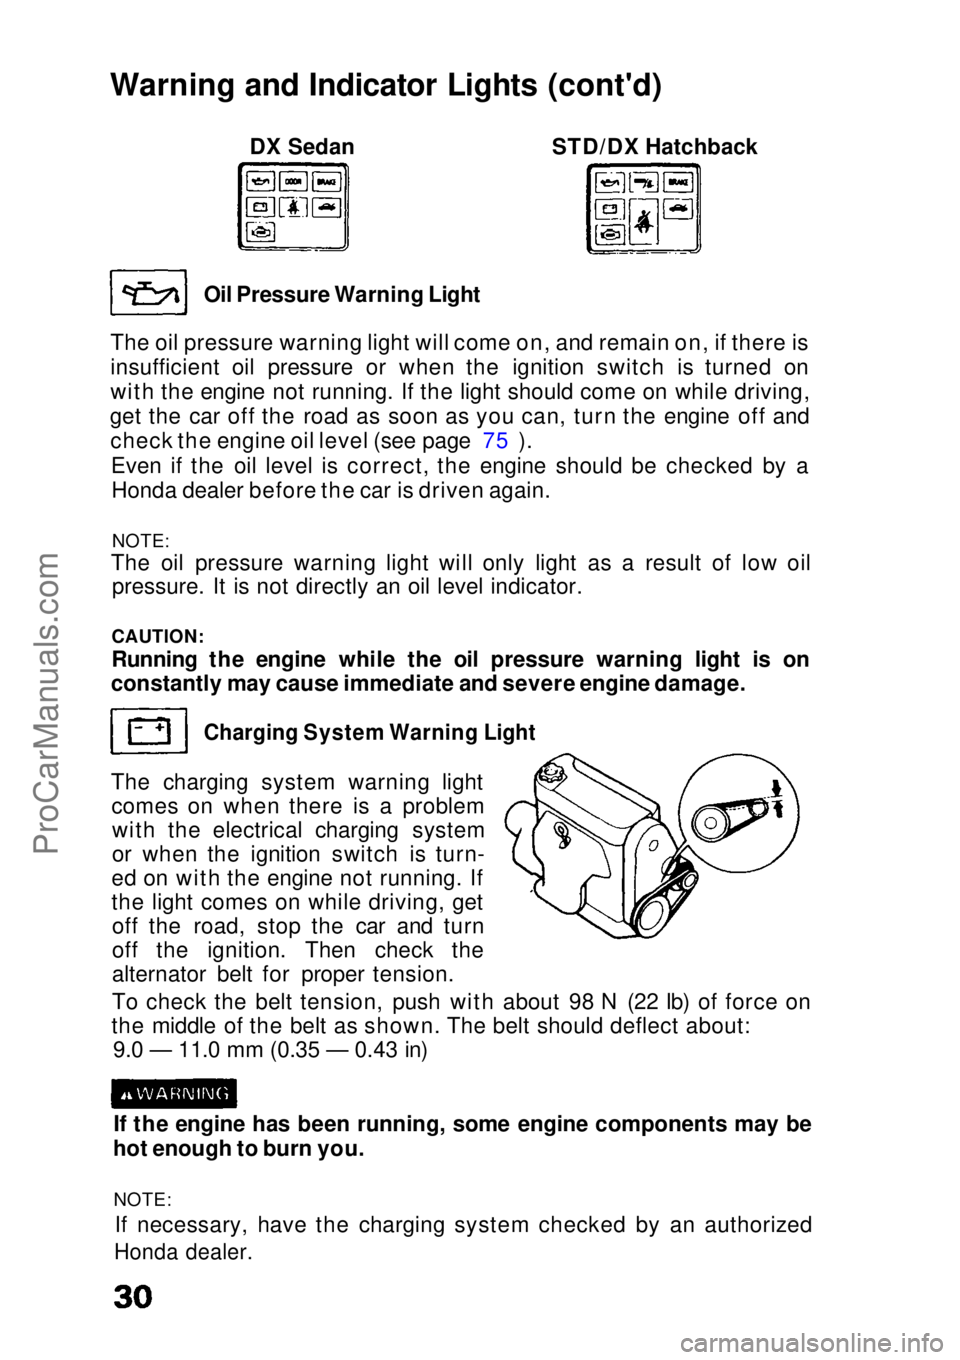
Warning and Indicator Lights (cont'd)
DX Sedan STD/DX Hatchback
Oil Pressure Warning Light
The oil pressure warning light will come on, and remain on, if there is
insufficient oil pressure or when the ignition switch is turned on
with the engine not running. If the light should come on while driving,
get the car off the road as soon as you can, turn the engine off and check the engine oil level (see page 75 ).
Even if the oil level is correct, the engine should be checked by aHonda dealer before the car is driven again.
NOTE:
The oil pressure warning light will only light as a result of low oil
pressure. It is not directly an oil level indicator.
CAUTION:
Running the engine while the oil pressure warning light is on
constantly may cause immediate and severe engine damage.
Charging System Warning Light
The charging system warning light comes on when there is a problemwith the electrical charging system
or when the ignition switch is turn-
ed on with the engine not running. If
the light comes on while driving, get off the road, stop the car and turn
off the ignition. Then check the
alternator belt for proper tension.
To check the belt tension, push with about 98 N (22 Ib) of force on
the middle of the belt as shown. The belt should deflect about: 9.0 — 11.0 mm (0.35 — 0.43 in)
If the engine has been running, some engine components may be
hot enough to burn you.
NOTE: If necessary, have the charging system checked by an authorized
Honda dealer.ProCarManuals.comMain Menu s t
Page 32 of 136
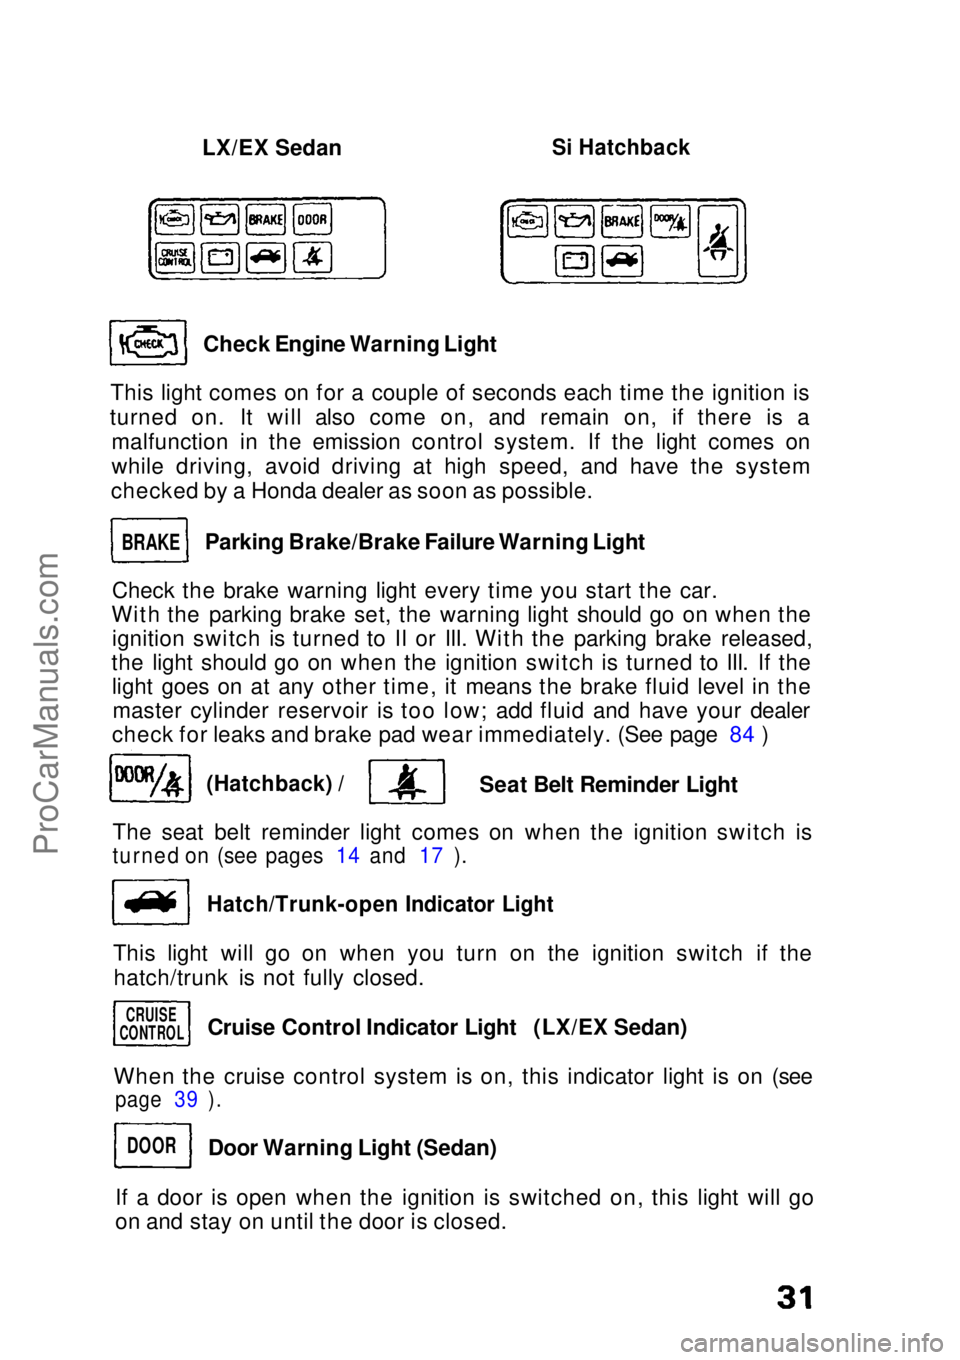
LX/EX Sedan
Si Hatchback
Check Engine Warning Light
This light comes on for a couple of seconds each time the ignition is
turned on. It will also come on, and remain on, if there is a malfunction in the emission control system. If the light comes on
while driving, avoid driving at high speed, and have the system
checked by a Honda dealer as soon as possible.
Parking Brake/Brake Failure Warning Light
Check the brake warning light every time you start the car.
With the parking brake set, the warning light should go on when the ignition switch is turned to II or III. With the parking brake released,
the light should go on when the ignition switch is turned to III. If the light goes on at any other time, it means the brake fluid level in themaster cylinder reservoir is too low; add fluid and have your dealer
check for leaks and brake pad wear immediately. (See page 84 )
(Hatchback) /
Seat Belt Reminder Light
The seat belt reminder light comes on when the ignition switch is
turned on (see pages 14 and 17 ).
Hatch/Trunk-open Indicator Light
This light will go on when you turn on the ignition switch if the hatch/trunk is not fully closed.
When the cruise control system is on, this indicator light is on (see
page 39 ).
If a door is open when the ignition is switched on, this light will go
on and stay on until the door is closed.
BRAKE
CRUISE
CONTROL
DOOR
Cruise Control Indicator Light (LX/EX Sedan)
Door Warning Light (Sedan)ProCarManuals.comMain Menu s t
Page 57 of 136

Gasoline (cont'd)
Fuel vapor is extremely hazardous under certain conditions.
Always stop the engine before refueling, and never refuel near
sparks or open flames. CAUTION:
When reinstalling the fuel cap, be sure both tabs on the cap are
engaged in the slots of the filler neck and turn the cap until it stops. If you replace the cap, use only a genuine Honda replacement part
or its equivalent. Failure to use the proper part could cause serious
fuel system problems.
How to Improve Your Gas Mileage: Drive at a smooth, steady pace to avoid unnecessary decele-
rations and stops — accelerating back to speed uses more fuel.Plan trips to avoid rush hour traffic if possible. Make sure the parking brake is completely released.
Consolidate trips whenever possible.
Keep vehicle weight to a minimum by removing unnecessary
items from the luggage area.
Whenever possible, use fresh air from the dash vents to keep
cool when driving; open windows, or use of the optional air
conditioning both affect fuel economy.
Keep the tires adjusted to the recommended pressure.
Tire Pressure (measured cold): STD Hatchback front 240 kPa (35 psi)
rear 220 kPa (32 psi)
DX Hatchback front 220 kPa (32 psi)
rear 220 kPa (32 psi)
Si Hatchback front 195 kPa (28 psi)
rear 195 kPa (28 psi)
DX Sedan front 220 kPa (32 psi)
rear 220 kPa (32 psi)
LX Sedan front 180 kPa (26 psi)
rear 180 kPa (26 psi)
EX Sedan front 180 kPa (26 psi)
rear 180 kPa (26 psi)
Condition of Your Car You can only get maximum fuel economy if your car is in toprunning condition. Have all required maintenance done at the proper
intervals. Check tire pressures and tire wear frequently. If tire wear is uneven, have the alignment checked by your Honda dealer.
Proper alignment saves gasoline and prolongs tire life.ProCarManuals.comMain Menu s t
Page 62 of 136
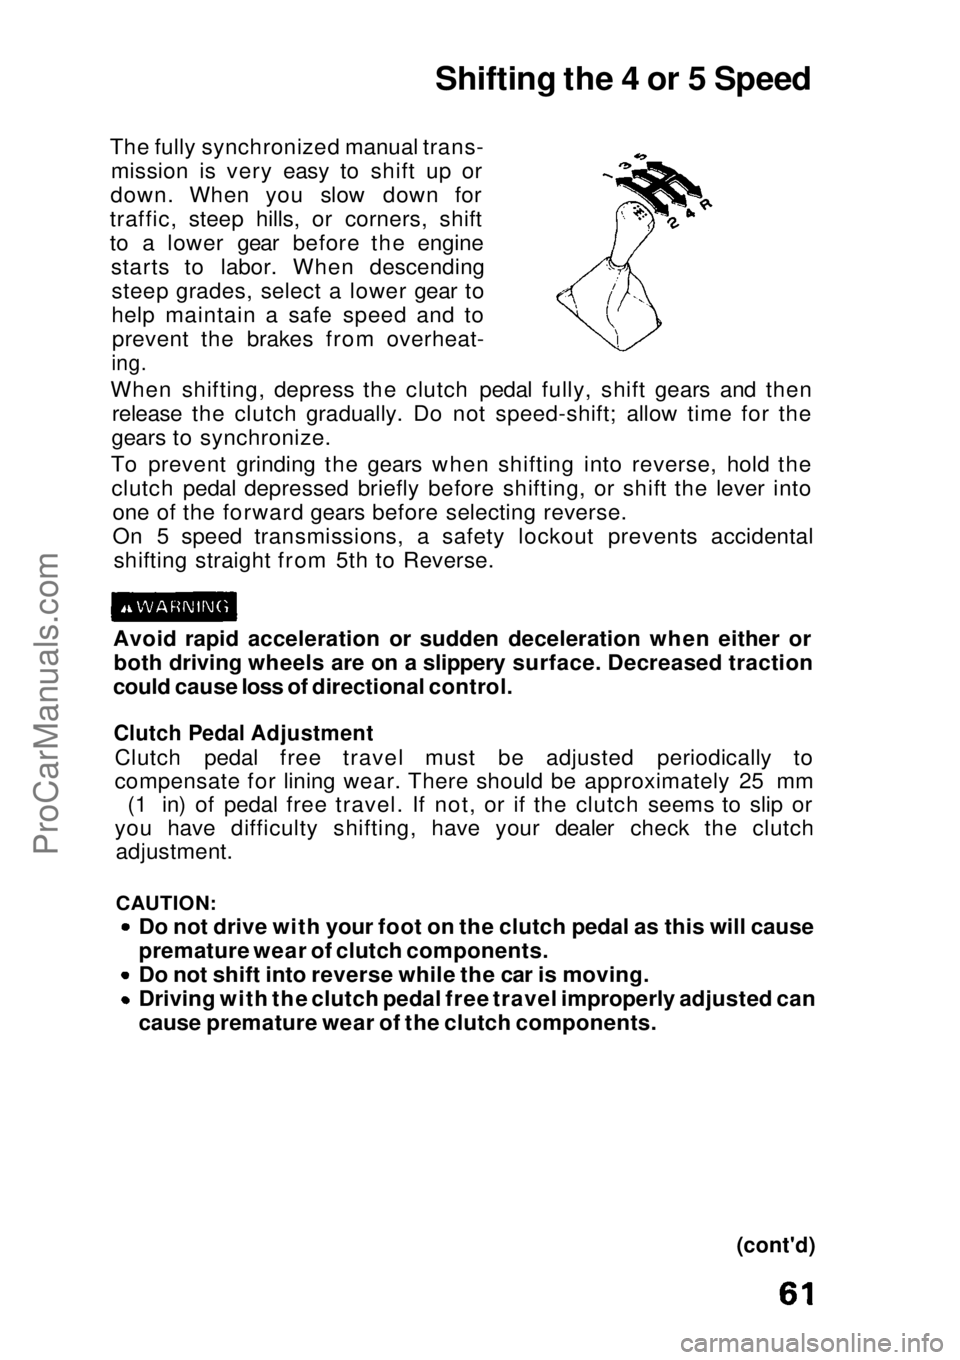
Shifting the 4 or 5 Speed
The fully synchronized manual trans- mission is very easy to shift up or
down. When you slow down for
traffic, steep hills, or corners, shift
to a lower gear before the engine starts to labor. When descendingsteep grades, select a lower gear to
help maintain a safe speed and toprevent the brakes from overheat-
ing.
When shifting, depress the clutch pedal fully, shift gears and then release the clutch gradually. Do not speed-shift; allow time for the
gears to synchronize.
To prevent grinding the gears when shifting into reverse, hold the clutch pedal depressed briefly before shifting, or shift the lever into one of the forward gears before selecting reverse.
On 5 speed transmissions, a safety lockout prevents accidentalshifting straight from 5th to Reverse.
Avoid rapid acceleration or sudden deceleration when either or both driving wheels are on a slippery surface. Decreased traction
could cause loss of directional control.
Clutch Pedal Adjustment
Clutch pedal free travel must be adjusted periodically to
compensate for lining wear. There should be approximately 25 mm (1 in) of pedal free travel. If not, or if the clutch seems to slip or
you have difficulty shifting, have your dealer check the clutch adjustment.
CAUTION:
Do not drive with your foot on the clutch pedal as this will cause
premature wear of clutch components.
Do not shift into reverse while the car is moving. Driving with the clutch pedal free travel improperly adjusted can
cause premature wear of the clutch components.
(cont'd)ProCarManuals.comMain Menu s t
Page 65 of 136
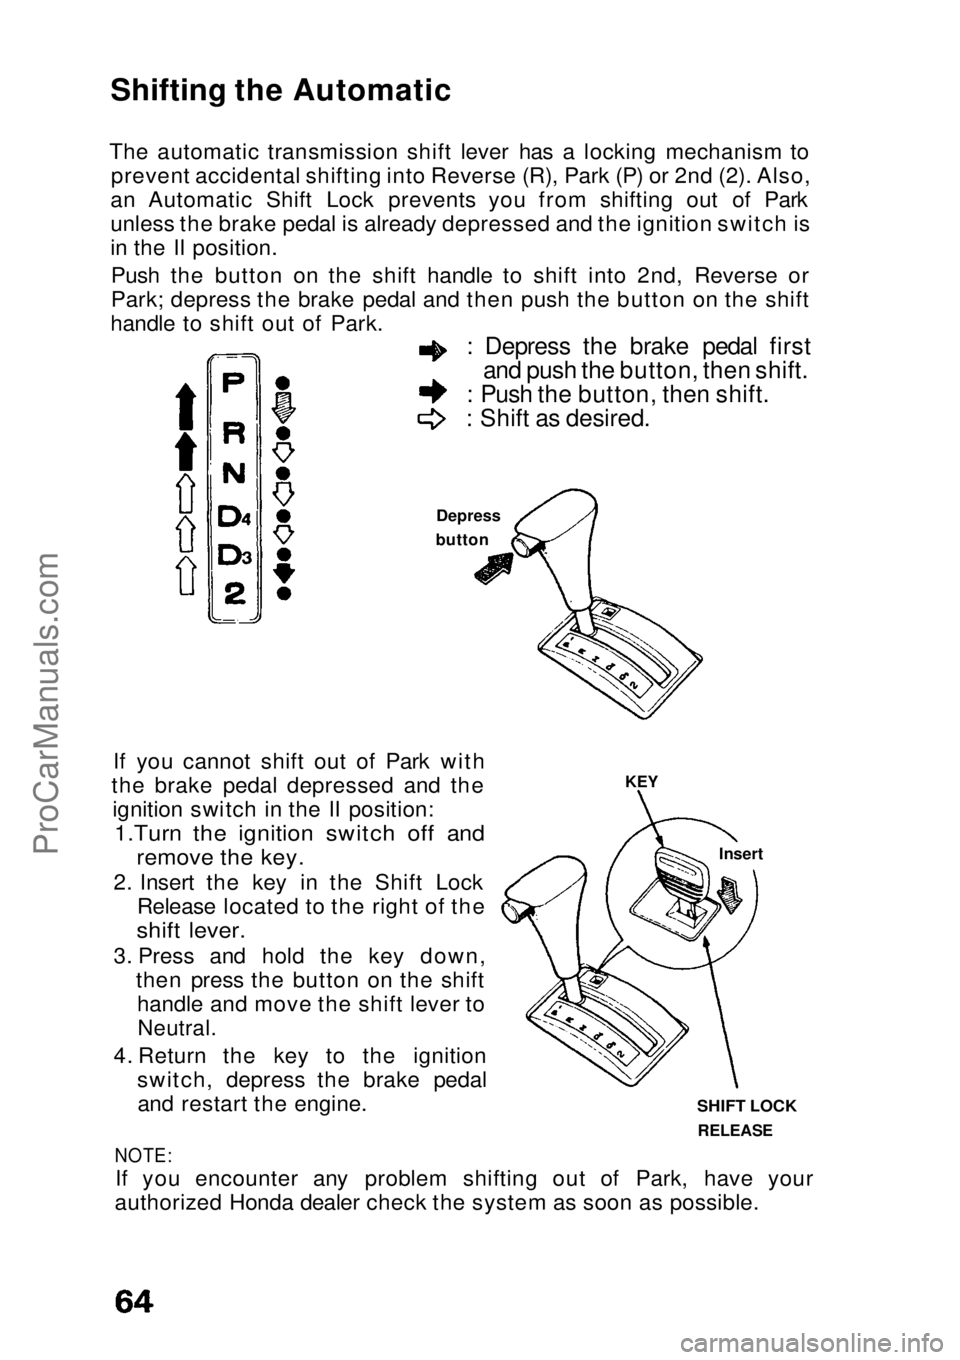
Shifting the Automatic
The automatic transmission shift lever has a locking mechanism to prevent accidental shifting into Reverse (R), Park (P) or 2nd (2). Also,
an Automatic Shift Lock prevents you from shifting out of Park
unless the brake pedal is already depressed and the ignition switch is
in the II position.
Push the button on the shift handle to shift into 2nd, Reverse or
Park; depress the brake pedal and then push the button on the shift
handle to shift out of Park. : Depress the brake pedal first
and push the button, then shift.
: Push the button, then shift.
: Shift as desired.
Depress
button
SHIFT LOCK
RELEASE
KEY
Insert
If you cannot shift out of Park with
the brake pedal depressed and the ignition switch in the II position:
1.Turn the ignition switch off and
remove the key.
2. Insert the key in the Shift Lock Release located to the right of the
shift lever.
3. Press and hold the key down, then press the button on the shifthandle and move the shift lever to
Neutral.
4. Return the key to the ignition switch, depress the brake pedaland restart the engine.
NOTE:
If you encounter any problem shifting out of Park, have your
authorized Honda dealer check the system as soon as possible.ProCarManuals.comMain Menu s t
Page 69 of 136

Check the following items at each fuel stop:
1. Engine oil level.
2. Radiator coolant level.
Check the following items periodically: 1. Brakes: for braking efficiency, brake pedal travel and hydraulic
fluid level.
2. Lights: for operation of headlights, taillights, side marker lights, stoplights, turn signals and back-up lights.
3. Tires: for correct pressures (including spare); inspect for cuts and uneven or excessive wear. Rotate every 7,500 miles (12,000 km)
in the pattern shown on page 97.
4. Steering: for excessive play or vibration while driving. 5. Exhaust system: for leaks or loose mounts.
6. Wipers: for operation of windshield wipers and washer, and condition of wiper blades.
7. Seat belts: for condition of fabric and buckles, and operation of the restraint mechanism.
8. Battery condition.
9. Clutch adjustment (clutch pedal free travel).
(cont'd)ProCarManuals.comMain Menu s t
Page 75 of 136
Engine Oil and Filter
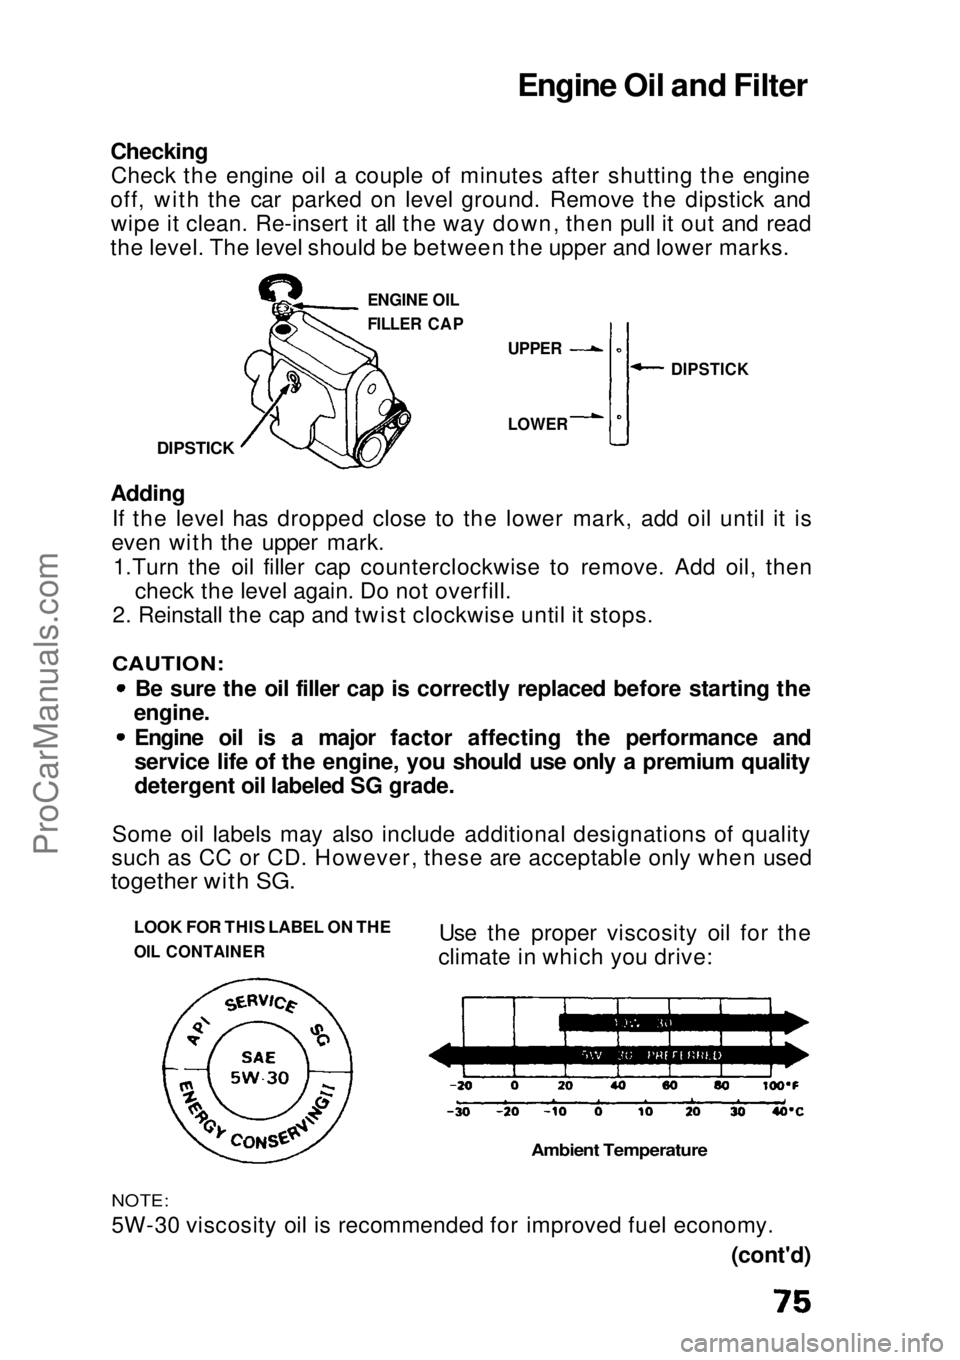
Checking
Check the engine oil a couple of minutes after shutting the engine
off, with the car parked on level ground. Remove the dipstick and wipe it clean. Re-insert it all the way down, then pull it out and read
the level. The level should be between the upper and lower marks.
DIPSTICK
ENGINE OIL
FILLER CAP
Adding
If the level has dropped close to the lower mark, add oil until it is
even with the upper mark.
1.Turn the oil filler cap counterclockwise to remove. Add oil, then check the level again. Do not overfill.
2. Reinstall the cap and twist clockwise until it stops.
CAUTION:
Be sure the oil filler cap is correctly replaced before starting the
engine.
Engine oil is a major factor affecting the performance and
service life of the engine, you should use only a premium quality
detergent oil labeled SG grade.
Some oil labels may also include additional designations of quality
such as CC or CD. However, these are acceptable only when used
together with SG.
LOOK FOR THIS LABEL ON THE
OIL CONTAINER
Use the proper viscosity oil for the
climate in which you drive:
Ambient Temperature
NOTE:
5W-30 viscosity oil is recommended for improved fuel economy.
(cont'd)
DIPSTICK
LOWER UPPERProCarManuals.comMain Menu s t