Page 113 of 143

Volvo 1990 240 Model
pg. 82 Wheels and tires
Checking and correcting tire pressure
Check the tire pressure when refueling. The tire pressure should only be\
corrected when the tires are
cold. With warm tires, correct only when the pressure is too low. The ti\
re temperature (and, thus,
pressure) rises after driving just a few miles.
Warning: Improperly inflated tires will reduce tire life, adversely affe\
ct vehicle handling and can
possibly lead to failure resulting in loss of vehicle control without pr\
ior warning.
Vehicle Loading
The tires on your Volvo will perform to specifications at all normal loa\
ds when inflated as
recommended on the tire information label located on the rear facing sid\
e of the right front door. This
label lists both tire and vehicle design limits.
Do not load your car beyond the load limits indicated.
Tire Pressure Label
The tire pressure label is located on the rear facing side of the right \
front door.
See section titled ''Specifications'' and Consumer Information Booklet f\
or complete tire pressure
information.
Wear indicator
The tires have a so-called "wear indicator in the form of a number of na\
rrow strips running across or
parallel to the tread. When approx 1/16 " (1.5 mm) is left on the trea\
d, these strips show up and indicate
the tire should be replaced.
Tires with less than 1/16" (1.5 mm) tread have a very poor grip in rai\
n or snow.
pg. 83 Wheels and tires
file:///K|/ownersdocs/1990/1990_240/90240_17.htm (1 of 2)12/30/2006 8:\
25:10 AM
Page 116 of 143

Volvo 1990 240 Model
cloth.
CAUTION: It is particularly important to wash the car frequently in the \
winter time, to prevent
corrosion, when salt has been used on the roads. Also wash off the dirt \
on the underside (Wheel
housings and fenders etc.)
WARNING: When the car is driven immediately after being washed, carefull\
y apply the brakes
several times in order to remove any moisture from the brake linings.
pg. 87 Washing, Cleaning, Anti-rust treatment
Automatic washing - simple and quick
An automatic wash is a simple and quick way to clean your car, but it is\
worth remembering that it can
never be as thorough as when you yourself go over the car with sponge an\
d water. Keeping the
underbody clean is most important, especially in the winter. Some automa\
tic washers do not have
facilities for washing the underbody.
Before driving into an automatic wash, make sure that side view mirrors,\
auxiliary lamps, etc., are
secure, otherwise there is risk of the machine dislodging them. You shou\
ld also lower the antenna.
We recommend that you do not wash your car in an automatic wash during t\
he first six months (because
the paint will not have hardened sufficiently).
Bird droppings /Tree sap
Remove from paintwork as soon as possible. Otherwise the finish may be p\
ermanently damaged.
Chromed parts
Chromium-plated and anodized parts should be washed with clean water as \
soon as they become dirty.
This is particularly important if you drive on gravel roads or on roads \
where salt is used during the
winter. After the car has been washed, apply wax or an anti-rust prepara\
tion.
Stains on chrome trim can be removed with commercially available chrome \
cleaner. Do not use abrasive
compounds or steel wool.
file:///K|/ownersdocs/1990/1990_240/90240_18.htm (2 of 8)12/30/2006 8:\
25:11 AM
Page 117 of 143

Volvo 1990 240 Model
Polishing (waxing)
Normally, polishing is not required during the first year after delivery\
. Waxing may be beneficial.
Before applying polish or wax the car must be washed and dried. Tar spot\
s can be removed with
kerosene or tar remover. Difficult spots may require a fine rubbing comp\
ound.
After polishing use liquid or paste wax.
Several commercially available products contain both polish and wax. Wax\
ing alone does not substitute
for polishing of a dull surface.
A wide range of polymer based car waxes can be purchased today. The waxe\
s are easy to use and
produce a long lasting high gloss finish which protects the bodywork aga\
inst oxidation, road dirt and
fading.
Cleaning the upholstery
Generally the fabric can be cleaned with soapy water or a detergent. For\
more difficult spots caused by
oil, ice cream, shoe polish, grease, etc., use a stain remover.
The plastic in the upholstery can be washed.
To clean leather upholstery , use soft cloth and mild soap solution, for\
instance common bath soap.
For more difficult spots, consult an expert for the choice of cleaning a\
gent.
On no account must gasoline, naphtha or similar cleaning agents be used \
on the plastic or the leather
since these can cause damage.
When aging, leather changes appearance, but the typical texture remains.\
To preserve smoothness and
appearance, it is recommended to treat the leather with a special leathe\
r preservative after one or two
years of use.
Cleaning the seat belts
Clean only with luke warm water and mild soap solution.
WARNING! Do not use cleaning solvents to clean the seat
belts.
Cleaning floor mats
file:///K|/ownersdocs/1990/1990_240/90240_18.htm (3 of 8)12/30/2006 8:\
25:11 AM
Page 121 of 143

Volvo 1990 240 Model
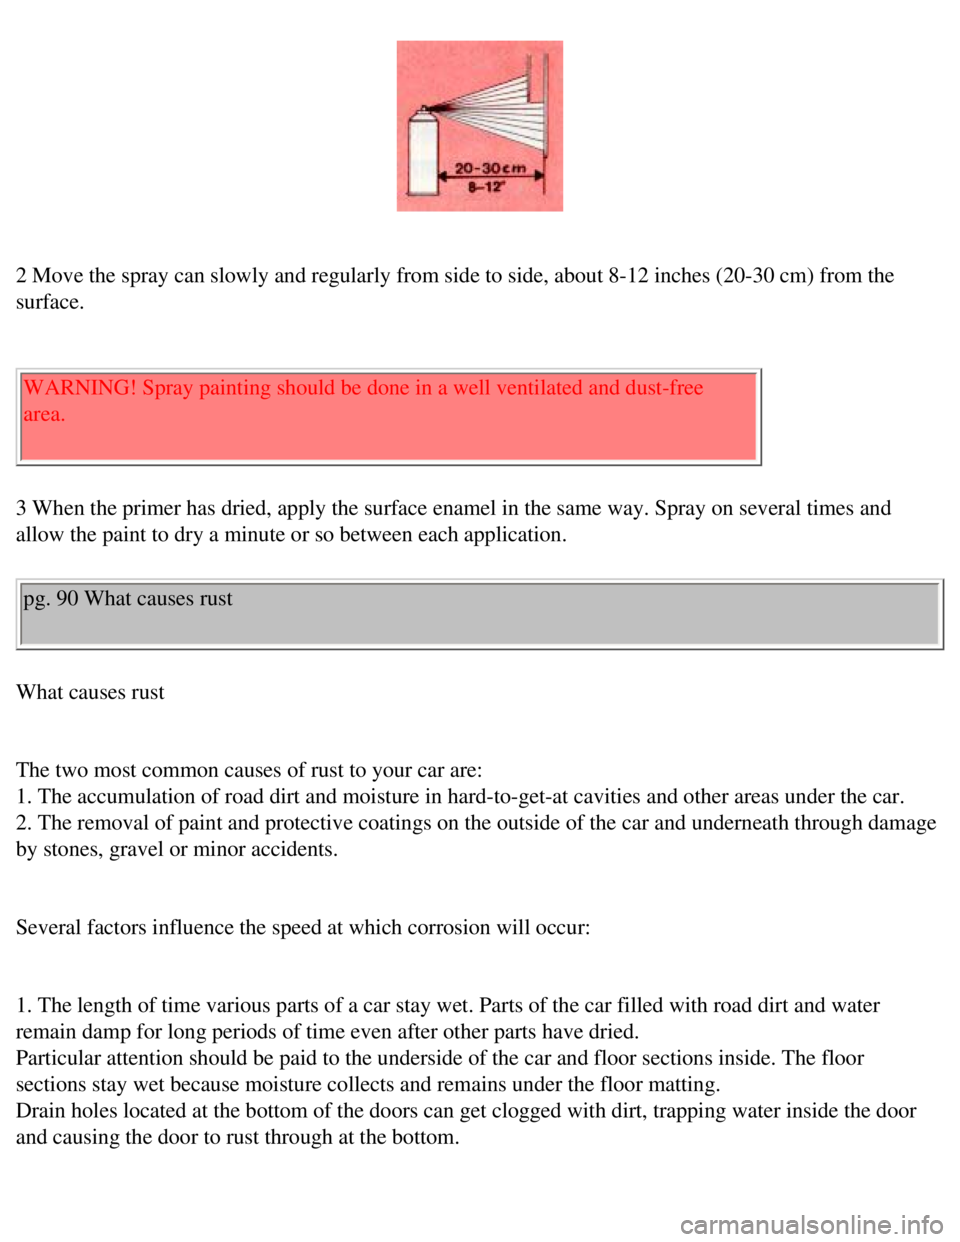
2 Move the spray can slowly and regularly from side to side, about 8-12 \
inches (20-30 cm) from the
surface.
WARNING! Spray painting should be done in a well ventilated and dust-fre\
e
area.
3 When the primer has dried, apply the surface enamel in the same way. S\
pray on several times and
allow the paint to dry a minute or so between each application.
pg. 90 What causes rust
What causes rust
The two most common causes of rust to your car are:
1. The accumulation of road dirt and moisture in hard-to-get-at cavities\
and other areas under the car.
2. The removal of paint and protective coatings on the outside of the ca\
r and underneath through damage
by stones, gravel or minor accidents.
Several factors influence the speed at which corrosion will occur:
1. The length of time various parts of a car stay wet. Parts of the car \
filled with road dirt and water
remain damp for long periods of time even after other parts have dried. \
Particular attention should be paid to the underside of the car and floo\
r sections inside. The floor
sections stay wet because moisture collects and remains under the floor \
matting.
Drain holes located at the bottom of the doors can get clogged with dirt\
, trapping water inside the door
and causing the door to rust through at the bottom.
file:///K|/ownersdocs/1990/1990_240/90240_18.htm (7 of 8)12/30/2006 8:\
25:11 AM
Page 125 of 143

Volvo 1990 240 Model
dealer.
Condition: Starter fails to operate (or operates very slowly)
Possible cause Correction
Weak battery or dead cell. With the starting (ignition) switch in the "Driving"
or "On" position, check to see if the warning lights
on the dashboard come on and if they stay on when
the starter is engaged. If the lights do not come on or
if they go off when the starter is engaged, the battery
is discharged or see below.
Loose or corroded battery cable terminals. Check battery terminals and clamps. Clean or
replace if necessary. Check that the starter cable is
secure at its terminals.
The ground strap, which connects the battery
negative (-) terminal to the engine, should also be
checked for corrosion or looseness.
Open circuit between starting (ignition) switch
and starting (ignition) switch terminal on
starter. The circuit is closed if a clicking sound is heard
from the starter when it is engaged. If no clicking
sound is heard, check that the blue wire at the starter
is secure. If still no clicking sound is heard, the
starting (ignition) switch or the wire is defective.
Starter motor defective. If the above checks have been performed, and no
fault is evident, the starter may be defective. NOTE:
In this case the headlight intensity will not dim when
the starter is engaged.
pg. 93 Service diagnosis
Condition: Starter motor operates but engine does not start
file:///K|/ownersdocs/1990/1990_240/90240_19.htm (3 of 7)12/30/2006 8:\
25:13 AM
Page 132 of 143

Volvo 1990 240 Model
Cargo opening, maximum width 45.7" (116 cm)
Cargo opening, maximum
height 30.7" (78 cm)
WARNING: When adding accessories, equipment, luggage and other cargo to \
your vehicle, the total
loaded weight capacity of the vehicle must not be exceeded. Consult your\
dealer for information.
Dimensions and weights for Canadian models
4 door Wagon
Length 482 cm 484 cm
Curb weight (depending on
type) 1306-1321
kg 1373- 1388
kg
Gross vehicle weight 1830 kg 1950 kg
Capacity weight 440 kg 540 kg
Permissible axle weight, front
rear 855 kg
990 kg 855 kg
1180 kg
pg. 99 Specifications
Engine B230F (2.3 liters; 141 cu. in.)
Liquid-cooled, gasoline, 4-cylinder in-line engine. Cast-iron cylinder b\
lock with cylinders bored directly
in block. Aluminum-alloy cylinder head with single overhead camshaft and\
separate intake and outlet
channels. Engine lubrication is provided by a gear pump driven from the \
crankshaft. Full-flow type oil
file:///K|/ownersdocs/1990/1990_240/90240_20.htm (3 of 14)12/30/2006 8\
:25:15 AM
Page 138 of 143
Volvo 1990 240 Model
Rear ash tray light 1.2 W W2x4.6d 1
License plate light, sedan 4 W Ba 9 s 2
License plate light,
wagon 5 W
S 8.5-8 2
Interior light 10 W S 8.5-8 1
Glove box light 2 W Ba 9 s 1
Instrument panel light 3 W W2.1x9.5d 2
Control panel light 1.2 W W2x4.6d 3
Shift positions, auto trans. 1.2 W W2x4.6d 1
Engine compartment light 15 W S 8.5-8 1
Trunk light 15 W S 8.5-8 1
Warning indicator lamps
Charging 1.2 W W2x4.6d 1
Turn signals 1.2 W W2x4.6d 2
Brake failure 1.2 W W2x4.6d 1
Parking brake 1.2 W W2x4.6d 1
Headlights 1.2 W W2x4.6d 1
Oil pressure 1.2 W W2x4.6d 1
file:///K|/ownersdocs/1990/1990_240/90240_20.htm (9 of 14)12/30/2006 8\
:25:15 AM
Page 139 of 143
Volvo 1990 240 Model
Overdrive off (auto
trans.) 1.2 W
W2x4.6d 1
Warning flashers 1.2 W W2x4.6d 1
El. heated window 1.2 W W2x4.6d 1
Seat belts 2 W Ba 9 s 2
Bulb failure 1.2 W W2x4.6d 1
pg. 103 Specifications
Recommended max. and min. speeds†, mph (km/h)
Manual transmission M47 II
1st gear 2nd gear 3rd gear 4th gear 5th gear
-25 (-
40) 10-44 (20-
70) 20-70 (30-
110) 25-
(44-) 44-
(70-)
† always observe posted speed limits.
Vehicle Loading
The tires on your Volvo will perform to specifications at all normal loa\
ds when inflated as
recommended on the tire information label located on the rear facing sid\
e of the right front door.
This label lists both tire and vehicle design limits.
Do not load your car beyond the load limits indicated.
file:///K|/ownersdocs/1990/1990_240/90240_20.htm (10 of 14)12/30/2006 \
8:25:15 AM