1989 FORD FIESTA manual radio set
[x] Cancel search: manual radio setPage 250 of 296

27 Anti-theft systems-
general information
Anti-theft alarm system
1 This system provides an added form of
vehicle security. When the system is
activated, the alarm will sound if the vehicle is
broken into through any one of the doors, the
bonnet, or tailgate. The alarm will also be
triggered if the ignition system is turned on or
the radio/cassette disconnected whilst the
system is activated.
2 This system is activated/de-activated
whenever one of the front doors is
locked/unlocked by the key. The system
operates on all doors, the bonnet and tailgate
whenever each door is individually locked (or,
in the case of central locking, when the central
locking is engaged). In addition, the
ignition/starting system is also immobilised
when the system is activated.
3 A further security feature included is that
even though the battery may be disconnected
whilst the system is activated, the alarm
activation continues as soon as the battery is
reconnected. Because of this feature, it is
important to ensure that the system is de-
activated before disconnecting the battery at
any time, such as when working on the
vehicle.
4 The system incorporates a diagnostic mode
to enable Ford technicians to quickly identify
any faults in the system. In the event of a
system malfunction, any testing or
component removal and refitting should be
entrusted to a Ford dealer.
Passive Anti-Theft System
(PATS)
5 From 1994 model year onwards, a Passive
Anti-Theft System (PATS) is fitted. This
system, (which works independently of the
standard alarm system) is a vehicle
immobiliser which prevents the engine from
being started unless a specific code,
programmed into the ignition key, is
recognised by the PATS transceiver.
6 The PATS transceiver, fitted around the
ignition switch, decodes a signal from the
ignition key as the key is turned from position
“O” to position “II”. If the coded signal
matches that stored in the memory of the
PATS module, the engine will start. If the
signal is not recognised, the engine will crank
on the starter but will not fire.
28 Air bag (driver’s side) -
removal and refitting
4
Warning: Handle the air bag
with extreme care as a
precaution against personal
injury, and always hold it with the cover facing away from your body. If in
doubt concerning any proposed work
involving the air bag or its control circuitry,
consult a Ford dealer or other qualified
specialist.
Removal
1
Disconnect the battery negative (earth) lead
(refer to Chapter 5A, Section 1). Warning: Before proceeding,
wait a minimum of 15 minutes,
as a precaution against
accidental firing of the air bag.
This period ensures that any stored energy
in the back-up capacitor is dissipated.
2 Undo the screws, and remove the steering
column lower shroud.
3 Undo the two external screws and the two
internal screws and remove the steering
column upper shroud.
4 Turn the steering wheel as necessary so
that one of the air bag module retaining bolts
becomes accessible from the rear of the
steering wheel. Undo the bolt, then turn the
steering wheel again until the second bolt is
accessible. Undo this bolt also.
5 Withdraw the air bag module from the
steering wheel far enough to access the
wiring multi-plug. Some force may be needed
to free the module from the additional steering
wheel spoke retainers.
6 Disconnect the multi-plug from the rear of
the module, and remove the module from the
vehicle. Warning: Position the air bag
module in a safe place, with the
mechanism facing downwards
as a precaution against
accidental operation.
Warning: Do not attempt to
open or repair the air bag unit,
or apply any electrical current to
it. Do not use any air bag which
is visibly damaged or which has been
tampered with.
Refitting
7 Refitting is a reversal of the removal
procedure.
29 Air bag (passenger’s side) -
removal and refitting
4
Warning: Handle the air bag
with extreme care as a
precaution against personal
injury, and always hold it with
the cover facing away from your body. If in
doubt concerning any proposed work
involving the air bag or its control circuitry,
consult a Ford dealer or other qualified
specialist.
Removal
1 Disconnect the battery negative (earth) lead
(refer to Chapter 5A, Section 1). Warning: Before proceeding,
wait a minimum of 15 minutes,
as a precaution against
accidental firing of the air bag.
This period ensures that any stored energy
in the back-up capacitor is dissipated.
2 Remove the facia as described in Chap-
ter 11.
3 Undo the air bag module retaining nuts and
remove the unit from the facia. Warning: Position the air bag
module in a safe place, with the
mechanism facing downwards
as a precaution against
accidental operation.
Warning: Do not attempt to
open or repair the air bag unit,
or apply any electrical current to
it. Do not use any air bag which
is visibly damaged or which has been
tampered with.
Refitting
4 Refitting is a reversal of the removal
procedure.
30 Air bag control module -
removal and refitting
4
Removal
1 Disconnect the battery negative (earth) lead
(refer to Chapter 5A, Section 1). Warning: Before proceeding,
wait a minimum of 15 minutes,
as a precaution against
accidental firing of the air bag
unit. This period ensures that any stored
energy in the back-up capacitor is
dissipated.
2 Remove the module access cover from the
rear of the glovebox.
3 Press the module wiring multi-plug locking
tag upwards then pivot the retaining strap
over and disconnect the multi-plug.
4 Remove the facia as described in Chap-
ter 11.
5 Undo the three retaining bolts and remove
the module from its location.
Refitting
6 Refitting is a reversal of the removal
procedure.
31 Air bag clock spring -
removal and refitting
4
Removal
1 Remove the steering wheel as described in
Chapter 10.
2 Undo the three retaining screws, and
remove the clock spring from the steering
wheel. As the unit is withdrawn, note which
aperture in the steering wheel the air bag
Body electrical systems 12•17
12
1595Ford Fiesta Remakeprocarmanuals.com
http://vnx.su
Page 267 of 296

1595 Ford Fiesta Remake
REF
Dimensions and weights
Note:All figures are approximate, and may vary according to model. Refer to m\
anufacturer’s data for exact figures.
Dimensions
Overall length: 3/5 door hatchback models . . . . . . . . . . . . . . . . . . . . . . . . . . . . . . . . 3743 mm
XR2i, RS Turbo and RS 1800 models . . . . . . . . . . . . . . . . . . . . . . . . . 3801 mm
Courier models . . . . . . . . . . . . . . . . . . . . . . . . . . . . . . . . . . . .\
. . . . . . 4052 mm
Width (excluding mirrors): 3/5 door hatchback models . . . . . . . . . . . . . . . . . . . . . . . . . . . . . . . . 1606 mm
XR2i, RS Turbo and RS 1800 models . . . . . . . . . . . . . . . . . . . . . . . . . 1630 mm
Courier models . . . . . . . . . . . . . . . . . . . . . . . . . . . . . . . . . . . .\
. . . . . . 1650 mm
Overall height: 3/5 door hatchback models . . . . . . . . . . . . . . . . . . . . . . . . . . . . . . . . 1376 mm
XR2i, RS Turbo and RS 1800 models . . . . . . . . . . . . . . . . . . . . . . . . . 1365 mm
Courier models . . . . . . . . . . . . . . . . . . . . . . . . . . . . . . . . . . . .\
. . . . . . 1812 mm
Wheelbase: Courier models . . . . . . . . . . . . . . . . . . . . . . . . . . . . . . . . . . . .\
. . . . . . 2700 mm
All other models . . . . . . . . . . . . . . . . . . . . . . . . . . . . . . . . . . . .\
. . . . . 2446 mm
Front track: 3/5 door hatchback models . . . . . . . . . . . . . . . . . . . . . . . . . . . . . . . . 1392 mm
XR2i, RS Turbo and RS 1800 models . . . . . . . . . . . . . . . . . . . . . . . . . 1406 mm
Courier models . . . . . . . . . . . . . . . . . . . . . . . . . . . . . . . . . . . .\
. . . . . . 1392 mm
Rear track: 3/5 door hatchback models . . . . . . . . . . . . . . . . . . . . . . . . . . . . . . . . 1384 mm
XR2i, RS Turbo and RS 1800 models . . . . . . . . . . . . . . . . . . . . . . . . . 1376 mm
Courier models . . . . . . . . . . . . . . . . . . . . . . . . . . . . . . . . . . . .\
. . . . . . 1395 mm
Dimensions and weights . . . . . . . . . . . . . . . . REF•1
Vehicle identification . . . . . . . . . . . . . . . . . . . REF•3
General repair procedures . . . . . . . . . . . . . . REF•4
Jacking and vehicle support . . . . . . . . . . . . . REF•5
Buying spare parts . . . . . . . . . . . . . . . . . . . . REF•5
Radio/cassette unit anti-theft system . . . . . REF•5Conversion factors . . . . . . . . . . . . . . . . . . . .
REF•6
Tools and working facilities . . . . . . . . . . . . . . REF•7
MOT test checks . . . . . . . . . . . . . . . . . . . . . REF•10
Fault finding . . . . . . . . . . . . . . . . . . . . . . . . REF•14
Glossary of technical terms . . . . . . . . . . . . REF•22
Index . . . . . . . . . . . . . . . . . . . . . . . . . . . . . . REF•27
Reference REF•1
procarmanuals.com
http://vnx.su
Page 271 of 296

1595 Ford Fiesta Remake
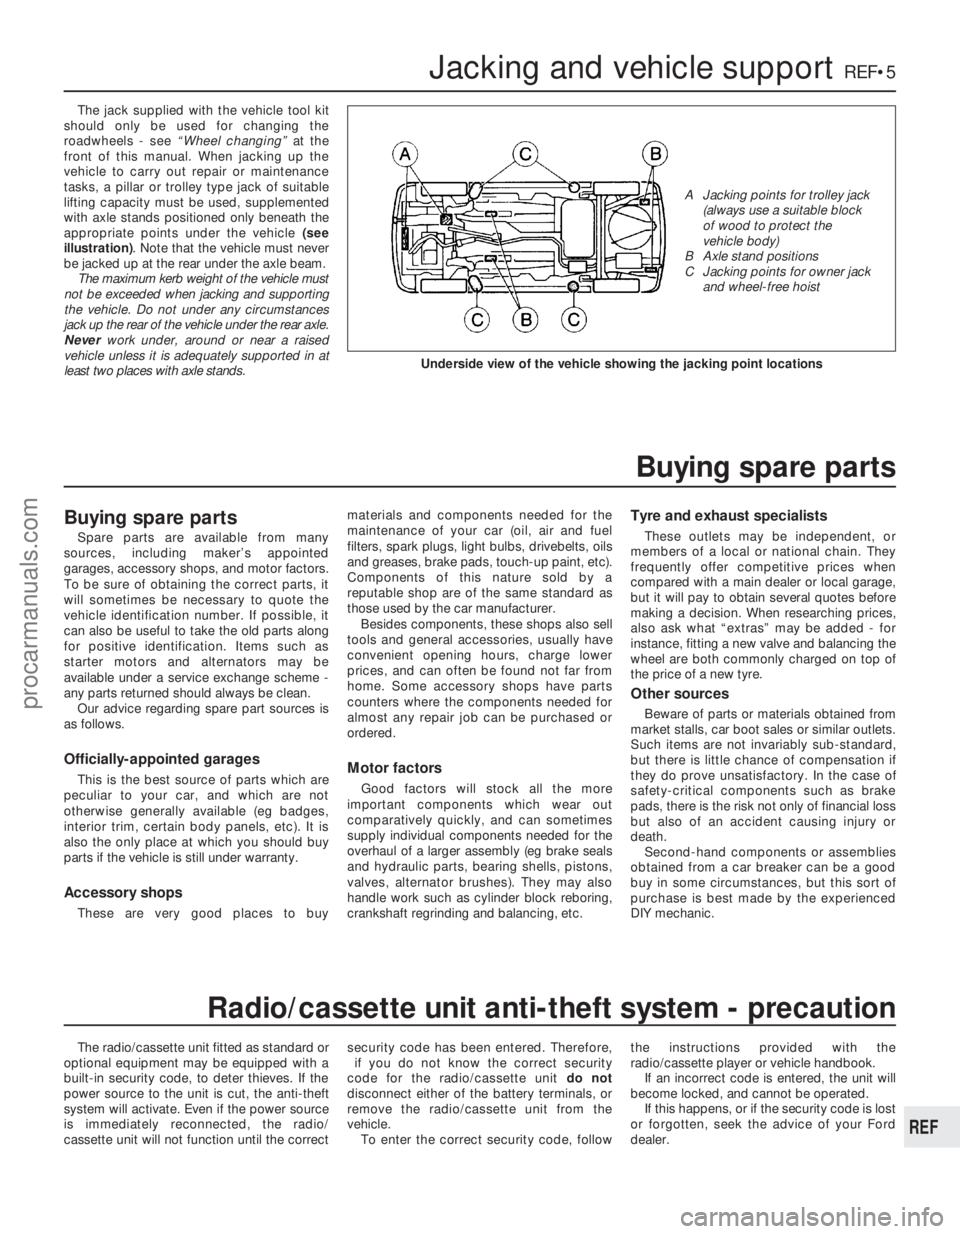
The jack supplied with the vehicle tool kit
should only be used for changing the
roadwheels - see “Wheel changing” at the
front of this manual. When jacking up the
vehicle to carry out repair or maintenance
tasks, a pillar or trolley type jack of suitable
lifting capacity must be used, supplemented
with axle stands positioned only beneath the
appropriate points under the vehicle (see
illustration) . Note that the vehicle must never
be jacked up at the rear under the axle beam. The maximum kerb weight of the vehicle must
not be exceeded when jacking and supporting
the vehicle. Do not under any circumstances
jack up the rear of the vehicle under the rear axle.
Never work under, around or near a raised
vehicle unless it is adequately supported in at
least two places with axle stands.
The radio/cassette unit fitted as standard or
optional equipment may be equipped with a
built-in security code, to deter thieves. If the
power source to the unit is cut, the anti-theft
system will activate. Even if the power source
is immediately reconnected, the radio/
cassette unit will not function until the correct security code has been entered. Therefore,
if you do not know the correct security
code for the radio/cassette unit do not
disconnect either of the battery terminals, or
remove the radio/cassette unit from the
vehicle. To enter the correct security code, follow the instructions provided with the
radio/cassette player or vehicle handbook.
If an incorrect code is entered, the unit will
become locked, and cannot be operated.
If this happens, or if the security code is lost
or forgotten, seek the advice of your Ford
dealer.
Jacking and vehicle supportREF•5
REF
Radio/cassette unit anti-theft system - precaution
Underside view of the vehicle showing the jacking point locations
A Jacking points for trolley jack (always use a suitable block
of wood to protect the
vehicle body)
B Axle stand positions
C Jacking points for owner jack and wheel-free hoist
Buying spare parts
Spare parts are available from many
sources, including maker’s appointed
garages, accessory shops, and motor factors.
To be sure of obtaining the correct parts, it
will sometimes be necessary to quote the
vehicle identification number. If possible, it
can also be useful to take the old parts along
for positive identification. Items such as
starter motors and alternators may be
available under a service exchange scheme -
any parts returned should always be clean.
Our advice regarding spare part sources is
as follows.
Officially-appointed garages
This is the best source of parts which are
peculiar to your car, and which are not
otherwise generally available (eg badges,
interior trim, certain body panels, etc). It is
also the only place at which you should buy
parts if the vehicle is still under warranty.
Accessory shops
These are very good places to buy materials and components needed for the
maintenance of your car (oil, air and fuel
filters, spark plugs, light bulbs, drivebelts, oils
and greases, brake pads, touch-up paint, etc).
Components of this nature sold by a
reputable shop are of the same standard as
those used by the car manufacturer.
Besides components, these shops also sell
tools and general accessories, usually have
convenient opening hours, charge lower
prices, and can often be found not far from
home. Some accessory shops have parts
counters where the components needed for
almost any repair job can be purchased or
ordered.
Motor factors
Good factors will stock all the more
important components which wear out
comparatively quickly, and can sometimes
supply individual components needed for the
overhaul of a larger assembly (eg brake seals
and hydraulic parts, bearing shells, pistons,
valves, alternator brushes). They may also
handle work such as cylinder block reboring,
crankshaft regrinding and balancing, etc.
Tyre and exhaust specialists
These outlets may be independent, or
members of a local or national chain. They
frequently offer competitive prices when
compared with a main dealer or local garage,
but it will pay to obtain several quotes before
making a decision. When researching prices,
also ask what “extras” may be added - for
instance, fitting a new valve and balancing the
wheel are both commonly charged on top of
the price of a new tyre.
Other sources
Beware of parts or materials obtained from
market stalls, car boot sales or similar outlets.
Such items are not invariably sub-standard,
but there is little chance of compensation if
they do prove unsatisfactory. In the case of
safety-critical components such as brake
pads, there is the risk not only of financial loss
but also of an accident causing injury or
death. Second-hand components or assemblies
obtained from a car breaker can be a good
buy in some circumstances, but this sort of
purchase is best made by the experienced
DIY mechanic.
Buying spare parts
procarmanuals.com
http://vnx.su