Page 859 of 1378
pulse signal generator, the magnetic field becomes weaker. This
indicates the position of piston number one to the ECU. When the
trailing edge of the pulse ring leaves the sync pulse signal
generator, the magnetic field becomes stronger. This indicates the
position of piston number six.
The sync pulse signal input and engine speed sensor input
allow the ECU to establish the necessary reference point to
synchronize the fuel injection.
Fig. 11: Sync Pulse Signal Generator Operation
Courtesy of Chrysler Motors.
KNOCK SENSOR
The knock sensor is located on the lower left side of the
engine block just above the oil pan. See Fig. 12. The knock sensor
provides an input to the ECU, indicating detonation (knock) during
engine operation. When knock occurs, the ECU retards the ignition
advance to eliminate the knock at the appropriate cylinder(s).
Page 861 of 1378

If connector locking tabs weaken or break, press together
firmly and bind with electrical tape or a harness tie strap to assure
good connection.
COMPONENT LOCATIONS
COMPONENT LOCATIONS������������������\
������������������\
������������������\
������������������\
������������������\
������������������\
�����������
Component Location
Coolant Temperature
Sensor (CTS) .................... On left side of engine
Engine Speed Sensor .... Attached to flywheel cover housing
Ignition Control Module ......... Mounted to ignition coil
Knock Sensor ................ On lower left side of engine
Manifold Absolute Pressure
(MAP) Sensor ................ Under the hood, on firewall
Manifold Air Temperature
(MAT) sensor .......................... On intake manifold
Sync Pulse Signal Generator ........... Inside distributor
������������������\
������������������\
������������������\
������������������\
������������������\
������������������\
�����������
TESTING
BASIC DIAGNOSTIC PROCEDURES
This section contains information for determining individual
system component performance. Diagnosis of ECU/Engine Control System
is performed using the DRB-II Diagnostic Tester. See the appropriate
Computerized Engine Control System article in this section.
COOLANT TEMPERATURE SENSOR (CTS) TEST
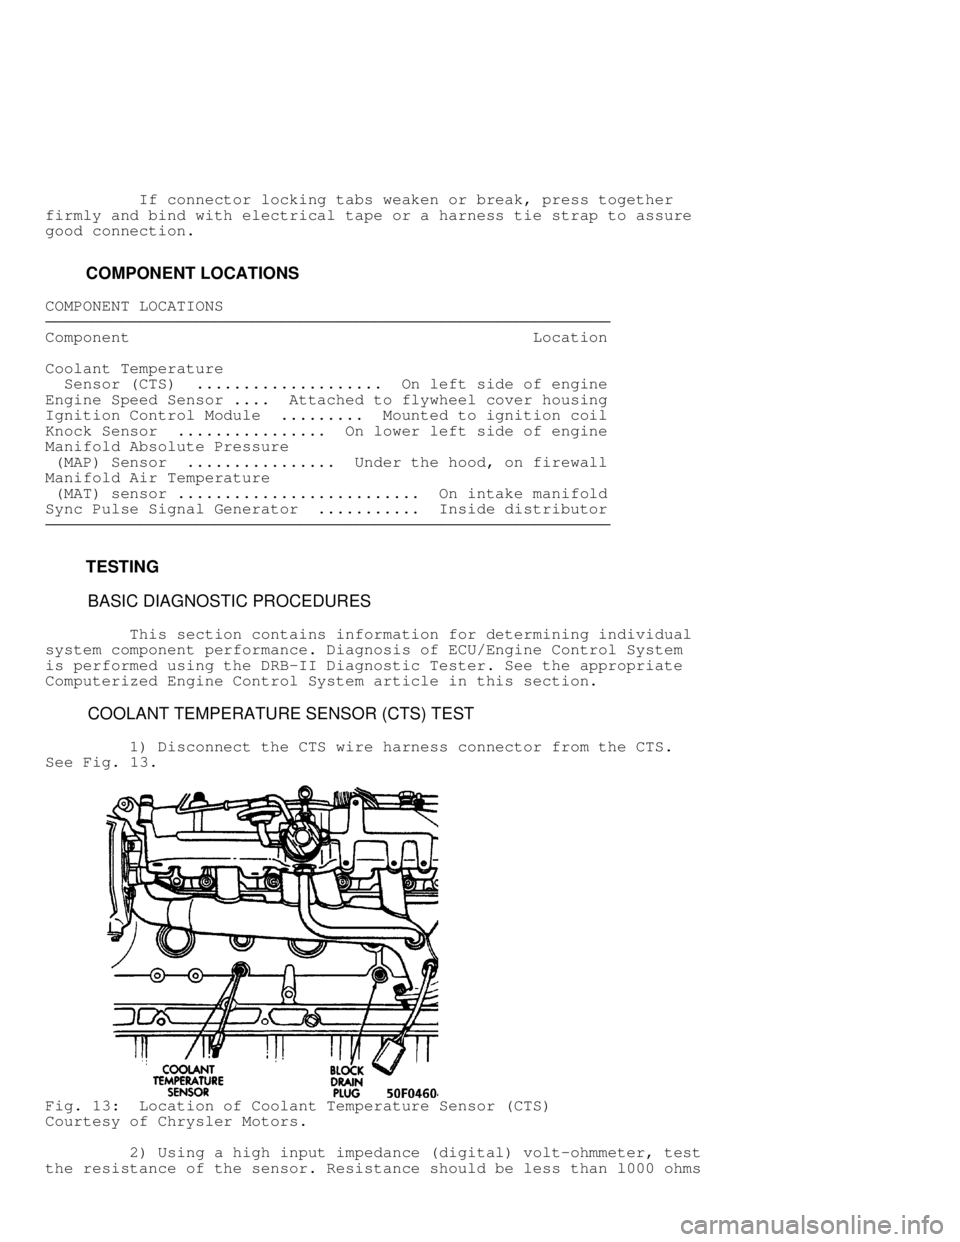
1) Disconnect the CTS wire harness connector from the CTS.
See Fig. 13 .
Fig. 13: Location of Coolant Temperature Sensor (CTS)
Courtesy of Chrysler Motors.
2) Using a high input impedance (digital) volt-ohmmeter, tes\
t
the resistance of the sensor. Resistance should be less than l000 ohms
Page 864 of 1378

Fig. 15. With a hot idle condition, the voltage reading should drop to
between 0.5-1.5 volts.
3) Test ECU terminal "C-6" for the same voltage as described
in step 2) to verify the wiring harness. Repair as necessary.
4) Test the MAP sensor supply voltage at the sensor connector
terminal "C" with the ignition ON. Voltage reading should be between
4.5-5.5 volts. Check that the voltage reading at terminal "C-14" is
also 4.5-5.5 volts.
5) Repair or replace the wire harness as necessary.
6) Test the MAP sensor ground circuit at the sensor connector
terminal "A" and ECU connector terminal "D-3". Repair the wire harness
as necessary.
7) Using an ohmmeter, test the MAP sensor ground circuit at
the ECU connector between terminal "D-3" and terminal "B-ll". If an
open circuit is indicated, check for a defective sensor ground
connection. The MAP sensor ground is located on the right side of the
engine block.
8) If, after performing step 7), the ground connection is
verified to be good, check for a short to 12 volts at terminal "D-3".
If a short is found, repair the short and then replace the ECU.
KNOCK SENSOR TEST
1) Connect Diagnostic Tester M.S. 1700 to the vehicle.
2) Go to "State Display" mode.
3) Start the engine and let idle.
4) Observe knock sensor value.
5) Using the tip of a screwdriver, lightly tap the cylinder
block near the sensor while observing the knock sensor value.
6) The knock sensor value should increase when the cylinder
block is tapped.
7) If the knock sensor value does not increase while tapping
on the cylinder block near the knock sensor, check for proper
connections to the knock sensor. If connections are good, replace
the knock sensor. Refer to REMOVAL & INSTALLATION in this article.
ENGINE SPEED SENSOR TEST
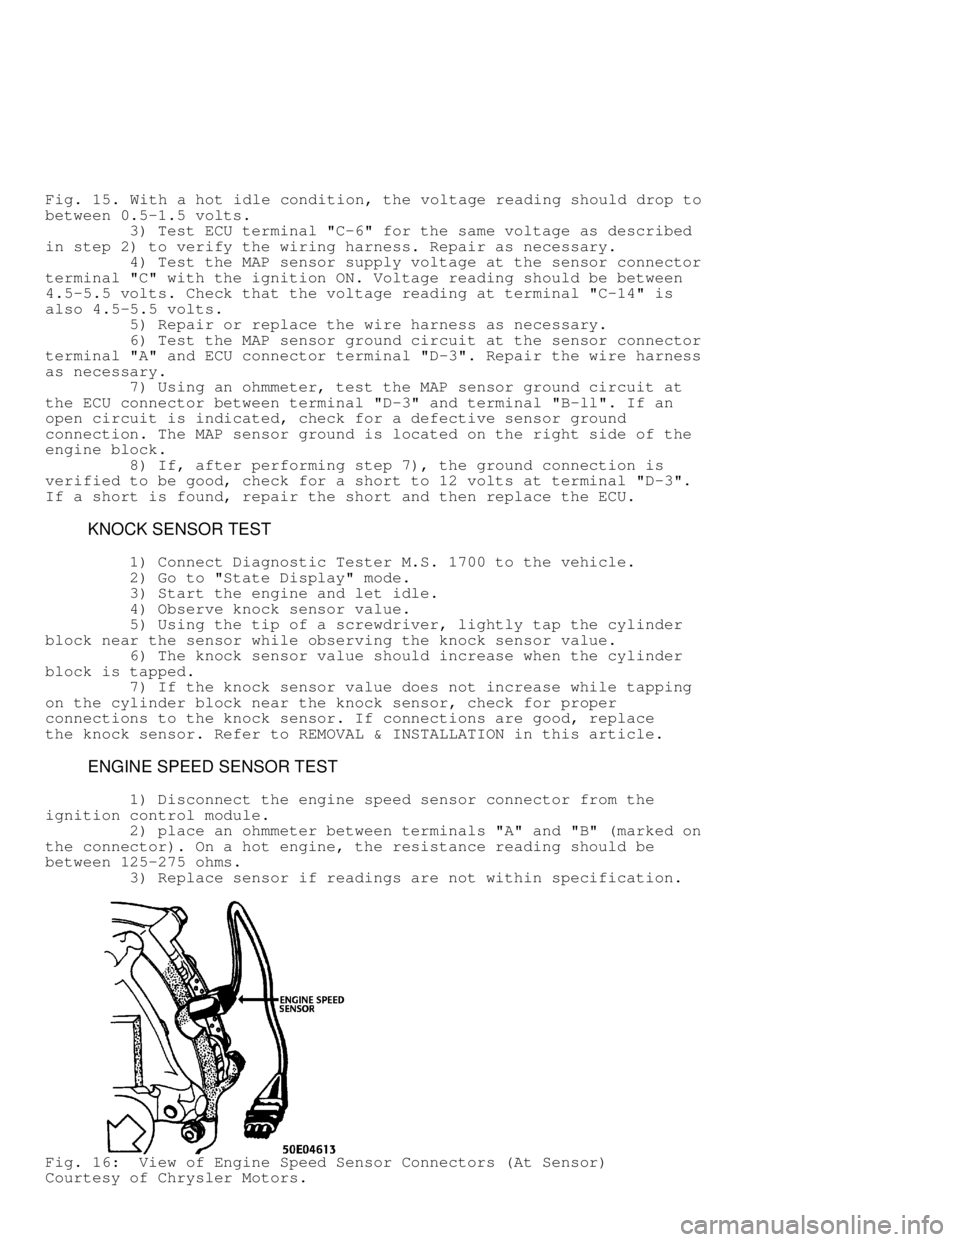
1) Disconnect the engine speed sensor connector from the
ignition control module.
2) place an ohmmeter between terminals "A" and "B" (marked on\
the connector). On a hot engine, the resistance reading should be
between 125-275 ohms.
3) Replace sensor if readings are not within specification.
Fig. 16: View of Engine Speed Sensor Connectors (At Sensor)
Courtesy of Chrysler Motors.
Page 866 of 1378
2) Remove air cleaner assembly.
3) Disconnect the CTS wire connector. See Fig. 17.
4) Remove the CTS from the left side of the engine block.
Fig. 17: Coolant Temperature Sensor (CTS) Connector
Courtesy of Chrysler Motors.
Installation
1) Install the CTS to the cylinder block. Tighten the CTS
to 21 Ft. Lbs. (28 Nm).
2) Connect the CTS wire connector.
3) Install air cleaner assembly.
4) Fill the cooling system.
Page 867 of 1378
MANIFOLD AIR TEMPERATURE (MAT) SENSOR
Removal
1) Disconnect the MAT sensor wire connector. See Fig. 18.
2) Remove the MAT from the intake manifold.
Fig. 18: Manifold Air Temperature (MAT) Sensor Connectors
Courtesy of Chrysler Motors.
Installation
1) Install the MAT sensor to the cylinder block. Tighten the
MAT sensor to 21 Ft. Lbs. (28 Nm).
2) Connect the MAT sensor wire connector.
Page 869 of 1378
1) Install the MAP sensor to the firewall. Tighten the MAP
sensor attaching nuts.
2) Connect the MAP sensor vacuum supply hose.
3) Connect the MAP sensor wire connector.
KNOCK SENSOR
Removal
1) Raise and support the vehicle.
2) Disconnect the knock sensor wire connector located below
and to the rear of the Coolant Temperature Sensor. See Fig. 20.
3) Remove knock sensor from left side of the engine block.
Fig. 20: Knock Sensor Connector
Courtesy of Chrysler Motors.
Installation
Page 870 of 1378
WARNING: The knock sensor MUST be tightened to the EXACT torque
specified in order to ensure proper operation.
1) Install the knock sensor to the cylinder block. Tighten
the knock sensor to 89 INCH Lbs. (10 Nm).
2) Connect the knock sensor wire connector.
3) Lower vehicle.
ENGINE SPEED SENSOR
Removal
1) Remove engine speed sensor wire connector. See Fig. 21.
2) Remove the engine speed sensor-to-transmission housing
attaching bolts. Remove engine speed sensor from transmission housing.
Fig. 21: Engine Speed Sensor Mounting Bolts
Courtesy of Chrysler Motors.
Installation
1) Install the engine speed sensor to the transmission
Page 873 of 1378

Removal
1) Disconnect the battery negative cable.
2) On vehicles equipped with A/C, remove the electrical
cooling fan and shroud assembly from the radiator to allow room to
rotate the engine with a socket and ratchet using the vibration damper
bolt.
3) Scribe a mark on the distributor housing below the left
side (past) the number one spark plug wire post of the distributor cap\
for reassembly reference for No 1 cylinder firing position.
4) Remove the distributor cap.
5) Turn the engine in a clockwise direction until the rotor
is approaching the scribed mark on the distributor housing. Then
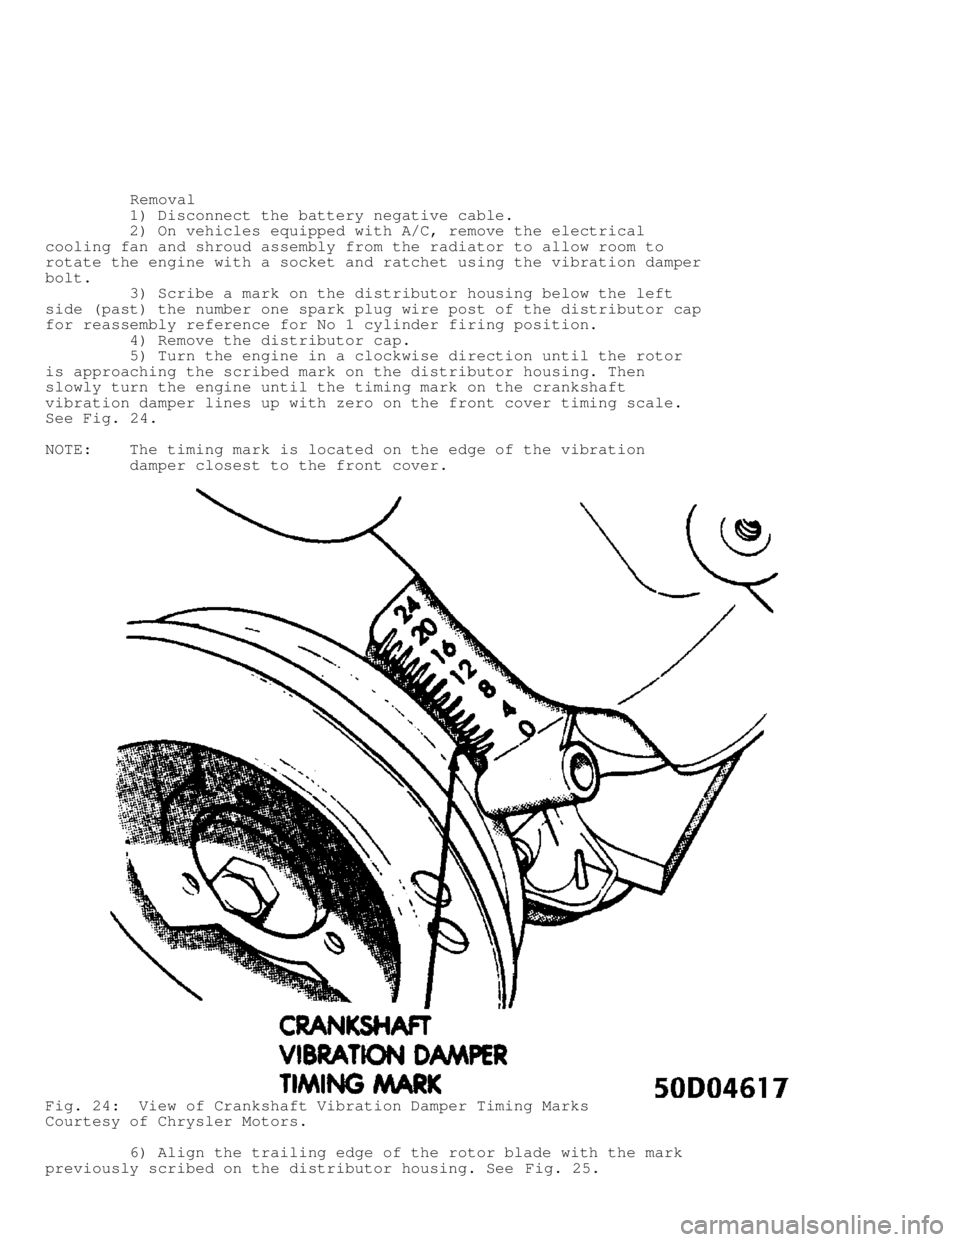
slowly turn the engine until the timing mark on the crankshaft
vibration damper lines up with zero on the front cover timing scale.
See Fig. 24 .
NOTE: The timing mark is located on the edge of the vibration
damper closest to the front cover.
Fig. 24: View of Crankshaft Vibration Damper Timing Marks
Courtesy of Chrysler Motors.
6) Align the trailing edge of the rotor blade with the mark
previously scribed on the distributor housing. See Fig. 25.