Page 1601 of 1865

14 WINDSHIELD GLASS
Repair seal
Dam
_5 mm
.(0.19
11 mm
(0.43 in)
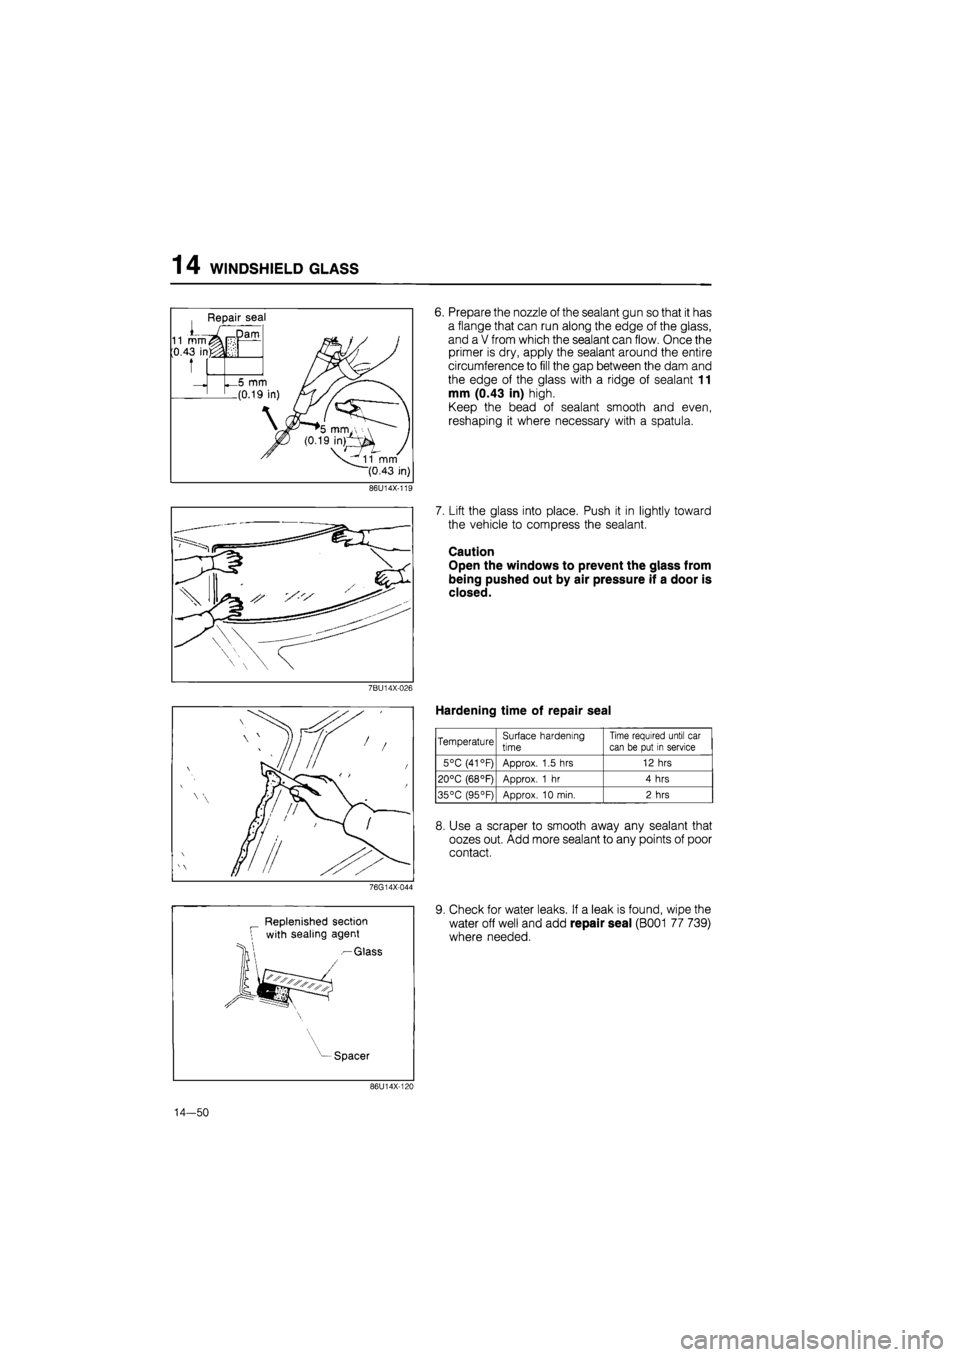
6. Prepare the nozzle of the sealant gun so that it has
a flange that can run along the edge of the glass,
and a V from which the sealant can flow. Once the
primer is dry, apply the sealant around the entire
circumference to fill the gap between the dam and
the edge of the glass with a ridge of sealant 11
mm (0.43 in) high.
Keep the bead of sealant smooth and even,
reshaping it where necessary with a spatula.
86U14X-11E
7BU14X-026
76G14X-044
Replenished section
with sealing agent
— Glass
7. Lift the glass into place. Push it in lightly toward
the vehicle to compress the sealant.
Caution
Open the windows to prevent the glass from
being pushed out by air pressure if a door is
closed.
Hardening time of repair seal
Temperature Surface hardening
time
Time required until car
can be put in service
5°C (41 °F) Approx. 1.5 hrs 12 hrs
20°C (68°F) Approx. 1 hr 4 hrs
35°C (95°F) Approx. 10 min. 2 hrs
8. Use a scraper to smooth away any sealant that
oozes out. Add more sealant to any points of poor
contact.
9. Check for water leaks. If a leak is found, wipe the
water off well and add repair seal (B001 77 739)
where needed.
Spacer
86U14X-120
14-50
Page 1631 of 1865

14 INSTRUMENT PANEL
INSTALLATION
Install in the reverse order of removal, noting the fol-
lowing.
1. Tightening torque:
.^Torque Bolt
N-m (m-kg,
ft-lb)
©
4.22-6.18 (0.43-0.63, 3.10-4.54)
®(D
8.8-14 (0.9—1.4, 6.5—10)
©(D
8.8—14 (0.9—1.4, 6.5—10)
©@
8.8-14 (0.9-1.4, 6.5-10)
Steering wheel 39-49 (4.0—5.0, 29—36)
86U14X-195
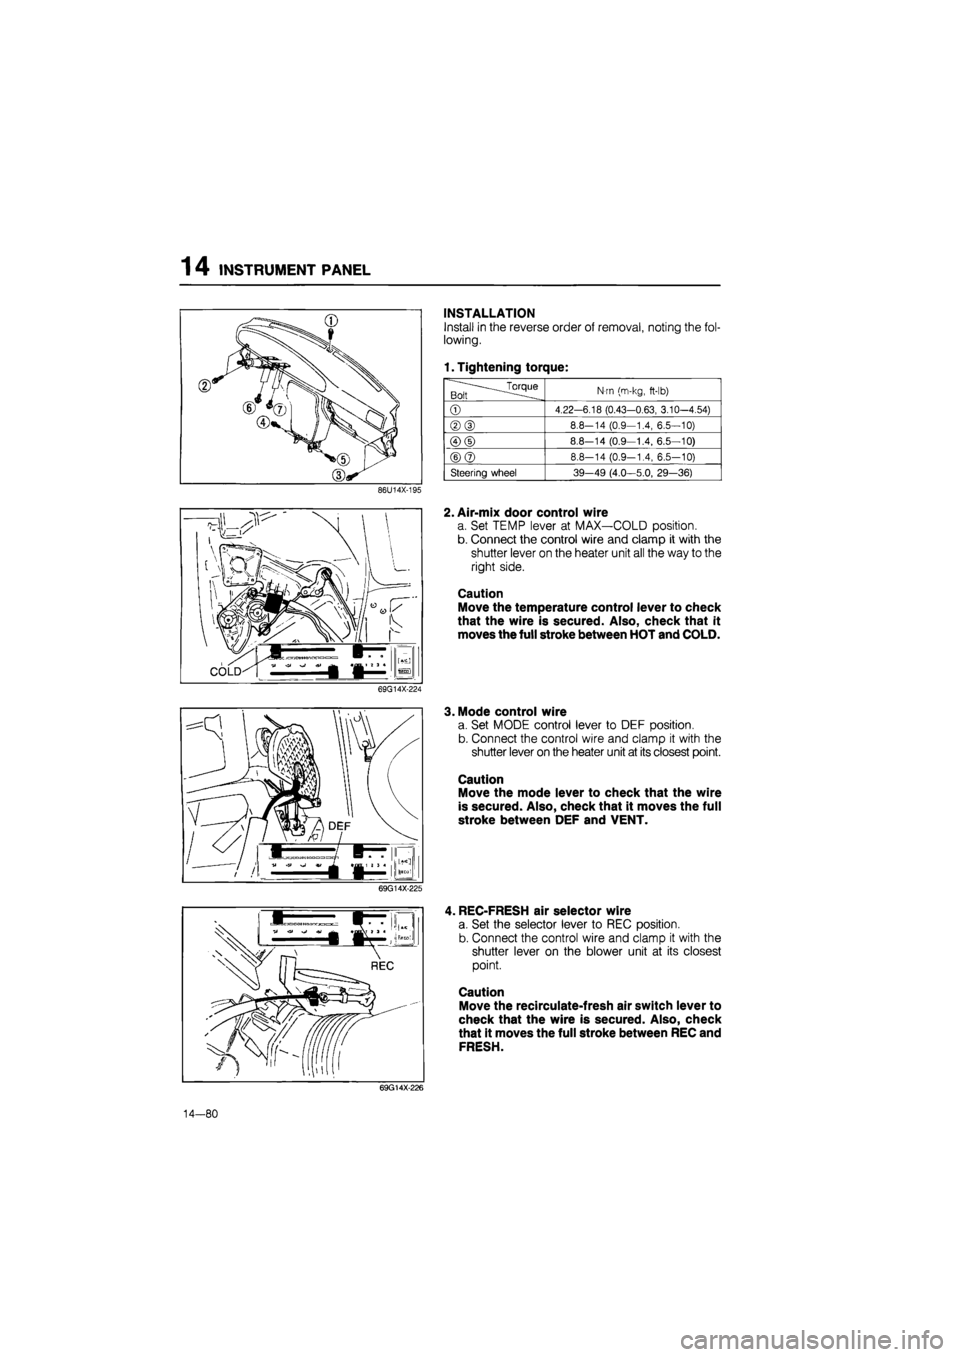
2. Air-mix door control wire
a. Set TEMP lever at MAX—COLD position.
b. Connect the control wire and clamp it with the
shutter lever on the heater unit all the way to the
right side.
Caution
Move the temperature control lever to check
that the wire is secured. Also, check that it
moves the full stroke between HOT and COLD.
69G14X-224
3. Mode control wire
a. Set MODE control lever to DEF position.
b. Connect the control wire and clamp it with the
shutter lever on the heater unit at its closest point.
Caution
Move the mode lever to check that the wire
is secured. Also, check that it moves the full
stroke between DEF and VENT.
69G14X-225
, REC-FRESH air selector wire
a. Set the selector lever to REC position.
b. Connect the control wire and clamp it with the
shutter lever on the blower unit at its closest
point.
Caution
Move the recirculate-fresh air switch lever to
check that the wire is secured. Also, check
that it moves the full stroke between REC and
FRESH.
69G14X-226
14—80
Page 1677 of 1865
15 METER
METER
STRUCTURAL VIEW
DIGITAL ELECTRONIC DISPLAY METER
ANALOG DISPLAY METER
76G15X-007
1. Speedometer 5. Warning and indicator lights
2. Tachometer 6. Tripmeter
3. Water temperature gauge 7. Twin tripmeter change switch
4. Fuel gauge 8. Fuel garge scale change switch
15—22
Page 1682 of 1865
![MAZDA 626 1987 Workshop Manual
METER 15
86U15X-033
86U15X-034
104.1t! 21
2330 16.10
a £] U \JEMP j n
JJ
86U15X-035
Standard indication
(km/h)
Allowable range
(km/h)
60 60-63
Standard indication
(mph)
Allowable ran MAZDA 626 1987 Workshop Manual
METER 15
86U15X-033
86U15X-034
104.1t! 21
2330 16.10
a £] U \JEMP j n
JJ
86U15X-035
Standard indication
(km/h)
Allowable range
(km/h)
60 60-63
Standard indication
(mph)
Allowable ran](/manual-img/28/57059/w960_57059-1681.png)
METER 15
86U15X-033
86U15X-034
104.1t! 21
2330 16.10
a £] U \JEMP j n
JJ
86U15X-035
Standard indication
(km/h)
Allowable range
(km/h)
60 60-63
Standard indication
(mph)
Allowable range
(mph)
60 60-63
86U15X-036
3. Set the SST to the resistance values shown in the
figure.
4. Turn the ignition switch ON, and check that the
needle indicator displays the correct values.
If the needle displays correctly, check the gauge
unit. If not, replace the fuel gauge in the meter or
repair the wiring harness.
Caution
a) Continue the above checks for at least two
minutes each to correctly judge the con-
dition.
b)The allowable indication error is twice the
width of the needle.
Water Temperature Gauge
1. Disconnect the connector from the water thermo
sensor.
2. Connect the red lead of the SST to the connec-
tor, and the black lead to a body ground.
3. Set the SST to the resistance values shown in the
figure.
4. Turn the ignition switch ON, and check that the
needle indicator displays the correct values.
If the needle displays the correct values, the trou-
ble is in the gauge unit; if not, the trouble is in the
meter or the wiring harness.
Caution
a) Continue the above checks for at least two
minutes each to correctly judge the con-
dition.
b)The allowable indication error is twice the
width of the needle.
INSPECTION OF DIGITAL METER
Speedometer
1. Using a speedometer tester, check the speedom-
eter for allowable indication error, and check the
operation of the odometer. Replace the meter as-
sembly if necessary.
2. Check the speedometer for fluctuation and/or ab-
normal noise.
Caution
a) If significant fluctuation occurs or the
speedometer does not move at all, remove
the speedometer cable. If normal, replace
the digital meter assembly.
b)Tire wear and improper inflation will in-
crease speedometer error.
15—27
Page 1684 of 1865

METER 15
Water Temperature Gauge
1. Remove the connector from the water thermo
sensor.
2. Connect the red lead of the SST to the connec-
tor, and the black lead to a body ground.
86U15X-041
C -&TEMP H
r
•
|
7 •
V i y
86U15X-042
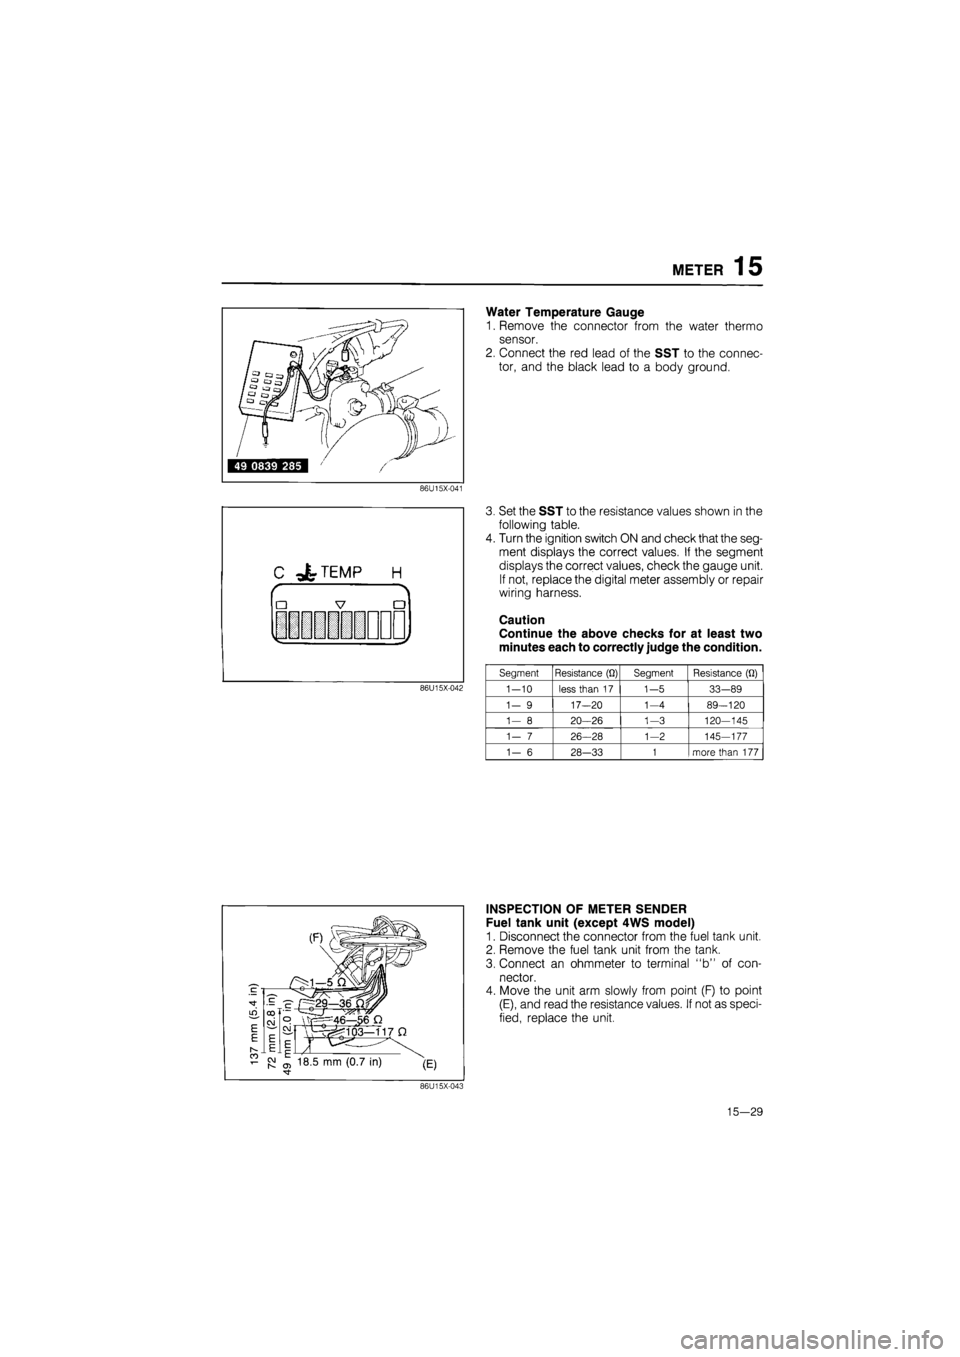
3. Set the SST to the resistance values shown in the
following table.
4. Turn the ignition switch ON and check that the seg-
ment displays the correct values. If the segment
displays the correct values, check the gauge unit.
If not, replace the digital meter assembly or repair
wiring harness.
Caution
Continue the above checks for at least two
minutes each to correctly judge the condition.
Segment Resistance
(Q)
Segment Resistance
(Q)
1-10
less than
17
1-5
33-89
1-
9
17—20
1-4
89-120
1—
8
20—26
1-3
120-145
1—
7
26-28
1-2
145-177
1-
6
28-33
1
more than
177
INSPECTION OF METER SENDER
Fuel tank unit (except 4WS model)
1. Disconnect the connector from the fuel tank unit.
2. Remove the fuel tank unit from the tank.
3. Connect an ohmmeter to terminal "b" of con-
nector.
4. Move the unit arm slowly from point (F) to point
(E), and read the resistance values. If not as speci-
fied, replace the unit.
86U15X-043
15—29
Page 1775 of 1865
![MAZDA 626 1987 Workshop Manual
15 HEATER
LEVER CONTROL TYPE
Type A Temperature control lever
*
REC-FRESH air selector lever
•••DODDQODaaCD °
vV ^ ® •OFF 1 7 3 4
Mode control lever
•
OFF
4 [Art]
BE CO
Fan sp MAZDA 626 1987 Workshop Manual
15 HEATER
LEVER CONTROL TYPE
Type A Temperature control lever
*
REC-FRESH air selector lever
•••DODDQODaaCD °
vV ^ ® •OFF 1 7 3 4
Mode control lever
•
OFF
4 [Art]
BE CO
Fan sp](/manual-img/28/57059/w960_57059-1774.png)
15 HEATER
LEVER CONTROL TYPE
Type A Temperature control lever
*
REC-FRESH air selector lever
•••DODDQODaaCD °
vV ^ ® •OFF 1 7 3 4
Mode control lever
•
OFF
4 [Art]
BE CO
Fan speed control switch
86U15X-203
86U15X-204
69G15X-203
Adjustments
Air-mix door control wire
1 .Set temperature control lever at MAX-COLD po-
sition.
2. Connect and clamp the control wire with the shut-
ter lever on the heater unit all the way to the right
side.
Caution
Move the temperature control lever to be sure
the wire is attached. Also, be sure it can move
the full stroke between HOT and COLD.
Mode control wire
1. Set mode control lever to DEF position.
2. Connect and clamp the control wire with the shut-
ter lever on the heater unit at its closest point.
Caution
Move the mode lever to be sure the wire is at-
tached. Also, be sure it can move the full
stroke between DEF and VENT.
REC-FRESH air selector wire
1. Set the selector lever to REC position.
2. Connect and clamp the control wire with the shut-
ter lever on the blower unit at its closest point.
Caution
Move the rec-fresh lever to be sure the wire
is attached. Also, be sure it can move the full
stroke between REC and FRESH.
86U15X-205
15—120
Page 1776 of 1865
HEATER 15
LOGICAL CONTROL TYPE
Type B
Mode control switch REC-FRESH air selector switch
W ^ W cOD A'C - ECOH
du tzzi
J|T OFF 13 3 4.
Temperature control lever Fan speed control lever
REC-FRESH air select motor
AIR-MIX motor
MODE control motor
Outline of Components
69G15X-207
Part Name Description
Logical control switch
One-touch, push type, mode control switch
MODE control motor
Controls
air
outlet
for
each mode
Drives VENT, HEAT and DEF doors
AIR MIX motor
Controls
air
outlet temperature
by
operating the
air
mix doors
REC-FRESH air select motor
Controls intake
air by
driving the rec-fresh
air
select door
15—121
Page 1780 of 1865
![MAZDA 626 1987 Workshop Manual
HEATER 15
Effl
k /
Voltmeter
86U15X-214
d I
k J X
S3
Voltmeter
86U15X-215
[ I H
k J X /
xj;
iD5F]H|j
ll iE;G Ll.i.i..
Ohmmeter
86U15X-216
d C
•W
©
i IL i
X / X
Qi ! i
+
MAZDA 626 1987 Workshop Manual
HEATER 15
Effl
k /
Voltmeter
86U15X-214
d I
k J X
S3
Voltmeter
86U15X-215
[ I H
k J X /
xj;
iD5F]H|j
ll iE;G Ll.i.i..
Ohmmeter
86U15X-216
d C
•W
©
i IL i
X / X
Qi ! i
+](/manual-img/28/57059/w960_57059-1779.png)
HEATER 15
Effl
k /
Voltmeter
86U15X-214
d I
k J X
S3
Voltmeter
86U15X-215
[ I H
k J X /
xj;
iD5F]H|j
ll iE;G Ll.i.i..
Ohmmeter
86U15X-216
d C
•W
©
i IL i
X / X
Qi ! i
+
u
Voltmeter
3. Connect a resistance (at least 1 kfi) between d ter-
minal and D terminal, and check the voltage be-
tween D terminal and L terminal using a voltmeter.
Terminals Voltage
D
- L
Less than
1V
4. Connect a resistance (at least 1 kfl) between d ter-
minal and A terminal, and check the voltage be-
tween A terminal and L terminal using a voltmeter.
Terminal Voltage
A - L Less than 1V
5. Check for continuity between each terminal with
following condition using an ohmmeter.
Condition Terminals Continuity
Push the VENT switch J
- L
Yes
Push the B/L switch G
- L
Yes
Push the HEAT switch H
— L
Yes
Push the H/D switch E
- L
Yes
Push the DEF switch F
- L
Yes
Checking Air Mix Control Circuit
1. Connect a resistance (at least 1 kfl) between Q ter-
minal and T terminal.
Set temperature control lever to center position be-
tween MAX HOT and MAX COLD.
Connect a jumper wire between V terminal and U
terminal, and check the voltage between each ter-
minals.
Terminals Voltage
T
- L
Approx.
12V
Q
- L
Less than
1V
86U15X-217
15—125