Page 3 of 21
BRAKE HYDRAULIC LINE
Removal and Installation
CAUTION
a. When removing and installing brake tube, use
Tool.
b Cover openings to prevent entrance of dirt
whenever disconnecting hydraulic line.
To remove brake hose, first remove flare nut
securing brake
tube to hose, then withdraw
lock spring. Next disconnect the other side
All hoses must be free from excessive bending,
twisting and pulling
Whenever installing brake lines, be sure to
check for
oil leakage by fully depressing brake
pedal
- Inspection
Check brake lines (tubes and hoses) for evidence of
cracks, deterioration or other damage Replace any
damaged
parts.
If leakage occurs around joints, retighten or, if
necessary, replace damaged parts.
BR-3
Page 9 of 21
FRONT DISC BRAKE (CL28VA, CL28VB) - Caliper
CAUTION:
When cylinder body
IS open, do not depress brake
pedal, or piston
w~ll pop out.
1. Remove pin bolt.
SBR~
Toraue member fixing bolt- rWear indicator
2. Open cylinder body upward. Then remove pad
retainer, and Inner and outer shims
SBR825
Be careful not to damage piston boot or get oil on
rotor. Always replace shims in replacing pads.
/ / /rlnner~hm [9) 72 - 97 (7 3.9 9,53.721
Sub p~n =@ to rildlng portion
Rubber bushing
Retainer bushing Pin boot1 hetamer boot
=@ P B c IPOI~ ~utyl Cupryrill grease or rhcone-based grease Pomt =@ Rubber grease point I Always replace when disassembled (c1 N m Ikg-rn. ft-lbl
SEI3824
Page 10 of 21

FRONT DISC BRAKE (CL28VA, CL28VB) - Caliper
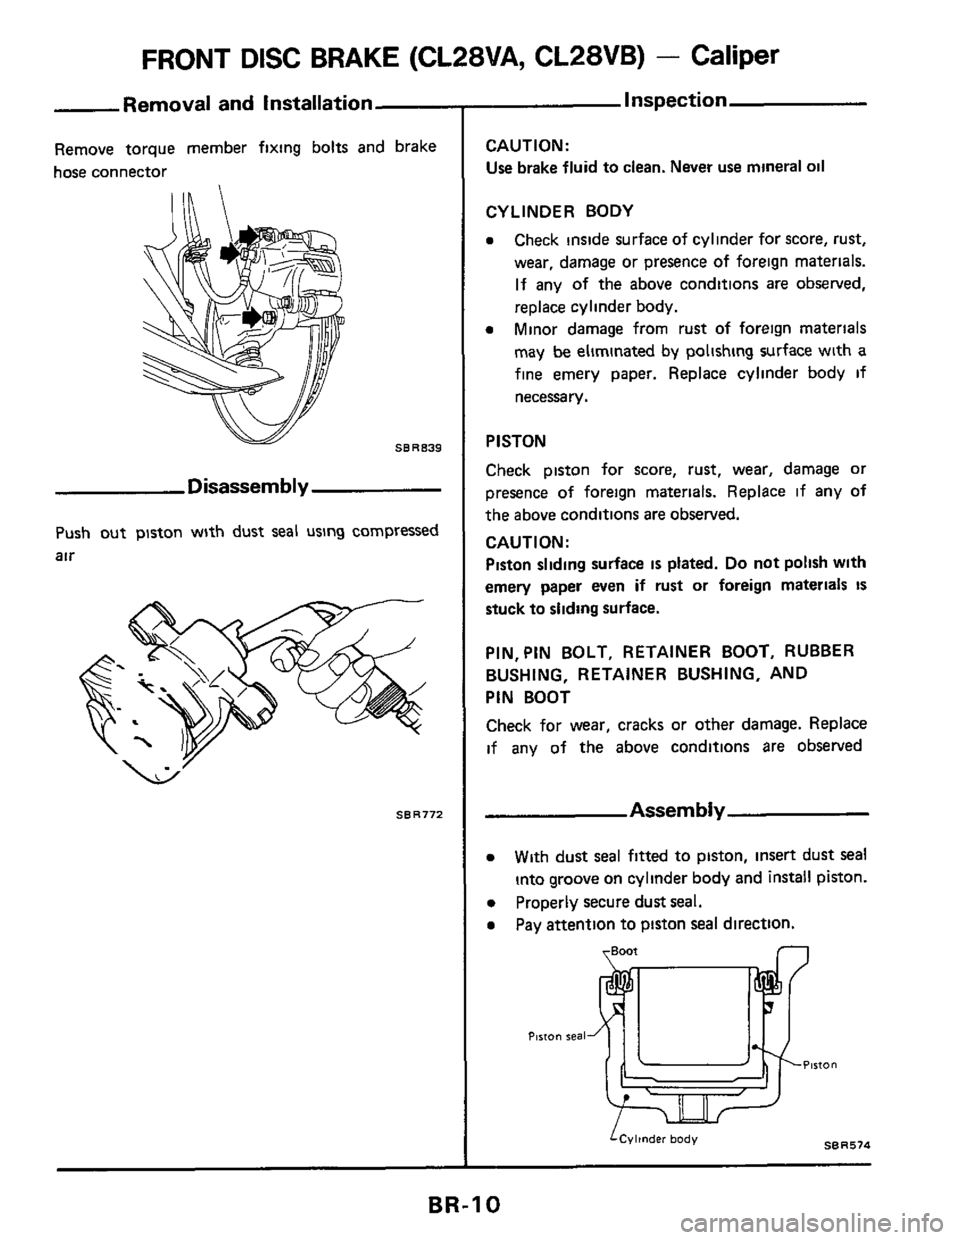
Removal and Installation
Remove torque member fixing bolts and brake
hose connector
SBR839
Disassembly
Push out piston with dust seal using compressed
air
SER772
Inspection
CAUTION: Use brake fluid to clean. Never
use mineral oil
CYLINDER BODY
a Check inside surface of cylinder for score, rust,
wear, damage or presence of foreign materials.
If any of the above conditions
are observed,
replace cylinder body.
Minor damage from rust of foreign materials
may be eliminated by polishing surface with
a
fine emery paper. Replace cylinder body if
necessary.
a
PISTON
Check piston for score, rust, wear, damage or
presence of foreign materials. Replace if any of
the above conditions are observed.
CAUTl ON :
Piston sliding surface IS plated. Do not polish with
emery paper even if rust
or foreign materials IS
stuck to sliding surface.
PIN, PIN BOLT, RETAINER BOOT, RUBBER
BUSHING, RETAINER BUSHING, AND
PIN
BOOT
Check for wear, cracks or other damage. Replace
if any of the above conditions are observed
0
0
Properly secure dust seal.
a
With dust seal fitted to piston, insert dust seal
into groove on cylinder body and install piston.
Pay attention to piston
seal direction.
y000t n
PlStO"
Plrron seal
ULdU
LCvlinder body SBR574
BR-10
Page 13 of 21
REAR DISC BRAKE (CL14H, CL14HB) - Caliper
Pad Replacement
CAUTION:
When cylinder body IS open, do not depress brake
pedal, or piston will pop out.
1 Disconnect parking brake cable, then remove
pin bolts
2 Remove pad retainer, pads and shims.
SBR840
SBR640
3. When inaalllng pads, retract piston into cylin-
der body by turning
it clockwise
Be careful not to damage piston boot or get oil on
rotor.
Always replace shims when replacing pads.
SBR641
Removal and Installation
Disconnect parking brake cable and brake hose,
then remove caliper assembly
u SBRB41
BR-13
Page 15 of 21

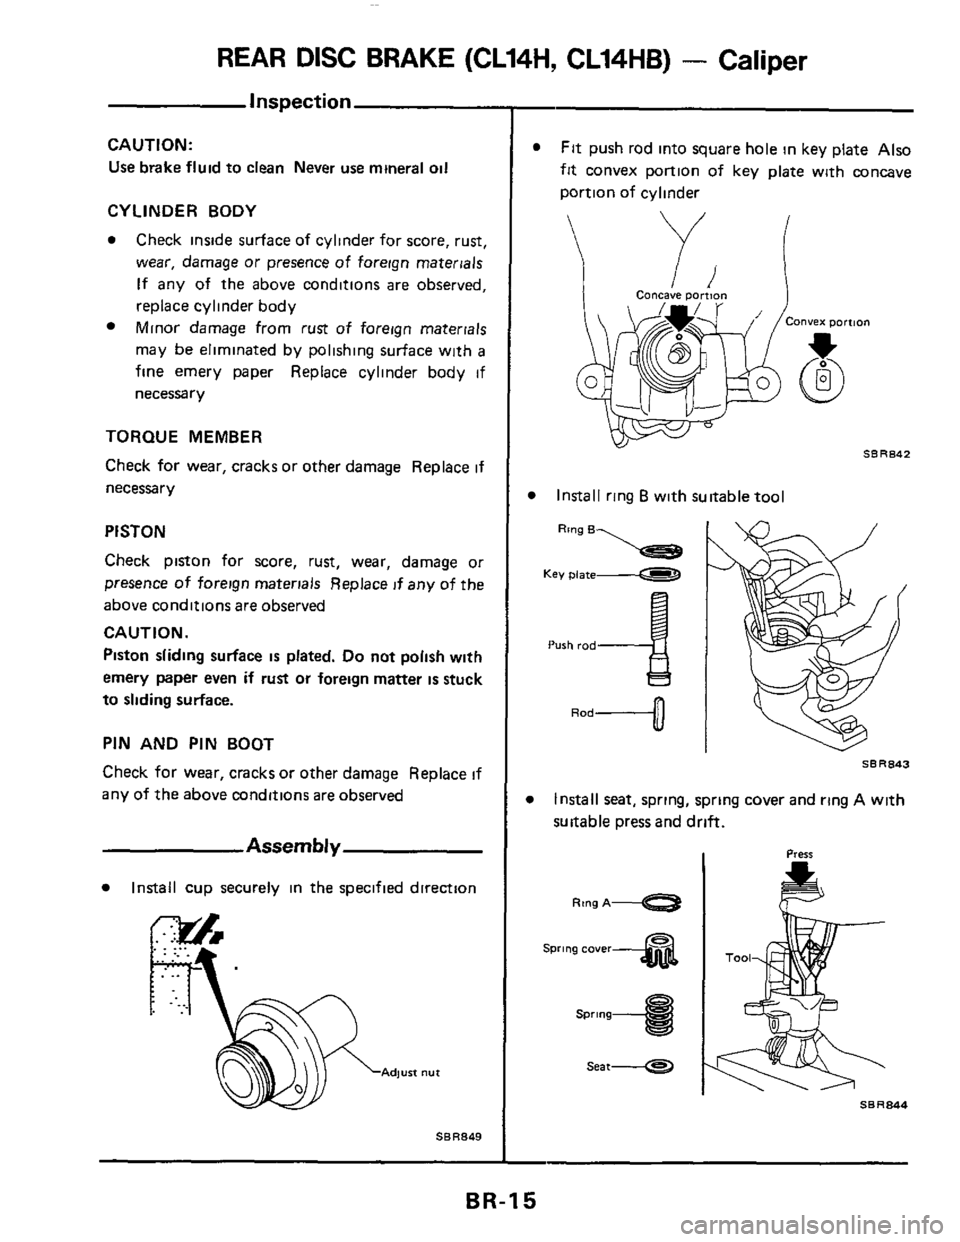
REAR DISC BRAKE (CL14H, CL14HB) - Caliper
CAUTION:
Use brake fluid to clean Never use mineral oil
CYLINDER BODY
Check inside surface of cylinder for score, rust,
wear,
damage or presence of foreign materials
If any of the above conditions are observed,
replace cylinder body
Minor damage from
rust of foreign materials
may be eliminated by polishing surface with
a
fine emery paper Replace cylinder body if
necessary
TORQUE MEMBER
Check for wear, cracks or other damage Replace if
necessary
PISTON
Check piston for score, rust, wear, damage or
presence of foreign materials Replace
if any of the
above conditions are observed
CAUTION.
Piston sliding surface IS plated. Do not polish with
emery paper even
if rust or foreign matter is stuck
to sliding surface.
PIN AND PIN BOOT
Check for wear, cracksor other damage Replace if
any of the above conditions are observed
Assembly
Install cup securely in the specified direction
Adjust nu1
SBR849
Fit push rod into square hole in key plate Also
fit convex portion of key plate with concave
portion of cylinder
onvex portmn
v SBRB42
Install ring B with suitable tool
Rmg B
Key plate
Push rod
S0R843
Install seat, spring, spring cover and ring A with
suitable press and
drift.
Ring A-
Spring cover-
Seat-
BR-15