1984 CHEVROLET CAVALIER seats
[x] Cancel search: seatsPage 10 of 105
Downloaded from www.Manualslib.com manuals search engine Convex Rearview Mirror
Your vehicle may have an optional convex outside right-hand mirror. (A convex
mirror has a curved surface.)
• Use care when judging the size or distance of a vehicle· or object seen in Ihis convex mirror -such objecls will LOOK smaller and appear farther
away than when seen in a flat mirror.
• Use your inside mirror (or glance rearward) to determine the size and distance of objects seen in the convex mirror.
• Adjust the mirror so you can just see the side of your vehicle.
SEAT CONTROLS
Bucket Seats
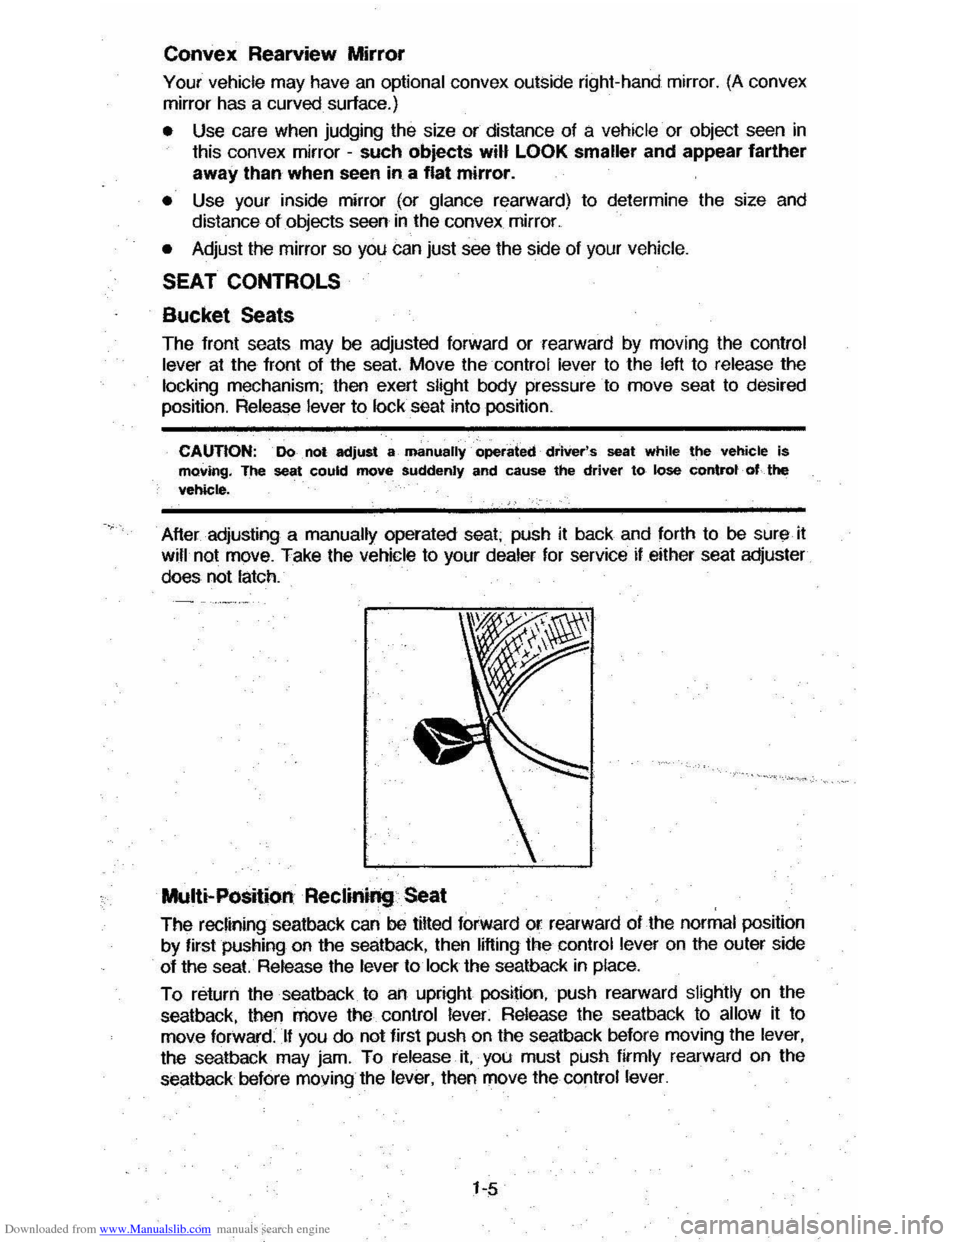
The fronl seals may be adjusled forward or rearward by moving Ihe conlrol
lever at the front of the seat. Move thecontro! lever to the left to release the locking mechanism; then exert slight body pressure· to move seat to desired position. Release lever to lock seat into position.
CAUTION: . Do . not adjust a· manually· operated· driVer's seat while the vehicle is moving. The seat could move suddenly and cause the driver to lose controt· of.. the vehicle.
After adjusling a manually operaled seal; push il back and forlh 10 be sur" il wifl not move. Take the vehicle to your dealer for service if either seat adjuster
does not lalch.
Multi-Position Reclinil'lg Seat
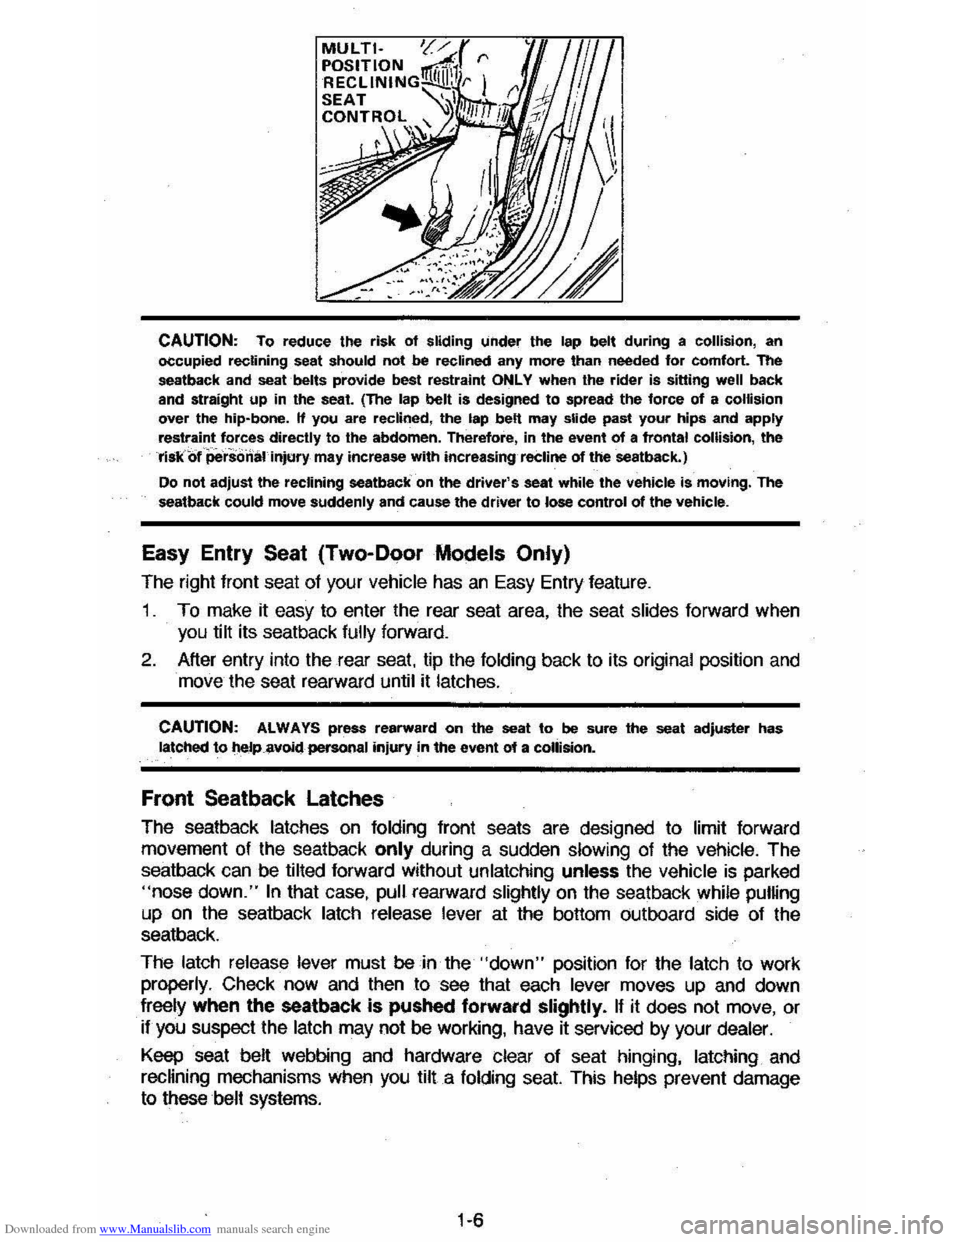
The reclining sealback can be tilted forward or rearward of Ihe normal posilion
by firsl pushing on
Ihe sealback, Ihen lifting the conlrol lever on Ihe ouler side
of
Ihe seat. Release Ihe lever 10 lock the sealback in place.
To relurn Ihe sealback 10 an uprighl position, push rearward slightly on the
sealback, lhen move
Ihe conlrol lever. Release the sealback 10 allow il 10 move forward:· .Lf you do not first push on the seatback before moving the lever,
the seatback may jam.
To release it, you must push firmly rearward on the
seatback before moving the lever, then move
the control lever.
1-5
Page 11 of 105
Downloaded from www.Manualslib.com manuals search engine CAUTION: To reduce the risk of sliding under the lap belt during a collision, an
occupied reclining seat should not be reclined any more than needed for comfort. The
seatback and seat belts provide best restraint ONLY when the rider is siuing well back
and straight up in the seat. (The lap belt is designed to spread the force of a collision over the hip-bone. If you are reclined, the lap belt may slide past your hips and apply restraint forces directly to the abdomen. Therefore, in the event of a frontal collision, the riskof 'personal Injury may increase with increasing reCline of theseatback.)
Do not adjust the reclining seatback on the driver's seat while the vehicle is moving. The
seatback could move suddenly and cause the driver to lose control of the vehicle.
Easy Entry Seat (Two-Door Models Only)
The right front seat of your vehicle has an Easy Entry feature.
1 . To make it easy to enter the rear seat area, the seat slides forward when
you tilt its seatback
fully forward.
2. After entry into the rear seat. tip the folding back to its original position and
move the seat rearward until it latches.
CAUTION: ALWAYS press rearward on the seat to be sure the seat adjuster has latched to t\eJp.8voidpersonal injury in the event of a collision.
Front Seatback Latches
The seatback latches on folding front seats are designed to limit forward
movement of the seatback
only during a sudden slowing of the vehicle. The
seatback can be tilted forward without unlatching unless the vehicle
is parked "nose down." In that case, pull rearward slightly on the seatback while pumng
up on the seatback latch release lever at the bottom outboard side of the
seatback.
The latch release lever must
be in the "down" position for the latch to work
properly. Check now and then to see that each lever moves up and down
freely when the seatback
is pushed forward slightly. If it does not move, or
if you suspect the latch may not be working, have it serviced by your dealer.
Keep seat belt webbing and hardware clear of seat hinging, latching and
recHning mechanisms When you tilt a folding seat. This helps prevent damage
to these belt systems.
1·6
Page 12 of 105
Downloaded from www.Manualslib.com manuals search engine Power Operated Front Seats (Optional)
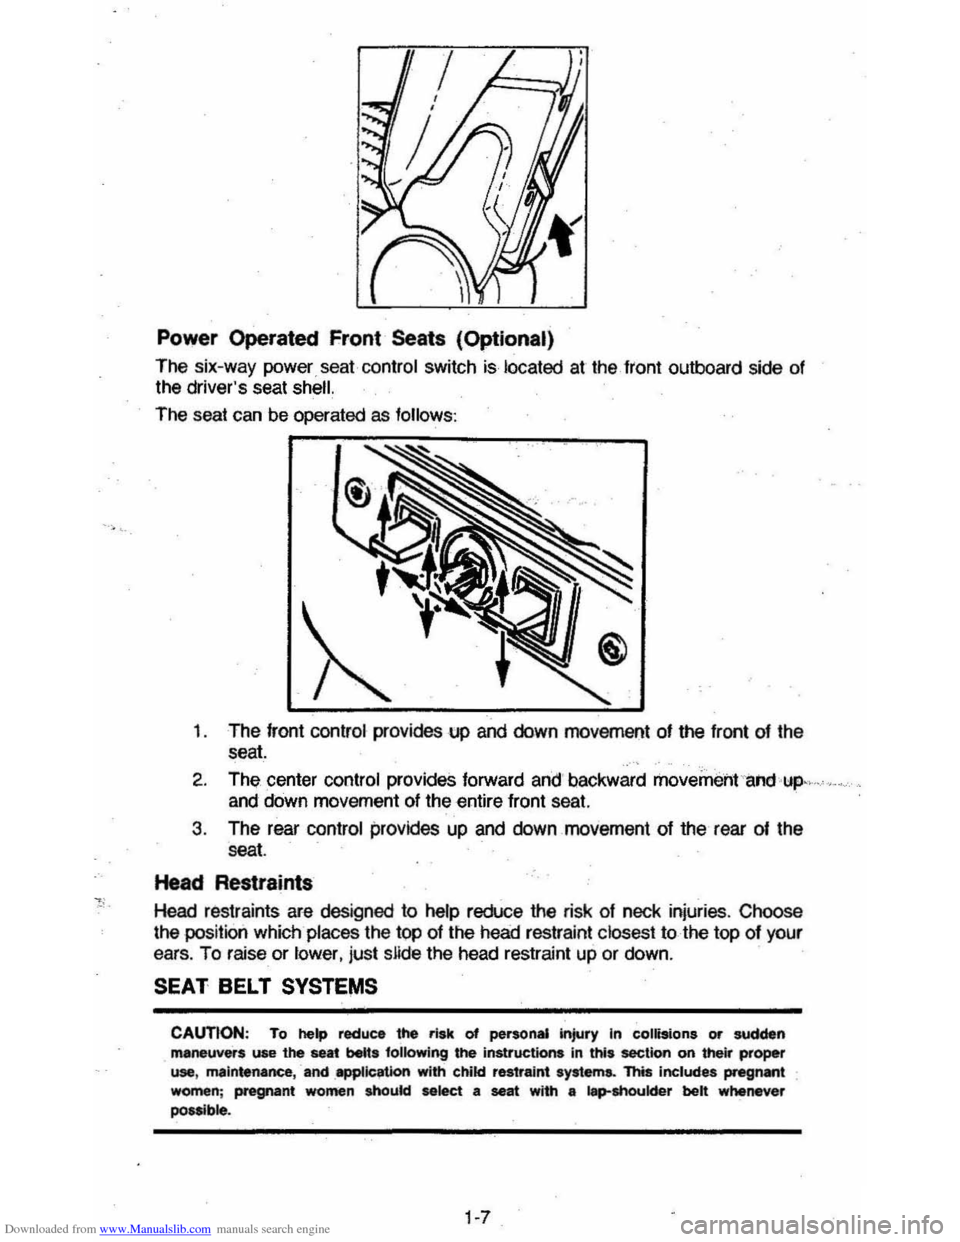
The six-way power seat. control switch is located at the. front outboard side of the driver's seat shell.
The seat can be operated as follows :
t . The front control provides up and down movement of the front of the
seat.
2. The center control provides forward and' backward movement ·i,"d·~p" ..
and down movement of the entire front seat.
3 . The rear
control provides up and down movement of the rear of the
seat.
Head Restraints
Head restraints are designed to help reduce the risk of neck injuries . Choose
the position which
places the top of the head restraint closest to the top of your ears. To raise or lower, just slide the head restraint up or down.
SEAT BEL.T SYSTEMS
CAUTION: To help reduce the risk 01 personal injury In collisions or sudden maneuvers use the selt belts fOllowing the instructions in this section on their proper use, mlintenance. -and IPPUCaUon with child res1riUnt system.. This includes pregnant women ; pregnant women shoukl Mk!ct a seat wrth a tep-shoukler bett whenever OOsoible.
1 .. 7
Page 15 of 105
Downloaded from www.Manualslib.com manuals search engine 4. To lengthen the center seat lap belt, place the latch plate at a right angle
to the belt webbing and pull on the latch plate; the belt should then slide
easily.
Rear Seat Shoulder Belts (Dealer-Installed Accessory)
Except Convertible
When properly worn with a lap bell, a shoulder belt (available for rear outboard
seats) can give riders added protection. It can prevent or reduce impact with the inside of the vehicle by restraining the upper body in a collision, especially
in a frontal impact.
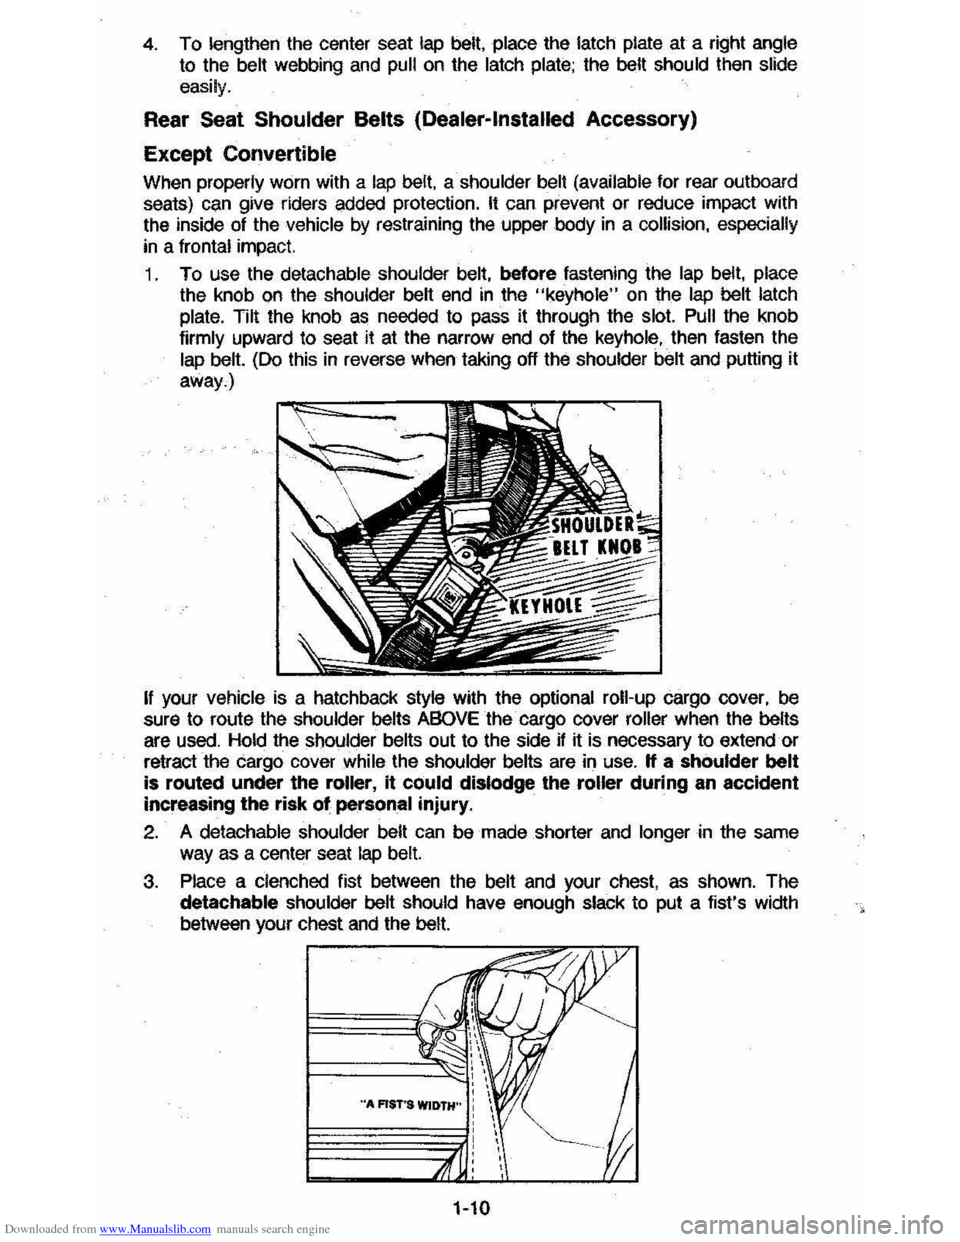
1 . To use the detachable
shoulder belt, before fastening the lap belt, place the knob on the shoulder belt end in the "keyhole" on the lap bell latch
plate. Tilt
the knob as needed to pass it through the slot. Pull the knob
firmly upward to seat it at the narrow end of the keyhole, then fasten the lap belt. (Do this in reverse when taking off the shoulder belt and putting it
away.)
If your vehicle is a hatchback style with the optional roll-up cargo cover, be
sure to route the shoulder belts ABOVE the cargo cover roller when the belts are used. Hold the Shoulder belts out to the side if it is necessary to extend or
retract the cargo cover
while the shoulder belts are in use. If a shoulder belt
is routed under the roller, it eQuid dislodge the roller during an accident
increasing
the risk of personal injury.
2. A detachable shoulder belt can be made shorter and longer in the same way as a center seat lap belt.
3. Place a clenched fist between the belt and your chest, as shown. The
detachable shoulder belt should have enough slack to put a fist's width
between your chest
and the belt.
1-10
Page 35 of 105
Downloaded from www.Manualslib.com manuals search engine PARKING BRAKE
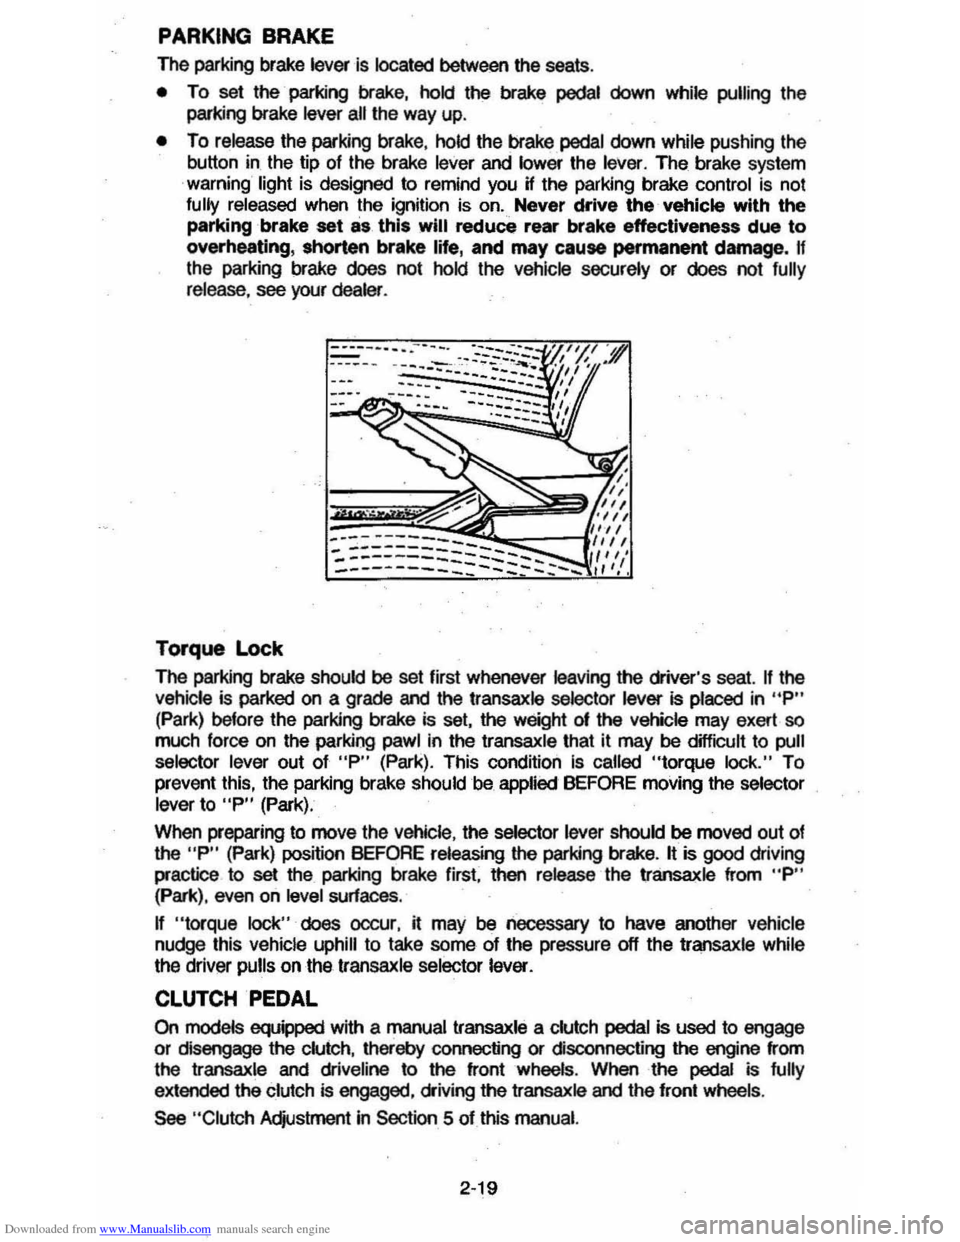
The parking brake lever is located between the seats .
• To set the parking brake, hold the brake pedal down while pulling the
parking brake
lever all the way up.
• To release the parking brake, hold the brake pedal down while pushing the
button in the tip of the brake
lever and lower the lever. The brake system
warning light is designed to remind you H the parking brake control is not fully released when the ignition is on. Never drive the vehicle with the
parking brake set as this will reduce rear brake effectiveness due to
overheating, shorten brake life, and may cause permanent damege, If
the parking brake does not hold the vehicle securely or does not fully release , see your dealer .
Torque Lock
The perking brake should be set first whenever leaving the driver's seat. If the vehicle is parked on a grade and the transaxle selector lever is placed in "P"
(Park) before the parking brake is set, the weight 01 the vehicle may exert so
much force on the parking pawl in the transaxle that it may be difficult to pull
selector lever out of "P" (Park). This condition Is called "torque lock." To
prevent this, the parking brake should be applied BEFORE moving the selector lever to "P" (Park).
When preparing to move the
Vehicle , the selector lever should be moved out of the "P" (Park) position BEFORE releasing the parking brake. It is good driving
practice to
set the parking brake first. then release the transaxle from "P" (Park), even on level surfaces .
n "torque lock" does oocur, it may be necessary to have another vehicle
nudge this vehicle uphill to take some of the pressure off the transaxle while
the driver pulls on the transaxle selector lever.
CLUTCH PEDAL
On models equipped with a manual transaxle a clutch pedal is used to engage
or disengage the clutch, thereby connecting or disconnecting the engine from
the transaxle and dliveline to the front wheels . When the pedal is fully
extended the clutch is engaged, driving the transaxle and the front wheels .
See "Clutch Adjustment in Section 5 of this manual.
2·19
Page 53 of 105
Downloaded from www.Manualslib.com manuals search engine To store the sunshield when rennoved from the car, always select a place
where the sunshade can lay flat without anything stored on top of it or leaned against it. Hanging the sunshade flat on a wall by its hinges is an excellent way
to store it.
As with any decorative surface. washing with a mild soap and water solution is
recommended . Abrasive materials or chemical solvents may adversely affect
the finish of the sunshade.
FOLDING SEATBACK OPERATION
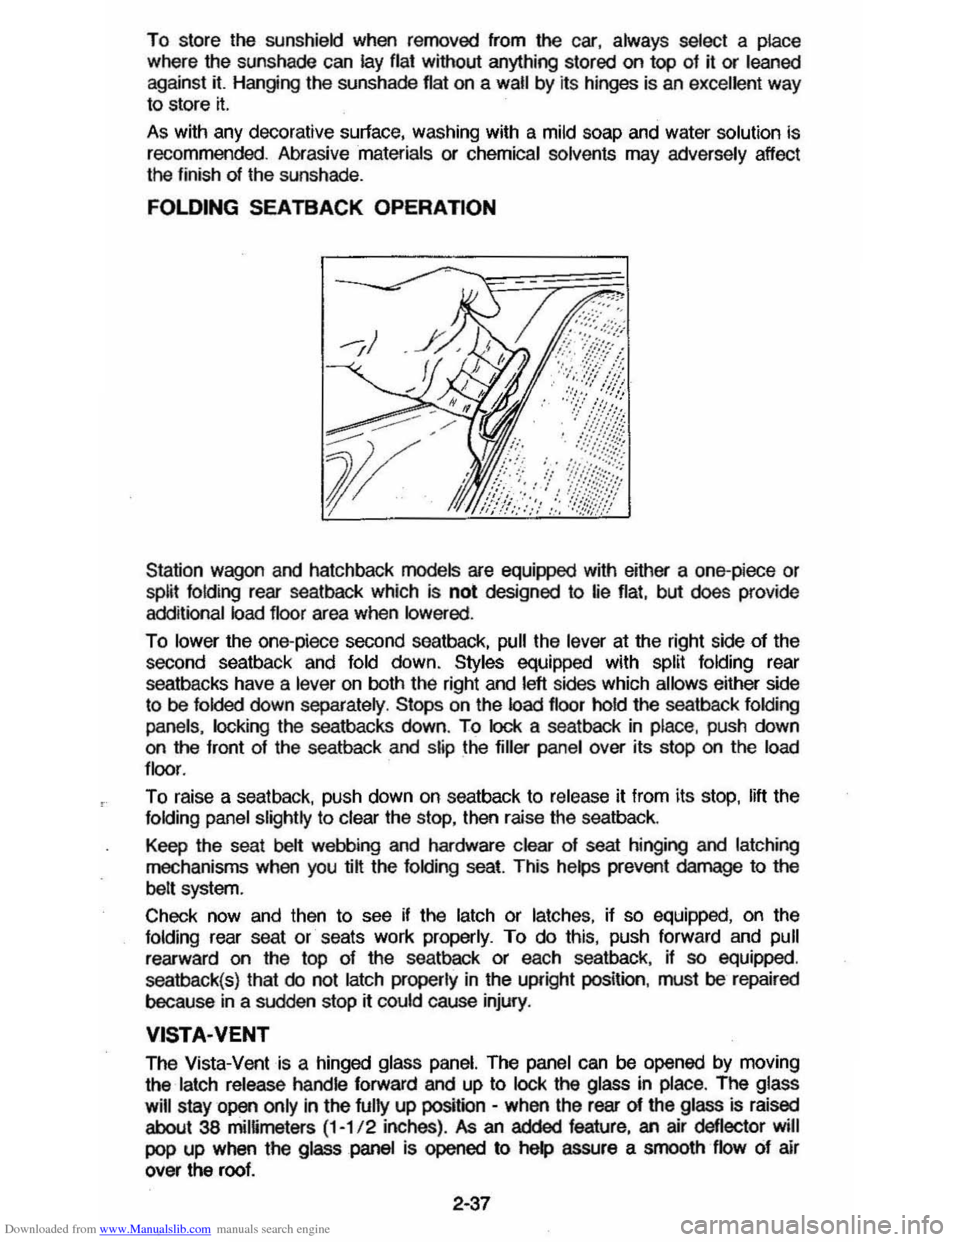
Station wagon and hatchback models are equipped with either a one-piece or split folding rear seatback which is not designed to lie flat, but does provide
additional load floor area when lowered .
To lower the one-piece second seatback, pull the lever at the right side of the
second seatback and fold down. Styles equipped with split folding rear
seatbacks have a
lever on both the right and left sides which allows either side
to be folded down separately . Stops on the load floor hold the seatback folding
panels. locking
the seatbacks down. To lock a seatback in place, push down on the front of the seatback and slip the filler panel over its stop on the load
floor .
To raise a seat back. push down on seatback to release it from its stop. lift the folding panel slightly to clear the stop, then raise the seatback.
Keep the seat
belt webbing and hardware clear of seat hinging and latching
mechanisms when you @ the folding seat. This helps prevent damage to the
belt system.
Check now and then
to see if the latch or latches, if so equipped, on the folding rear seat or seats work properly. To do this, push forward and pull
rearward on the top of the seatback or each seatback, if so equipped.
seatback(s) that
do not latch properly in the upright position. must be repaired
because
in a sudden stop rt could cause injury.
VISTA·VENT
The Vista-Vent is a hinged glass panel. The panel can be opened by moving
the
latch release handle forward and up to lock the glass in place. The glass
will
stay open only in the fully up position -when the rear of the glass is raised
about 38 mimmeters (1-1/ 2 inches) . As an added feature, an air deflector will
pop up when the glass panel is opened to help assure a smooth flow of air
over the roof.
2·37
Page 56 of 105
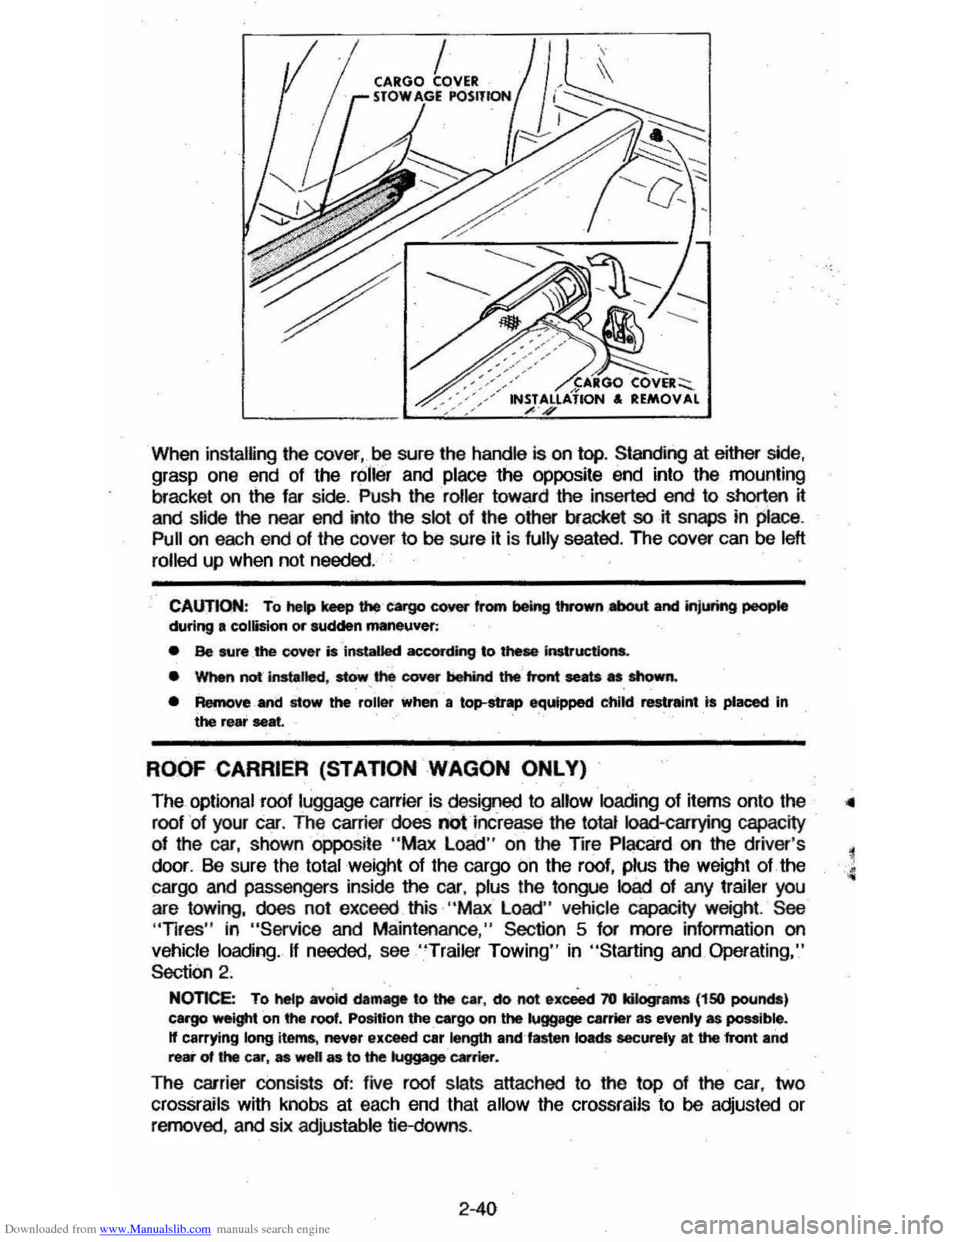
Downloaded from www.Manualslib.com manuals search engine When installing the cover,oo sure the handle is on top. Standing at either side, grasp one end of the roller and place the opposite end into the mounting
bracket on
the far side . Push the roller toward the inserted end to shorten it
and slide the near end into the slot of the other bracket so it snaps in place.
Pull on each end of the cover to 00 sure it is fully seated. The cover can be left
rolled
up when not needed .
CAUTION: To help keep u.., cargo cover from being thrown .,.a,oot and jnjlM'ing people during a collision or sudden maneuver:
• Be sure _the cover is installed according to these Instructions.
• WMn not-instalted, stow, the cover behind the front seats as shown.
• Remove and stow the roiler when a top-strap equipped child restraint is placed In the rear seat.
ROOF CARRIER (STAnON WAGON ONLY)
The optional roof luggage carrier is designed to allow loading of items onto the
roof
' of your car. The carrier does not increase the total Ioad-carrying capacity
of the car, shown oppoSite "Max Load " on the TIre Placard on the driver's
door. Be sure the
total weight of the cargo on the roof, plus the weight of the
cargo and passengers inside
the car, plus the tongue load of any trailer you
are towing, does not exceed this· "Max Load" vehicle capacity weight. See "Tires" in "Service and Maintenance," Section 5 for more information on
vehicle loading. If needed, see "Trailer Towing" in "Starting and. Operating,"
Section 2 .
NOnce: To hetp avOid damage to the car, do not exceect 70 kilograms (150 pounds) cargo weight on the roof. Position the cargo on the luggage carrier as evenly as possible. If carrying long items , never exceed car length emUasten loads eacurely at the front and rear of the car, as well as to the luggage ~rier.
The carrier consists of: five roof slats attached to the top of the car, two
crossrails with knobs at each end that allow the crossrails to 00 adjusted or removed, and six adjustable tie-downs.
2-40
Page 73 of 105
Downloaded from www.Manualslib.com manuals search engine '"
.,.
PART NUMBER
1051516
1050017
1052277
1050172
1050173
1050174 "1050214 "1050244 1052627
1050427
1050429
1052349 1050729
1052870
1051055 "1051398 1051515 1050201 1051855 1052367 1052753
1052271 1052535
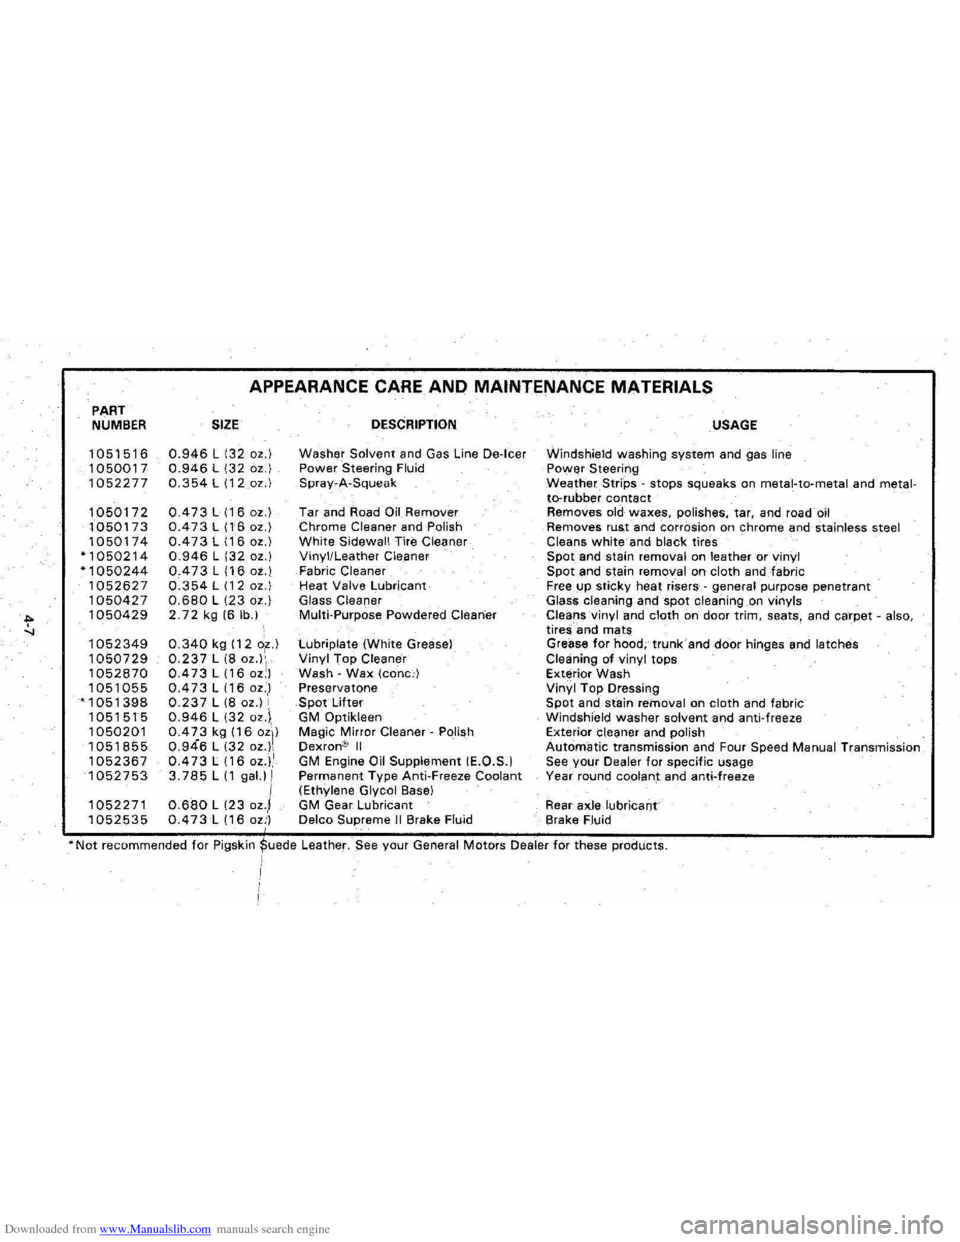
APPEARANCE CARE AND MAINTENANCE MATERIALS
SIZE
0.946 L 132 oz.) 0.946 L 132 oz.) 0.354 L (12oz.)
0.473 L 116 oz.) 0.473 L (16 oz.) 0.473 L 116 oz.) 0.946 L 132 oz.) 0.473 L 116 ot.) 0.354 L 112 oz.) 0.680 L 123 oz.) 2.72 kg 16 lb.)
0.340 kg 112 o~.) 0.237 L 18 oZ')'1 0.473 L 116 oz,) 0.473 L 116 oz.,1 0.237 L 18 oz.) , 0.946 L 132 oz.i, 0.4Z3 kg 116 oZI) 0.946 L 132 oz.), 0.473 L (16 OZ.),.I 3.785 L 11 gal.) 1
0.680 L (23 oz.l 0.473 L 116 ozi)
DESCRIPTION
Washer Solvent and Gas Line De-Icer Power Steering Fluid Spray~A-Squeak
Tar and Road on Remover Chrome Cleaner and Polish White Sidewall Tire Cleaner Vinyl/Leather Cleaner Fabric Cleaner Heat Valve Lubricant Glass Cleaner Multi-Purpose Powdered Cleaner
tubriplate (White Grease) Vinyl Top Cleaner Wash -Wax (cone.') Preservatone Spot Lifter GM Optikleen Magic Mirror Cleaner-Polish Dexron® II GM Engine Oil Supplement IE.O.S.1 Permanent Type Anti.Freeze Coolant (Ethylene Glycol Base) GM Gear Lubricant Delco Supreme II Brake Fluid
USAGE
Windshield washing system and gas line Power Steering WeatherStrips -stops squeaks on metal-to-metaland metalto-rubber contact Removes old waxes, polishes, tar, and road oil Removes rust and corrosion on chrome and stainless steel Cleans white and black tires Spot and stain removal on leather or vinyl Spot and stain removal on cloth andfabric Free up sticky heat risers -general purpose penetrant
Glass cleaning and spot cleaning on vinyls Cleans vinyl and cloth on door trim, seats, and carpet -also, tireS; and mats
Grease for hood; trunk and door hinges and latches
Cleaning of vinyl tops
Exterior Wash
Vinyl Top Dressing
Spot and stain removal on cloth and fabric
Windshield washer solvent and anti-freeze Exterior Cleaner and polish Automatic transmission and Four Speed Manual Transmission See your Dealer for specific usage
Year round coolant and anti-freeze
Rear
axle lubricant
Brake Fluid
*Not recommended for Pigskj~ede Leather. $ee your General Motors Dealer for these products. I