1983 FIAT UNO sunroof
[x] Cancel search: sunroofPage 4 of 303

The Fiat Uno is a well designed and
constructed car having an excellent
power-to-weight ratio.
The car is very economical, but still offers
good performance with excellent body interior
space.
Attractive features include the options
available for four- or five-speeds or three- or
five-door bodywork.
All essential accessories, except a radio,
are fitted as standard and a sunroof is
optionally available.
From the home mechanic’s point of view all
repair and servicing operations are straight-
forward without the need for special tools.
Spare parts are immediately available at
moderate cost.
Acknowledgements
Thanks are due to Champion Spark Plug
who supplied the illustrations showing spark
plug conditions. Certain other illustrations are
the copyright of the Fiat Motor Company (UK)
Limited and are used with their permission.
Thanks are also due to Sykes-Pickavant
Limited, who provided some of the
workshop tools, and to all those people at
Sparkford who helped in the production of
this manual.
We take great pride in the accuracy of
information given in this manual, but
vehicle manufacturers make alterations
and design changes during the production
run of a particular vehicle of which they do
not inform us, No liability can be accepted
by the authors or publishers for loss,
damage or injury caused by any errors in,
or omissions from, the information given.
0•4Introduction
Introduction to the
Fiat Uno
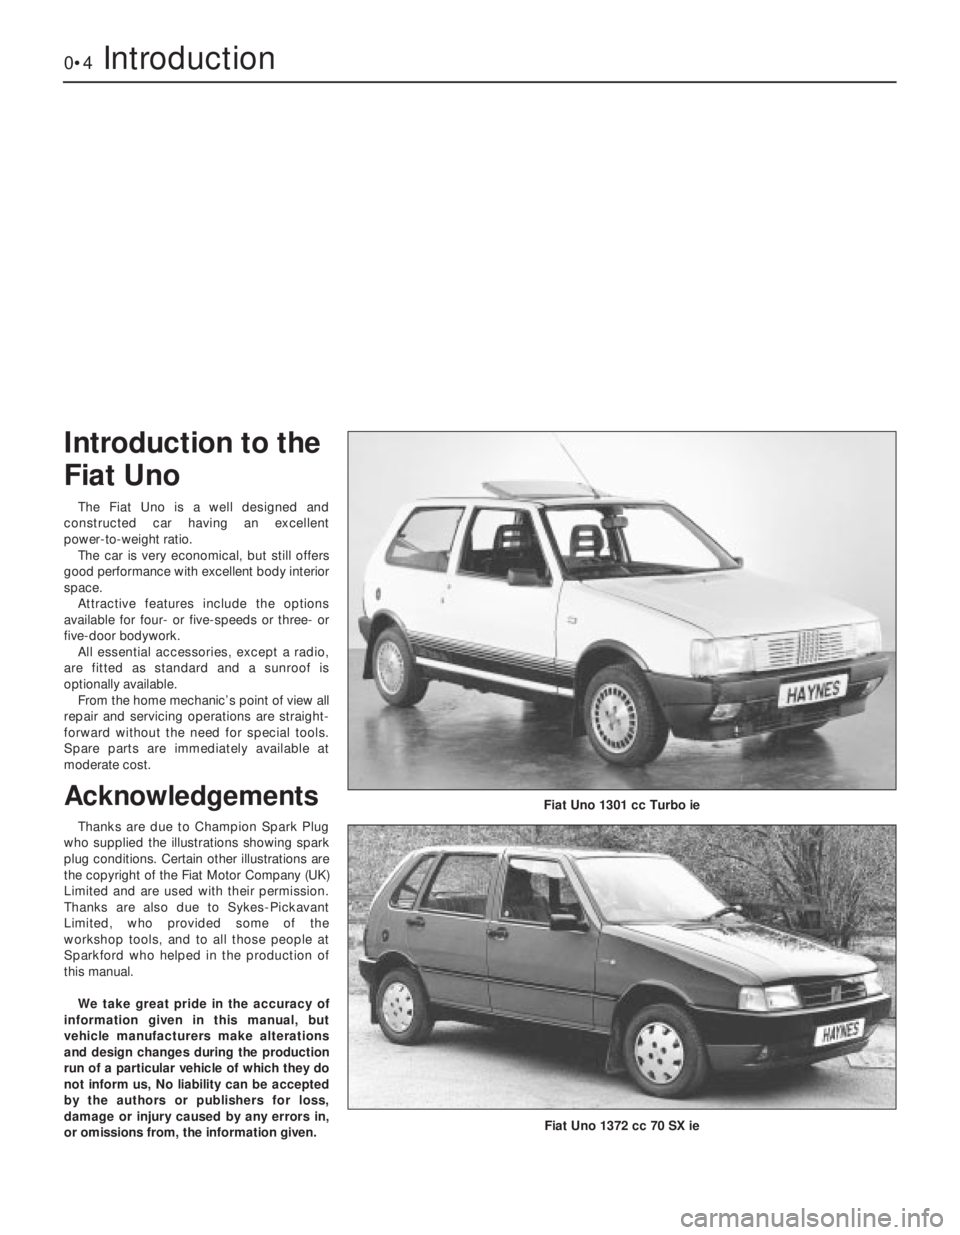
Fiat Uno 1301 cc Turbo ie
Fiat Uno 1372 cc 70 SX ie
Page 114 of 303

12
For dimensions, weights etc. refer to the Introductory Section of this Manual.
Chapter 12 Bodywork
For modifications, and information applicable to later models, see Supplement at end of manual
Bonnet - removal and refitting . . . . . . . . . . . . . . . . . . . . . . . . . . . . . 7
Bonnet - lock and release . . . . . . . . . . . . . . . . . . . . . . . . . . . . . . . . . 8
Centre console - removal and refitting . . . . . . . . . . . . . . . . . . . . . . . 21
Door - dismantling . . . . . . . . . . . . . . . . . . . . . . . . . . . . . . . . . . . . . . . 12
Door - removal and refitting . . . . . . . . . . . . . . . . . . . . . . . . . . . . . . . 13
Door trim panel - removal and refitting . . . . . . . . . . . . . . . . . . . . . . . 11
Facia panel - removal and refitting . . . . . . . . . . . . . . . . . . . . . . . . . . 22
Fixed side window (five-door) - removal and refitting . . . . . . . . . . . . 17
Front bumpers - removal and refitting . . . . . . . . . . . . . . . . . . . . . . . 9
Front seat - removal and refitting . . . . . . . . . . . . . . . . . . . . . . . . . . . 19
Front wing - removal and refitting . . . . . . . . . . . . . . . . . . . . . . . . . . . 10
General description . . . . . . . . . . . . . . . . . . . . . . . . . . . . . . . . . . . . . . 1
Grab handles . . . . . . . . . . . . . . . . . . . . . . . . . . . . . . . . . . . . . . . . . . . 25
Maintenance - bodywork and underframe . . . . . . . . . . . . . . . . . . . . 2Maintenance - upholstery and carpets . . . . . . . . . . . . . . . . . . . . . . . 3
Major body damage - repair . . . . . . . . . . . . . . . . . . . . . . . . . . . . . . . 5
Minor body damage - repair . . . . . . . . . . . . . . . . . . . . . . . . . . . . . . . 4
Opening side window (three-door) - removal and refitting . . . . . . . . 18
Radiator grille - removal and refitting . . . . . . . . . . . . . . . . . . . . . . . . 6
Rear bumpers - removal and refitting . . . . . . . . . . . . . . . . . . . . . . . . 26
Rear seat - removal and refitting . . . . . . . . . . . . . . . . . . . . . . . . . . . . 20
Rear view mirrors . . . . . . . . . . . . . . . . . . . . . . . . . . . . . . . . . . . . . . . 24
Roof rack . . . . . . . . . . . . . . . . . . . . . . . . . . . . . . . . . . . . . . . . . . . . . . 27
Seat belts . . . . . . . . . . . . . . . . . . . . . . . . . . . . . . . . . . . . . . . . . . . . . 23
Sunroof - operation and maintenance . . . . . . . . . . . . . . . . . . . . . . . 28
Tailgate - removal and refitting . . . . . . . . . . . . . . . . . . . . . . . . . . . . . 14
Tailgate glass - removal and refitting . . . . . . . . . . . . . . . . . . . . . . . . 16
Windscreen glass - removal and refitting . . . . . . . . . . . . . . . . . . . . . 15
12•1
Specifications Contents
Easy,suitable for
novice with little
experienceFairly easy,suitable
for beginner with
some experienceFairly difficult,
suitable for competent
DIY mechanic
Difficult,suitable for
experienced DIY
mechanicVery difficult,
suitable for expert DIY
or professional
Degrees of difficulty
54321
1 General description
The Uno is an all steel, welded Hatchback
of unitary construction available in three- or
five-door versions.
Various levels of trim and equipment are
available depending upon model.
Factory fitted options include a sunroof,
central door locking and electrically-operated
front windows.
2 Maintenance-
bodywork and underframe
1
The general condition of a vehicle’s
bodywork is the one thing that significantly
affects its value. Maintenance is easy, but
needs to be regular. Neglect, particularly after
minor damage, can lead quickly to further
deterioration and costly repair bills. It is
important also to keep watch on those parts
of the vehicle not immediately visible, for
instance the underside, inside all the wheel
arches, and the lower part of the engine
compartment.The basic maintenance routine for the
bodywork is washing - preferably with a lot of
water, from a hose. This will remove all the
loose solids which may have stuck to the
vehicle. It is important to flush these off in
such a way as to prevent grit from scratching
the finish. The wheel arches and underframe
need washing in the same way, to remove any
accumulated mud, which will retain moisture
and tend to encourage rust. Paradoxically
enough, the best time to clean the underframe
and wheel arches is in wet weather, when the
mud is thoroughly wet and soft. In very wet
weather, the underframe is usually cleaned of
large accumulations automatically, and this is
a good time for inspection.
Periodically, except on vehicles with a wax-
based underbody protective coating, it is a
good idea to have the whole of the
underframe of the vehicle steam-cleaned,
engine compartment included, so that a
thorough inspection can be carried out to see
what minor repairs and renovations are
necessary. Steam-cleaning is available at
many garages, and is necessary for the
removal of the accumulation of oily grime,
which sometimes is allowed to become thick
in certain areas. If steam-cleaning facilities are
not available, there are some excellent grease
solvents available which can be brush-applied; the dirt can then be simply hosed off.
Note that these methods should not be used
on vehicles with wax-based underbody
protective coating, or the coating will be
removed. Such vehicles should be inspected
annually, preferably just prior to Winter, when
the underbody should be washed down, and
any damage to the wax coating repaired.
Ideally, a completely fresh coat should be
applied. It would also be worth considering
the use of such wax-based protection for
injection into door panels, sills, box sections,
etc, as an additional safeguard against rust
damage, where such protection is not
provided by the vehicle manufacturer.
After washing paintwork, wipe off with a
chamois leather to give an unspotted clear
finish. A coat of clear protective wax polish
will give added protection against chemical
pollutants in the air. If the paintwork sheen
has dulled or oxidised, use a cleaner/polisher
combination to restore the brilliance of the
shine. This requires a little effort, but such
dulling is usually caused because regular
washing has been neglected. Care needs to
be taken with metallic paintwork, as special
non-abrasive cleaner/polisher is required to
avoid damage to the finish. Always check that
the door and ventilator opening drain holes
and pipes are completely clear, so that water
Page 124 of 303

24 Rear view mirrors
1
Interior
1The mirror may be removed after extracting
the fixing screws. The mirror is designed to
break off if struck.
Exterior
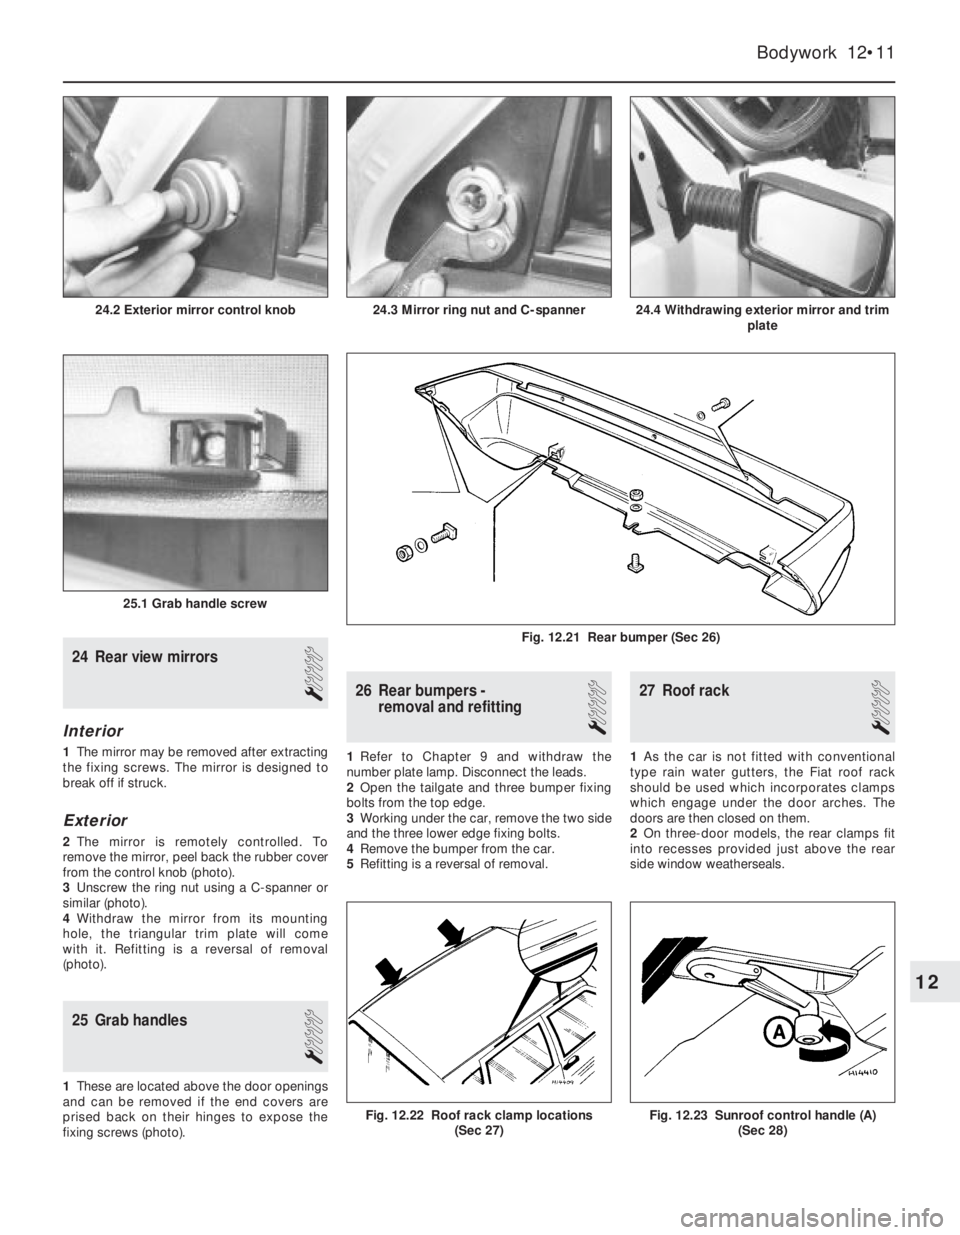
2The mirror is remotely controlled. To
remove the mirror, peel back the rubber cover
from the control knob (photo).
3Unscrew the ring nut using a C-spanner or
similar (photo).
4Withdraw the mirror from its mounting
hole, the triangular trim plate will come
with it. Refitting is a reversal of removal
(photo).
25 Grab handles
1
1These are located above the door openings
and can be removed if the end covers are
prised back on their hinges to expose the
fixing screws (photo).
26 Rear bumpers -
removal and refitting
1
1Refer to Chapter 9 and withdraw the
number plate lamp. Disconnect the leads.
2Open the tailgate and three bumper fixing
bolts from the top edge.
3Working under the car, remove the two side
and the three lower edge fixing bolts.
4Remove the bumper from the car.
5Refitting is a reversal of removal.
27 Roof rack
1
1As the car is not fitted with conventional
type rain water gutters, the Fiat roof rack
should be used which incorporates clamps
which engage under the door arches. The
doors are then closed on them.
2On three-door models, the rear clamps fit
into recesses provided just above the rear
side window weatherseals.
Bodywork 12•11
24.4 Withdrawing exterior mirror and trim
plate
25.1 Grab handle screw
24.3 Mirror ring nut and C-spanner24.2 Exterior mirror control knob
Fig. 12.23 Sunroof control handle (A)
(Sec 28)Fig. 12.22 Roof rack clamp locations
(Sec 27)
Fig. 12.21 Rear bumper (Sec 26)
12
Page 125 of 303

28 Sunroof-
operation and maintenance
1
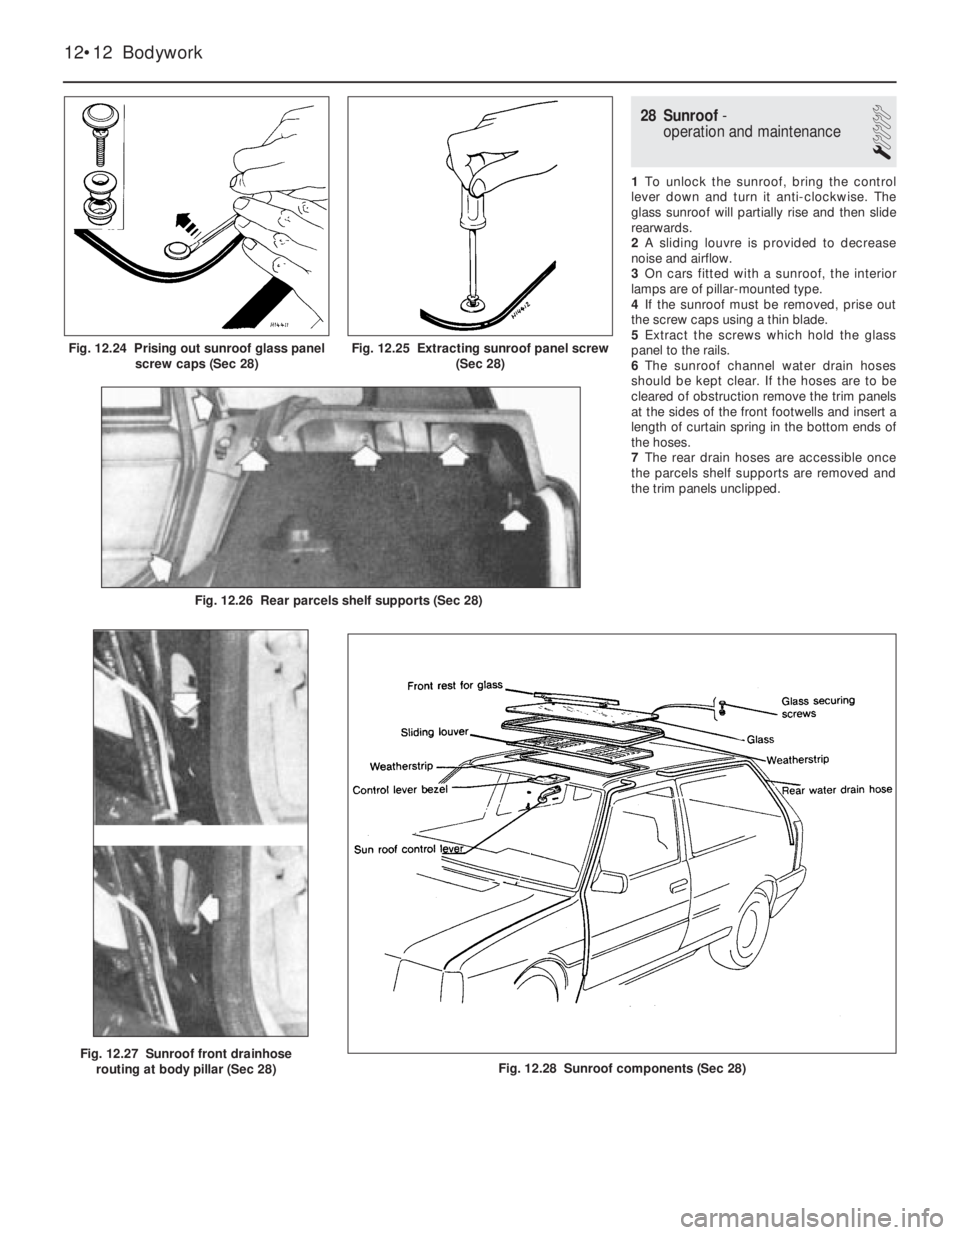
1To unlock the sunroof, bring the control
lever down and turn it anti-clockwise. The
glass sunroof will partially rise and then slide
rearwards.
2A sliding louvre is provided to decrease
noise and airflow.
3On cars fitted with a sunroof, the interior
lamps are of pillar-mounted type.
4If the sunroof must be removed, prise out
the screw caps using a thin blade.
5Extract the screws which hold the glass
panel to the rails.
6The sunroof channel water drain hoses
should be kept clear. If the hoses are to be
cleared of obstruction remove the trim panels
at the sides of the front footwells and insert a
length of curtain spring in the bottom ends of
the hoses.
7The rear drain hoses are accessible once
the parcels shelf supports are removed and
the trim panels unclipped.
12•12 Bodywork
Fig. 12.28 Sunroof components (Sec 28)Fig. 12.27 Sunroof front drainhose
routing at body pillar (Sec 28)
Fig. 12.26 Rear parcels shelf supports (Sec 28)
Fig. 12.25 Extracting sunroof panel screw
(Sec 28)Fig. 12.24 Prising out sunroof glass panel
screw caps (Sec 28)
Page 302 of 303

S
Safety first -0•5
Safety pressure switch - 13•90
Scalding -0•5
Scratches in bodywork - 12•2
Screw threads and fastenings - REF•8
Seat belts - 12•10, REF•2
Seats - 12•9, REF•2
Servo unit -8•8, 13•103
Shock absorbers - 11•4, REF•2, REF•3
Shoes -8•3
Side light -9•7
Side repeater lamp -9•7
Spares - REF•10, REF•12
Spark plugs -4•7, 13•92
Speedometer -9•8
Spotlamp - 13•108
Springs - 11•3, 11•4, REF•3
Starter motor -9•4, 13•104, 13•105
Starter fault -1•35, 9•14, 13•92, REF•10
Steering-9•5, 10•1et seq, 13•106, REF•1,
REF•2, REF•3
Steering fault finding - 10•4
Stop lamp switch -8•9
Struts - 11•2, 13•111
Sump -1•11, 1•22, 1•26, 1•31, 13•19,
13•24, 13•46, 13•53
Sunroof - 12•12
Supplement: Revisions and information on
later models- 13•1et seq
Supplementary air valve - 13•67, 13•69,
13•71, 13•80
Suspension- 11•1et seq, 13•111, REF•2,
REF•3
Suspension fault finding - 11•6
Switches -2•3, 4•8, 8•9, 9•5, 13•69, 13•72,
13•80, 13•90, 13•106 to 13•109
T
Tailgate -9•6, 12•8, 12•9, 13•112
TDC sensor -4•7, 13•90, 13•91
Thermostat -2•3, 13•54, 13•57
Throttle control linkage - 13•72
Throttle position switch - 13•69, 13•72,
13•80
Throttle valve housing - 13•67, 13•70,
13•80
Tie-rod - 10•2
Timing -4•4, 13•85, 13•91
Timing belt -1•24, 1•29, 1•32, 13•20,
13•30, 13•35, 13•38, 13•53
Timing chain -1•9, 1•19, 1•22
Tools - REF•5, REF•7, REF•8, REF•10
Towing -0•8
Track control arm - 11•4
Trailing arms - 11•5
Transmission-1•13, 1•22, 1•27, 1•32, 6•1
et seq, 13•26, 13•33, 13•36, 13•49,
13•53, 13•94, 13•96
Transmission fault finding -6•4
Transmission oil -0•6, 0•13, 6•1, 13•14,
13•95
Trim panels - 12•5, 13•114
Trip master - 13•108
Tripode joint -7•3
Turbocharger - 13•82, 13•83
Turbocharger fault finding - 13•84
Tyres -7•5, 10•4, 11•6, REF•4
U
Underframe - 12•1
Unleaded fuel - 13•60
Upholstery - 12•2
V
Vacuum sensor - 13•86
Vacuum servo -8•8, 13•103
Valve clearances -1•9, 1•23, 1•32, 13•20,
13•37
Vehicle identification - REF•2, REF•12
Voltage regulator -9•4
W
Washer system -9•10, 13•110
Water pump -2•4, 13•55, 13•58
Weights -0•6, 13•17
Wheel alignment - 10•3
Wheel bearings -7•3, 7•4, REF•3
Wheel changing -0•8
Wheel cylinder -8•4
Wheels -7•5, REF•4
Window regulator - 12•7
Windows -9•11, 12•6, 12•9, 13•109,
13•113
Windscreen - 12•8, REF•1
Wings - 12•5
Wiper blade and arm -9•9
Wiper motor -9•9, 9•10, 13•109, 13•110
Wiper fault -9•14
Wiring diagrams- 14•1et seq
Working facilities - REF•7
IndexREF•19
REF