1983 FIAT UNO battery
[x] Cancel search: batteryPage 5 of 303

Safety First!0•5
Working on your car can be dangerous.
This page shows just some of the potential
risks and hazards, with the aim of creating a
safety-conscious attitude.
General hazards
Scalding
• Don’t remove the radiator or expansion
tank cap while the engine is hot.
• Engine oil, automatic transmission fluid or
power steering fluid may also be dangerously
hot if the engine has recently been running.
Burning
• Beware of burns from the exhaust system
and from any part of the engine. Brake discs
and drums can also be extremely hot
immediately after use.
Crushing
• When working under or near
a raised vehicle,
always
supplement the
jack with axle
stands, or use
drive-on
ramps.
Never
venture
under a car which
is only supported by a jack.
• Take care if loosening or tightening high-
torque nuts when the vehicle is on stands.
Initial loosening and final tightening should
be done with the wheels on the ground.
Fire
• Fuel is highly flammable; fuel vapour is
explosive.
• Don’t let fuel spill onto a hot engine.
• Do not smoke or allow naked lights
(including pilot lights) anywhere near a
vehicle being worked on. Also beware of
creating sparks
(electrically or by use of tools).
• Fuel vapour is heavier than air, so don’t
work on the fuel system with the vehicle over
an inspection pit.
• Another cause of fire is an electrical
overload or short-circuit. Take care when
repairing or modifying the vehicle wiring.
• Keep a fire extinguisher handy, of a type
suitable for use on fuel and electrical fires.
Electric shock
• Ignition HT
voltage can be
dangerous,
especially to
people with heart
problems or a
pacemaker. Don’t
work on or near the
ignition system with
the engine running or
the ignition switched on.• Mains voltage is also dangerous. Make
sure that any mains-operated equipment is
correctly earthed. Mains power points should
be protected by a residual current device
(RCD) circuit breaker.
Fume or gas intoxication
• Exhaust fumes are
poisonous; they often
contain carbon
monoxide, which is
rapidly fatal if inhaled.
Never run the
engine in a
confined space
such as a garage
with the doors shut.
• Fuel vapour is also
poisonous, as are the vapours from some
cleaning solvents and paint thinners.
Poisonous or irritant substances
• Avoid skin contact with battery acid and
with any fuel, fluid or lubricant, especially
antifreeze, brake hydraulic fluid and Diesel
fuel. Don’t syphon them by mouth. If such a
substance is swallowed or gets into the eyes,
seek medical advice.
• Prolonged contact with used engine oil can
cause skin cancer. Wear gloves or use a
barrier cream if necessary. Change out of oil-
soaked clothes and do not keep oily rags in
your pocket.
• Air conditioning refrigerant forms a
poisonous gas if exposed to a naked flame
(including a cigarette). It can also cause skin
burns on contact.
Asbestos
• Asbestos dust can cause cancer if inhaled
or swallowed. Asbestos may be found in
gaskets and in brake and clutch linings.
When dealing with such components it is
safest to assume that they contain asbestos.
Special hazards
Hydrofluoric acid
• This extremely corrosive acid is formed
when certain types of synthetic rubber, found
in some O-rings, oil seals, fuel hoses etc, are
exposed to temperatures above 400
0C. The
rubber changes into a charred or sticky
substance containing the acid. Once formed,
the acid remains dangerous for years. If it
gets onto the skin, it may be necessary to
amputate the limb concerned.
• When dealing with a vehicle which has
suffered a fire, or with components salvaged
from such a vehicle, wear protective gloves
and discard them after use.
The battery
• Batteries contain sulphuric acid, which
attacks clothing, eyes and skin. Take care
when topping-up or carrying the battery.
• The hydrogen gas given off by the battery
is highly explosive. Never cause a spark or
allow a naked light nearby. Be careful when
connecting and disconnecting battery
chargers or jump leads.
Air bags
• Air bags can cause injury if they go off
accidentally. Take care when removing the
steering wheel and/or facia. Special storage
instructions may apply.
Diesel injection equipment
• Diesel injection pumps supply fuel at very
high pressure. Take care when working on
the fuel injectors and fuel pipes.
Warning: Never expose the hands,
face or any other part of the body
to injector spray; the fuel can
penetrate the skin with potentially fatal
results.
Remember...
DO
• Do use eye protection when using power
tools, and when working under the vehicle.
• Do wear gloves or use barrier cream to
protect your hands when necessary.
• Do get someone to check periodically
that all is well when working alone on the
vehicle.
• Do keep loose clothing and long hair well
out of the way of moving mechanical parts.
• Do remove rings, wristwatch etc, before
working on the vehicle – especially the
electrical system.
• Do ensure that any lifting or jacking
equipment has a safe working load rating
adequate for the job.
A few tips
DON’T
• Don’t attempt to lift a heavy component
which may be beyond your capability – get
assistance.
• Don’t rush to finish a job, or take
unverified short cuts.
• Don’t use ill-fitting tools which may slip
and cause injury.
• Don’t leave tools or parts lying around
where someone can trip over them. Mop
up oil and fuel spills at once.
• Don’t allow children or pets to play in or
near a vehicle being worked on.
Page 7 of 303
Roadside Repairs0•7
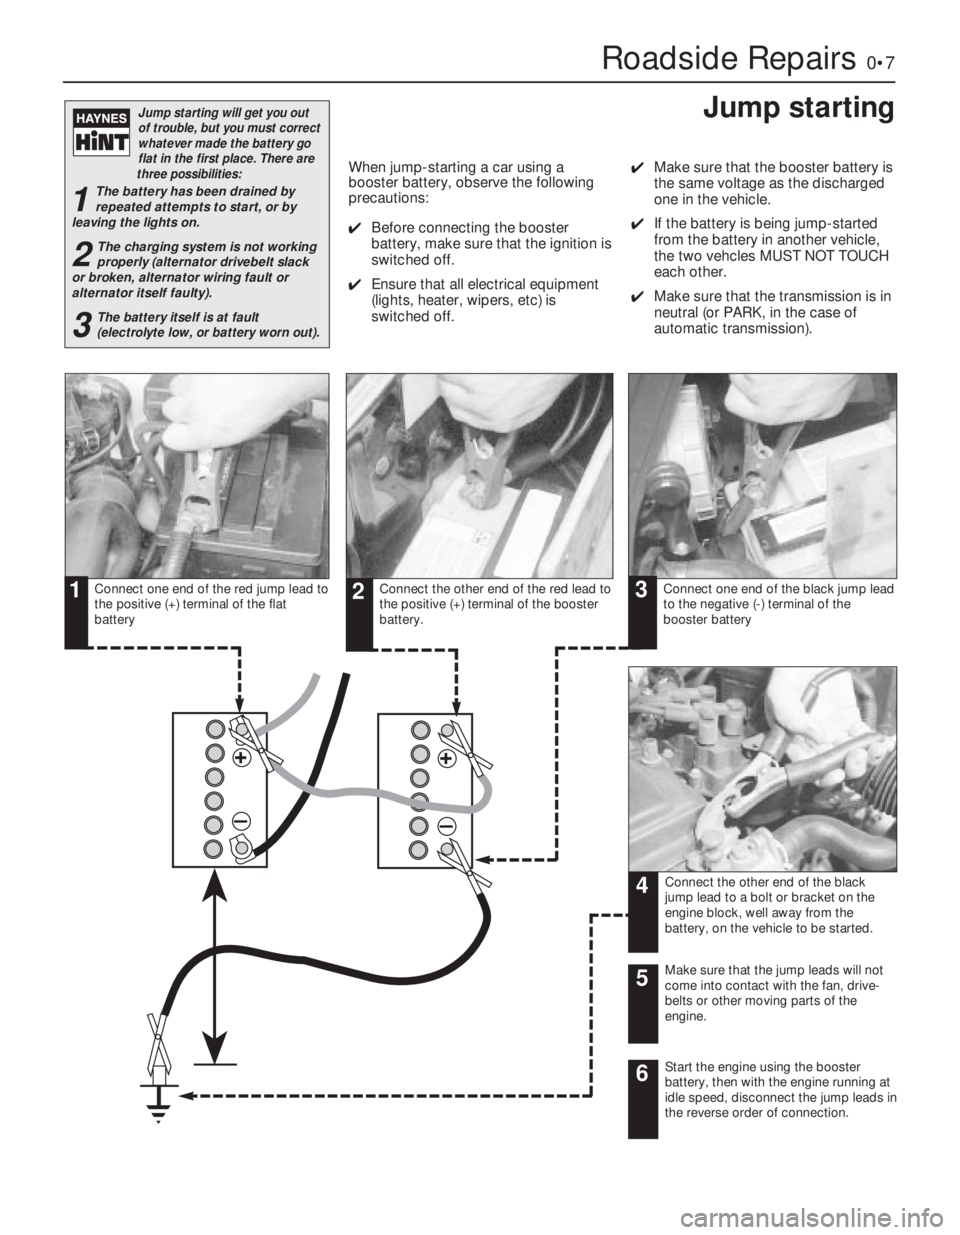
Connect one end of the red jump lead to
the positive (+) terminal of the flat
batteryConnect the other end of the red lead to
the positive (+) terminal of the booster
battery.Connect one end of the black jump lead
to the negative (-) terminal of the
booster battery
Connect the other end of the black
jump lead to a bolt or bracket on the
engine block, well away from the
battery, on the vehicle to be started.
–
+
+
–
123
4
Make sure that the jump leads will not
come into contact with the fan, drive-
belts or other moving parts of the
engine.5
Start the engine using the booster
battery, then with the engine running at
idle speed, disconnect the jump leads in
the reverse order of connection.6
Jump starting will get you out
of trouble, but you must correct
whatever made the battery go
flat in the first place. There are
three possibilities:
1The battery has been drained by
repeated attempts to start, or by
leaving the lights on.
2The charging system is not working
properly (alternator drivebelt slack
or broken, alternator wiring fault or
alternator itself faulty).
3The battery itself is at fault
(electrolyte low, or battery worn out).
Booster battery (jump) starting
When jump-starting a car using a
booster battery, observe the following
precautions:
4Before connecting the booster
battery, make sure that the ignition is
switched off.
4Ensure that all electrical equipment
(lights, heater, wipers, etc) is
switched off.4Make sure that the booster battery is
the same voltage as the discharged
one in the vehicle.
4If the battery is being jump-started
from the battery in another vehicle,
the two vehcles MUST NOT TOUCH
each other.
4Make sure that the transmission is in
neutral (or PARK, in the case of
automatic transmission).
Jump starting
Page 10 of 303

0•10Routine maintenance
Maintenance is essential for ensuring safety and desirable for the
purpose of getting the best in terms of performance and economy
from the car. Over the years the need for periodic lubrication has been
greatly reduced if not totally eliminated. This has unfortunately tended
to lead some owners to think that because no such action is required
the items either no longer exist or will last forever. This is certainly not
the case; it is essential to carry out regular visual examinations as
comprehensively as possible in order to spot any possible defects at
an early stage before they develop into major and expensive repairs.
For information applicable to later models, see Supplement.
Every 250 miles (400 km), weekly,
or before a long journey
m mCheck engine oil level
m mCheck brake reservoir fluid level
m mCheck tyre pressures
m mCheck operation of all lights and horn
m mTop up washer fluid reservoirs, adding a screen
wash, and check operation of washers and wipers
m mCheck coolant level
m mCheck battery electrolyte level
Every 6000 miles (10 000 km)
or six months, whichever comes first
m mRenew engine oil and filter (Chapter 1, Section 2)
m mCheck drivebelt tension (Chapter 2, Section 8)
m mCheck carburettor idle speed and mixture
adjustments (Chapter 3)
m mCheck contact points and dwell angle (mechanical
breaker distributors) (Chapter 4, Section 3)
m mCheck tyre tread wear (Chapter 7, Section 7)
m mCheck disc pads for wear (Chapter 8, Section 3)
Every 36 000 miles (60 000 km)
or three years, whichever comes first
m mRenew the timing belt - 1116 and 1299/1301 cc
(Chapter 1, Section 28)
m mCheck exhaust system for corrosion (Chapter 3,
Section 19)
m mRenew contact breaker points and adjust dwell
angle (mechanical breaker distributors) (Chapter 4,
Section 3)
m mCheck and adjust ignition timing (Chapter 4,
Section 4)
m mRenew spark plugs (Chapter 4, Section 11)
m mCheck clutch adjustment (Chapter 5, Section 2)
m mCheck transmission oil level (Chapter 6, Section 2)
m mCheck driveshaft and steering rack gaiters for splits
(Chapters 7 and 10)
m mCheck rear brake shoe linings for wear (Chapter 8,
Section 4)
m mCheck handbrake travel (Chapter 8, Section 16)
m mCheck headlamp beam alignment (Chapter 9,
Section 17)
m mCheck balljoints for wear (Chapter 10, Section 2)
m mCheck front wheel alignment (Chapter 10, Section 8)
m mCheck suspension bushes for wear (Chapter 11,
Section 2)
m mCheck seat belts for fraying (Chapter 12, Section 23)
m mLubricate controls, hinges and locks
Every 24 000 miles (40 000 km)
or two years, whichever comes first
m mRenew coolant anti-freeze mixture (Chapter 2,
Section 3)
m mRenew transmission oil (Chapter 6, Section 2)
m mRenew brake hydraulic fluid (Chapter 8, Section 12)
m mCheck for underbody corrosion and clean out door
and sill drain holes (Chapter 12, Section 2)
Every 12 000 miles (20 000 km) or
12 months, whichever comes first
m mCheck and adjust valve clearances (Chapter 1,
Sections 5 and 26)
m mRenew air cleaner element (Chapter 3, Section 2)
Page 11 of 303
Routine maintenance0•11
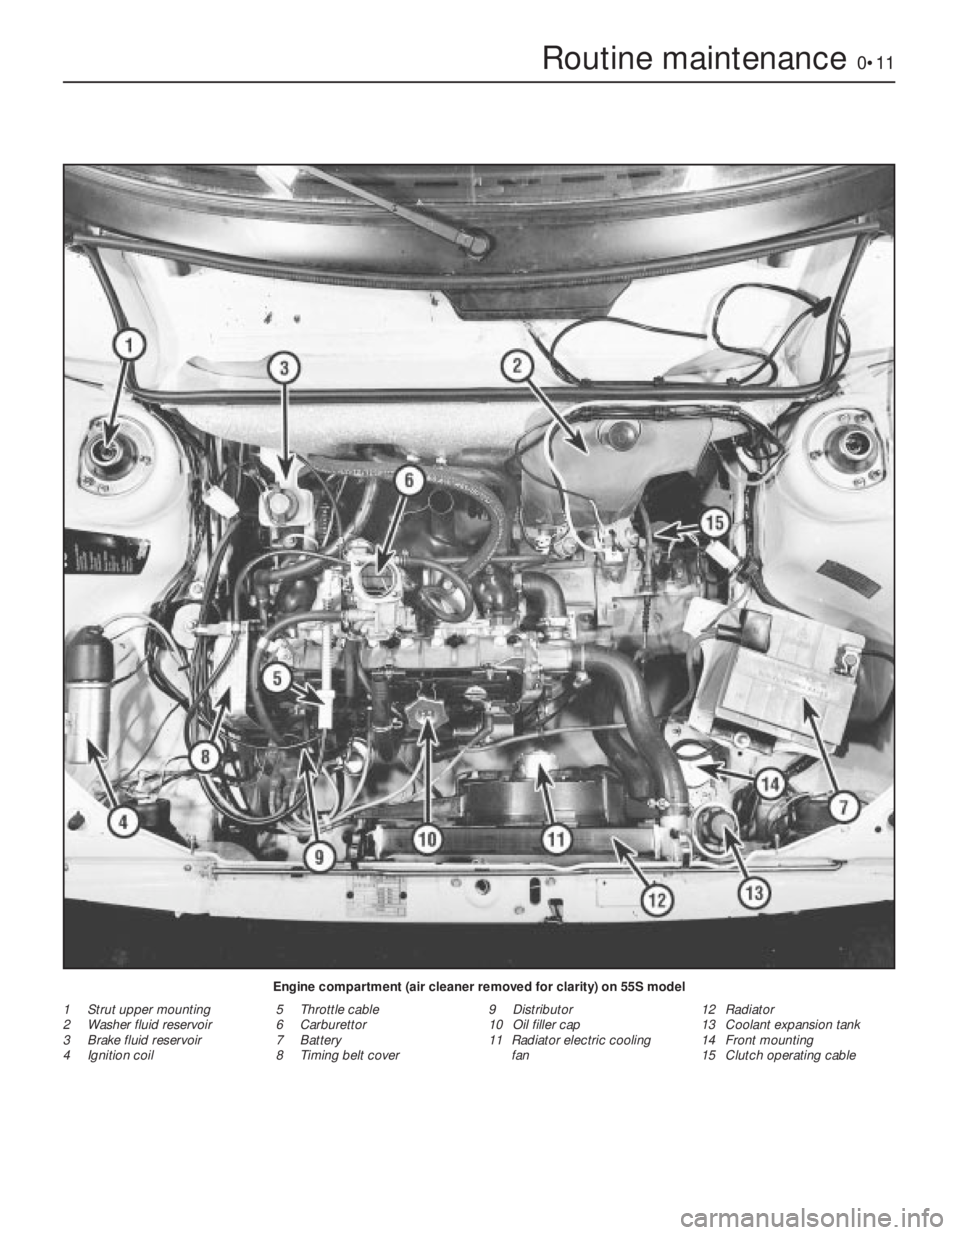
Engine compartment (air cleaner removed for clarity) on 55S model
1 Strut upper mounting
2 Washer fluid reservoir
3 Brake fluid reservoir
4 Ignition coil5 Throttle cable
6 Carburettor
7 Battery
8 Timing belt cover9 Distributor
10 Oil filler cap
11 Radiator electric cooling
fan12 Radiator
13 Coolant expansion tank
14 Front mounting
15 Clutch operating cable
Page 24 of 303

13Engage the timing chain with the teeth of
the crankshaft sprocket. Then locate the
camshaft sprocket within the upper loop of
the chain in such a way that when the
sprocket is pushed onto the camshaft, the
timing marks will be in alignment. Make sure
that the self-tensioning links are on the inside
of the chain against the cylinder block
(photos).
14Place the camshaft sprocket onto the
camshaft so that its positioning dowel
engages.
15Secure the camshaft sprocket by fitting
the special cam, that drives the fuel pump, on
its locating dowel. Fit the camshaft sprocket
retaining bolt (photo).
16Tighten the sprocket bolt to the specified
torque.
17If the timing cover oil seal showed signs of
leaking before engine overhaul the old seal
should be removed and a new one fitted.
18Using a screwdriver, carefully remove the
old oil seal, working from the rear of the cover.
Fit the new seal making sure it is inserted
squarely, and tap home with a hammer.
19Lubricate the oil seal with engine oil.
20With all traces of old gasket and jointing
compound removed from the timing cover
and cylinder block mating faces, smear a little
grease onto the timing cover mating face and
fit a new gasket in position.
21Fit the timing cover to the cylinder block
and finger tighten the securing bolts, and
spring washer. Ensure that the fuel pump
pushrod bush is in place in the cover.22Wipe the hub of the pulley and carefully
place into position on the crankshaft. It should
locate on the Woodruff key. It may be
necessary to adjust the position of the timing
cover slightly in order to centralise the oil seal
relative to the pulley hub.
23Tighten the timing cover securing bolts in
a diagonal and progressive manner.
24Tighten the crankshaft pulley nut to the
specified torque again holding the crankshaft
against rotation as previously described
(paragraph 2) this Section.
25Refit the fuel pump and alternator
drivebelt.
7 Cylinder head-
removal and refitting
3
1For safety reasons, disconnect the battery
negative lead.
2Refer to Chapter 2 and drain the cooling
system.
3Refer to Chapter 3 and remove the
carburettor, air cleaner and spacer block.
4Undo and remove the five nuts and
washers securing the exhaust manifold and
hot air ducting to the cylinder head.
5Detach the cable from the temperature
indicator sender unit.
6Refer to Chapter 4 and disconnect the
distributor LT lead and the coil HT lead.
7Refer to Chapter 2 and remove the
thermostat housing from the cylinder head.
8Disconnect the coolant hoses from the
cylinder head.
9Note the electrical connections to the rear
of the alternator and disconnect them.
10Disconnect the mounting and adjuster link
bolts and remove the alternator from the
engine.
11Unscrew the four nuts securing the rocker
cover to the top of the cylinder head and lift
away the spring washers and metal packing
pieces. Remove the rocker cover and cork
gasket.
12Unscrew the four rocker pedestal
securing nuts in a progressive manner. Lift
away the four nuts and spring washers andease the valve rocker assembly from the
cylinder head studs.
13Remove the pushrods, keeping them in
the relative order in which they were removed.
The easiest way to do this is to push them
through a sheet of thick paper or thin card in
the correct sequence.
14Unscrew the cylinder head securing bolts
half a turn at a time in the reverse order to that
shown in Fig. 1.7; don’t forget the one within
the inlet manifold. When all the bolts are no
longer under tension they may be unscrewed
from the cylinder head one at a time. This will
also release a section of the cooling system
pipe secured by two of the bolts. All the bolts
have washers.
15The cylinder head may now be lifted off. If
the head is jammed, try to rock it to break the
seal. Under no circumstances try to prise it
apart from the cylinder block with a
screwdriver or cold chisel as damage may be
done to the faces of the head or block. If this
or the Hint, fail to work, strike the head
sharply with a plastic headed hammer, or with
a wooden hammer, or with a metal hammer
with an interposed piece of wood to cushion
the blows. Under no circumstances hit the
head directly with a metal hammer as this may
cause the casting to fracture. Several sharp
taps with the hammer, at the same time
pulling upwards, should free the head. Lift the
head off and place on one side.
16The cylinder head may now be de-
carbonised or dismantled, refer to Section 17.
Refitting
17After checking that both the cylinder block
and cylinder head mating surfaces are
perfectly clean, generously lubricate each
cylinder with engine oil.
18Always use a new cylinder head gasket as
the old gasket will be compressed and not
capable of giving a good seal.
1•10 903 cc engine
6.15 Fitting fuel pump drive cam and
sprocket bolt
6.13C Self-tensioning links on inside of
chain6.13B Timing mark alignment6.13A Fitting the sprockets and timing
chain
If the head will not readily
free, turn the crankshaft.
The compression generated
in the cylinders will often
break the gasket joint
Page 25 of 303
19Never smear grease on the gasket as,
when the engine heats up, the grease will melt
and may allow compression leaks to develop.
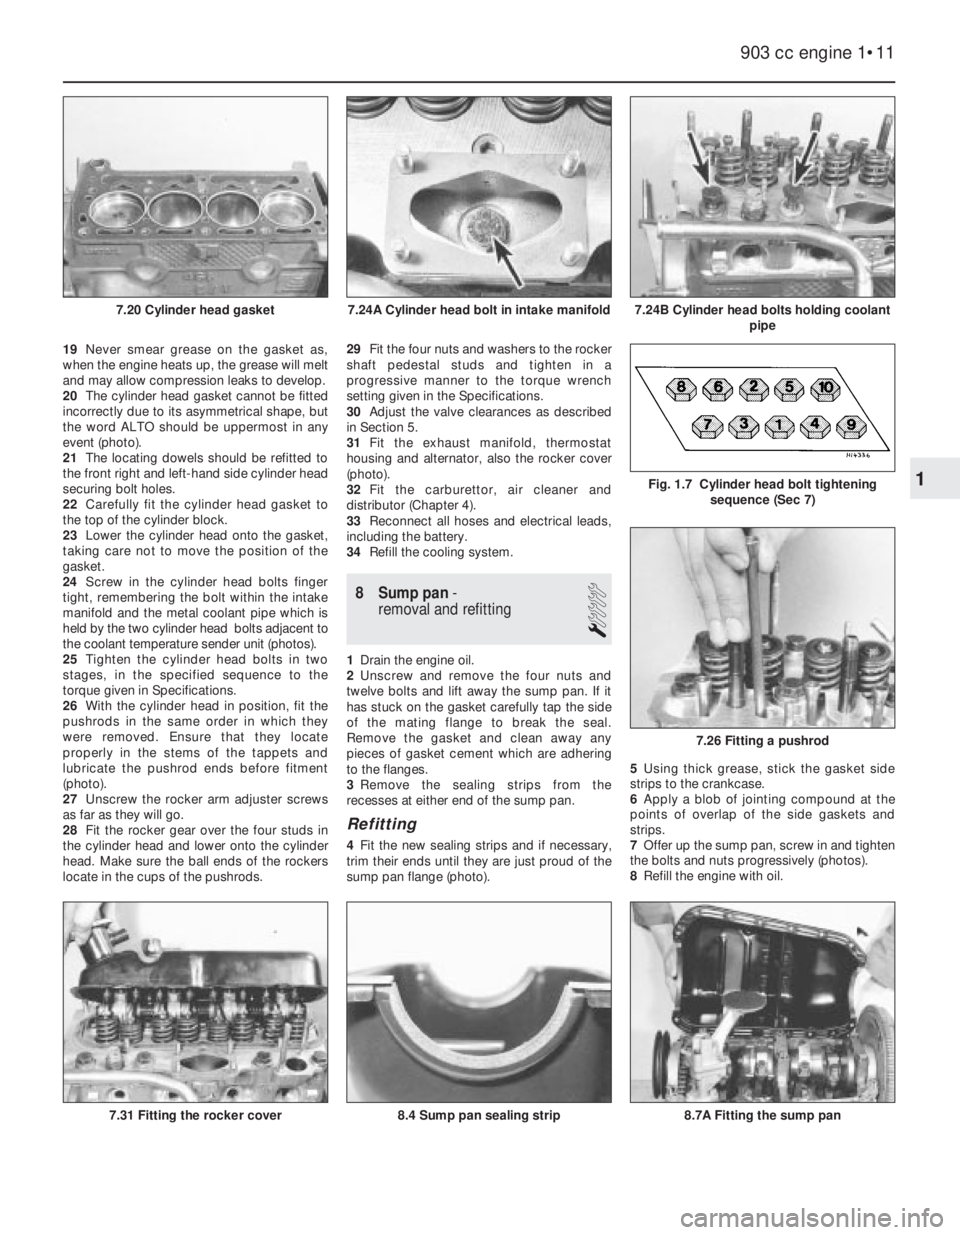
20The cylinder head gasket cannot be fitted
incorrectly due to its asymmetrical shape, but
the word ALTO should be uppermost in any
event (photo).
21The locating dowels should be refitted to
the front right and left-hand side cylinder head
securing bolt holes.
22Carefully fit the cylinder head gasket to
the top of the cylinder block.
23Lower the cylinder head onto the gasket,
taking care not to move the position of the
gasket.
24Screw in the cylinder head bolts finger
tight, remembering the bolt within the intake
manifold and the metal coolant pipe which is
held by the two cylinder head bolts adjacent to
the coolant temperature sender unit (photos).
25Tighten the cylinder head bolts in two
stages, in the specified sequence to the
torque given in Specifications.
26With the cylinder head in position, fit the
pushrods in the same order in which they
were removed. Ensure that they locate
properly in the stems of the tappets and
lubricate the pushrod ends before fitment
(photo).
27Unscrew the rocker arm adjuster screws
as far as they will go.
28Fit the rocker gear over the four studs in
the cylinder head and lower onto the cylinder
head. Make sure the ball ends of the rockers
locate in the cups of the pushrods.29Fit the four nuts and washers to the rocker
shaft pedestal studs and tighten in a
progressive manner to the torque wrench
setting given in the Specifications.
30Adjust the valve clearances as described
in Section 5.
31Fit the exhaust manifold, thermostat
housing and alternator, also the rocker cover
(photo).
32Fit the carburettor, air cleaner and
distributor (Chapter 4).
33Reconnect all hoses and electrical leads,
including the battery.
34Refill the cooling system.
8 Sump pan-
removal and refitting
1
1Drain the engine oil.
2Unscrew and remove the four nuts and
twelve bolts and lift away the sump pan. If it
has stuck on the gasket carefully tap the side
of the mating flange to break the seal.
Remove the gasket and clean away any
pieces of gasket cement which are adhering
to the flanges.
3Remove the sealing strips from the
recesses at either end of the sump pan.
Refitting
4Fit the new sealing strips and if necessary,
trim their ends until they are just proud of the
sump pan flange (photo).5Using thick grease, stick the gasket side
strips to the crankcase.
6Apply a blob of jointing compound at the
points of overlap of the side gaskets and
strips.
7Offer up the sump pan, screw in and tighten
the bolts and nuts progressively (photos).
8Refill the engine with oil.
903 cc engine 1•11
7.24B Cylinder head bolts holding coolant
pipe7.24A Cylinder head bolt in intake manifold7.20 Cylinder head gasket
7.31 Fitting the rocker cover
7.26 Fitting a pushrod
Fig. 1.7 Cylinder head bolt tightening
sequence (Sec 7)1
8.4 Sump pan sealing strip8.7A Fitting the sump pan
Page 27 of 303
24Screw in the big-end bolts and tighten to
the specified torque (photo).
25Refit the sump pan (Sec 8) and the
cylinder head (Sec 7).
26Refill the engine with oil and coolant.
10 Oil pump-
removal and refitting
1
1Remove the sump pan as described in
Section 8.
2Unscrew the two bolts which hold the oil
pump housing to the underside of the
crankcase and withdraw the pump. Remove
and discard the pump flange gasket.
Refitting
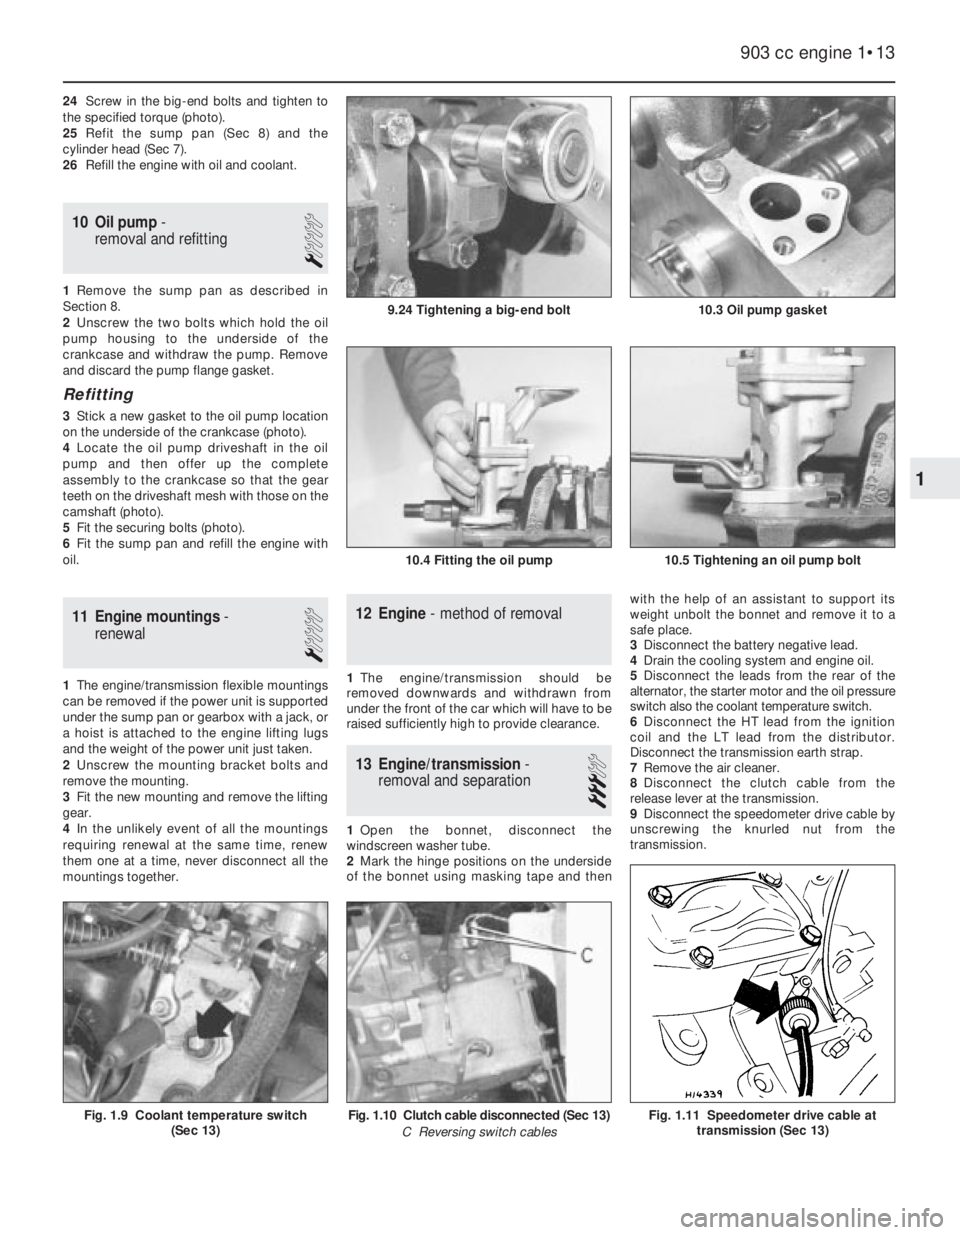
3Stick a new gasket to the oil pump location
on the underside of the crankcase (photo).
4Locate the oil pump driveshaft in the oil
pump and then offer up the complete
assembly to the crankcase so that the gear
teeth on the driveshaft mesh with those on the
camshaft (photo).
5Fit the securing bolts (photo).
6Fit the sump pan and refill the engine with
oil.
11 Engine mountings-
renewal
1
1The engine/transmission flexible mountings
can be removed if the power unit is supported
under the sump pan or gearbox with a jack, or
a hoist is attached to the engine lifting lugs
and the weight of the power unit just taken.
2Unscrew the mounting bracket bolts and
remove the mounting.
3Fit the new mounting and remove the lifting
gear.
4In the unlikely event of all the mountings
requiring renewal at the same time, renew
them one at a time, never disconnect all the
mountings together.
12 Engine- method of removal
1The engine/transmission should be
removed downwards and withdrawn from
under the front of the car which will have to be
raised sufficiently high to provide clearance.
13 Engine/transmission-
removal and separation
3
1Open the bonnet, disconnect the
windscreen washer tube.
2Mark the hinge positions on the underside
of the bonnet using masking tape and thenwith the help of an assistant to support its
weight unbolt the bonnet and remove it to a
safe place.
3Disconnect the battery negative lead.
4Drain the cooling system and engine oil.
5Disconnect the leads from the rear of the
alternator, the starter motor and the oil pressure
switch also the coolant temperature switch.
6Disconnect the HT lead from the ignition
coil and the LT lead from the distributor.
Disconnect the transmission earth strap.
7Remove the air cleaner.
8Disconnect the clutch cable from the
release lever at the transmission.
9Disconnect the speedometer drive cable by
unscrewing the knurled nut from the
transmission.
903 cc engine 1•13
10.3 Oil pump gasket
10.4 Fitting the oil pump10.5 Tightening an oil pump bolt
9.24 Tightening a big-end bolt
Fig. 1.11 Speedometer drive cable at
transmission (Sec 13)Fig. 1.10 Clutch cable disconnected (Sec 13)
C Reversing switch cablesFig. 1.9 Coolant temperature switch
(Sec 13)
1
Page 37 of 303
removed and the weight of the car is again on
its roadwheels.
4Fill the cooling system.
5Fill the engine with oil.
6Replenish lost transmission oil.
7Reconnect the battery.
8Adjust the clutch pedal as described in
Chapter 5.
24 Engine- initial start-up after
overhaul or major repair
4
1Make sure that the battery is fully charged
and that all lubricants, coolant and fuel are
replenished.
2If the fuel system has been dismantled it will
require several revolutions of the engine on
the starter motor to pump the petrol up to the
carburettor.
3Turn the carburettor throttle speed screwthrough one complete turn to increase the idle
speed in order to offset the initial stiffness of
new engine internal components.
4As soon as the engine fires and runs, keep
it going at a fast idle speed and bring it up to
normal working temperature.
5As the engine warms up there will be odd
smells and some smoke from parts getting
hot and burning off oil deposits. The signs to
look for are leaks of water or oil which will be
obvious.
6Check also the exhaust pipe and manifold
connections as these do not always “find”
their exact gas tight position until the warmth
and vibration have acted on them and it is
almost certain that they will need tightening
further. This should be done, of course, with
the engine stopped.
7When normal running temperature has
been reached, adjust the engine idle speed as
described in Chapter 3.
8Stop the engine and wait a few minutes tosee if any lubricant or coolant is dripping out
when the engine is stationary.
9Road test the car to check that the timing is
correct and that the engine is giving the
necessary smoothness and power. Do not
race the engine - if new bearings and/or
pistons have been fitted it should be treated
as a new engine and run in at a reduced
speed for the first 500 km (300 miles).
10After the first 1500 km (900 miles) the
cylinder head bolts must be re-torqued in the
following way (engine cold).
11Remove the air cleaner and rocker cover.
Unscrew the first bolt (Fig. 1.7) through a
quarter turn and then tighten it to final stage 2
torque (see Specifications).
12Repeat on the remaining bolts, one at a
time.
13Check and adjust the valve clearances
(Section 5).
14Refit the rocker cover and air cleaner.
903 cc engine 1•23
26.4 Shim engraved mark26.2 Removing a shim from a cam follower25.4 Checking a valve clearance
1
Part 3: 1116 cc and 1301 cc engines
25 Valve clearances- checking
2
This should only be required if the valves
have been renewed or ground in, or at high
mileages when noise or poor engine
performance indicates that a check is
necessary.
It is important that each valve clearance is
set correct otherwise the timing will be
wrong and engine performance poor. If there
is no clearance at all, the valve and its seat
will soon burn. Always set the clearances
with the engine cold.
1Remove the camshaft cover. Jack-up a
front wheel and engage top gear so that by
turning the wheel, the crankshaft can be
rotated.
2Each valve clearance must be checked
when the high point of the cam is pointing
directly upward away from the cam follower.
3Check the clearances in the firing order
1-3-4-2, No. 1 cylinder being at the timing
belt end of the engine. This will minimise the
amount of crankshaft rotation required.4Insert the appropriate feeler blade
between the heel of the cam and the cam
follower shim of the first valve. If necessary
alter the thickness of the feeler blade until it
is a stiff, sliding fit. Record the thickness,
which will, of course, represent the valve
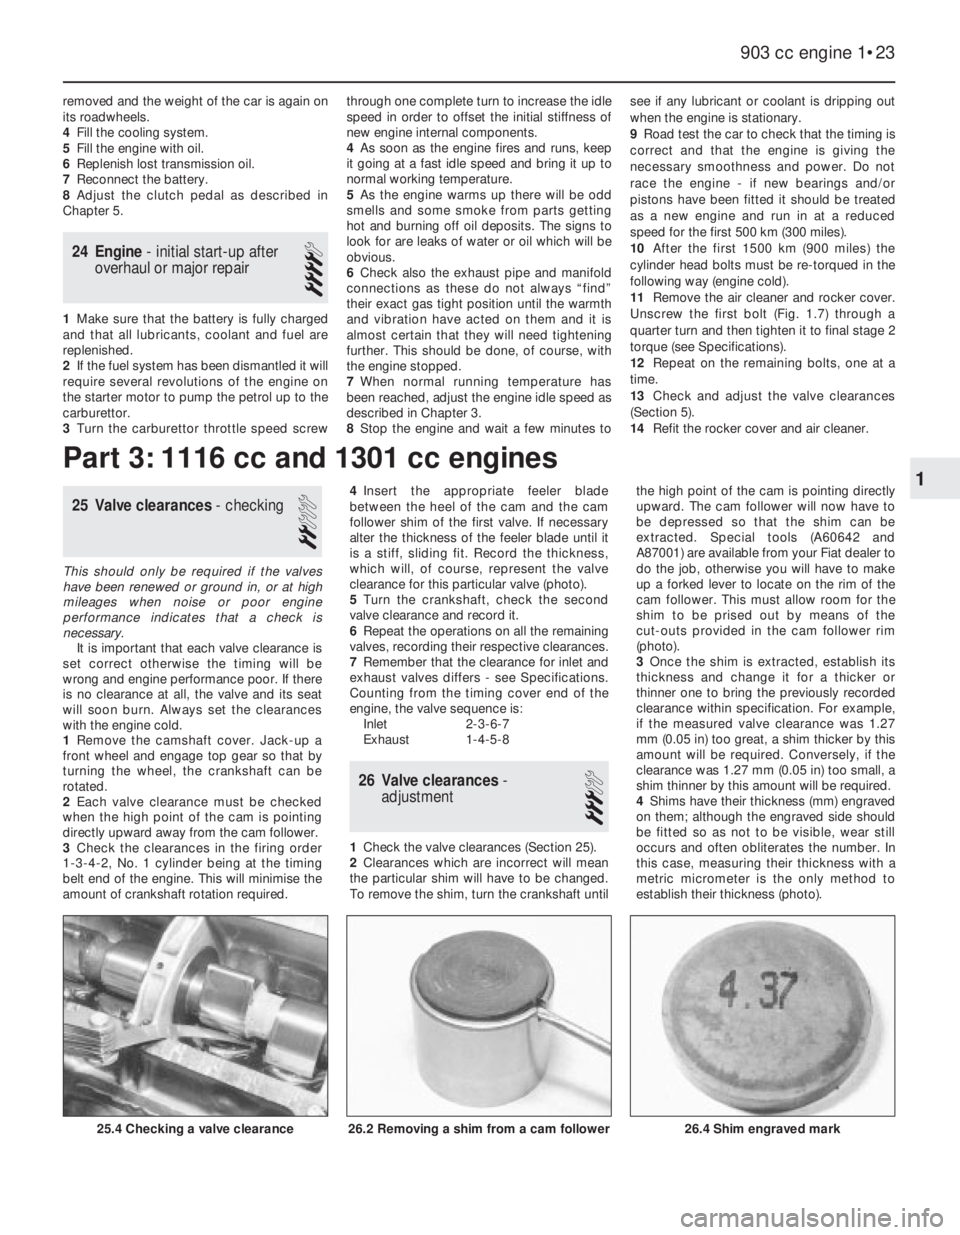
clearance for this particular valve (photo).
5Turn the crankshaft, check the second
valve clearance and record it.
6Repeat the operations on all the remaining
valves, recording their respective clearances.
7Remember that the clearance for inlet and
exhaust valves differs - see Specifications.
Counting from the timing cover end of the
engine, the valve sequence is:
Inlet 2-3-6-7
Exhaust 1-4-5-8
26 Valve clearances-
adjustment
3
1Check the valve clearances (Section 25).
2Clearances which are incorrect will mean
the particular shim will have to be changed.
To remove the shim, turn the crankshaft untilthe high point of the cam is pointing directly
upward. The cam follower will now have to
be depressed so that the shim can be
extracted. Special tools (A60642 and
A87001) are available from your Fiat dealer to
do the job, otherwise you will have to make
up a forked lever to locate on the rim of the
cam follower. This must allow room for the
shim to be prised out by means of the
cut-outs provided in the cam follower rim
(photo).
3Once the shim is extracted, establish its
thickness and change it for a thicker or
thinner one to bring the previously recorded
clearance within specification. For example,
if the measured valve clearance was 1.27
mm (0.05 in) too great, a shim thicker by this
amount will be required. Conversely, if the
clearance was 1.27 mm (0.05 in) too small, a
shim thinner by this amount will be required.
4Shims have their thickness (mm) engraved
on them; although the engraved side should
be fitted so as not to be visible, wear still
occurs and often obliterates the number. In
this case, measuring their thickness with a
metric micrometer is the only method to
establish their thickness (photo).